利用opencv+flandmark 进行face detection, face alignment and crop
2016-01-11 22:47
1406 查看
平时看论文的过程中发现,用来做测试的人脸需要进行face alignment + crop,这样处理后的准确率通常比之前的准确率要高。本文的工作便是对人脸数据做这样的预处理:
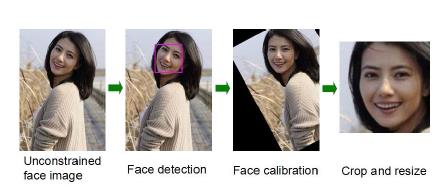
具体步骤
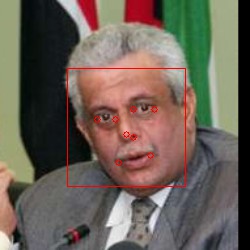
本文主要利用opencv自带的haar分类器进行检测到bounding box后,再通过flandmark检测人眼。flandmark是一个检测脸部特征点的开源代码库
(http://cmp.felk.cvut.cz/~uricamic/flandmark/), 利用flandmark可以检测到左右眼睛的左右角点、鼻子、嘴的左右角点,位置如下:
/*
* 5 1 2 6
*
* 0/7
*
* 3 4
*
*/
检测效果如下:
根据上述眼部特征点计算每只眼睛的中心点并进行连线,计算与水平线之间的夹角,根据这个角度对图片进行仿射变换,如下图:
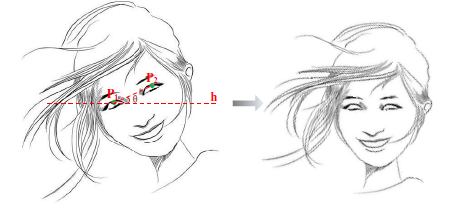
由此可以得到水平对齐后的图片,此时再进行人脸的剪切,就完成了face alignment和face crop。
代码实现
运行效果:
左图是原图,右图是运行后的图片,可以看到,图片中的人脸确实得到了一定角度的调整。

——–>

比较多张人脸的情况,可以看到,仍有较好的效果:

——–>

参考资料
1. http://blog.csdn.net/lichengyu/article/details/23383789
2. http://answers.opencv.org/question/24670/how-can-i-align-face-images/
3. http://cmp.felk.cvut.cz/~uricamic/flandmark/
具体步骤
本文主要利用opencv自带的haar分类器进行检测到bounding box后,再通过flandmark检测人眼。flandmark是一个检测脸部特征点的开源代码库
(http://cmp.felk.cvut.cz/~uricamic/flandmark/), 利用flandmark可以检测到左右眼睛的左右角点、鼻子、嘴的左右角点,位置如下:
/*
* 5 1 2 6
*
* 0/7
*
* 3 4
*
*/
检测效果如下:
根据上述眼部特征点计算每只眼睛的中心点并进行连线,计算与水平线之间的夹角,根据这个角度对图片进行仿射变换,如下图:
由此可以得到水平对齐后的图片,此时再进行人脸的剪切,就完成了face alignment和face crop。
代码实现
#include "flandmark_detector.h"
#include "opencv2\highgui.hpp"
#include "opencv2\imgproc.hpp"
#include "cv.h"
#include "highgui.h"
#include "FileHelper.h" //the file that contains the functions on file operation
#include <iostream>
#include <fstream>
#include <algorithm>

using namespace cv;
using namespace std;

int detectFaceInImage(IplImage* orig, IplImage* input, CvHaarClassifierCascade* cascade, \
FLANDMARK_Model *model, int *bbox, double *landmarks);
void FaceAlign(const Mat &orig, double *landmarks, Mat& outputarray);
void cropAlignedFace(Mat *input, CvHaarClassifierCascade* cascade, string saveAddr);

int main(int argc, char** argv)
{
// Haar Cascade file, used for Face Detection.
const char faceCascadeFilename[] = "haarcascade_frontalface_alt.xml";
// ***face detection ***//
CvHaarClassifierCascade* faceCascade;
faceCascade = (CvHaarClassifierCascade*)cvLoad(faceCascadeFilename);
if (!faceCascade)
{
printf("Couldnt load Face detector '%s'\n", faceCascadeFilename);
exit(1);
}
// begin flandmark load model
FLANDMARK_Model * model = flandmark_init("flandmark_model.dat");
if (model == 0)
{
printf("Structure model wasn't created. Corrupted file flandmark_model.dat?\n");
exit(1);
}

// *** input image *** //
int *bbox_src = (int*)malloc(4 * sizeof(int));  //memory allocation---bbox
double *landmarks_src = (double*)malloc(2 * model->data.options.M*sizeof(double)); //landmarks
Mat output;
//
string txtName = "G:\\lfw\\undetected_face.txt";        //save the undetected face to the txt file
std::ofstream fout;
fout.open(txtName.c_str());
string saveFolder = "G:\\lfw\\align_face\\";  //the directory to save the aligned images
string foldname = "G:\\lfw\\source_face\\"; //the directory to read the source images
char *suffix = ".jpg";  //the image format
vector<string> flist;
GetAllFilesInCurFolder(foldname.c_str(), suffix, flist);
//*** operates on the image ***//
for (int i = 0; i < flist.size(); i++)
{
string imgAddr = foldname + flist[i];
Mat src_mat = imread(imgAddr);
string saveFile = undefolder + flist[i];
IplImage *src = cvLoadImage(imgAddr.c_str());
IplImage *src_gray = cvCreateImage(cvSize(src->width, src->height), IPL_DEPTH_8U, 1);
if (src == NULL)
{
fprintf(stderr, "Cannot open image %s. Exiting...\n", imgAddr);
continue;
}
cvConvertImage(src, src_gray);  // convert image to grayscale
// *** detect landmarks and bbox ***//
int ret_src = detectFaceInImage(src, src_gray, faceCascade, model, bbox_src, landmarks_src);
if (ret_src != 0) {
printf("Landmark not detected!\n");
fout << flist[i] << "\n";
continue;
}
// *** face alignment begin *** //
FaceAlign(src_mat, landmarks_src, output);

// *** crop the aligned face *** //
cropAlignedFace(&output, faceCascade, saveFile);
}
fout.close();

// *** clean up *** //
free(bbox_src);
free(landmarks_src);
cvDestroyAllWindows();
cvReleaseHaarClassifierCascade(&faceCascade);
flandmark_free(model);
}

//detect the face bbox and landmarks in the image
int detectFaceInImage(IplImage* orig, IplImage* input, CvHaarClassifierCascade* cascade, \
FLANDMARK_Model *model, int *bbox, double *landmarks)
{
int ret = 0;
// Smallest face size.
CvSize minFeatureSize = cvSize(50, 50);
int flags = CV_HAAR_DO_CANNY_PRUNING;
// How detailed should the search be.
float search_scale_factor = 1.1f;
CvMemStorage* storage;
CvSeq* rects;
int nFaces;

storage = cvCreateMemStorage(0);
cvClearMemStorage(storage);

// Detect all the faces in the greyscale image.
rects = cvHaarDetectObjects(input, cascade, storage, search_scale_factor, <
b167
span class="hljs-number">2, flags, minFeatureSize);
nFaces = rects->total; //the ammounts of face in the image
if (nFaces <= 0)
{
printf("NO Face\n");
ret = -1;
return ret;
}

CvRect *r = (CvRect*)cvGetSeqElem(rects, 0);
printf("Detected %d faces\n", nFaces);
//If there is more than 1 face in picture, we select the biggest face
if (nFaces > 1)
{
for (int iface = 1; iface < nFaces; ++iface)
{
CvRect *rr = (CvRect*)cvGetSeqElem(rects, iface);
if (rr->width > r->width)
*r = *rr;
}
}

bbox[0] = r->x;
bbox[1] = r->y;
bbox[2] = r->x + r->width;
bbox[3] = r->y + r->height;

ret = flandmark_detect(input, bbox, model, landmarks);

//Display landmarks
//cvRectangle(orig, cvPoint(bbox[0], bbox[1]), cvPoint(bbox[2], bbox[3]), CV_RGB(255, 0, 0));
//for (int i = 0; i < 2 * model->data.options.M; i += 2)
//{
//  cvCircle(orig, cvPoint(int(landmarks[i]), int(landmarks[i + 1])), 3, CV_RGB(255, 0, 0));
//}
cvReleaseMemStorage(&storage);
return ret;
}

//Face Alignment
void FaceAlign(const Mat &orig, double *landmarks, Mat& outputarray)
{
int desiredFaceWidth = orig.cols;
int desiredFaceHeight = desiredFaceWidth;

// Get the eyes center-point with the landmarks
Point2d leftEye = Point2d((landmarks[2] + landmarks[10]) * 0.5f, (landmarks[3] + landmarks[11]) * 0.5f);
Point2d rightEye = Point2d((landmarks[4] + landmarks[12]) * 0.5f, (landmarks[5] + landmarks[13]) * 0.5f);;

// Get the center between the 2 eyes center-points
Point2f eyesCenter = Point2f((leftEye.x + rightEye.x) * 0.5f, (leftEye.y + rightEye.y) * 0.5f);

// Get the angle between the line eyes and horizontal line.
double dy = (rightEye.y - leftEye.y);
double dx = (rightEye.x - leftEye.x);
double len = sqrt(dx*dx + dy*dy);
double angle = atan2(dy, dx) * 180.0 / CV_PI; // Convert from radians to degrees.
double scale = 1;
// Get the transformation matrix for rotating and scaling the face to the desired angle & size.
Mat rot_mat = getRotationMatrix2D(eyesCenter, angle, scale);
outputarray.create(desiredFaceHeight, desiredFaceWidth, CV_8UC3);
warpAffine(orig, outputarray, rot_mat, outputarray.size());
return;
}

//Crop the aligned face
void cropAlignedFace(Mat *input, CvHaarClassifierCascade* cascade, string saveAddr)
{
CvSize minFeatureSize = cvSize(50, 50);
int flags = CV_HAAR_DO_CANNY_PRUNING;
float search_scale_factor = 1.1f;
CvMemStorage* storage;
CvSeq* rects;
storage = cvCreateMemStorage(0);
cvClearMemStorage(storage);

// Detect all the faces in the already aligned image.
IplImage ipl_img(*input);
IplImage *img = &ipl_img;
rects = cvHaarDetectObjects(img, cascade, storage, search_scale_factor, 2, flags, minFeatureSize);
int nfaces = rects->total;
if (nfaces <= 0)
return;
CvRect *r = (CvRect*)cvGetSeqElem(rects, 0);
//choose the biggest face
if (nfaces > 1)
{
for (int iface = 1; iface < nfaces; ++iface)
{
CvRect *rr = (CvRect*)cvGetSeqElem(rects, iface);
if (rr->width > r->width)
*r = *rr;
}
}
// Get the new bounding box with the scale
float scale = 0.1;            //the scale to expand the bbox size
int paddingx = scale * r->width;
int paddingy = scale * r->height;
int newx = max(0, r->x - paddingx);
int newy = max(0, r->y - paddingy);
int newwidth = min(input->cols - 1,r->width + paddingx * 2);
int newheight = min(input->rows - 1,r->height + paddingy * 2);
//crop, and save the cropped face
cvSetImageROI(img, cvRect(newx, newy, newwidth, newheight));
cvSaveImage(saveAddr.c_str(), img);
return;
}
运行效果:
左图是原图,右图是运行后的图片,可以看到,图片中的人脸确实得到了一定角度的调整。
——–>
比较多张人脸的情况,可以看到,仍有较好的效果:
——–>
参考资料
1. http://blog.csdn.net/lichengyu/article/details/23383789
2. http://answers.opencv.org/question/24670/how-can-i-align-face-images/
3. http://cmp.felk.cvut.cz/~uricamic/flandmark/

相关文章推荐
- Locate a File Using a File Open Dialog Box
- Save a File Using a File Save Dialog Box
- python中使用OpenCV进行人脸检测的例子
- opencv 做人脸识别 opencv 人脸匹配分析
- 使用opencv拉伸图像扩大分辨率示例
- 基于C++实现kinect+opencv 获取深度及彩色数据
- OpenCV 2.4.3 C++ 平滑处理分析
- 利用Python和OpenCV库将URL转换为OpenCV格式的方法
- python结合opencv实现人脸检测与跟踪
- Python实现OpenCV的安装与使用示例
- 在树莓派2或树莓派B+上安装Python和OpenCV的教程
- opencv-python学习一--人脸检测
- 在Ubuntu上安装OpenCV3.0和Python-openCV的经历
- OpenCV配置,从来没有这么简单!
- ubuntu下opencv和qt的安装配置
- OpenCV学习笔记(二十五)——OpenCV图形界面设计Qt+VS2008
- 分享一些OpenCV实现立体视觉的经验
- 关于OpenCv图像变换与基本图形检测
- "应用程序正常初始化失败"-0xc0150002 解决办法
- OpenCV->HSV色彩空间