Android View之测量
2015-12-28 11:52
615 查看
Android系统在绘制View之前,必须对View进行测量。Android提供的一个MeasureSpec类,来帮助我们测量View。MeasureSpec是一个32位的int值,其中高2位为测量的模式,低30位为测量的大小,在计算中使用位运算的原因是为了提供并优化效率,在自定义View的时候,同过重写onMeasure()方法来测量View的大小。
测试的模式为可以分为以下三种:
1、 EXACTLY(精确模式);即当我们为控件的高宽指定一个具体的大小,或者控件的高宽为匹配父控件的时候,系统使用的是EXACTLY。
2、 AT_MOST(最大模式);即当我们为控件的高宽的大小是包含内容的时候。
3、 UNSPECIFIED(不指定其大小模式) 这种这种情况不多,一般在父控件为AdpterView,通过measure方法传入的模式,因此在onMeasure()方法是要根据模式不同进行尺寸大小的计算。
View默认的onMeasure方法只支持EXACTLY模式,所以在自定义View的时候,如果在自定义控件的时候不重写onMeasure方法的时候,使用的只能是EXACTLY模式。
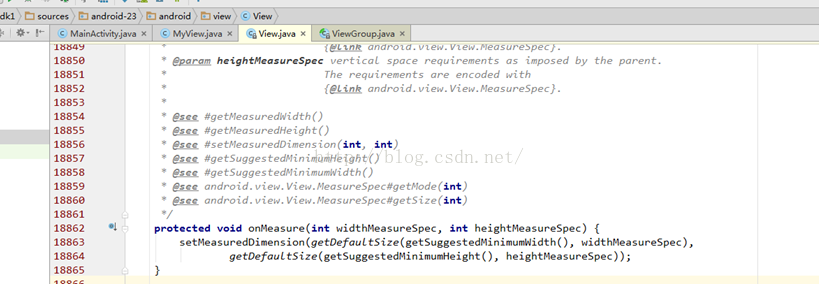
冲View源码onMeasure()方法可以看出,系统通过setMeasureDimension(int measuredWidth,intmeasreHeght)方法来来测量高宽。
测量View的高宽的基本步骤:
1、 从MeasureSpec对象中提取拒听的测量模式与大小
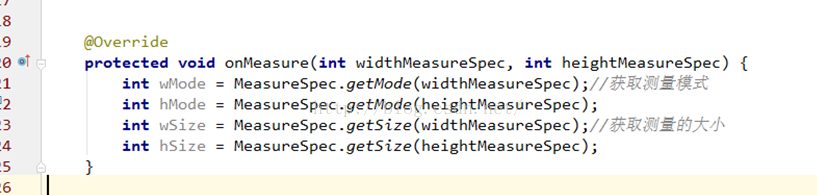
2、 通过判断测量的模式,给出不同的测量值。
ViewGroup测量
ViewGroup在管理其子View时,其中一个管理项目就是负责子View的显示大小。当ViewGroup的大小为wrap_content时,ViewGroup就需要对子View进行遍历,以便获取所有子View的大小,从而决定自己的大小。而在其他模式下则会通过具体指定的值来设置自身的大小。
ViewGroup在测量时通过遍历所有的子View,从而调用子View的Measure方法来获取每一个View的测量结果。当子View测量完毕之后,就需要将子View放到合适的位置,这个过程就是View的Layout过程。ViewGroup在执行Layout过程时,同样是使用遍历来调用子View的方法,并指定其具体的显示位置,从而来决定其布局位置。在自定义ViewGroup时,通常会去重写onLayout()方法来控制其子View显示位置的逻辑 。同样,如果需要支持wrap_content属性,则必须重写onMeasure方法。
ViewGroup通常情况下不需要绘制,因为它本身就没有需要绘制的东西,如果不是指定了ViewGroup的背景颜色,那么ViewGroup的onDraw()方法都不会调用。当时,ViewGroup会调用dispatchDraw()方法来绘制其子View,其过程同样是通过遍历所有的子View,并调用子View的绘制方法来完成绘制工作。
在自定义View时,我们通常会去重写onDraw()方法来绘制View的显示内容。如果该View使用wrap_content属性,那么还必须重写onMeasure()方法。在自定义View时比较几个重要的回调方法:
onFinishInflate():从Xml加载组件后回调。
onSizeChaged():组件大小改变的时候回调
onMeasure():回调该方法进行测量(ViewGrop测量时会调用子View的Measure子View的测量)
onLayout():回调该方法来确定显示位置。
onTouchEvent():监听到触摸事件回调。
通常情况下,有以下三种方法来实现自定义的控件。
1、 对现有控件进行拓展。
2、 通过组合来实现新控件。
3、 重写View来实现全新的控件
测试的模式为可以分为以下三种:
1、 EXACTLY(精确模式);即当我们为控件的高宽指定一个具体的大小,或者控件的高宽为匹配父控件的时候,系统使用的是EXACTLY。
2、 AT_MOST(最大模式);即当我们为控件的高宽的大小是包含内容的时候。
3、 UNSPECIFIED(不指定其大小模式) 这种这种情况不多,一般在父控件为AdpterView,通过measure方法传入的模式,因此在onMeasure()方法是要根据模式不同进行尺寸大小的计算。
View默认的onMeasure方法只支持EXACTLY模式,所以在自定义View的时候,如果在自定义控件的时候不重写onMeasure方法的时候,使用的只能是EXACTLY模式。
冲View源码onMeasure()方法可以看出,系统通过setMeasureDimension(int measuredWidth,intmeasreHeght)方法来来测量高宽。
测量View的高宽的基本步骤:
1、 从MeasureSpec对象中提取拒听的测量模式与大小
2、 通过判断测量的模式,给出不同的测量值。
ViewGroup测量
ViewGroup在管理其子View时,其中一个管理项目就是负责子View的显示大小。当ViewGroup的大小为wrap_content时,ViewGroup就需要对子View进行遍历,以便获取所有子View的大小,从而决定自己的大小。而在其他模式下则会通过具体指定的值来设置自身的大小。
ViewGroup在测量时通过遍历所有的子View,从而调用子View的Measure方法来获取每一个View的测量结果。当子View测量完毕之后,就需要将子View放到合适的位置,这个过程就是View的Layout过程。ViewGroup在执行Layout过程时,同样是使用遍历来调用子View的方法,并指定其具体的显示位置,从而来决定其布局位置。在自定义ViewGroup时,通常会去重写onLayout()方法来控制其子View显示位置的逻辑 。同样,如果需要支持wrap_content属性,则必须重写onMeasure方法。
ViewGroup通常情况下不需要绘制,因为它本身就没有需要绘制的东西,如果不是指定了ViewGroup的背景颜色,那么ViewGroup的onDraw()方法都不会调用。当时,ViewGroup会调用dispatchDraw()方法来绘制其子View,其过程同样是通过遍历所有的子View,并调用子View的绘制方法来完成绘制工作。
在自定义View时,我们通常会去重写onDraw()方法来绘制View的显示内容。如果该View使用wrap_content属性,那么还必须重写onMeasure()方法。在自定义View时比较几个重要的回调方法:
onFinishInflate():从Xml加载组件后回调。
onSizeChaged():组件大小改变的时候回调
onMeasure():回调该方法进行测量(ViewGrop测量时会调用子View的Measure子View的测量)
onLayout():回调该方法来确定显示位置。
onTouchEvent():监听到触摸事件回调。
通常情况下,有以下三种方法来实现自定义的控件。
1、 对现有控件进行拓展。
2、 通过组合来实现新控件。
3、 重写View来实现全新的控件
package com.xiong.demo1;
import android.content.Context;
import android.graphics.Canvas;
import android.graphics.Color;
import android.graphics.Paint;
import android.util.AttributeSet;
import android.view.View;
/**
* Created by xionglh on 2015/12/25.
*/
public class MyView extends View {
private Paint mPaint;
public MyView(Context context, AttributeSet attributes) {
super(context, attributes, 0);
mPaint = new Paint();
mPaint.setColor(Color.RED);
mPaint.setTextSize(2);
mPaint.setStyle(Paint.Style.FILL);
}
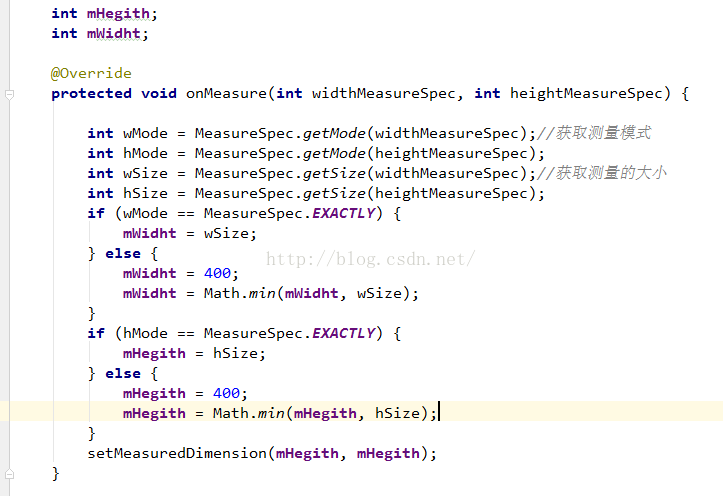
int mHegith;
int mWidht;
@Override
protected void onMeasure(int widthMeasureSpec, int heightMeasureSpec) {
int wMode = MeasureSpec.getMode(widthMeasureSpec);//获取测量模式
int hMode = MeasureSpec.getMode(heightMeasureSpec);
int wSize = MeasureSpec.getSize(widthMeasureSpec);//获取测量的大小
int hSize = MeasureSpec.getSize(heightMeasureSpec);
if (wMode == MeasureSpec.EXACTLY) {
mWidht = wSize;
} else {
mWidht = 400;
mWidht = Math.min(mWidht, wSize);
}
if (hMode == MeasureSpec.EXACTLY) {
mHegith = hSize;
} else {
mHegith = 400;
mHegith = Math.min(mHegith, hSize);
}
setMeasuredDimension(mHegith, mHegith);
}
@Override
protected void onDraw(Canvas canvas) {
super.onDraw(canvas);
canvas.drawRect(0, 0, mWidht,mHegith , mPaint);
}
}<?xml version="1.0" encoding="utf-8"?> <LinearLayout xmlns:android="http://schemas.android.com/apk/res/android" android:layout_width="match_parent" android:layout_height="match_parent"> <com.xiong.demo1.MyView android:layout_width="wrap_content" android:layout_height="wrap_content"/> <TextView android:layout_width="wrap_content" android:layout_height="wrap_content" android:text="ssssssssssssssss"/> </LinearLayout>

相关文章推荐
- Android中使用Handler造成内存泄露的分析和解决
- Android驱动调试步骤(新出厂的第一版硬件必须遵守)
- Android 中的布局的gravity和layout_gravity
- Android之数据存储共享参数实现系统设置操作功能(二)
- android drawText时使文字居中、获取文字宽高
- android解决使用CountDownTimer出现的时间不稳定问题(执行多次变化加快)
- android Studio中关于Gradle的使用注解
- (三)Android中Intent概念及应用
- android47
- android最近心得整理
- Android——友盟社会化分享集成【友盟4.3版本SDK】
- Android开发总结笔记 Btimap (上) 3-4
- Android中Service与Activity数据交互的简单理解
- Android开发者网址导航
- Android开发之多媒体编程之获取图片的副本
- android layout_gravity失效的问题
- Android 应用退出后销毁apk进程
- android资源选择器URI路径问题
- Android中的activity栈
- Android开发者网址导航