CSS Sprite——CSS雪碧图
2015-12-16 00:00
519 查看
雪碧图的使用原则
静态图片,不随用户信息变化而变化小图片,图片容量较小
加载量较大的情况下使用
大图不建议使用雪碧图
作用
减少HTTP的请求数量:每请求一次,就会和服务器链接一次,建立连接需要额外的时间加速内容的显示
实现原理
通过CSS background-position实现控制一个层可显示区域范围的大小,通过一个窗口,进行背景图的滑动
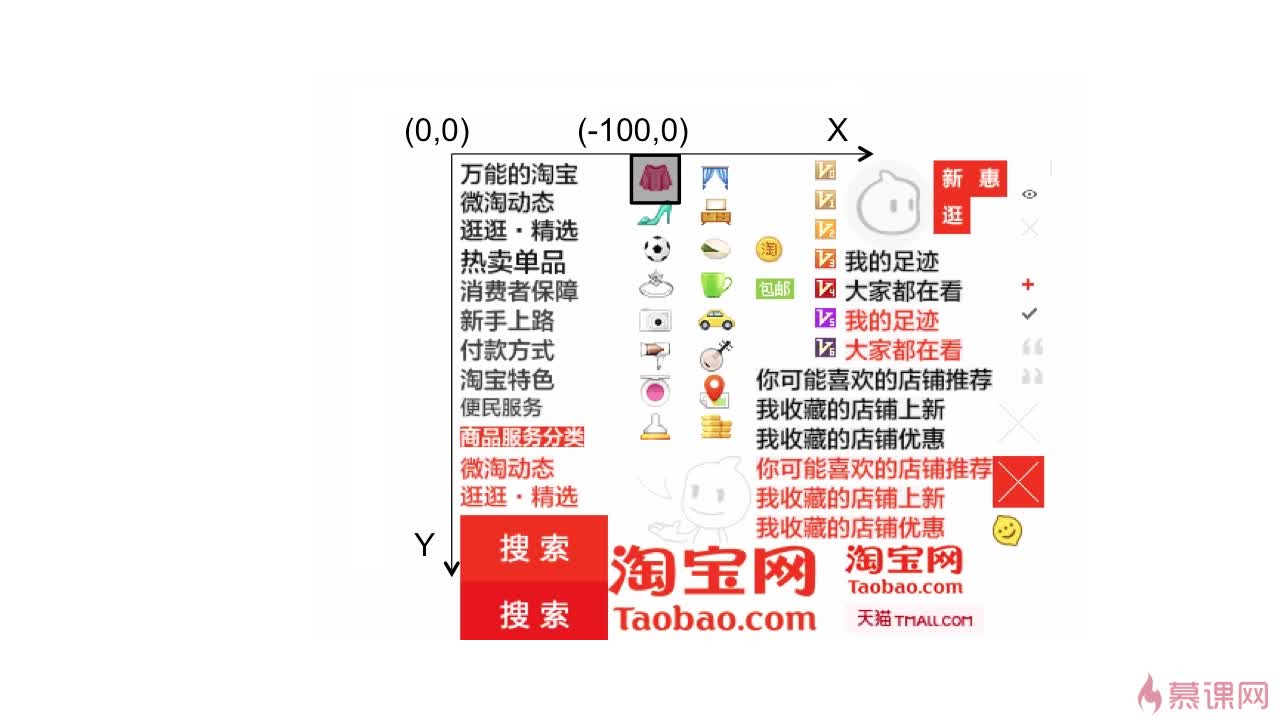
实现方式
PS手动拼图,要记住每张图的坐标点使用sprite自动生成工具(CssGaga:www.99css.com/archives/1524)
实例
HTML代码:<html>
<head>
<!--准备一个空白的HTML页面,同时完成css reset样式 -->
<meta charset="utf-8">
<style>
* {padding:0; margin:0;}
ul{ list-style-type:none; border:1px solid #555;}
li { border-bottom:1px solid #eee;display:block; overflow:hidden; height:32px; line-height:32px;}
li h3 {font-size:15px; font-weight:400; font-family:“微软雅黑”;}
.cat { width:150px; background:#f8f8f8;}
</style>
<!--补充完整的样式-->
</head>
<body>
<div class="cat">
<ul>
<li>
<i class="cat_1"></i>
<h3>服装内衣</h3>
</li>
<li>
<i class="cat_2"></i>
<h3>鞋包配饰</h3>
</li>
<li>
<i class="cat_3"></i>
<h3>运动户外</h3>
</li>
<li>
<i class="cat_4"></i>
<h3>珠宝手表</h3>
</li>
<li>
<i class="cat_5"></i>
<h3>手机数码</h3>
</li>
<li>
<i class="cat_6"></i>
<h3>家电办公</h3>
</li>
<li>
<i class="cat_7"></i>
<h3>护肤彩妆</h3>
</li>
<li>
<i class="cat_8"></i>
<h3>母婴用品</h3>
</li>
</ul>
</div>
</body>
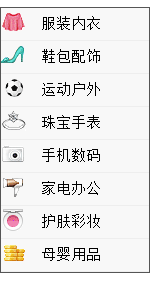
</html>雪碧图:

实现雪碧图:
li i {
background:url(http://img.mukewang.com/539a950e00015ba500710200.jpg);
display:inline;
float:left;
width:30px;
height:24px;
margin:3px 10px 0 0;
}
.cat_1 { background-position:0 0; }
.cat_2 { background-position:0 -24px; }
.cat_3 { background-position:0 -48px; }
.cat_4 { background-position:0 -72px; }
.cat_5 { background-position:0 -96px; }
.cat_6 { background-position:0 -120px; }
.cat_7 { background-position:0 -144px; }
.cat_8 { background-position:-40px -168px; }
效果:
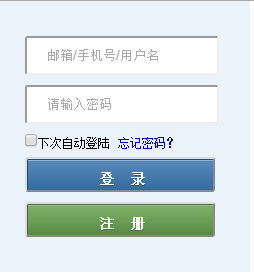
登陆的雪碧图应用
雪碧图:
HTML:
<!doctype html>
<html>
<head>
<meta charset="utf-8">
<title>无标题文档</title>

</head>

<body>
<div class="login">
<form method="post" action="" name="loginForm">
<input type="text" name="username" placeholder="邮箱/手机号/用户名">
<input type="password" name="password" placeholder="请输入密码">
<input type="checkbox" name="auto_login" id="auto_login"><label for="auto_login">下次自动登陆</label>
<a href="javascript:;">忘记密码?</a>
<input type="submit" name="login_submit" value="登录">
<input type="submit" name="register_submit" value="注册">
</form>
</div>
</body>
</html>
效果:

设置CSS样式:
<style type="text/css">
blockquote, body, button, dd, dl, dt, fieldset, form, h1, h2, h3, h4, h5, h6, hr, input, legend, li, ol, p, pre, td, textarea, th, ul{
margin: 0;
padding: 0;
}
.login {
background-color:#ebf3fa;
width:200px;
overflow:hidden;
padding:25px;
}
.login * {
border-radius:3px;
margin:5px 0;
}
.login input[type="text"],
.login input[type="password"] {
width:190px;
height:35px;
text-indent:20px;
clear:both;
}
.login label[for="auto_login"] {
font-size:10px;
}
.login a {
text-decoration:none;
font-size:10px;
}
.login input[type="submit"],
.login input[type="login"] {
width:190px;
height:35px;
color:#fff;
word-spacing:5px;
text-align:center;
line-height:35px;
}
.login input[name*="submit"] {
background:url(login.png) 0 0;
}
.login input[name*="register"] {
background:url(login.png) 0 -38px;
}

</style>
效果:
CSS display:inline和float:left两者区别
①display:inline:任何不是块级元素的可见元素都是内联元素。其表现的特性是“行布局”形式!(行布局:其表现形式始终以行进行显示) ②float:left:指定元素脱离普通的文档流而产生的特别的布局特性。并且float必需应用在块级元素之上,也就是说浮动并不应用于内联标签。或者可以说如果应用了float这个元素将被指定为块级元素。 那么两者的区别显而易见:display:inline元素不能设置宽高,因为它属于行布局,其特性是在一行里进行布局,所以不能被设定宽高

相关文章推荐
- 常见错误8-搭建hexo,本地server成功,部署到github上之后不能显示主题样式
- [How to]使用自定义cell进行tableview的创建,适用于cell样式不发生变化的情况。
- css
- 10007---CSS创建
- html+css复习小结
- css样式设置小技巧
- 10006---CSS id 和 class 选择器
- 前端开发入门:html和css基础知识回顾2
- Head First HTML&CSS 笔记(2)-定位与布局
- CSS代码缩写,占用更少的带宽
- 10005---CSS语法
- CSS Framework
- 前端开发入门:html和css基础知识回顾
- css3学习
- css布局模型
- CSS盒模型
- css3媒体查询
- 手机横屏竖屏css
- 取消默认样式总结
- console.log影响IE样式的解决方法