ortlet OverviewThis tutorial will show you how to create and deploy a simple portlet. Portlets are Java technology based web components, that can process requests and generate dynamic content. A portlet is not an autonomous entity, but it is managed by a portlet container,which provides the necessary runtime environment for the portlet executions. It should be noted that a single portal can host multiple portlet containers. A portlet’s life-cycle is commanded by the container, which is also respnsible for delegating requeststo the appropriate deployed portlet.Portlets and servlets are closely related and the Portlet Specification borrows ideas from the previously defined Servlet Specification. In fact, a Portlet application is in its essence an extension of a web application and portlets and servletscan be combined in the same web application.A portlet can have various modes which can be controlled by the user via navigation controllers provided by the portal (usually buttons). There are three standard modes (although additional custom modes can provided by a portal vendor as proprietaryextensions):View[/u]: This is the normal display of the portlet and the most commonly used one.Edit[/u]: In this mode the user can configure the portlet providing his preferences (helpful in achieving personalization).Help[/u]: As its name implies, this mode is used in order to provide help to the user.Installing JBoss PortalFor our tutorial, we chose to use JBossPortal, a portal implementation provided by Red Hat, which also gives us the famous JBoss application server. As you will see in the official page, all the development effort is now targeting
GateIn,a collaboration between eXo and JBoss portals. However, JBoss portal is definitely very robust and stable and I prefer it over GateIn for the following two reasons:Better looking interface and better portlet renderingEasier administration, configuration and managementIn any case, the installation/deployment procedure should be the same in all portals.JBoss portal can be downloaded
here andit comes in two flavors:JBossPortal Binary: Only the JBoss portal component, bundled as a Service Archive (SAR) file.JBossPortal + JBoss AS 4.2.3: The typical JBoss application server with the portal already deployed.Since it is more likely to already have JBoss AS already deployed, I chose the first option, thus using the portal binary as an external application. After downloading the ZIP file, extract its contents. The folder “jboss-portal.sar” can be foundthere and it is the one you have to copy into the “/server/default/deploy/” directory.After this step, the datasource for the portal database has to be setup. In the “jboss-portal-2.7.2/setup” folder, a number of datasource declarations can be found, for all the commonly used DBMSs. For development purposes and to get started reallyquick,
HSQLDB isthe way to go. So, copy the file “portal-hsqldb-ds.xml” into the “/server/default/deploy/” directory to setup the datasource.We are now ready, fire up JBoss server and after it is up and running, you will be able to access the portal at the following URL:
http://localhost:8080/portal/You should be able to see the following screen:

Note: JBoss portal loads a lot of classes during deployment and it is possible that you will hit
OutOfMemory errorsdue to limited permanent generation space. If that is the case, you will find that the server is unresponsive and the following error message will appear:“java.lang.OutOfMemoryError: PermGen space”To resolve this issue, edit the startup script (run.bat for Windows and run.conf for Linux) and add the following parameter in the JVM arguments:-XX:MaxPermSize=512mRestart the server in order to have the change applied.Creating the portlet projectLet’s continue by creating a new Eclipse project under the name “HelloWorldPortletProject”. In order to start building portlets, we need access to the Portlet API. The necessary library can be found at the PortletSpecification site. Download the “portlet.jar” file and add it to the project’s classpath. Also, make sure to bookmark the PortletAPI Javadocs page.The class that we will create, will directly extend the
GenericPortlet class,which provides a default implementation for the
Portlet interface.The only functionality is provided inside the overridden
render method,which is called by the portlet container to allow the portlet to generate the content of the response based on its current state. The arguments to that method are a
RenderRequest object,which represents the request sent to the portlet to handle a render and the
RenderResponse object,which defines an object to assist the portlet in sending a response to the portal.Here is the code for that class:
01 | package com.javacodegeeks.portlets; |
<20000div class="line alt1" style="padding:0px!important; margin:0px!important; outline:0px!important; list-style:none; border:0px!important; text-align:left!important; float:none!important; vertical-align:baseline!important; position:static!important; left:auto!important; top:auto!important; right:auto!important; bottom:auto!important; height:auto!important; width:auto!important; line-height:1.1em!important; font-family:Consolas,'Bitstream Vera Sans Mono','Courier New',Courier,monospace!important; font-weight:normal!important; font-style:normal!important; font-size:1em!important; direction:ltr!important; background:none rgb(255,255,255)!important">
03 | import java.io.IOException; |
04 | import java.io.PrintWriter; |
06 | import javax.portlet.GenericPortlet; |
07 | import javax.portlet.PortletException; |
08 | import javax.portlet.RenderRequest; |
09 | import javax.portlet.RenderResponse; |
11 | public class HelloWorldPortlet extends GenericPortlet
{ |
14 | public void render(RenderRequest
req, RenderResponse res) |
15 | throws PortletException,
IOException { |
17 | res.setContentType( "text/html" ); |
19 | PrintWriter
writer = res.getWriter(); |
21 | writer.println( "Hello
World!" ); |
As you can see, there are many similarities with the Java Servlet API. We can set the response’s Content-Type (text/html in our case) and obtain a PrintWriter from the response so that we can send back data to the client.In order to deploy that portlet to the container, we need to bundle it in a Web Archive (WAR) file. Again, the procedure is similar to the one used in the servlets world, so one critical component is that of the deployment descriptor. The descriptoris named “portlet.xml” and it provides declaration regarding the portlet’s name, the implementing class, the supported MIME types and the supported views. Here is a simple descriptor for our portlet:
01 | <? xml version = "1.0" encoding = "UTF-8" ?> |
09 | < description xml:lang = "en" >A
Hello World Portlet</ description > |
10 | < portlet-name >HelloPortlet</ portlet-name > |
11 | < display-name xml:lang = "en" >Hello
World</ display-name > |
12 | < portlet-class >com.javacodegeeks.portlets.HelloWorldPortlet</ portlet-class > |
13 | < expiration-cache >-1</ expiration-cache > |
15 | < mime-type >text/html</ mime-type > |
16 | < portlet-mode >view</ portlet-mode > |
18 | < supported-locale >en</ supported-locale > |
20 | < title >Hello
World</ title > |
21 | < short-title >Hello</ short-title > |
22 | < keywords >portlet,hello, world</ keywords > |
Apart from the descriptor for the portlets, the classic “web.xml” has also to be provided. This can be used in order to define servlets or listeners etc. In our case, it will be empty:
1 | <? xml version = "1.0" encoding = "UTF-8" ?> |
2 | <!DOCTYPEweb-app PUBLIC "-//Sun Microsystems, Inc.//DTD Web Application 2.3//EN" |
In order to automate the procedure of the WAR generation, I have created a simple ANT script which can be invoked from inside Eclipse in order to build the project and provide the deliverable.
01 | <? xml version = "1.0" encoding = "UTF-8" ?> |
03 | < project default = "main" basedir = "." > |
05 | < property name = "bin" value = "bin" /> |
06 | < property name = "src" value = "src" /> |
07 | < property name = "dist" value = "dist" /> |
08 | < property name = "war" value = "war" /> |
14 | < war destfile = "${dist}/helloworld-portlet.war" webxml = "${war}/WEB-INF/web.xml"> |
15 | < zipfileset dir = "${war}/WEB-INF" prefix = "WEB-INF" /> |
16 | < classes dir = "${bin}"/> |
Execute the build script and if everything runs well, you should find a WAR file named “helloworld-portlet.war” ready inside the “dist” file. Copy the file inside the “/server/default/deploy/” directory. A line similar to the one below will appear,indicating that the portlet and the web application have been successfully deployed:[TomcatDeployer] deploy, ctxPath=/helloworld-portlet, warUrl=…/tmp/deploy/tmp404700420646853190helloworld-portlet-exp.war/Making the portlet availableThe final step is to actually make the deployed portlet available. Hit the “Login” link in the upper, right side of the main screen and login as the administrator using the “admin/admin” default credentials. After you have successfully logged in, visit the“Admin” link which leads to the following URL:
http://localhost:8080/portal/auth/portal/adminYou will be presented with the following administration page:
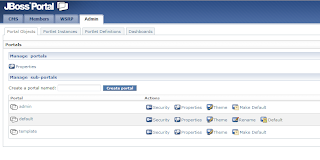
Hit the “Portlet Definitions” tab and search for our “Hello World” portlet among the other deployed portlets. Then hit the “Create Instance” link at the right side of the page.

Next, provide a name for the new instance, for example “HelloWorldInstance” and hit the button in order to create it.

You will then be presented with the portlet details as in the following image:
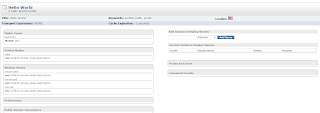
Note that the portlet’s details heavily depend on the configuration we provided via the “portlet.xml” descriptor.Finally, we have to associate the portlet instance we just created with a dashboard. Hit the “Dashboard” link at the upper, right screen or visit the following URL:
http://localhost:8080/portal/auth/dashboardNote that this corresponds to the administrator’s dashboard and that it currently hosts only the deafault portlets. Then, hit the “Configure Dashboard” link or visit the following URL:
http://localhost:8080/portal/auth/configure?editPageSelect=default&action=2The “Personal Dashboard Editor” will appear and you should see a list with all the available portlet instances and a choice to include them either in the center or left region of the specific dashboard. Click on the “HelloWorldInstance” text andthen hit the “Add” button of one of the two available regions.

Now we have added the portlet and if we access again the dashboard page (http://localhost:8080/portal/auth/dashboard), we should see the following image:

Our “Hello World” has been successfully included in the main page. As always, the created Eclipse project is available
here.
 Hit the “Portlet Definitions” tab and search for our “Hello World” portlet among the other deployed portlets. Then hit the “Create Instance” link at the right side of the page.
 Next, provide a name for the new instance, for example “HelloWorldInstance” and hit the button in order to create it.
 You will then be presented with the portlet details as in the following image:
 Note that the portlet’s details heavily depend on the configuration we provided via the “portlet.xml” descriptor.Finally, we have to associate the portlet instance we just created with a dashboard. Hit the “Dashboard” link at the upper, right screen or visit the following URL:http://localhost:8080/portal/auth/dashboardNote that this corresponds to the administrator’s dashboard and that it currently hosts only the deafault portlets. Then, hit the “Configure Dashboard” link or visit the following URL:http://localhost:8080/portal/auth/configure?editPageSelect=default&action=2The “Personal Dashboard Editor” will appear and you should see a list with all the available portlet instances and a choice to include them either in the center or left region of the specific dashboard. Click on the “HelloWorldInstance” text andthen hit the “Add” button of one of the two available regions.
 Now we have added the portlet and if we access again the dashboard page (http://localhost:8080/portal/auth/dashboard), we should see the following image:
 Our “Hello World” has been successfully included in the main page. As always, the created Eclipse project is available here.
