自学QT之实现一个用户信息窗口
2015-12-10 00:00
302 查看
用户信息窗口如果用设计师界面来做当然是非常简单了,但是为了锻炼自己的开发能力和对QT以及C++的深入理解,有必要用代码来进行操作。其实,代码比设计师界面更加灵活。看到代码多,不要害怕,其实代码中的大部分单词只需要输入开头就可以自动补全的。
新建一个项目,基于对话框,取消界面选项。
头文件如下:
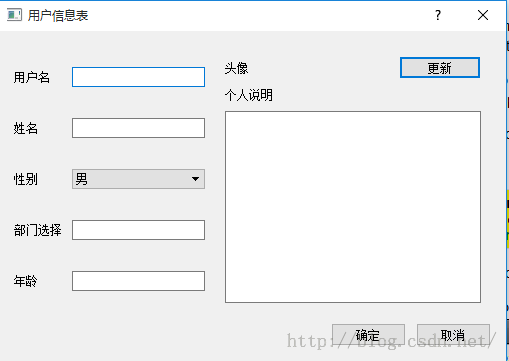
运行后的结果:
新建一个项目,基于对话框,取消界面选项。
头文件如下:
#ifndef DIALOG_H
#define DIALOG_H

#include <QDialog>
#include <QLabel>
#include <QLineEdit>
#include <QComboBox>
#include <QTextEdit>
#include <QGridLayout>
#include <QPushButton>

class Dialog : public QDialog
{
Q_OBJECT

public:
Dialog(QWidget *parent = 0);
~Dialog();
private:
//左侧部分的代码
QLabel *UserNameLabel;
QLabel *NameLabel;
QLabel *SexLabel;
QLabel *DepartmentLabel;
QLabel *AgeLabel;
QLabel *OtherLabel;
QLineEdit *UserNameLineEdit;
QLineEdit *NameLineEdit;
QComboBox *SexComBox;
QLineEdit *DepartmentEdit;
QLineEdit *AgeEdit;
QGridLayout *LeftLayout;
//右侧部分的代码
QLabel *HeadLabel;
QLabel *HeadIconLabel;
QPushButton *UpdateHeadButn;
QHBoxLayout *TopRightLayout;
QLabel *IntroductionLabel;
QTextEdit *IntroductionText;
QVBoxLayout *RightLayout;

//底部部分
QPushButton *OKBtn;
QPushButton *CancelBtn;
QHBoxLayout *BtnLayout;

};

#endif // DIALOG_H.cpp文件如下:#include "dialog.h"
Dialog::Dialog(QWidget *parent)
: QDialog(parent)
{
setWindowTitle("用户信息表");
UserNameLabel=new QLabel("用户名");
UserNameLineEdit=new QLineEdit;
NameLabel=new QLabel("姓名");
NameLineEdit=new QLineEdit;
SexLabel=new QLabel("性别");
SexComBox=new QComboBox;
SexComBox->addItem("男");
SexComBox->addItem("女");
DepartmentEdit=new QLineEdit;
DepartmentLabel=new QLabel("部门选择");
AgeLabel=new QLabel("年龄");
AgeEdit=new QLineEdit;
OtherLabel=new QLabel("备注");
OtherLabel->setFrameStyle(QFrame::Panel|QFrame::Sunken);
LeftLayout=new QGridLayout();
//开始加入控件
LeftLayout->addWidget(UserNameLabel,0,0);
LeftLayout->addWidget(UserNameLineEdit,0,1);
LeftLayout->addWidget(NameLabel,1,0);
LeftLayout->addWidget(NameLineEdit,1,1);
LeftLayout->addWidget(SexLabel,2,0);
LeftLayout->addWidget(SexComBox,2,1);
LeftLayout->addWidget(DepartmentLabel,3,0);
LeftLayout->addWidget(DepartmentEdit,3,1);
LeftLayout->addWidget(AgeLabel,4,0);
LeftLayout->addWidget(AgeEdit,4,1);
LeftLayout->setColumnStretch(0,1);
LeftLayout->setColumnStretch(1,3);
//接下来是右侧的部分
HeadLabel=new QLabel("头像");
HeadIconLabel =new QLabel;
QPixmap icon("touxiang.png");
HeadIconLabel->setPixmap(icon);
HeadIconLabel->resize(icon.width(),icon.height());
UpdateHeadButn=new QPushButton("更新");
TopRightLayout=new QHBoxLayout();
TopRightLayout->setSpacing(5);
TopRightLayout->addWidget(HeadLabel);
TopRightLayout->addWidget(HeadIconLabel);
TopRightLayout->addWidget(UpdateHeadButn);
IntroductionLabel=new QLabel("个人说明");
IntroductionText=new QTextEdit;
//右侧的布局
RightLayout=new QVBoxLayout();
RightLayout->setMargin(10);
RightLayout->addLayout(TopRightLayout);
RightLayout->addWidget(IntroductionLabel);
RightLayout->addWidget(IntroductionText);
//接下来是底部的布局
OKBtn=new QPushButton("确定");
CancelBtn=new QPushButton("取消");
BtnLayout=new QHBoxLayout();
BtnLayout->addStretch();//增加一个占位符,使得按钮都显示在右侧
BtnLayout->addWidget(OKBtn);
BtnLayout->addWidget(CancelBtn);
QGridLayout *mainLayout=new QGridLayout(this);
mainLayout->setMargin(15);
mainLayout->setSpacing(10);
mainLayout->addLayout(LeftLayout,0,0);
mainLayout->addLayout(RightLayout,0,1);
mainLayout->addLayout(BtnLayout,1,0,1,2);
mainLayout->setSizeConstraint(QLayout::SetFixedSize);//增加一个约束,控件都按照sizeHint()来显示
}
Dialog::~Dialog()
{
}运行后的结果:

相关文章推荐
- 自学QT之制作QQ界面
- 自学QT之停靠窗口
- 自学QT之简易音乐播放器基于QT5.5
- 自学QT之判断输入内容实现按钮可用或者不可用
- 自学QT之报错: name lookup of 'i' changed for ISO 'for' scoping
- 自学QT之键盘事件
- 自学QT之windeployqt工具的使用
- 自学QT之libpng warning: iCCP: known incorrect sRGB profile
- 自学QT之颜色选择对话框
- 自学QT之字体选择对话框
- 自学QT之标准文件对话框
- 自学QT之获取正确的文件名
- 自学QT之让label透明和隐藏标题栏
- 自学QT之实现QMessageBox的按钮中文显示
- 自学QT之QML实现响应鼠标和键盘事件
- 自学QT之启动画面
- 自学QT之鼠标事件
- 自学QT之托盘图标
- qt用mingw编译时报错 multiple definition of
- tempgauge测试-MQTT Over WebSocket