Android学习笔记(2):看一个XML文件
2015-12-07 02:41
701 查看
我们来开始第一个Android应用
使用Android Studio开发Android应用大致分为如下3步:
1. 创建一个Android项目或Android模块。
2. 在XML布局本件中定义应用程序的用户界面。
3. 在Java代码中编写业务实现。
我们先用Android Studio创建一个项目选择SDK的最低版本(随便选),选择“Blank Activity”,其他一路Next最后Finsh。
我们修改layout目录下的activity_main.xml文件,修改成下面的样子:
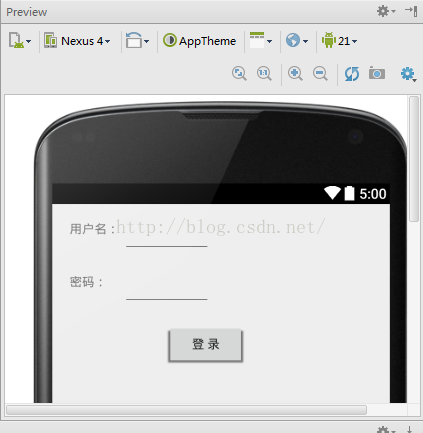
可以看到预览界面变成了这个样子:
下面来解释一下这段代码:
Android使用XML文档来实现用户UI的设计,当然也提供了用Java代码设计用户UI的方案,两套方案协同作用,对于一些简单的UI设计,XML文档常常是够用的。
Android的XML文件使用的是Android标签。这有点像HTML页面的HTML标签。
AbsoluteLayout 代表一个绝对布局,这也是一个组件,有点像Java swing的空布局,在绝对布局中的组件是通过x、y设置位置的。
android:layout_width="match_parent"
android:layout_height="match_parent"
这两行代码设置组件的宽度和高度,match_parent表示该组件也其父容器的宽度(或高度)相同,wrap_content 表示该组件的宽度(或高度)取决于组件中的内容。
android:layout_x="20dp"
android:layout_y="20dp"
这个是设置位置的很好理解吧。
android:password="true"
有了这个设置,该文本编辑器组件在输入时显示就想密码输入框一样了******
android:id="@+id/username"/>
指定组件的唯一标示符,在Java程序中可以通过findViewById(username)来获取指定的Android组件。
Android标签的用法有很多,许多都和特定的组件有关系,所以我们后面再来介绍。
我们先不管Java程序,来运行下这个应用,连上手机,打开调试模式,点击Android Studio的运行按钮,选择需要部署的设备——真机,点击OK按钮,然后慢慢感受了。
出现问题了也不要害怕,是时候考验自己使用百度的能力了。
使用Android Studio开发Android应用大致分为如下3步:
1. 创建一个Android项目或Android模块。
2. 在XML布局本件中定义应用程序的用户界面。
3. 在Java代码中编写业务实现。
我们先用Android Studio创建一个项目选择SDK的最低版本(随便选),选择“Blank Activity”,其他一路Next最后Finsh。
我们修改layout目录下的activity_main.xml文件,修改成下面的样子:
<?xml version="1.0" encoding="utf-8"?>
<AbsoluteLayout xmlns:android="http://schemas.android.com/apk/res/android"
android:layout_width="match_parent"
android:layout_height="match_parent">
<!--定义一个文本框,使用绝对定位-->
<TextView
android:layout_x="20dp"
android:layout_y="20dp"
android:layout_width="wrap_content"
android:layout_height="wrap_content"
android:text="用户名: "/>
<!--定义一个文本编辑器,使用绝对定位-->
<EditText
android:layout_x="80dp"
android:layout_y="15dp"
android:layout_width="wrap_content"
android:width="200px"
android:layout_height="wrap_content"
android:id="@+id/username"/>
<!--定义一个文本框,使用绝对定位-->
<TextView
android:layout_x="20dp"
android:layout_y="80dp"
android:layout_width="wrap_content"
android:layout_height="wrap_content"
android:text="密码: "/>
<!--定义一个文本编辑器,使用绝对定位-->
<EditText
android:layout_width="wrap_content"
android:layout_height="wrap_content"
android:layout_x="80dp"
android:layout_y="75dp"
android:width="200px"
android:password="true"
android:id="@+id/password"/>
<!--定义一个按钮,使用绝对定位-->
<Button
android:layout_x="130dp"
android:layout_y="135dp"
android:layout_width="wrap_content"
android:layout_height="wrap_content"
android:text="登 录"
/>
</AbsoluteLayout>
可以看到预览界面变成了这个样子:
下面来解释一下这段代码:
Android使用XML文档来实现用户UI的设计,当然也提供了用Java代码设计用户UI的方案,两套方案协同作用,对于一些简单的UI设计,XML文档常常是够用的。
Android的XML文件使用的是Android标签。这有点像HTML页面的HTML标签。
AbsoluteLayout 代表一个绝对布局,这也是一个组件,有点像Java swing的空布局,在绝对布局中的组件是通过x、y设置位置的。
android:layout_width="match_parent"
android:layout_height="match_parent"
这两行代码设置组件的宽度和高度,match_parent表示该组件也其父容器的宽度(或高度)相同,wrap_content 表示该组件的宽度(或高度)取决于组件中的内容。
android:layout_x="20dp"
android:layout_y="20dp"
这个是设置位置的很好理解吧。
android:password="true"
有了这个设置,该文本编辑器组件在输入时显示就想密码输入框一样了******
android:id="@+id/username"/>
指定组件的唯一标示符,在Java程序中可以通过findViewById(username)来获取指定的Android组件。
Android标签的用法有很多,许多都和特定的组件有关系,所以我们后面再来介绍。
我们先不管Java程序,来运行下这个应用,连上手机,打开调试模式,点击Android Studio的运行按钮,选择需要部署的设备——真机,点击OK按钮,然后慢慢感受了。
出现问题了也不要害怕,是时候考验自己使用百度的能力了。

相关文章推荐
- Android实现表情 抓取新浪表情
- 详解Android解析Xml的三种方式——DOM、SAX以及XMLpull
- android开发环境遇到adt无法启动的问题分析及解决方法
- Android开发 旋转屏幕导致Activity重建解决方法
- Android开发技巧之在a标签或TextView控件中单击链接弹出Activity(自定义动作)
- Android开发技巧之ViewStub控件惰性装载
- 分享10个很棒的学习Android开发的网站
- android开发之横向滚动/竖向滚动的ListView(固定列头)
- Android开发技巧之我的菜单我做主(自定义菜单)
- Windows下使用Apache Cordova开发ANDROID之HelloWorld
- 根据根据图片的url怎么取得图片ImageView对象
- [转] ADB server didn't ACK
- android开发的相关链接
- Android数据存储之SharedPreferences 共享首选项/偏好设置
- 基于NDK的Android防破解
- 麦子学院android开发笔记:Android更换RatingBar图片
- android开发入门知识之AIDL详解
- AutoCompleteTextView组件的功能和用法
- Android的TabHost组件的功能和用法