LibGDX_6.5: 常用系统控件: 文本框(TextField)
2015-12-07 00:18
399 查看
本文链接: http://blog.csdn.net/xietansheng/article/details/50187911
LibGDX 基础教程(总目录)
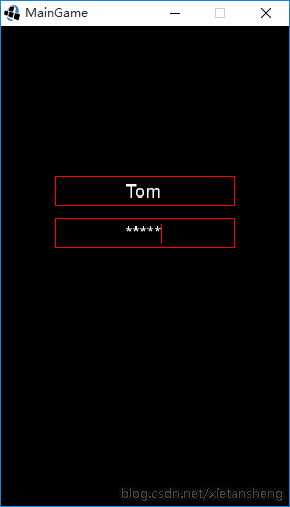
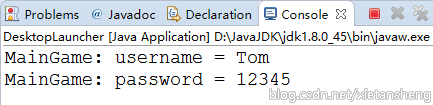
运行代码,输入用户名和密码(只能输入 BitmapFont 中包含的字符),然后按回车键查看控制台输出的 Log:

LibGDX 基础教程(总目录)
1. 文本框(TextField)
文本框主要用于提供给用户输入文字,获取用户输出,例如在登录时让用户输入用户名和密码等。文本框一般由背景图片(文本框的边框)和 光标(也用图片来表示)组成。为了方便演示,这里不再引入外部的图片和字体文件,而是使用 Pixmap 自己在内存中创建图片生成纹理,并且直接使用 gdx.jar 包中的字体文件(字体较小,可能会显示不清晰)。2. 代码示例: TextField 的使用
package com.libgdx.test;

import com.badlogic.gdx.Application;
import com.badlogic.gdx.ApplicationAdapter;
import com.badlogic.gdx.Gdx;
import com.badlogic.gdx.Input.Keys;
import com.badlogic.gdx.graphics.Color;
import com.badlogic.gdx.graphics.GL20;
import com.badlogic.gdx.graphics.Pixmap;
import com.badlogic.gdx.graphics.Texture;
import com.badlogic.gdx.graphics.g2d.BitmapFont;
import com.badlogic.gdx.graphics.g2d.TextureRegion;
import com.badlogic.gdx.scenes.scene2d.Stage;
import com.badlogic.gdx.scenes.scene2d.ui.TextField;
import com.badlogic.gdx.scenes.scene2d.utils.TextureRegionDrawable;
import com.badlogic.gdx.utils.Align;
import com.badlogic.gdx.utils.viewport.StretchViewport;

/**
* 游戏主程序的启动入口类
*/
public class MainGame extends ApplicationAdapter {

private static final String TAG = MainGame.class.getSimpleName();

// 视口世界的宽高统使用 480 * 800, 并统一使用伸展视口(StretchViewport)
public static final float WORLD_WIDTH = 480;
public static final float WORLD_HEIGHT = 800;

// 文本框的宽高
public static final int TEXT_FIELD_WIDTH = 300;
public static final int TEXT_FIELD_HEIGHT = 50;

// 舞台
private Stage stage;

// 文本框背景纹理
private Texture bgTexture;

// 文本框中的光标纹理
private Texture cursorTexture;

// 位图字体
private BitmapFont bitmapFont;

// 文本框(用户名)
private TextField usernameTextField;

// 文本框(密码)
private TextField passwordTextField;

@Override
public void create() {
// 设置日志输出级别
Gdx.app.setLogLevel(Application.LOG_DEBUG);

// 使用伸展视口(StretchViewport)创建舞台
stage = new Stage(new StretchViewport(WORLD_WIDTH, WORLD_HEIGHT));

// 将输入处理设置到舞台(必须设置, 否则文本框无法获取焦点)
Gdx.input.setInputProcessor(stage);

/*
* 第 1 步: 创建文本框背景纹理, 光标纹理, 以及创建位图字体(用于显示文本框中的文本)
*
* 为了方便演示, 这里创建纹理不再用图片来创建, 而是使用 Pixmap 来创建
*/
bgTexture = createBackgroundTexture();
cursorTexture = createCursorTexture();

// 为了方便演示, 这里直接使用 gdx.jar 中自带的字体文件创建位图字体(只要在 BitmapFont 中包含有的字符才能够被输入)
bitmapFont = new BitmapFont();

// gdx.jar 中自带的字体比较小, 这里放大一下
bitmapFont.getData().setScale(2.0F);

/*
* 第 2 步: 创建 TextFieldStyle
*/
TextField.TextFieldStyle style = new TextField.TextFieldStyle();

// 设置背景纹理区域
style.background = new TextureRegionDrawable(new TextureRegion(bgTexture));

// 设置光标纹理区域
style.cursor = new TextureRegionDrawable(new TextureRegion(cursorTexture));

// 设置文本框显示文本的字体来源
style.font = bitmapFont;

// 设置文本框字体颜色为白色
style.fontColor = new Color(1, 1, 1, 1);

/*
* 第 3 步: 创建 TextField
*/
usernameTextField = new TextField("", style);
passwordTextField = new TextField("", style);

// 设置文本框的宽高
usernameTextField.setSize(TEXT_FIELD_WIDTH, TEXT_FIELD_HEIGHT);
passwordTextField.setSize(TEXT_FIELD_WIDTH, TEXT_FIELD_HEIGHT);

// 设置文本框的位置
usernameTextField.setPosition(90, 500);
passwordTextField.setPosition(90, 430);

// 文本框中的文字居中对齐
usernameTextField.setAlignment(Align.center);
passwordTextField.setAlignment(Align.center);

// 用于显示密码的文本框, 需要将文本框设置为密码模式
passwordTextField.setPasswordMode(true);
// 显示密码时用 * 号代替密码字符
passwordTextField.setPasswordCharacter('*');

/*
* 第 4 步: 添加 TextField 到舞台
*/
stage.addActor(usernameTextField);
stage.addActor(passwordTextField);
}

/**
* 创建文本框的背景纹理
*/
private Texture createBackgroundTexture() {
Pixmap pixmap = new Pixmap(TEXT_FIELD_WIDTH, TEXT_FIELD_HEIGHT, Pixmap.Format.RGBA8888);
pixmap.setColor(1, 0, 0, 1);
pixmap.drawRectangle(0, 0, pixmap.getWidth(), pixmap.getHeight());
Texture texture = new Texture(pixmap);
pixmap.dispose();
return texture;
}

/**
* 创建文本框中的光标纹理
*/
private Texture createCursorTexture() {
Pixmap pixmap = new Pixmap(1, TEXT_FIELD_HEIGHT - 4, Pixmap.Format.RGBA8888);
pixmap.setColor(1, 0, 0, 1);
pixmap.fill();
Texture texture = new Texture(pixmap);
pixmap.dispose();
return texture;
}

@Override
public void render() {
/*
* 当按下 回车键 时获取文本框中的用户名和密码输出 Log
*/
if (Gdx.input.isKeyJustPressed(Keys.ENTER)) {
Gdx.app.log(TAG, "username = " + usernameTextField.getText());
Gdx.app.log(TAG, "password = " + passwordTextField.getText());
}

// 黑色清屏
Gdx.gl.glClearColor(0, 0, 0, 1);
Gdx.gl.glClear(GL20.GL_COLOR_BUFFER_BIT);

// 更新舞台逻辑
stage.act();
// 绘制舞台
stage.draw();
}

@Override
public void dispose() {
// 应用退出时释放资源
if (bgTexture != null) {
bgTexture.dispose();
}
if (cursorTexture != null) {
cursorTexture.dispose();
}
if (bitmapFont != null) {
bitmapFont.dispose();
}
if (stage != null) {
stage.dispose();
}
}

}
运行代码,输入用户名和密码(只能输入 BitmapFont 中包含的字符),然后按回车键查看控制台输出的 Log:

相关文章推荐
- javascript制作游戏开发碰撞检测的封装代码
- 跨平台移动WEB应用开发框架iMAG入门教程
- Android游戏开发实践之人物移动地图的平滑滚动处理
- PHP跨平台获取服务器IP地址自定义函数分享
- 跨平台python异步回调机制实现和使用方法
- Libgdx之封装简单的脚本机制
- Libgdx学习笔记:UI之技能冷却按钮
- 游戏服务器端开发要点
- 跨平台音频项目
- tvOS游戏开发系列(SpriteKit)之准备工作(一)
- tvOS游戏开发系列(SpriteKit)之新建tvOS游戏项目(二)
- 开源游戏 “打飞机”
- 开源游戏 “Elvish Bird”
- 开源游戏“2048”IOS移植版
- 游戏开发如何成功
- 【v2.x OGE教程 15】布局相关
- 【v2.x OGE-example 第二节】 实体参数
- HTML5简介
- [转]C++强大背后
- [游戏资讯][转]《反恐精英:全球攻势》要实现跨平台对战