Arduino 平台与C语言程序设计-week3-Arduino Programs-Lesson2
2015-12-06 22:44
429 查看
This series of articles are the study notes of "An Arduino platform and C Programming", by Prof. Harris, Department of Computer Science, University of California, Irvine. This article is the notes of week 3, Arduino Programs, lessen
2.
functions, using Arduino libraries because they refer to classes often.
Declaration of a variable creates an object
Operator used to access members: Data and functions
Functions can be defined inside the class
So, classes basically bring data and functions together and give them a name. So, in this example right here I define a class called X, you can see it says class X. Inside class X you see public. That just means that the data
inside there is public, anybody can see it. We don't need to focus on that. But inside there, inside class X, I define two things: int m, and then int mf.
and it's going to be an integer.
but mf is a function that I'm defining. So I say int mf, and it takes an integer v, it returns an integer. So Functions can be defined inside the class.
X var, what that does is it just declares a new object of type of class X. So, you know how I would say int var and then it would make var an integer. Well by saying X var, I'm making var
an object of class X. So, that means, when I make that, I'm implicitly making a variable m. Because var is a new object of that class, so it's going to have its variable m. So there's going to be some m variable in there that's dedicated to that object. Okay,
even though I don't explicitly say it.
Now in the next line, I say
var.m = 7. So what I'm doing there, is I'm taking that m, that's associated with var, the new object that I just created, and setting it equal to 7.
And in the next line, I define a new variable, z, and I say z = var.mf(9). So, in that case I'm calling a function, mf is a function that's associated with that class. So I say var.mf, tells
me, oh I want the function associated with this class that var is a part of, that mf function. It calls that function, passes the argument 9 to it, and which returns an integer, and then z is set equal to that integer.
So, when you talk about a class and its members, the members are the things that are part of the class. So for instance in our class, we can say it has two members. m, which is a variable in there and mf, which is a function
in there. So this class we could say has two members. And the way you refer to the members is with this dot operator.
functions that you want to use. And so you have to refer to these functions based by the class name often, or an object name. So what I'm showing down here is like
Ethernet.begin. Now we haven't gotten to this yet, but there's an Ethernet library that you can get from Arduino that you can use with an Ethernet shield, and this library, it has a begin function. When you want to initialize
the Ethernet adapter, you have to call this begin function.
Next I have Serial.begin. So by the way, begin is the extremely common name for the first function in this libraries. The first thing you do to set up the library, you often call begin. So,
there's another library called the Serial library, if I want to use a Serial interface, which we will cover, and that also has a begin.
Now notice that Ethernet library and Serial library both have begin functions associated with them. And in order for the machine, the compiler, to know which one I'm referring to, I have to prefix it with the name of the library
or the name of the class. So, Ethernet.begin, Serial.begin.
and we'll cover that, where it prints something on the serial cable. But then,
Client.print, client is the name of an object that you can create inside the ethernet library and that does something completely different. Client.print actually takes the word Hello and sends it as a message on the internet.
So, those two prints do completely different things. And you have to prefix a print with the name of the object and the name of the class where the function comes from.
So, this is why we're actually learning about classes at all, is so that you understand what you're doing when you make these calls to library functions, Arduino libraries. So, we don't need to know a lot about classes. We will
not define classes in this course. We'll just use predefined classes that come with the library. So we'll use the classes that are defined in these libraries, like Ethernet or serial or whatever the libraries are. And we'll hit these as we go through the lectures.
has to sort of follow this template.
function where execution starts. The main is created but it's created behind the scenes. So it happens during the compile.
Used for initialization operations
Returns no value, takes no arguments
setup(){
…
}
So setup is a program that's executed once when the Arduino is powered up. So, when you plug it into power, the first thing it does, first thing it does is run the boot loader, but as soon as that's done, it executes the setup
function. And the setup function, it happens one time. So it's used for initialization purposes.
You need to do to initialize your devices is. It depends, completely depends on the application and what you're doing. Maybe you need to initialize a memory. Maybe you need to set up your communication link with Siri or something
like this. If you were to look at our Arduino libraries for all the shields and things like this, they all often, not all but pretty much all have these, have a begin function which sets up the interface and is executed one time.
Setup takes no arguments, it returns no values so it's a void, and between the curly brackets you just list whatever the setup functions are, or setup operations are that you want to perform. So every Arduino program has to have
a setup function.
Executed iteratively as long as the Arduino is powered up
Loop() starts executing after setup() as has finished
Loo() is the main program control flow
Return no value takes no arguments
Void loop(){
…
}
In addition to that, every Arduino program has to have a loop. Now this is a property of any sort of embedded systems. IoT devices, any sort of devices that you want to write code for. They're always, the code is always written
in an infinite loop. Because and embedded system, or an IoT device which is an embedded system those things have to operate. They have to be always operating as long as they are powered on.
Now if it were an Arduino you would actually write an explicit infinite loop. You'd say while one or something likes that. While true, and that would be an infinite loop. The Arduino, it does that automatically for you so when
it makes its main, it takes whatever you write into this loop function and just executes it infinitely.
come off the leads, pieces of metal that come off the microcontroller that you can connect to other devices. And they can be inputs and outputs and so on, and these are the main interfaces.
So we've got a picture of the Arduino here. It's got several pins. Actually this isn't the whole picture, but this is most of it. The Arduino board itself has two rows of pins. The regular Arduino Uno has two rows of pins, a
row on the top, you can see that row on the top, and then a row on the bottom that you actually can't see in this image. So those are the rows of pins on the board. Those pins on the board are connected to the pins to the leads on the chip.
of the microcontroller and your code can then control the pins and observe the pins.
is through the pin. So most of other components in the system will be connected to the Arduino board through those pins. You will wire them to the pins.
voltage on the pin.
Voltage is determined by your sketch
Other components can be controlled through outputs
So pins can be designated as output pins or input pins.
An output pin is controlled by the Arduino, so the voltage is determined by your sketch. So your sketch calls a library function which sets the voltage. Other components can be controlled through
these outputs. So say you want to take, like here, an LED. Take an LED, you want to connect that to an Arduino, you will wire the two leads of the LED to the pins of the Arduino. Actually you'll probably use a resistor in between, but I'm not drawing that
right now. But you can wire the leads of the component to the Arduino's pins. And then you can write code inside your Arduino, write a sketch that assigns voltages to those pins and does something to the LED, presumably turns it off and on or makes it blink
or something like that. So that's what output pins are for. Output pins are for controlling other devices from your Arduino.
Arduino reads the voltage on the pins
Allows it to respond to events and data
Now pins can also be designated as input pins. Input pins are controlled by other components, so that the outside component controls the voltage on the input pin, and the Arduino just reads the voltage. So in this way the Arduino
can receive input from the outside world. So this is how you connect sensors up to the Arduino.
You take the sensor,
you wire it to some of these input pins. The Arduino can then read the voltage and interpret whatever the data is that that sensor is producing. So in this case we got a picture of a switch, very simple. If we wired this up properly,
this switch, if it's switched one way, actually it's a three state, but say it's a regular switch, it just has two positions, on, off. So we could wire a circuit so that if the switch is switched one way, that a voltage, maybe five volts, would appear on one
of the pins. And if it was switched the other way, then zero volts would appear. And then inside your sketch, you can detect if five volts is on the pin or if zero volts is on the pin. So you can determine if somebody has flicked the switch or not, and write
some code to do something appropriate.
So input pins are for reading from sensors, where output pins are generally for driving actuators. You can drive a motor with it or something like that if it's an output pin.
- Read digital input, write digital output
- 0 volts or 5 volts
Some pins can be analog inputs
- Can read analog voltage on thepin
- Useful for analog sensors
Analog-only pins are clearly labeled
No pins can generate an analog output
Now pins can either be digital or analog.
Digital is like integers, where analog is like real numbers, continuous values.
but for Arduino Uno, it's zero volts, five volts on the digital pin. Now an analog pin can receive anywhere, usually zero to five volts. Actually you can change that range if you want to, but a continuous set of values anywhere in there.
So some pins on the Arduino are digital only, can only act as digital pins, and they're labeled. So if you look at the Arduino board, one side of them it says digital.
Pins 0 through 13 are digital pins. So
you can read digital inputs of a digital pin. You can write digital outputs. So you can read input. You can attach it as an input, output, as digital one, zero volts to five volts.
is, the voltage can be interpreted as a digital number.
So there are a lot of sensors that output analog information, it’s useful to read analog sensors. So you need to read those. Analog only pins are clearly labeled. No pins can generate analog output. So the digital pins can read
digital input and drive digital output. You can drive zeros and ones by calling library functions of Arduino. But the analog pins cannot create analog outputs. They can read analog inputs and convert them to digital. They can read analog inputs but they can't
drive analog outputs. That's because we don't have a digital analog converter inside the device.
So now there is a way we can fake it, using pulse with modulation (PWM) and we'll get to that in a later course.
2.
2. Lesson 2
This lecture, we'll talk about classes a little bit more, just a little bit more. We just wanna give enough about classes to express the minimum that we need to understand about classes in order to go ahead and start using libraryfunctions, using Arduino libraries because they refer to classes often.
2.1 Lecture2-1: Classes
2.1.1 Classes and Members
(1) Example of Class
<div style="text-align: justify;"><span style="font-family: Arial, Helvetica, sans-serif;">Class X{</span></div>Public:
<div style="text-align: justify;"><span style="font-family: Arial, Helvetica, sans-serif;">	int mf(int v) {</span></div>	int m;
<div style="text-align: justify;"><span style="font-family: Arial, Helvetica, sans-serif;">		m = v;</span></div>		int old = m;
<div style="text-align: justify;"><span style="font-family: Arial, Helvetica, sans-serif;">        }</span></div>		return old;
};
X var;
<div style="text-align: justify;"><span style="font-family: Arial, Helvetica, sans-serif;">int z =  var.mf(9);</span></div><div style="text-align: justify;"><span style="font-family: Arial, Helvetica, sans-serif;">var.m = 7;</span></div>
Declaration of a variable creates an object
Operator used to access members: Data and functions
Functions can be defined inside the class
So, classes basically bring data and functions together and give them a name. So, in this example right here I define a class called X, you can see it says class X. Inside class X you see public. That just means that the data
inside there is public, anybody can see it. We don't need to focus on that. But inside there, inside class X, I define two things: int m, and then int mf.
(2) Data Member
Now m is just a variable, an integer. So now, what that's saying is that inside this class X, every time I make a new object of that class, it's going to have a variable called m all to itself,and it's going to be an integer.
(3) Function member
Now for the next line, it says int mf. But notice that the mf has parentheses after it. You know, int v inside parentheses after it. Since it has those parentheses, the machine probably knows that is a function. So, m is a variable,but mf is a function that I'm defining. So I say int mf, and it takes an integer v, it returns an integer. So Functions can be defined inside the class.
(4) Declaration a Object of a Class
Now then the last three lines up there are actually using the class. So let's take that next line,X var, what that does is it just declares a new object of type of class X. So, you know how I would say int var and then it would make var an integer. Well by saying X var, I'm making var
an object of class X. So, that means, when I make that, I'm implicitly making a variable m. Because var is a new object of that class, so it's going to have its variable m. So there's going to be some m variable in there that's dedicated to that object. Okay,
even though I don't explicitly say it.
(5) Dot operator
The dot operator is used to access the member.Now in the next line, I say
var.m = 7. So what I'm doing there, is I'm taking that m, that's associated with var, the new object that I just created, and setting it equal to 7.
And in the next line, I define a new variable, z, and I say z = var.mf(9). So, in that case I'm calling a function, mf is a function that's associated with that class. So I say var.mf, tells
me, oh I want the function associated with this class that var is a part of, that mf function. It calls that function, passes the argument 9 to it, and which returns an integer, and then z is set equal to that integer.
So, when you talk about a class and its members, the members are the things that are part of the class. So for instance in our class, we can say it has two members. m, which is a variable in there and mf, which is a function
in there. So this class we could say has two members. And the way you refer to the members is with this dot operator.
2.1.2 Classes in Libraries
<div style="text-align: justify;"><span style="font-family: Arial, Helvetica, sans-serif;">Ethernet.begin(mac);</span></div>Serial.begin(speed);
<div style="text-align: justify;"><span style="font-family: Arial, Helvetica, sans-serif;">Client.print(“hello”);</span></div><div style="text-align: justify;"><span style="font-family: Arial, Helvetica, sans-serif;">Serial.print(“hello”);</span></div>
(1) .begin
Now, the reason why we're talking about classes at all is because classes are often used in libraries. So when you get a library, an Arduino library, typically they give you a set of classes, and each class contains a bunch offunctions that you want to use. And so you have to refer to these functions based by the class name often, or an object name. So what I'm showing down here is like
Ethernet.begin. Now we haven't gotten to this yet, but there's an Ethernet library that you can get from Arduino that you can use with an Ethernet shield, and this library, it has a begin function. When you want to initialize
the Ethernet adapter, you have to call this begin function.
Next I have Serial.begin. So by the way, begin is the extremely common name for the first function in this libraries. The first thing you do to set up the library, you often call begin. So,
there's another library called the Serial library, if I want to use a Serial interface, which we will cover, and that also has a begin.
Now notice that Ethernet library and Serial library both have begin functions associated with them. And in order for the machine, the compiler, to know which one I'm referring to, I have to prefix it with the name of the library
or the name of the class. So, Ethernet.begin, Serial.begin.
(2) print
You can have a Serial.printand we'll cover that, where it prints something on the serial cable. But then,
Client.print, client is the name of an object that you can create inside the ethernet library and that does something completely different. Client.print actually takes the word Hello and sends it as a message on the internet.
So, those two prints do completely different things. And you have to prefix a print with the name of the object and the name of the class where the function comes from.
So, this is why we're actually learning about classes at all, is so that you understand what you're doing when you make these calls to library functions, Arduino libraries. So, we don't need to know a lot about classes. We will
not define classes in this course. We'll just use predefined classes that come with the library. So we'll use the classes that are defined in these libraries, like Ethernet or serial or whatever the libraries are. And we'll hit these as we go through the lectures.
2.2 Lecture2-2: Sketch Structure
In this lecture, we'll talk about the structure of a sketch, the standard structure. There are certain functions that are defined, that have to be defined, inside every sketch, and so we'll talk about those because every sketchhas to sort of follow this template.
2.2.1 Setup() function
(1) A sketch does not have a main()
Every sketch has to have a setup function. So, a sketch is different than an actual, it looks different than an actual C++ program, in that it doesn't have a main. A C or C++ program always has to have a main, which is the mainfunction where execution starts. The main is created but it's created behind the scenes. So it happens during the compile.
(2) Every sketch has a setup() function
Executed once when Arduino is powered upUsed for initialization operations
Returns no value, takes no arguments
setup(){
…
}
So setup is a program that's executed once when the Arduino is powered up. So, when you plug it into power, the first thing it does, first thing it does is run the boot loader, but as soon as that's done, it executes the setup
function. And the setup function, it happens one time. So it's used for initialization purposes.
You need to do to initialize your devices is. It depends, completely depends on the application and what you're doing. Maybe you need to initialize a memory. Maybe you need to set up your communication link with Siri or something
like this. If you were to look at our Arduino libraries for all the shields and things like this, they all often, not all but pretty much all have these, have a begin function which sets up the interface and is executed one time.
Setup takes no arguments, it returns no values so it's a void, and between the curly brackets you just list whatever the setup functions are, or setup operations are that you want to perform. So every Arduino program has to have
a setup function.
2.2.2 Loop() function
Every sketch has a loop() functionExecuted iteratively as long as the Arduino is powered up
Loop() starts executing after setup() as has finished
Loo() is the main program control flow
Return no value takes no arguments
Void loop(){
…
}
In addition to that, every Arduino program has to have a loop. Now this is a property of any sort of embedded systems. IoT devices, any sort of devices that you want to write code for. They're always, the code is always written
in an infinite loop. Because and embedded system, or an IoT device which is an embedded system those things have to operate. They have to be always operating as long as they are powered on.
Now if it were an Arduino you would actually write an explicit infinite loop. You'd say while one or something likes that. While true, and that would be an infinite loop. The Arduino, it does that automatically for you so when
it makes its main, it takes whatever you write into this loop function and just executes it infinitely.
2.3 Lecture2-3: Pins
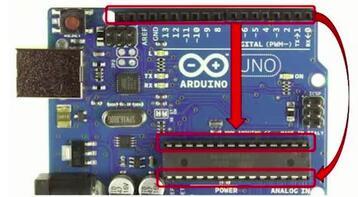
This lecture, we'll talk about the pins to the Arduino. The pins [COUGH] are the connections to the outside world. The main connections to the outside world are through these pins. Pins are basically just pieces of metal thatcome off the leads, pieces of metal that come off the microcontroller that you can connect to other devices. And they can be inputs and outputs and so on, and these are the main interfaces.
2.3.1 Pins
So we've got a picture of the Arduino here. It's got several pins. Actually this isn't the whole picture, but this is most of it. The Arduino board itself has two rows of pins. The regular Arduino Uno has two rows of pins, a
row on the top, you can see that row on the top, and then a row on the bottom that you actually can't see in this image. So those are the rows of pins on the board. Those pins on the board are connected to the pins to the leads on the chip.
(1) Pins are wires connected to the microcontroller
So if you want to access the outside world from the microcontroller, the way you do it is you take a wire and you plug it into those holes on the board. Those holes on the board are connected directly to the pins, to the leadsof the microcontroller and your code can then control the pins and observe the pins.
(2) Pins are the interface of the microcontroller
So pins are wires that are connected to the microcontroller. They're the main interface. Now there are other interfaces, right, there's a USB and so forth. But the main interface when you're building one of these IoT systemsis through the pin. So most of other components in the system will be connected to the Arduino board through those pins. You will wire them to the pins.
(3) Pin voltages are controlled by a sketch
The voltages on the pins can be controlled by the sketch if it's an output pin, which we'll talk about in a second. So you can control the voltages through a sketch. You can call a function inside your sketch; it will set thevoltage on the pin.
(4) Pin voltages can be read by a sketch
And pin voltages can be read by a sketch. That is, if something else is controlling the pin's voltage, you can read what that voltage is inside your sketch.2.3.2 Output Pins
Output pins are controlled by the ArduinoVoltage is determined by your sketch
Other components can be controlled through outputs
So pins can be designated as output pins or input pins.
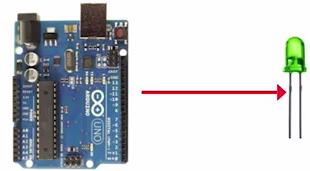
An output pin is controlled by the Arduino, so the voltage is determined by your sketch. So your sketch calls a library function which sets the voltage. Other components can be controlled through
these outputs. So say you want to take, like here, an LED. Take an LED, you want to connect that to an Arduino, you will wire the two leads of the LED to the pins of the Arduino. Actually you'll probably use a resistor in between, but I'm not drawing that
right now. But you can wire the leads of the component to the Arduino's pins. And then you can write code inside your Arduino, write a sketch that assigns voltages to those pins and does something to the LED, presumably turns it off and on or makes it blink
or something like that. So that's what output pins are for. Output pins are for controlling other devices from your Arduino.
2.3.3 Input Pins
Input pins are controlled by other componentsArduino reads the voltage on the pins
Allows it to respond to events and data
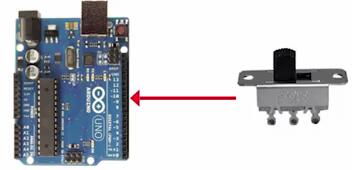
Now pins can also be designated as input pins. Input pins are controlled by other components, so that the outside component controls the voltage on the input pin, and the Arduino just reads the voltage. So in this way the Arduino
can receive input from the outside world. So this is how you connect sensors up to the Arduino.
You take the sensor,
you wire it to some of these input pins. The Arduino can then read the voltage and interpret whatever the data is that that sensor is producing. So in this case we got a picture of a switch, very simple. If we wired this up properly,
this switch, if it's switched one way, actually it's a three state, but say it's a regular switch, it just has two positions, on, off. So we could wire a circuit so that if the switch is switched one way, that a voltage, maybe five volts, would appear on one
of the pins. And if it was switched the other way, then zero volts would appear. And then inside your sketch, you can detect if five volts is on the pin or if zero volts is on the pin. So you can determine if somebody has flicked the switch or not, and write
some code to do something appropriate.
So input pins are for reading from sensors, where output pins are generally for driving actuators. You can drive a motor with it or something like that if it's an output pin.
2.3.4 Digital vs. Analog
Some pins are digital-only- Read digital input, write digital output
- 0 volts or 5 volts
Some pins can be analog inputs
- Can read analog voltage on thepin
- Useful for analog sensors
Analog-only pins are clearly labeled
No pins can generate an analog output
Now pins can either be digital or analog.
Digital is like integers, where analog is like real numbers, continuous values.
(1) Digital pins
Digital is discrete, zero, one, two, so on. So in our machine, if it's a digital pin the voltage can either be zero volts or five volts, on an Arduino Uno anyway. And there are other variants of Arduino that maybe change that,but for Arduino Uno, it's zero volts, five volts on the digital pin. Now an analog pin can receive anywhere, usually zero to five volts. Actually you can change that range if you want to, but a continuous set of values anywhere in there.
So some pins on the Arduino are digital only, can only act as digital pins, and they're labeled. So if you look at the Arduino board, one side of them it says digital.
Pins 0 through 13 are digital pins. So
you can read digital inputs of a digital pin. You can write digital outputs. So you can read input. You can attach it as an input, output, as digital one, zero volts to five volts.
(2) Analog pins
Some pins can be analog. These analog pins, they're labeled a0 through a5, and they're on the other side. They're also clearly labeled on the Arduino board. These analog pins, you can read analog voltages. So whatever the voltageis, the voltage can be interpreted as a digital number.
So there are a lot of sensors that output analog information, it’s useful to read analog sensors. So you need to read those. Analog only pins are clearly labeled. No pins can generate analog output. So the digital pins can read
digital input and drive digital output. You can drive zeros and ones by calling library functions of Arduino. But the analog pins cannot create analog outputs. They can read analog inputs and convert them to digital. They can read analog inputs but they can't
drive analog outputs. That's because we don't have a digital analog converter inside the device.
So now there is a way we can fake it, using pulse with modulation (PWM) and we'll get to that in a later course.

相关文章推荐
- 如何组织构建多文件 C 语言程序(二)
- 如何写好 C main 函数
- Lua和C语言的交互详解
- 关于C语言中参数的传值问题
- 简要对比C语言中三个用于退出进程的函数
- 深入C++中API的问题详解
- 基于C语言string函数的详解
- C语言中fchdir()函数和rewinddir()函数的使用详解
- C语言内存对齐实例详解
- C语言编程中统计输入的行数以及单词个数的方法
- 使用C语言判断英文字符大小写的方法
- c语言实现的带通配符匹配算法
- C语言实现顺序表基本操作汇总
- C语言中计算正弦的相关函数总结
- 使用C语言详解霍夫曼树数据结构
- 探讨C语言的那些小秘密之断言
- C语言实现BMP转换JPG的方法
- 深入探讨C语言中局部变量与全局变量在内存中的存放位置
- C语言查找数组里数字重复次数的方法
- C语言泛型编程实例教程