JavaWeb 利用springsecurity做用户权限限制
2015-12-05 19:31
423 查看
JavaWeb 利用springsecurity做用户权限限制。
利用springsecurity来实现的话,就非常简便(当然了,必须先做点准备工作)。
注释一下:
security是规定的一个taglib前标记。
authorize是规定的一个tld后标记。
name是规定的适配属性。
newAgentPage是规定的权限名字。
2、添加authorize后缀
把以上xml内容保存到WebContent/WEB-INF目录下的authorize.tld文件中。
稍作注释:
name标签中authorize就是定义的后缀名。
tag-class标签中为继承BodyTagSupport标记的子类,3小节中介绍。
attribute标签中定义了name属性,用来页面上传递name的value值。
3、AuthorizeTag类
稍作介绍:
对于BodyTagSupport 类,你可以参照自定义jsp标签: TagSupport与BodyTagSupport的区别 (转),了解一下类方法介绍,以及常量作用。
SecurityUserDto 类是针对我项目封装的用户权限类,主要作用就是获取登陆用户的角色,角色对应的权限,限于篇幅,本篇只做简单的介绍。
4、SecurityUserDto 类
稍作介绍:
限于篇幅,我删掉了一些属性。
关键内容是rolename、resources、
5、用户登陆
稍作解释:
以上xml内容片段来自于applicationContext-security.xml,使用过springsecurity的朋友对该文件都不会陌生。
用户登陆时,springsecurity机制会将用户名和密码传递到指定的customUserDetailsService服务对象。
然后我们来看看customUserDetailsService服务对象:
稍作解释:
关于如何获得权限resource,以及SecurityUserDto 对象就不多做介绍了。
通过loadUserByUsername方法,就把role、resource等信息全部封装到
6、权限配置
关于权限配置的相关内容也不做介绍了,因为数据表不一致,大家伙用的方法也不一致,如果以后需要的话,再另做介绍。
这里就只看看页面上如何配置权限,仅供参考。
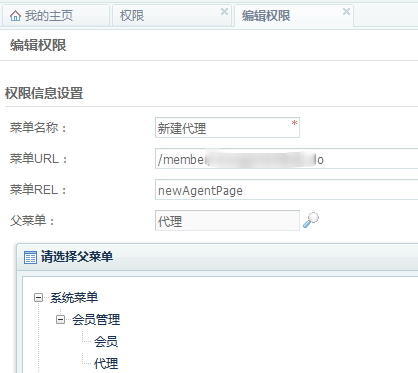
为“新建代理”创建指定的newAgentPage权限,其父菜单为整个代理列表页面。
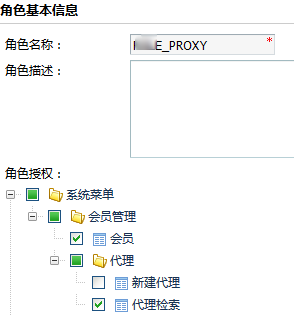
7、为角色分配权限
代码实现上也不多做介绍了。
代理角色不具有“新建代理”的权限。
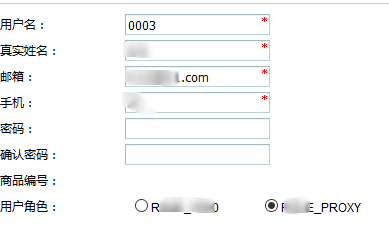
8、为用户分配角色
代码实现上不多做介绍了。
为我弟弟王三分配了代理(proxy)的角色。
到此就算是全部结束了,后续如果有朋友需要权限分配的介绍,再做说明。
该不该搁下重重的壳,寻找哪里到底有蓝天──周杰伦《蜗牛》
本文出自:【沉默王二的博客】
一、概述
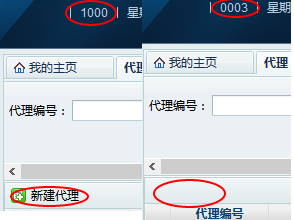
不同的user(用户)需要不同的role(角色),不同的role(角色)又会需要不同的resource(资源权限),比如说我王二,是个管理员(admin),我的权限大到什么都能操作,包括新建一个代理(proxy),再比如说我弟弟王三,是个代理(proxy),他却不能新建代理,他权限不够大。利用springsecurity来实现的话,就非常简便(当然了,必须先做点准备工作)。
<security:authorize name="newAgentPage">
<li><a class="add" title="新建代理"><span>新建代理</span></a></li>
</security:authorize>
注释一下:
security是规定的一个taglib前标记。
authorize是规定的一个tld后标记。
name是规定的适配属性。
newAgentPage是规定的权限名字。
二、直观体验
来看看我王二和弟弟王三的操作权限效果:三、具体实现
1、添加security前缀<%@ taglib prefix="security" uri="http://www.springsecurity.org/jsp"%>
2、添加authorize后缀
<?xml version="1.0" encoding="UTF-8" ?>
<taglib xmlns="http://java.sun.com/xml/ns/javaee"
xmlns:xsi="http://www.w3.org/2001/XMLSchema-instance"
xsi:schemaLocation="http://java.sun.com/xml/ns/javaee http://java.sun.com/xml/ns/javaee/web-jsptaglibrary_2_1.xsd" version="2.1">
<description>
<![CDATA[security Tags]]>
</description>
<tlib-version>1.0</tlib-version>
<short-name>security</short-name>
<uri>http://www.springsecurity.org/jsp</uri>
<tag>
<description>
<![CDATA[authorize Tag]]>
</description>
<name>authorize</name>
<tag-class>
com.honzh.security.filter.tag.AuthorizeTag
</tag-class>
<body-content>JSP</body-content>
<attribute>
<name>name</name>
<required>false</required>
<rtexprvalue>true</rtexprvalue>
<type>java.lang.String</type>
</attribute>
</tag>
</taglib>
把以上xml内容保存到WebContent/WEB-INF目录下的authorize.tld文件中。
稍作注释:
name标签中authorize就是定义的后缀名。
tag-class标签中为继承BodyTagSupport标记的子类,3小节中介绍。
attribute标签中定义了name属性,用来页面上传递name的value值。
3、AuthorizeTag类
package com.honzh.security.filter.tag;

import java.util.HashMap;
import java.util.List;

import javax.servlet.jsp.tagext.BodyTagSupport;

import org.apache.log4j.Logger;
import org.springframework.security.core.Authentication;
import org.springframework.security.core.context.SecurityContextHolder;

import com.honzh.biz.database.entity.security.SecurityUserDto;

public class AuthorizeTag extends BodyTagSupport {
private static Logger logger = Logger.getLogger(AuthorizeTag.class);

private static final long serialVersionUID = -5772328723066649929L;

// 页面上设置的name值
private String name;

/*
* (non-Javadoc)
*
* @see javax.servlet.jsp.tagext.BodyTagSupport#doStartTag()
*/
@SuppressWarnings("unchecked")
public int doStartTag() {
try {
// 登陆用户的权限对象
Authentication auth = SecurityContextHolder.getContext().getAuthentication();

if (auth == null) {
return SKIP_BODY;
}

// 封装了一系列便捷信息的登陆用户
SecurityUserDto securityUserDto = (SecurityUserDto) auth.getPrincipal();

// 匹配用户是否具有该权限
List<HashMap<String, String>> resources = securityUserDto.getResources();
for (HashMap<String, String> resource : resources) {
if (resource.get("name").equals(this.getName())) {
return EVAL_BODY_INCLUDE;
}
}

} catch (Exception e) {
logger.error(e.getMessage());
logger.error(e.getMessage(), e);
}

return SKIP_BODY;
}

public String getName() {
return name;
}

public void setName(String name) {
this.name = name;
}
}
稍作介绍:
对于BodyTagSupport 类,你可以参照自定义jsp标签: TagSupport与BodyTagSupport的区别 (转),了解一下类方法介绍,以及常量作用。
SecurityUserDto 类是针对我项目封装的用户权限类,主要作用就是获取登陆用户的角色,角色对应的权限,限于篇幅,本篇只做简单的介绍。
4、SecurityUserDto 类
package com.honzh.biz.database.entity.security;

import java.util.Collection;
import java.util.List;

import org.springframework.security.core.GrantedAuthority;

@SuppressWarnings("rawtypes")
public class SecurityUserDto extends SecurityUser {
private static final long serialVersionUID = -2841646575237530938L;
private Integer id;
private String rolename;
private List  resources;

public SecurityUserDto() {
}

public SecurityUserDto(String username, String password, Integer id,  boolean enabled,
Collection<GrantedAuthority> authorities, List resources) {
super(username, password, enabled, authorities);
this.id = id;
this.setResources(resources);
}
/**
* @return the rolename
*/
public String getRolename() {
return rolename;
}

/**
* @param rolename
*            the rolename to set
*/
public void setRolename(String rolename) {
this.rolename = rolename;
}
public Integer getId() {
return this.id;
}

public void setId(Integer id) {
this.id = id;
}

public List getResources() {
return resources;
}

public void setResources(List resources) {
this.resources = resources;
}
}
稍作介绍:
限于篇幅,我删掉了一些属性。
关键内容是rolename、resources、
Collection<GrantedAuthority> authorities。
5、用户登陆
<security:authentication-manager alias="authenticationManager">
<security:authentication-provider
user-service-ref="customUserDetailsService">
<security:password-encoder hash="md5" />
</security:authentication-provider>
</security:authentication-manager>
稍作解释:
以上xml内容片段来自于applicationContext-security.xml,使用过springsecurity的朋友对该文件都不会陌生。
用户登陆时,springsecurity机制会将用户名和密码传递到指定的customUserDetailsService服务对象。
然后我们来看看customUserDetailsService服务对象:
package com.honzh.spring.service.security.impl;

import java.util.HashSet;
import java.util.List;
import java.util.Set;

import org.springframework.beans.factory.annotation.Autowired;
import org.springframework.security.core.GrantedAuthority;
import org.springframework.security.core.authority.GrantedAuthorityImpl;
import org.springframework.security.core.userdetails.UserDetails;
import org.springframework.security.core.userdetails.UsernameNotFoundException;
import org.springframework.stereotype.Service;

import com.honzh.biz.database.entity.UserRole;
import com.honzh.biz.database.entity.security.SecurityUserDto;
import com.honzh.biz.database.mapper.ResourceMapper;
import com.honzh.biz.database.mapper.SecurityUserSpecMapper;
import com.honzh.biz.database.mapper.UserRoleMapper;
import com.honzh.spring.service.security.CustomUserDetailsService;

@Service("customUserDetailsService")
public class CustomUserDetailsServiceImpl implements CustomUserDetailsService {
@Autowired
private SecurityUserSpecMapper securityUserSpecMapper;
@Autowired
private UserRoleMapper userRoleMapper;
@Autowired
private ResourceMapper resourceMapper;

@SuppressWarnings("rawtypes")
public UserDetails loadUserByUsername(String userName) throws UsernameNotFoundException {
SecurityUserDto user = this.securityUserSpecMapper.selectByUsername(userName);

UserRole userRole = this.userRoleMapper.selectByUserid(user.getId());
List resources = this.resourceMapper.selectResources(user.getUsername(), userRole.getRoleId1());

Set<GrantedAuthority> auths = new HashSet<GrantedAuthority>();
auths.add(new GrantedAuthorityImpl(user.getRolename().replaceAll("\\*\\d{1,}\\*", "")));

return new SecurityUserDto(user.getUsername(), user.getPassword(), user.getId(),
auths, resources);
}
}
稍作解释:
关于如何获得权限resource,以及SecurityUserDto 对象就不多做介绍了。
通过loadUserByUsername方法,就把role、resource等信息全部封装到
SecurityContextHolder.getContext().getAuthentication()权限对象中了。
6、权限配置
关于权限配置的相关内容也不做介绍了,因为数据表不一致,大家伙用的方法也不一致,如果以后需要的话,再另做介绍。
这里就只看看页面上如何配置权限,仅供参考。
为“新建代理”创建指定的newAgentPage权限,其父菜单为整个代理列表页面。
7、为角色分配权限
代码实现上也不多做介绍了。
代理角色不具有“新建代理”的权限。
8、为用户分配角色
代码实现上不多做介绍了。
为我弟弟王三分配了代理(proxy)的角色。
到此就算是全部结束了,后续如果有朋友需要权限分配的介绍,再做说明。
该不该搁下重重的壳,寻找哪里到底有蓝天──周杰伦《蜗牛》
本文出自:【沉默王二的博客】

相关文章推荐
- 一个jar包里的网站
- 一个jar包里的网站之文件上传
- 一个jar包里的网站之返回对媒体类型
- MySQL 安全事宜
- sql server 2005用户权限设置深入分析
- ASP 根据用户权限判断显示的列标题
- SQLServer 2005 控制用户权限访问表图文教程
- 模拟Spring的简单实现
- spring+html5实现安全传输随机数字密码键盘
- Spring中属性注入详解
- struts2 spring整合fieldError问题
- Oracle 用户权限管理方法
- Linux下SFTP用户权限设置条件及实现命令
- phpMyadmin 用户权限中英对照
- 如何用phpmyadmin设置mysql数据库用户的权限
- spring的jdbctemplate的crud的基类dao
- 读取spring配置文件的方法(spring读取资源文件)
- Spring Bean基本管理实例详解
- java实现简单美女拼图游戏
- 解析Java的Spring框架的BeanPostProcessor发布处理器