Memcached安装配置
2015-11-26 11:36
671 查看
一、Memcached介绍
是国外社区网站LiveJournal团队开发,通过缓存数据库查询结果,减少数据库访问次数,从而提高动态web站点性能。官方站点 http://memcached.org/
memcached属于键值(Key-Value)存储数据库,适合储存用户信息,比如会话、配置文件、参数、购物车等等。这些信息一般都是和ID(键)挂钩,这种情景下键值数据库是个很好的选择。
1、Memcached特性
(1)基于c/s架构,协议简单
(2)基于libevent的事件处理
(3)自主内存存储处理(slab allowcation)
(4)数据过期方式:Lazy Expiration和LRU
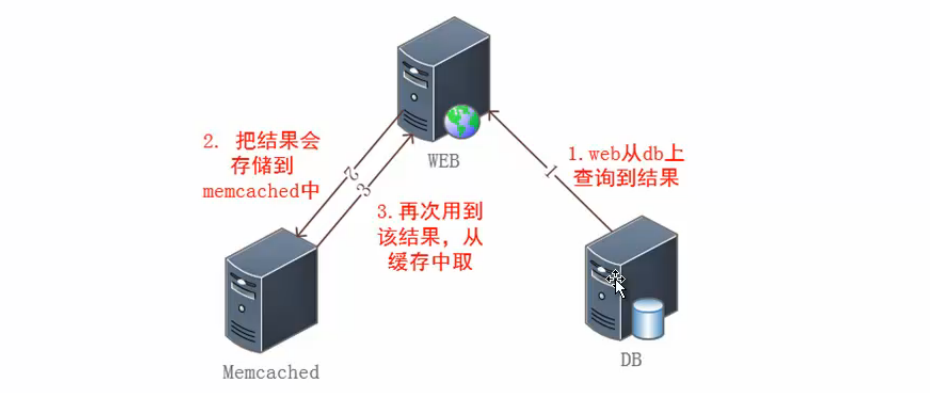
2、memcached数据流
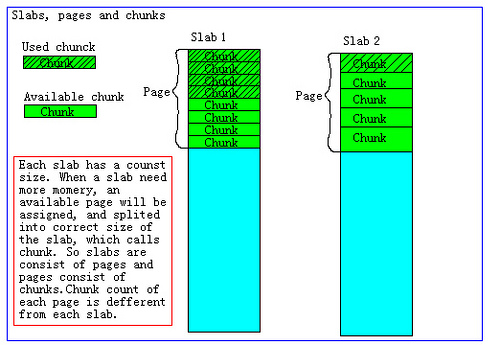
3、Slab Allowcationde
Slab Allowcationde原理:将分配的内存分割成各种尺寸的块(chunk),并把尺寸相同的块分成组(chunk的集合),每个chunk集合被称为slab。
Memcached的内存分配以Page为单位,Page默认值为1M,可以在启动时通过-l参数来指定。
Slab是由多个Page组成的,Page按照指定大小切割成多个chunk。其结构如图:
4、Growth Factor
memcached在启动时通过 -f 选项可以指定 Growth Factor 因子。该值控制slab之间的差异,chunk大小的差异。默认值为1.25。通过memcached-tool查看指定memcached实例的不同slab状态,可以看到各Item所占大小(chunk大小)差距为1.25
命令:#memcached-tool 127.0.0.1:11211 display
5、Memcached数据过期方式
(1)Lazy Expiration:
memcached内部不会监视记录是否过期,而是在get时查看记录的时间戳,检查记录是否过期。这种技术被称为lazy(惰性)expiration。因此,memcached不会再过期监视上耗费CPU时间。
(2)LRU:
memcached会优先使用已超时的记录的空间,但即使如此,也会发生追加新纪录时空间不足的情况,此时就要使用名为Least Recently Used(LRU)机制来分配空间。顾名思义,这是删除“最近最少使用”的记录的机制。因此,当内存空间不足时(无法从slab class获取到新的空间时),就从最近未被使用的记录中搜索,并将其空间分配给新的记录。从缓存的实用角度来看,该模型十分理想。
二、Memcached安装
[root@centos ~]# yum install -y epel-release
[root@centos ~]# yum install -y libevent memcached libmemcached
[root@centos ~]# /etc/init.d/memcached start
[root@centos ~]# netstat -lnp |grep memcached //可查看memcached端口号为11211
[root@centos ~]# ps aux |grep memcached //查看进程
1、Memcached启动参数说明
2、查看Memcached运行状态
[root@centos ~]# memcached-tool 127.0.0.1:11211 stats
注意:命中率为 get_hits/cmd_get 大于80%才行。
3、查看Memcached服务状态
[root@centos ~]# memstat --servers=127.0.0.1:11211 //需安装libmemcached
三、Memcached基本操作
1、memcached命令
[root@centos ~]# yum install -y telnet* //先安装telnet
[root@centos ~]# vim /etc/xinetd.d/telnet
[root@centos ~]# service xinetd start //开启telnet服务和xinetd
[root@centos ~]# telnet 127.0.0.1 11211 //连接memcached
2、memcached语法规则
<command name> <key> <flags> <exptime> <bytes> \r\n <data block> \r\n
四、PHP 连接 Memcached
1、安装php的memcache扩展
[root@centos ~]# cd /usr/local/src/
[root@centos src]# wget http://www.lishiming.net/data/attachment/forum/memcache-2.2.3.tgz
[root@centos src]# tar -zvxf memcache-2.2.3.tgz
[root@centos memcache-2.2.3]# /usr/local/php/bin/phpize
[root@centos memcache-2.2.3]# ./configure --with-php-config=/usr/local/php/bin/php-config
[root@centos memcache-2.2.3]# make
[root@centos memcache-2.2.3]# make install
2、配置
[root@centos memcache-2.2.3]# ls /usr/local/php/lib/php/extensions/no-debug-non-zts-20131226/
[root@centos memcache-2.2.3]# vim /usr/local/php/etc/php.ini
[root@centos memcache-2.2.3]# mkdir /usr/local/php/ext
[root@centos memcache-2.2.3]# cp /usr/local/php/lib/php/extensions/no-debug-non-zts-20131226/memcache.so /usr/local/php/ext
[root@centos memcache-2.2.3]# ls /usr/local/php/ext
3、检测是否连接成功
[root@centos memcache-2.2.3]# /usr/local/php/bin/php -m |grep memcache //有memcache模块
[root@centos memcache-2.2.3]# vim 1.php //编辑测试的php脚本
[root@centos memcache-2.2.3]# /usr/local/php/bin/php 1.php //运行测试脚本
显示上面的内容,说明解析成功。
五、Memcached 共享 Session
本实例是在lamp/lnmp环境中实现,通用方法。
1、编辑php.ini
[root@centos memcache-2.2.3]# vim /usr/local/php/etc/php.ini
2、测试
1)在lamp下测试:
[root@centos memcache-2.2.3]# cd /usr/local/apache2/htdocs
[root@centos htdocs]# vim session.php
[root@centos htdocs]# /usr/local/apache2/bin/apachectl start //开启httpd服务
[root@centos htdocs]# curl -x127.0.0.1:80 localhost/session.php //curl测试php脚本
[root@centos htdocs]# telnet 127.0.0.1 11211
由测试结果可知,memcached数据库获取了key内容,在lamp环境下,memcached实现了session共享。
2)在lnmp下测试:
[root@centos htdocs]# cp session.php /usr/local/nginx/html/ //复制脚本到nginx环境下
[root@centos html]# /usr/local/apache2/bin/apachectl stop //关闭httpd服务
[root@centos html]# service nginx start //开启nginx服务
[root@centos html]# curl -x127.0.0.1:80 localhost/session.php
[root@centos html]# telnet 127.0.0.1 11211
由上面测试结果可知,在lnmp环境下,memcached也实现了session共享。
注意说明:
是国外社区网站LiveJournal团队开发,通过缓存数据库查询结果,减少数据库访问次数,从而提高动态web站点性能。官方站点 http://memcached.org/
memcached属于键值(Key-Value)存储数据库,适合储存用户信息,比如会话、配置文件、参数、购物车等等。这些信息一般都是和ID(键)挂钩,这种情景下键值数据库是个很好的选择。
1、Memcached特性
(1)基于c/s架构,协议简单
(2)基于libevent的事件处理
(3)自主内存存储处理(slab allowcation)
(4)数据过期方式:Lazy Expiration和LRU
2、memcached数据流
3、Slab Allowcationde
Slab Allowcationde原理:将分配的内存分割成各种尺寸的块(chunk),并把尺寸相同的块分成组(chunk的集合),每个chunk集合被称为slab。
Memcached的内存分配以Page为单位,Page默认值为1M,可以在启动时通过-l参数来指定。
Slab是由多个Page组成的,Page按照指定大小切割成多个chunk。其结构如图:
4、Growth Factor
memcached在启动时通过 -f 选项可以指定 Growth Factor 因子。该值控制slab之间的差异,chunk大小的差异。默认值为1.25。通过memcached-tool查看指定memcached实例的不同slab状态,可以看到各Item所占大小(chunk大小)差距为1.25
命令:#memcached-tool 127.0.0.1:11211 display
5、Memcached数据过期方式
(1)Lazy Expiration:
memcached内部不会监视记录是否过期,而是在get时查看记录的时间戳,检查记录是否过期。这种技术被称为lazy(惰性)expiration。因此,memcached不会再过期监视上耗费CPU时间。
(2)LRU:
memcached会优先使用已超时的记录的空间,但即使如此,也会发生追加新纪录时空间不足的情况,此时就要使用名为Least Recently Used(LRU)机制来分配空间。顾名思义,这是删除“最近最少使用”的记录的机制。因此,当内存空间不足时(无法从slab class获取到新的空间时),就从最近未被使用的记录中搜索,并将其空间分配给新的记录。从缓存的实用角度来看,该模型十分理想。
二、Memcached安装
[root@centos ~]# yum install -y epel-release
[root@centos ~]# yum install -y libevent memcached libmemcached
[root@centos ~]# /etc/init.d/memcached start
[root@centos ~]# netstat -lnp |grep memcached //可查看memcached端口号为11211
| tcp 0 0 0.0.0.0:11211 0.0.0.0:* LISTEN 1931/memcachedtcp 0 0 :::11211 :::* LISTEN 1931/memcachedudp 0 0 0.0.0.0:11211 0.0.0.0:* 1931/memcachedudp 0 0 :::11211 :::* 1931/memcached |
| 498 1931 0.1 0.0 58188 896 ? Ssl 03:51 0:00 memcached -d -p 11211 -u memcached -m 64 -c 1024 -P /var/run/memcached/memcached.pidroot 1939 0.0 0.0 5980 748 pts/0 S+ 03:52 0:00 grep memcached |
| -d 是启动一个守护进程。 -p 是设置Memcached监听的端口,默认是11211。-u 是运行Memcached的用户,如果当前为root的话,需要使用此参数指定用户。-m 是分配给Memcached使用的内存数量,单位是MB,这里是64MB。-l 是监听的服务器IP地址,默认没有。 -c 是最大运行的并发连接数,默认是1024。 -P 是设置保存Memcached的pid文件。启动的相关参数在 /etc/init.d/memcached 和 /etc/sysconfig/memcached 中定义,若要修改启动参数,只有修改 /etc/sysconfig/memcached 才有效,修改 /etc/init.d/memcached 不会生效。 |
[root@centos ~]# memcached-tool 127.0.0.1:11211 stats
| #127.0.0.1:11211 Field Value accepting_conns 1 auth_cmds 0 auth_errors 0 bytes 0 bytes_read 7 bytes_written 0 cas_badval 0 cas_hits 0 cas_misses 0 cmd_flush 0 cmd_get 0 cmd_set 0 conn_yields 0 connection_structures 11 curr_connections 10 curr_items 0 decr_hits 0 decr_misses 0 delete_hits 0 delete_misses 0 evictions 0 get_hits 0 //命中数量 get_misses 0 incr_hits 0 incr_misses 0 limit_maxbytes 67108864 listen_disabled_num 0 pid 1931 pointer_size 32 rusage_system 0.119981 rusage_user 0.031995 threads 4 time 1448396035 total_connections 11 total_items 0 uptime 1332 version 1.4.4 |
3、查看Memcached服务状态
[root@centos ~]# memstat --servers=127.0.0.1:11211 //需安装libmemcached
| Listing 1 Server Server: 127.0.0.1 (11211) pid: 1931 uptime: 1379 time: 1448396082 version: 1.4.4 pointer_size: 32 rusage_user: 0.32994 rusage_system: 0.122981 curr_items: 0 total_items: 0 bytes: 0 curr_connections: 10 total_connections: 12 connection_structures: 11 cmd_get: 0 cmd_set: 0 get_hits: 0 get_misses: 0 evictions: 0 bytes_read: 0 bytes_written: 0 limit_maxbytes: 67108864 threads: 4 |
1、memcached命令
[root@centos ~]# yum install -y telnet* //先安装telnet
[root@centos ~]# vim /etc/xinetd.d/telnet
| disable = no |
[root@centos ~]# telnet 127.0.0.1 11211 //连接memcached
| Trying 127.0.0.1... Connected to 127.0.0.1. Escape character is '^]'. set key1 0 300 2 //储存数据 ab STORED get key1 VALUE key1 0 2 ab END replace key1 111 400 3 //替换数据 abc STORED get key1 VALUE key1 111 3 abc END delete key1 //删除数据 DELETED get key1 END quit //退出连接 |
<command name> <key> <flags> <exptime> <bytes> \r\n <data block> \r\n
| 1)<command name>可以是 "set"、"add"、"replace"、"delete". "set"表示按照相应的<key>存储该数据;若没有则增加,若有则覆盖 "add"表示按照相应的<key>添加该数据;若该<key>已存在,则操作失败 "replace"表示按照相应的<key>替换数据;若该<key>不存在,则操作失败 "delete"表示删除相应的<key>;若该<key>不存在,则操作失败 2)<key>客户端需要保存数据的key。 3)<flags> 是一个16位的无符号的整数(以十进制的方式表示)。 4)<exptime>过期时间。 若为0,表示存储的数据永远不过期(但可被服务器算法LRU等替换) 若为非0,当过期后,服务器可以保证用户得不到该数据(以服务器时间为标准) 5)<bytes> 需要存储的字节数,当用户希望存储空间数据时<bytes>可以为0。 6)\r\n 在Windows下是Enter键。 7)<data block>需要存储的内容,输入完成后,最后客户端需要加上"\r\n"(直接Enter)作为“命令头”的结束标志。 |
1、安装php的memcache扩展
[root@centos ~]# cd /usr/local/src/
[root@centos src]# wget http://www.lishiming.net/data/attachment/forum/memcache-2.2.3.tgz
[root@centos src]# tar -zvxf memcache-2.2.3.tgz
[root@centos memcache-2.2.3]# /usr/local/php/bin/phpize
[root@centos memcache-2.2.3]# ./configure --with-php-config=/usr/local/php/bin/php-config
[root@centos memcache-2.2.3]# make
[root@centos memcache-2.2.3]# make install
| Installing shared extensions: /usr/local/php/lib/php/extensions/no-debug-non-zts-20131226/ |
[root@centos memcache-2.2.3]# ls /usr/local/php/lib/php/extensions/no-debug-non-zts-20131226/
| memcache.so opcache.so |
| extension_dir = "/usr/local/php/ext" //指定目录,默认是在no-debug-non-zts-20131226 extension = memcache.so //末尾添加一行 |
[root@centos memcache-2.2.3]# cp /usr/local/php/lib/php/extensions/no-debug-non-zts-20131226/memcache.so /usr/local/php/ext
[root@centos memcache-2.2.3]# ls /usr/local/php/ext
| memcache.so |
[root@centos memcache-2.2.3]# /usr/local/php/bin/php -m |grep memcache //有memcache模块
| memcache |
| <?php //连接Memcache Memcache $mem = new Memcache; $mem->connect("localhost", 11211); //保存数据 $mem->set('key1', 'This is first value', 0, 60); $val = $mem->get('key1'); echo "Get key1 value: " . $val ."<br>"; //替换数据 $mem->replace('key1', 'This is replace value', 0, 60); $val = $mem->get('key1'); echo "Get key1 value: " . $val . "<br>"; //保存数组数据 $arr = array('aaa', 'bbb', 'ccc', 'ddd'); $mem->set('key2', $arr, 0, 60); $val2 = $mem->get('key2'); echo "Get key2 value: "; print_r($val2); echo "<br>"; //删除数据 $mem->delete('key1'); $val = $mem->get('key1'); echo "Get key1 value: " . $val . "<br>"; //清除所有数据 $mem->flush(); $val2 = $mem->get('key2'); echo "Get key2 value: "; print_r($val2); echo "<br>"; //关闭连接 $mem->close(); ?> |
| Get key1 value: This is first value<br>Get key1 value: This is replace value<br>Get key2 value: Array( [0] => aaa [1] => bbb [2] => ccc [3] => ddd)<br>Get key1 value: <br>Get key2 value: <br> |
五、Memcached 共享 Session
本实例是在lamp/lnmp环境中实现,通用方法。
1、编辑php.ini
[root@centos memcache-2.2.3]# vim /usr/local/php/etc/php.ini
| 找到: session.save_handler = files //注释掉 添加两行: session.save_handler = "memcache" session.save_path = "tcp://127.0.0.1:11211" //若是远程memcached,则为远程机器ip |
1)在lamp下测试:
[root@centos memcache-2.2.3]# cd /usr/local/apache2/htdocs
[root@centos htdocs]# vim session.php
| <?php session_start(); if (!isset($_SESSION['TEST'])) { $_SESSION['TEST'] = time(); } $_SESSION['TEST3'] = time(); print $_SESSION['TEST']; print "<br><br>"; print $_SESSION['TEST3']; print "<br><br>"; print session_id(); ?> |
[root@centos htdocs]# curl -x127.0.0.1:80 localhost/session.php //curl测试php脚本
| 1448477726<br><br>1448477726<br><br>h581d37pj6jbl9md4r67tim317 |
| Trying 127.0.0.1...Connected to 127.0.0.1.Escape character is '^]'.get h581d37pj6jbl9md4r67tim317 //get keyVALUE h581d37pj6jbl9md4r67tim317 0 37TEST|i:1448477726;TEST3|i:1448477726;END |
2)在lnmp下测试:
[root@centos htdocs]# cp session.php /usr/local/nginx/html/ //复制脚本到nginx环境下
[root@centos html]# /usr/local/apache2/bin/apachectl stop //关闭httpd服务
[root@centos html]# service nginx start //开启nginx服务
[root@centos html]# curl -x127.0.0.1:80 localhost/session.php
| 1448479908<br><br>1448479908<br><br>pmvlj2af2iq5to6hn1viuuo0n0 |
| Trying 127.0.0.1...Connected to 127.0.0.1.Escape character is '^]'.get pmvlj2af2iq5to6hn1viuuo0n0VALUE pmvlj2af2iq5to6hn1viuuo0n0 0 37TEST|i:1448479908;TEST3|i:1448479908;END |
注意说明:
| 上面实例是在lamp/lnmp环境中通用的方法,另外一种方法是单独在lamp或者lnmp下实现,不用修改php.ini文件,直接修改下面对应的配置文件: 1)lamp 在 httpd.conf 对应的虚拟主机中添加(可以针对每个虚拟主机进行memcached共享session) session.save_handler = "memcache" session.save_path = "tcp://127.0.0.1:11211" 2)lnmp 在 php-fpm.conf 对应的pool中添加 session.save_handler = "memcache" session.save_path = "tcp://127.0.0.1:11211" |

相关文章推荐
- 实战Memcached缓存系统
- nosql
- Redis和Memcached的区别详解
- PHP MemCached 高级缓存应用代码
- PHP模块 Memcached功能多于Memcache
- php的memcached客户端memcached
- php模块memcache和memcached区别分析
- 探讨:如何通过stats命令分析Memcached的内部状态
- 利用Memcached在php下实现session机制 替换PHP的原生session支持
- ubuntu+php环境下的Memcached 安装方法
- Nginx HttpMemcModule和直接访问memcached效率对比测试
- PHP内存缓存Memcached类实例
- Memcached常用命令及使用说明
- Memcached 入门介绍(安装与配置)
- PHP扩展模块memcached长连接使用方法分析
- Shell脚本实现的memcached进程监控
- linux下编译安装memcached服务
- php扩展memcached和memcache的安装配置方法
- PHP模块memcached使用指南
- 深入eAccelerator与memcached的区别详解