Positioning Parts with the EDC File
2015-11-26 01:14
295 查看
Positioning Parts with the EDC File


Content
Adding an Offset to Relative Positioning
Calculating the Edje Object Total Size
Using Edje Size Hints
Creating an Edje Swallow
Using ELM Layouts
Related Info
Edje API for Mobile Native
Elementary API for Mobile Native
Edje API for Wearable Native
Elementary API for Wearable Native
The size of a part in pixels is set using the
minand
maxproperties. The following code example sets the minimum and maximum size of the rectangle part to 200 x 200 px:
part
{
   name: "rectangle";
   type: RECT;
   description
   {
      state: "blue" 0.0;
      align: 0.0 0.0;
      // Set the size to 200x200
      min: 200 200;
      max: 200 200;
      // Blue color
      color: 0 0 255 255;
   }
}
The position of the parts is defined in the
rel1and
rel2blocks, which define the upper-left corner and the lower-right corner of the part. The position can be defined in relation to other parts (with the
relativeproperty) as an offset (
offsetproperty). When using relative positioning, the
to,
to_xand
to_yproperties are used to define in relation to which part the positioning is done. If nothing else is specified, the positioning is in relation to the parent's
part.
To demonstrate relative positioning, the following example creates another rectangle part and positions it under the first part. The upper-left corner of the new part starts at the lower-left corner of the previous one.
part
{
   name: "rectangle2";
   type: RECT;
   description
   {
      state: "green" 0.0;
      align: 0.0 0.0;
      // Set the size to 200 x 200
      min: 200 200;
      max: 200 200;
      // Green color
      color: 0 255 0 255;
      // Set the position
      // rel1 is relative to "rectangle"
      rel1
      {
         relative: 0.0 1.0;
         to: "rectangle";
      }
      // rel2 is relative to the parent
      rel2
      {
         relative: 1.0 1.0;
      }
   }
}
Note: The
alignproperty defines how the parts align themselves in the main window if their size is smaller than the main window. If nothing is specified, the parts
are aligned in the center of the window.
Adding an Offset to Relative Positioning
Therel1and
rel2blocks also support offset. The offset is a complement to the relative positioning: the corners are first placed according to their relative parameters, and then adjusted using the offsets.
The following figure shows the pixel positions for a 4 x 4 rectangle. The indexes start in the top-left corner at (0, 0), and increase to the right and to the bottom. Since the indexes have started at 0, the 4th pixel has an index of 3. To create
a 2 x 2 blue rectangle centered inside the green rectangle, the top-left corner must be (1, 1) and the bottom-right one (2, 2).
Figure: Offset indexes

To determine the relative position of the blue rectangle, Edje needs the following definitions:
Part coordinates, depending on the size and position of the green rectangle
Relative component of the positions must be the same: the top-left corner of the green rectangle
Top-left pixel (1, 1) and bottom-right pixel (2, 2)
The following code example shows the definitions:
name: "blue rectangle";

rel1.to: "green rectangle";
rel1.relative: 0 0;
rel1.offset: 1 1;rel2.to: "green rectangle";rel2.relative: 0 0;rel2.offset: 2 2;
For most tasks, relative positioning is simpler than using offsets. Offsets are usually left for fine-tuning and creating borders.
The following example is similar to the previous one but it uses relative positioning instead of offsets to achieve the same result for the 4 x 4 rectangle (though it can scale to larger sizes as well). The blue rectangle starts at 25% of the green rectangle
(both vertically and horizontally) and ends at 75% of it (both vertically and horizontally). Like in the previous example, the blue rectangle is named and Edje is told what the object of reference is:
name: "blue rectangle";
rel1.to: "green rectangle";rel2.to: "green rectangle";
The following figure shows how to refer to pixels using relative positioning when the offsets are (0, 0).
Figure: Relative positioning
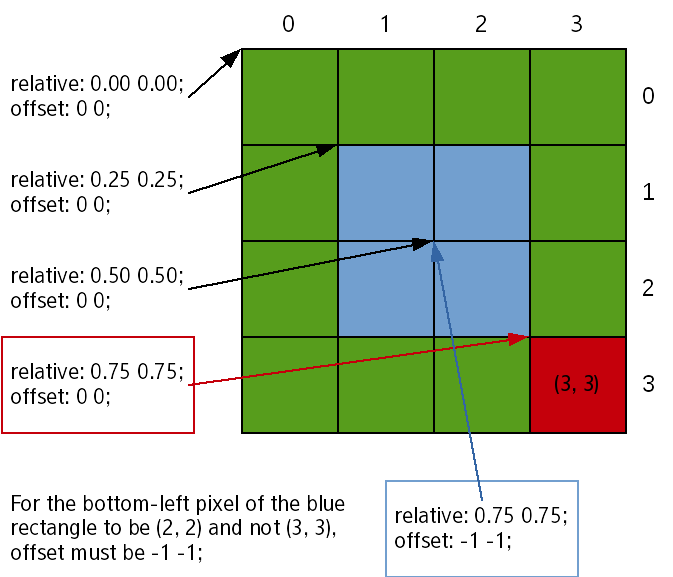
Note that in addressing the pixels, (0, 0) is addressed through
relative:
0 0; offset
0 0;
and each additional 0.25 in the relative field gives a 1-pixel move. With this, the pixel addressed through
relative:
0.75 0.75; offset:
0 0;
is at (3, 3) and not (2, 2).
This addressing method comes from a design choice in Evas and Edje, favoring simplicity. In the examples shown in this guide, there are 4 pixels, and therefore when the
[0;
1)
range is divided in 4, the result is
[0;
0.25),
[0.25;
0.50),
[0.50;
0.75),
[0.75;
0.100)
. With Edje, the value used to refer to each segment is the left bound and therefore, 0.75 refers to
[0.75;
0.100)
(the bottom-right pixel of the green rectangle and not the 3/4th one).
To refer to the previous pixel is to set the
rel2bound to
relative:
0.75 0.75;
, as expressed naturally, and
offset:
-1
-1;
. This can also be understood as extending the rectangle up to 75% of its parent with the upper bound excluded (as shown in the
[0.50;
0.75)
).
Since
-1
-1
is the most common offset wanted for
rel2, it is the default value as the default behavior is the most practical.
Calculating the Edje Object Total Size
When the EDC file is composed of several parts, Edje calculates the size of the global Edje object, by taking all the parts and their properties into account. The following properties have a role in this calculation and affect the global size:minand
max: define the minimum and the maximum size of a part.
rel1and
rel2: specify the relative position of a part.
align: relates to the alignment of the part in the parent object.
fixed: defines if the part has a fixed size.
Note: The
fixedproperty can only be used on the
TEXTBLOCKtype parts. Setting this property to
fixed:
1 1
does not take into account the part for the calculation of the global size.
Using Edje Size Hints
AnyEvas_Objectcan have hints for the object to know how to properly position and resize. Edje uses these hints when swallowing an
Evas_Objectto a position and resizing it in the
SWALLOWpart of the EDC file.
The size hints are not a size enforcement, they only tell the parent object the desired size for the child object. The parent tries to get as close as possible to the hint.
Hints are set in an
Evas_Objectusing the following
evas_object_size_hint_*()functions:
Minimum size hint
Set the hint for the object's minimum size, given in pixels. In the following example, the horizontal and vertical minimum size hint of an
Evas_Objectis set to 0 pixels:
Evas_Object *object;
evas_object_size_hint_min_set(object, 0, 0);
Maximum size hint
Set the hint for the object's maximum size, given in pixels. In the following example, the horizontal and vertical maximum size hint of an
Evas_Objectis set to 200 pixels:
evas_object_size_hint_max_set(object, 200, 200);
Aspect size hint
Set the hint for the object's aspect ratio. The available aspect size hints are:
EVAS_ASPECT_CONTROL_NONE
EVAS_ASPECT_CONTROL_HORIZONTAL
EVAS_ASPECT_CONTROL_VERTICAL
EVAS_ASPECT_CONTROL_BOTH
The other parameters are the aspect width and height ratio. These integers are used to calculate the proportions of the object. If the aspect ratio terms are
null, the object's container ignores the aspect and scale of the object and occupies the whole available area.
Figure: Aspect control
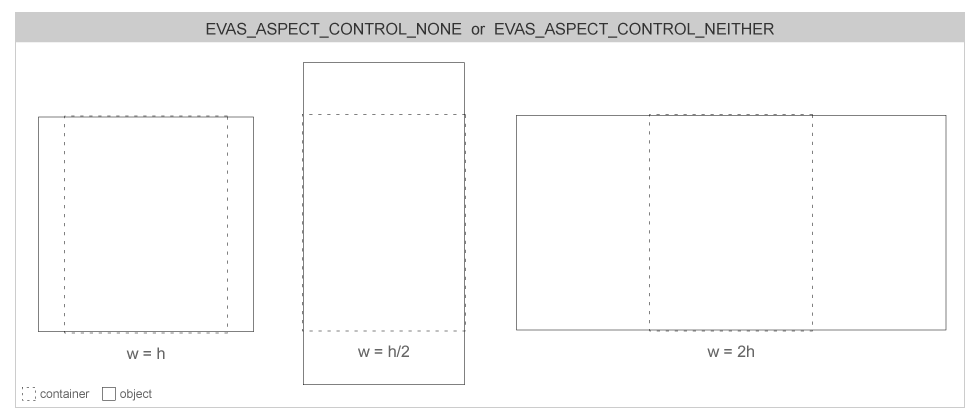
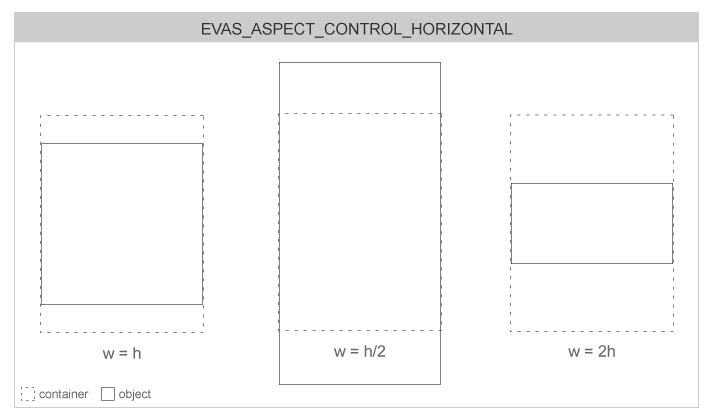

The following example sets the aspect size hint to
EVAS_ASPECT_CONTROL_BOTHwith a width of 100 and a height of 200. So the aspect ratio must be 1/2.
evas_object_size_hint_aspect_set(object, EVAS_ASPECT_CONTROL_BOTH, 100, 200);
Align size hint
Set the hint for the object's alignment. This hint is used when the object is smaller than its parent. The special
EVAS_HINT_FILLparameter uses the maximum size hints with a higher priority, if they are set. Also, any padding hints set on objects are added up to the alignment space on the final scene composition.
Figure: Alignment

In the following example, the special
EVAS_HINT_FILLparameter is used:
evas_object_size_hint_align_set(object, EVAS_HINT_FILL, EVAS_HINT_FILL);
Weight size hint
Set the hint for the object's weight. The weight tells to a container object how the given child is resized. If the
EVAS_HINT_EXPANDparameter is used, the child object's dimensions are expanded to fit the container's own.
When several child objects have different weights in a container object, the container distributes the space it has to layout them by those factors. Most weighted children get larger in this process than the lighter ones.
In the following example, the container is asked to expand the object in both directions:
evas_object_size_hint_weight_set(object, EVAS_HINT_EXPAND, EVAS_HINT_EXPAND);
Padding size hint
Set the hint for the object's padding space. Padding is extra space an object takes on each of its delimiting rectangle sides. The padding space is rendered transparent. Four hints can be defined for the left, right, top, and bottom padding.
Figure: Padding
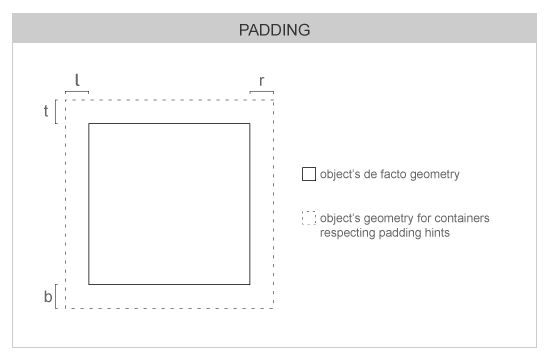
In the following example, the padding hints are set to 5 pixels on each side of the object:
evas_object_size_hint_padding_set(object, 5, 5, 5, 5);
Creating an Edje Swallow
The parent of all layout components is Edje. Edje, as detailed in theEDJE Data Collection Reference, is a library which converts EDC files into Evas objects. One of its main features is the possibility to create
SWALLOWobjects. When a
SWALLOWobject is added in Evas, it can contain any other
Evas_Object.
To create a swallow part:
Create the EDC file.
The file describes a group named
container, which contains a
SWALLOWtype part named
part.swallow. The part is centered inside the parent (it is the default behavior) but there are 32 pixels free all around this part.
collections
{
   group
   {
      name: "container";
      parts
      {
         part
         {
            name: "part.swallow"
            type: SWALLOW;
            description
            {
               state: "default" 0.0;
               rel1.offset: 31 31;
               rel2.offset: -32 -32;
            }
         }
      }
   }
}
Use the
edje_cctool to compile the EDC file into a binary
.edjfile:
edje_cc -o container.edj container.edc
Create an Edje object and load the file:
edje = edje_object_add(evas_object_evas_get(parent));
edje_object_file_set(edje, "container.edj", "container");
Note: The
edje_object_add()function, as opposed to an elementary object, does not take an
Evas_Objectas a parent. You must give the function the Evas on which the object is added. As the parent is already added on the Evas by elementary, retrieve a reference to it by using the
evas_object_evas_get()function.
Use the
edje_object_file_set()function to set the Edje file from which the object is loaded. The object itself is the name of the group as defined in the EDC file. In this
case it is
container.
Use the
edje_object_part_swallow()function to swallow any kind of
Evas_Objectinside it:
ic = elm_icon_add(parent);
elm_image_file_set(ic, "c1.png", NULL);
edje_object_part_swallow(edje, "part.swallow", ic);
Note: The
elm_image_file_set()function parameters are linked to Edje. The second parameter in this example is a PNG file, but it can also
be an Edje file. In that case, the third parameter must be the Edje group to load, exactly as previously shown with the
edje_object_file_set()function.
Using ELM Layouts
A layout is a container component. For the basic use of theelm_layoutcomponent with a default style, see the
Layout guide. The ELM layout takes a standard Edje design file and wraps it in a UI component. Layouts are the basis of graphical UI components used in Elementary.
To create a layout:
Create a new elementary layout using the
elm_layout_add()function:
Evas_Object *layout;
layout = elm_layout_add(parent);
For Edje swallows, load an Edje file:
Create an Edje file that contains a black rectangle and an icon in the center:
images
{
   image: "c1.png" COMP;
}

collections
{
   group
   {
      name: "my_layout";
      parts
      {
         part
         {
            name: "background";
            type: RECT; description
            {
               state: "default" 0.0; color: 0 0 0 255;
            }
         }
         part
         {
            name: "background";
            type: IMAGE;
            description
            {
               state: "default" 0.0;
               rel1.offset: 31 31;
               rel2.offset: -32 -32;
               default.image: "c1.png";
            }
         }
      }
   }
}
Compile the file with the
edje_cc
-o edje_example.edj edje_example.edc
command.
Load the file with the
elm_layout_file_set()function:
elm_layout_file_set(layout, "edje_example.edj", "my_layout");
The layout component can contain as many parts and children as described in its theme file (EDC). Some of these children can have special types:
SWALLOW(content holder):
Only one object can be added to a
SWALLOW. The
elm_layout_content_*()functions are used to manage the objects in a
SWALLOWpart. After being set to this part, the object's size, position, visibility, clipping, and other description properties are controlled by the description of the given part inside the Edje theme
file.
BOX:
The
BOXlayout can be used through the
elm_layout_box_*()functions. It is very similar to the
elm_boxcomponent, but the
BOXlayout's behavior is completely controlled by the Edje theme.
TABLE:
The
TABLElayout is like the
BOXlayout, but it is used through the
elm_layout_table_*()functions.
ELM can send Edje signals to the EDC part using the
elm_layout_signal_emit()function. You can also use the
elm_layout_signal_callback_add()function to receive signals.
Use the following code to listen to any signals sent by the layout:
elm_layout_signal_callback_add(layout, "*", "*", _signal_cb, NULL);

static void
_signal_cb(void *data, Evas_Object *obj, const char *emission, const char *source)
{
   printf("Info received from layout : %s %s\n", emission, source);
}
For more information on signals, see
Managing Multiple Signal Emitters in Layouts.
Note: Except as noted, this content is licensed under
LGPLv2.1+.
https://developer.tizen.org/development/ui-practices/native-application/efl/themes/positioning-parts-edc-file?langredirect=1

相关文章推荐
- android上实现富文本
- LYSE-模块
- const 指针和引用
- 01-03有关web前段开发DW篇
- zabbix实现微信报警
- Zookeeper简介
- Delphi反汇编内部字符串处理函数不完全列表
- QtMainWindow菜单的使用
- Log4J_demo_me_++
- 拼图响应式前端框架版响应式后台正式发布--关于有偿提供拼图响应式后台的通知
- 理论沉淀:RANSAC算法
- 第二讲:Windows应用程序框架
- 递归实现一个数的N次方
- Arduino蓝牙控制三色灯
- 网上书城项目总结(servlet_jsp+javaBean)
- Physics.Raycast重载方法的参数隐式转换引发的血案
- 反转字符,递归
- 【C#】Event事件的应用之观察者模式
- uva10859 树形dp
- 【TLS】SSL/TLS协议安全之不安全的重协商