编译安装lnmp
2015-11-16 17:51
267 查看
前言
上篇博文中学习了nginx的反向代理,负载均衡,缓存,fastcgi模块以及通过Yum快速安装了lnmp环境,现在开始学习用源码编译安装的方式来安装lnmp。
一、安装nginx
OS:CentOS6.4-x86_32
1、创建系统用户nginx来运行nginx[b]服务进程[/b]

4、安装nginx

请求一个不存在的页面:

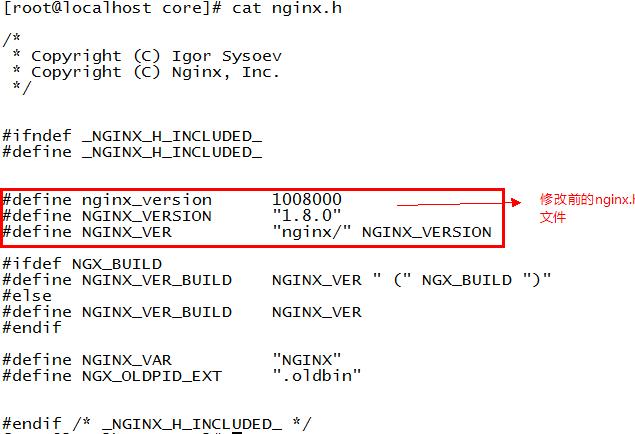
可以看到软件信息已经被更改
1、创建系统用户mysql和数据存储目录/data/mydata
2、解压mariadb并链接至mysql
3、初始化、创建配置文件和服务脚本并配置
10.1的版本需要安装jemalloc(epel源)否则启动不成功
1、安装依赖包
1、修改/etc/nginx/nginx.conf启用如下几行:
2、编辑/etc/nginx/fastcgi_params,将其内容更改为如下内容:

六、获取php-fpm的状态的状态信息
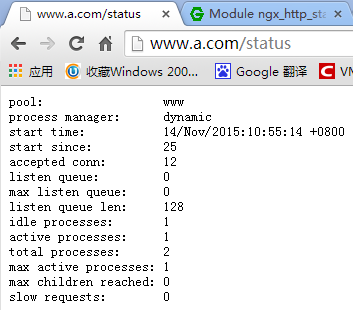
pool:进程池名称
process manager:进程管理器,有两种类型static和dynamic
上篇博文中学习了nginx的反向代理,负载均衡,缓存,fastcgi模块以及通过Yum快速安装了lnmp环境,现在开始学习用源码编译安装的方式来安装lnmp。
一、安装nginx
OS:CentOS6.4-x86_32
1、创建系统用户nginx来运行nginx[b]服务进程[/b]
[root@localhost ~]# useradd -r nginx2、安装依赖包
[root@localhost ~]# yum -y install pcre-devel openssl-devel3、修改nginx的软件信息减少黑客针对某版本漏洞进行攻击,我们会去更改或隐藏nginx版本号,将http请求响应头里的nginx版本号信息隐藏或更改掉。
[root@localhost ~]# cd src/
[root@localhost src]# ls
nginx-1.8.0.tar.gz
[root@localhost src]# tar xf nginx-1.8.0.tar.gz
[root@localhost src]# cd nginx-1.8.0
[root@localhost nginx-1.8.0]# ls
auto  CHANGES  CHANGES.ru  conf  configure  contrib  html  LICENSE  man  README  src
[root@localhost nginx-1.8.0]# cd src
[root@localhost src]# ls
core  event  http  mail  misc  os
[root@localhost src]# cd core
[root@localhost core]# ls
nginx.c           ngx_crypt.h       ngx_open_file_cache.c  ngx_resolver.c
nginx.h           ngx_cycle.c       ngx_open_file_cache.h  ngx_resolver.h
ngx_array.c       ngx_cycle.h       ngx_output_chain.c     ngx_sha1.h
ngx_array.h       ngx_file.c        ngx_palloc.c           ngx_shmtx.c
ngx_buf.c         ngx_file.h        ngx_palloc.h           ngx_shmtx.h
ngx_buf.h         ngx_hash.c        ngx_parse.c            ngx_slab.c
ngx_conf_file.c   ngx_hash.h        ngx_parse.h            ngx_slab.h
ngx_conf_file.h   ngx_inet.c        ngx_proxy_protocol.c   ngx_spinlock.c
ngx_config.h      ngx_inet.h        ngx_proxy_protocol.h   ngx_string.c
ngx_connection.c  ngx_list.c        ngx_queue.c            ngx_string.h
ngx_connection.h  ngx_list.h        ngx_queue.h            ngx_syslog.c
ngx_core.h        ngx_log.c         ngx_radix_tree.c       ngx_syslog.h
ngx_cpuinfo.c     ngx_log.h         ngx_radix_tree.h       ngx_thread_pool.c
ngx_crc32.c       ngx_md5.c         ngx_rbtree.c           ngx_thread_pool.h
ngx_crc32.h       ngx_md5.h         ngx_rbtree.h           ngx_times.c
ngx_crc.h         ngx_murmurhash.c  ngx_regex.c            ngx_times.h
ngx_crypt.c       ngx_murmurhash.h  ngx_regex.h
[root@localhost core]# vim nginx.h
4、安装nginx
[root@localhost nginx-1.8.0]# ./configure \ --prefix=/usr \ --sbin-path=/usr/sbin/nginx \ --conf-path=/etc/nginx/nginx.conf \ --error-log-path=/var/log/nginx/error.log \ --http-log-path=/var/log/nginx/access.log \ --pid-path=/var/run/nginx/nginx.pid \ --lock-path=/var/lock/nginx.lock \ --user=nginx \ --group=nginx \ --with-http_ssl_module \ --with-http_flv_module \ --with-http_stub_status_module \ --with-http_gzip_static_module \ --http-client-body-temp-path=/var/tmp/nginx/client/ \ --http-proxy-temp-path=/var/tmp/nginx/proxy/ \ --http-fastcgi-temp-path=/var/tmp/nginx/fcgi/ \ --http-uwsgi-temp-path=/var/tmp/nginx/uwsgi \ --http-scgi-temp-path=/var/tmp/nginx/scgi \ --with-pcre --with-http_realip_module [root@localhost nginx-1.8.0]# make && make install注意:http_realip_module这个模块允许从请求Headers里更改客户端的IP地址值(例如实时的转发)。5、启动并测试启动nginx前先检查是否有错误再启动
[root@localhost nginx-1.8.0]# nginx -t
nginx: the configuration file /etc/nginx/nginx.conf syntax is ok
nginx: [emerg] mkdir() "/var/tmp/nginx/client/" failed (2: No such file or directory)
nginx: configuration file /etc/nginx/nginx.conf test failed
[root@localhost nginx-1.8.0]# mkdir -pv /var/tmp/nginx/client
mkdir: created directory `/var/tmp/nginx'
mkdir: created directory `/var/tmp/nginx/client'
[root@localhost nginx-1.8.0]# nginx -t
nginx: the configuration file /etc/nginx/nginx.conf syntax is ok
nginx: configuration file /etc/nginx/nginx.conf test is successful
[root@localhost nginx-1.8.0]# nginx
[root@localhost nginx-1.8.0]# netstat -nlptu
Active Internet connections (only servers)
Proto Recv-Q Send-Q Local Address               Foreign Address             State       PID/Program name
tcp        0      0 0.0.0.0:80                  0.0.0.0:*                   LISTEN      4146/nginx
tcp        0      0 0.0.0.0:22                  0.0.0.0:*                   LISTEN      1100/sshd
tcp        0      0 127.0.0.1:25                0.0.0.0:*                   LISTEN      1176/master
tcp        0      0 :::22                       :::*                        LISTEN      1100/sshd
tcp        0      0 ::1:25                      :::*                        LISTEN      1176/master
请求一个不存在的页面:
可以看到软件信息已经被更改
[root@localhost nginx-1.8.0]# curl -I http://192.168.100.10 HTTP/1.1 200 OK
Server: lighttpd/1.4.37
Date: Thu, 12 Nov 2015 15:38:20 GMT
Content-Type: text/html
Content-Length: 612
Last-Modified: Thu, 12 Nov 2015 15:24:59 GMT
Connection: keep-alive
ETag: "5644af4b-264"
Accept-Ranges: bytes

[root@localhost nginx-1.8.0]#
6、为nginx提供SysV init脚本
[root@localhost nginx-1.8.0]# cd /etc/rc.d/init.d/
[root@localhost init.d]# vi nginx
[root@localhost init.d]# cat nginx
#!/bin/sh
#
# nginx - this script starts and stops the nginx daemon
#
# chkconfig:   - 85 15
# description:  Nginx is an HTTP(S) server, HTTP(S) reverse \
#               proxy and IMAP/POP3 proxy server
# processname: nginx
# config:      /etc/nginx/nginx.conf
# config:      /etc/sysconfig/nginx
# pidfile:     /var/run/nginx.pid

# Source function library.
. /etc/rc.d/init.d/functions

# Source networking configuration.
. /etc/sysconfig/network

# Check that networking is up.
[ "$NETWORKING" = "no" ] && exit 0

nginx="/usr/sbin/nginx"
prog=$(basename $nginx)

NGINX_CONF_FILE="/etc/nginx/nginx.conf"

[ -f /etc/sysconfig/nginx ] && . /etc/sysconfig/nginx

lockfile=/var/lock/subsys/nginx

make_dirs() {
# make required directories
user=`nginx -V 2>&1 | grep "configure arguments:" | sed 's/[^*]*--user=\([^ ]*\).*/\1/g' -`
options=`$nginx -V 2>&1 | grep 'configure arguments:'`
for opt in $options; do
if [ `echo $opt | grep '.*-temp-path'` ]; then
value=`echo $opt | cut -d "=" -f 2`
if [ ! -d "$value" ]; then
# echo "creating" $value
mkdir -p $value && chown -R $user $value
fi
fi
done
}

start() {
[ -x $nginx ] || exit 5
[ -f $NGINX_CONF_FILE ] || exit 6
make_dirs
echo -n $"Starting $prog: "
daemon $nginx -c $NGINX_CONF_FILE
retval=$?
echo
[ $retval -eq 0 ] && touch $lockfile
return $retval
}

stop() {
echo -n $"Stopping $prog: "
killproc $prog -QUIT
retval=$?
echo
[ $retval -eq 0 ] && rm -f $lockfile
return $retval
}

restart() {
configtest || return $?
stop
sleep 1
start
}

reload() {
configtest || return $?
echo -n $"Reloading $prog: "
killproc $nginx -HUP
RETVAL=$?
echo
}

force_reload() {
restart
}

configtest() {
$nginx -t -c $NGINX_CONF_FILE
}

rh_status() {
status $prog
}

rh_status_q() {
rh_status >/dev/null 2>&1
}

case "$1" in
start)
rh_status_q && exit 0
$1
;;
stop)
rh_status_q || exit 0
$1
;;
restart|configtest)
$1
;;
reload)
rh_status_q || exit 7
$1
;;
force-reload)
force_reload
;;
status)
rh_status
;;
condrestart|try-restart)
rh_status_q || exit 0
;;
*)
echo $"Usage: $0 {start|stop|status|restart|condrestart|try-restart|reload|force-reload|configtest}"
exit 2
esac

[root@localhost init.d]# ls
auditd            halt       lvm2-lvmetad  netconsole  ntpd     rdisc        saslauthd  udev-post
blk-availability  ip6tables  lvm2-monitor  netfs       ntpdate  restorecond  single
crond             iptables   messagebus    network     oddjobd  rsyslog      sshd
functions         killall    mysqld        nginx       postfix  sandbox      svnserve
[root@localhost init.d]# chmod +x nginx
[root@localhost init.d]# ls
auditd            halt       lvm2-lvmetad  netconsole  ntpd     rdisc        saslauthd  udev-post
blk-availability  ip6tables  lvm2-monitor  netfs       ntpdate  restorecond  single
crond             iptables   messagebus    network     oddjobd  rsyslog      sshd
functions         killall    mysqld        nginx       postfix  sandbox      svnserve
[root@localhost init.d]# chkconfig --add nginx
[root@localhost init.d]# chkconfig --list nginx
nginx           0:off   1:off   2:off   3:off   4:off   5:off   6:off
[root@localhost init.d]# service nginx status
nginx (pid 4147 4146) is running...
[root@localhost init.d]# service nginx configtest
nginx: the configuration file /etc/nginx/nginx.conf syntax is ok
nginx: configuration file /etc/nginx/nginx.conf test is successful
[root@localhost init.d]# service nginx restart
nginx: the configuration file /etc/nginx/nginx.conf syntax is ok
nginx: configuration file /etc/nginx/nginx.conf test is successful
Stopping nginx: [  OK  ]
Starting nginx: [ OK ]二、安装mariadb(通用二进制)1、创建系统用户mysql和数据存储目录/data/mydata
[root@localhost local]# useradd -r mysql
[root@localhost local]# mkdir /data/mydata
[root@localhost local]# chown -R mysql.mysql /data/mydata/
2、解压mariadb并链接至mysql
[root@localhost src]# ls
mariadb-10.1.8-linux-i686.tar.gz  nginx-1.8.0  nginx-1.8.0.tar.gz  php-5.6.15.tar.bz2
[root@localhost src]# tar xf  mariadb-10.1.8-linux-i686.tar.gz -C /usr/local
[root@localhost src]# cd /usr/local
[root@localhost local]# ls
bin  etc  games  include  lib  libexec  mariadb-10.1.8-linux-i686  sbin  share  src
[root@localhost local]# ln -sv mariadb-10.1.8-linux-i686/ mysql
`mysql' -> `mariadb-10.1.8-linux-i686/'
[root@localhost local]# chmod -R root.mysql mysql/
3、初始化、创建配置文件和服务脚本并配置
[root@localhost mysql]# scripts/mysql_install_db  --user=mysql --datadir=/data/mydata
[root@localhost mysql]# cp support-files/
binary-configure        my-medium.cnf           policy/
magic                   my-small.cnf            wsrep.cnf
my-huge.cnf             mysqld_multi.server     wsrep_notify
my-innodb-heavy-4G.cnf  mysql-log-rotate
my-large.cnf            mysql.server
[root@localhost mysql]# cp support-files/my-large.cnf /etc/my.cnf
[root@localhost mysql]# cp support-files/mysql.server /etc/rc.d/init.d/mysqld
[root@localhost mysql]# chmod +x /etc/rc.d/init.d/mysqld
[root@localhost mysql]# chkconfig --add mysqld
[root@localhost mysql]# chkconfig --list mysqld
mysqld          0:off   1:off   2:on    3:on    4:on    5:on    6:off

[root@localhost mysql]# vi /etc/my.cnf
在mysqld段添加如下2行:
datadir=/data/mydata
innodb_file_per_table = ON
4、启动并测试
10.1的版本需要安装jemalloc(epel源)否则启动不成功
[root@www mysql]# service mysqld start
Starting MySQL. SUCCESS!
[root@www mysql]# netstat -nlptu
Active Internet connections (only servers)
Proto Recv-Q Send-Q Local Address               Foreign Address             State       PID/Program name
tcp        0      0 0.0.0.0:80                  0.0.0.0:*                   LISTEN      5943/nginx
tcp        0      0 0.0.0.0:22                  0.0.0.0:*                   LISTEN      1100/sshd
tcp        0      0 127.0.0.1:25                0.0.0.0:*                   LISTEN      1176/master
tcp        0      0 :::3306                     :::*                        LISTEN      9976/mysqld
tcp        0      0 :::22                       :::*                        LISTEN      1100/sshd
tcp        0      0 ::1:25                      :::*                        LISTEN      1176/master
5、后续配置
[root@www mysql]# vi /etc/profile.d/mysql.sh
export PATH=/usr/local/mysql/bin:$PATH
[root@www mysql]# . /etc/profile.d/mysql.sh
[root@www mysql]# mysql
Welcome to the MariaDB monitor.  Commands end with ; or \g.
Your MariaDB connection id is 4
Server version: 10.1.8-MariaDB-log MariaDB Server

Copyright (c) 2000, 2015, Oracle, MariaDB Corporation Ab and others.

Type 'help;' or '\h' for help. Type '\c' to clear the current input statement.

MariaDB [(none)]>
三、安装Php
1、安装依赖包
yum -y install libxml2-devel bzip2-devel libmcrypt-devel(epel) freetype curl-devel2、编译安装php
[root@www mysql]# cd
[root@www ~]# cd src/
[root@www src]# ls
mariadb-10.1.8-linux-i686.tar.gz  nginx-1.8.0  nginx-1.8.0.tar.gz  php-5.6.15.tar.bz2
[root@www src]# tar xf php-5.6.15.tar.bz2
[root@www src]# cd php-5.6.15
[root@www php-5.6.15]# ./configure --prefix=/usr/local/php --with-mysql=/usr/local/mysql
--with-openssl --enable-fpm --enable-sockets --enable-sysvshm  --with-mysqli=/usr/local/m
ysql/bin/mysql_config --enable-mbstring --with-freetype-dir --with-jpeg-dir --with-png-di
r --with-zlib-dir --with-libxml-dir=/usr --enable-xml  --with-mhash --with-mcrypt  --with
-config-file-path=/etc --with-config-file-scan-dir=/etc/php.d --with-bz2 --with-curl
[root@www php-5.6.15]# make && make install
3、配置php,php-fpm并提供服务脚本
[root@www php-5.6.15]# cp php.ini-production /etc/php.ini
[root@www php-5.6.15]# cp sapi/fpm/init.d.php-fpm /etc/rc.d/init.d/php-fpm
[root@www php-5.6.15]# chmod +x /etc/rc.d/init.d/php-fpm
[root@www php-5.6.15]# chkconfig --add php-fpm
[root@www php-5.6.15]# chkconfig --list php-fpm
php-fpm         0:off   1:off   2:on    3:on    4:on    5:on    6:off

[root@www php-5.6.15]# cp /usr/local/php/etc/php-fpm.conf.default /usr/local/php/etc/php-
fpm.conf
# vim /usr/local/php/etc/php-fpm.conf
#配置fpm的相关选项为你所需要的值,并启用pid文件(如下最后一行):
pm.max_children = 50
pm.start_servers = 5
pm.min_spare_servers = 2
pm.max_spare_servers = 8

pid = /usr/local/php5/var/run/php-fpm.pid  #要和服务脚本中的路径一致
4、启动并测试
[root@www php-5.6.15]# service php-fpm start
Starting php-fpm  done
[root@www php-5.6.15]# service php-fpm start
Starting php-fpm [14-Nov-2015 07:49:26] ERROR: unable to bind listening socket for address '127.0.0.1:9000': Address already in use (98)
[14-Nov-2015 07:49:26] ERROR: FPM initialization failed
failed
[root@www php-5.6.15]# service php-fpm start
Starting php-fpm [14-Nov-2015 07:49:29] ERROR: unable to bind listening socket for address '127.0.0.1:9000': Address already in use (98)
[14-Nov-2015 07:49:29] ERROR: FPM initialization failed
failed
[root@www php-5.6.15]# service php-fpm status
php-fpm (pid 21332) is running...
[root@www php-5.6.15]# service php-fpm status
php-fpm (pid 21332) is running...
[root@www php-5.6.15]# netst -nlptu
-bash: netst: command not found
[root@www php-5.6.15]# netstat -nlptu
Active Internet connections (only servers)
Proto Recv-Q Send-Q Local Address               Foreign Address             State       PID/Program name
tcp        0      0 127.0.0.1:9000              0.0.0.0:*                   LISTEN      21332/php-fpm
tcp        0      0 0.0.0.0:80                  0.0.0.0:*                   LISTEN      5943/nginx
tcp        0      0 0.0.0.0:22                  0.0.0.0:*                   LISTEN      1100/sshd
tcp        0      0 127.0.0.1:25                0.0.0.0:*                   LISTEN      1176/master
tcp        0      0 :::3306                     :::*                        LISTEN      9976/mysqld
tcp        0      0 :::22                       :::*                        LISTEN      1100/sshd
tcp        0      0 ::1:25                      :::*                        LISTEN      1176/master
四、更改nginx的配置文件支持php
1、修改/etc/nginx/nginx.conf启用如下几行:
location ~ \.php$ {
root           /www/a.com/;      #修改这里的目录
fastcgi_pass   127.0.0.1:9000;
fastcgi_index  index.php;
fastcgi_param  SCRIPT_FILENAME  /scripts$fastcgi_script_name;
include        fastcgi_params;
}主页面格式中添加php格式的主页location / {
root html;
index index.php index.html index.htm;
}2、编辑/etc/nginx/fastcgi_params,将其内容更改为如下内容:
fastcgi_param  GATEWAY_INTERFACE  CGI/1.1;
fastcgi_param  SERVER_SOFTWARE    nginx;
fastcgi_param  QUERY_STRING       $query_string;
fastcgi_param  REQUEST_METHOD     $request_method;
fastcgi_param  CONTENT_TYPE       $content_type;
fastcgi_param  CONTENT_LENGTH     $content_length;
fastcgi_param  SCRIPT_FILENAME    $document_root$fastcgi_script_name;
fastcgi_param  SCRIPT_NAME        $fastcgi_script_name;
fastcgi_param  REQUEST_URI        $request_uri;
fastcgi_param  DOCUMENT_URI       $document_uri;
fastcgi_param  DOCUMENT_ROOT      $document_root;
fastcgi_param  SERVER_PROTOCOL    $server_protocol;
fastcgi_param  REMOTE_ADDR        $remote_addr;
fastcgi_param  REMOTE_PORT        $remote_port;
fastcgi_param  SERVER_ADDR        $server_addr;
fastcgi_param  SERVER_PORT        $server_port;
fastcgi_param  SERVER_NAME        $server_name;
五、测试
[root@www nginx]# vi /www/a.com/index.php
<?php
$conn=mysql_connect('127.0.0.1','root','');
if($conn)
echo succ;
else
echo fail;

phpinfo();
?>
六、获取php-fpm的状态的状态信息
location ~* /(status|ping) {   #要先上php-fpm的配置文件中启用status,ping选项
root /www/a.com;
fastcgi_pass 127.0.0.1:9000;
fastcgi_param SCRIPT_FILENAME $fastcgi_script_name;
include  fastcgi_params;
}
pool:进程池名称
process manager:进程管理器,有两种类型static和dynamic
start time:           14/Nov/2015:10:55:14 +0800   #启动时间
start since:          25       #运行时长
accepted conn:        12       #已经接收的请求数
listen queue:         0        #等待队列中的请求个数
max listen queue:     0        #fpm启动以来等待队列中的请求的总数
listen queue len:     128      #等待队列长度
idle processes:       1        #空闲的进程数
active processes:     1        #活动的进程数
total processes:      2        #总进程数
max active processes: 1        #fpm启动以来最大活动进程数
max children reached: 0        #达到最大子进程的次数
slow requests:        0        #慢速请求的个数

相关文章推荐
- A sequence of numbers
- 【Android】ListView addHeaderView低版本报错问题
- Hadoop多路径输出(MultipleOutputs)
- jQuery获取Select选择的Text和 Value(转)
- imagesize()函数获取图片信息
- 50个常用的sql语句
- 【Leet Code】33. Search in Rotated Sorted Array---Hard
- Linux系统日常笔记总结
- js对象继承之原型链继承实例
- Mongodb GetLastError写入安全机制
- Python - Windows下安装easy_install, pip 及whl文件安装方法
- activity的数据状态保存:自己的一点经验
- 网页设计大赛正式起航!--南大软院大神养成计划
- MongoDB——从基础来入门
- 线索二叉树 – 数据结构和算法48
- uniupload mapping
- 什么是持续集成及相关工具
- 二叉树的建立和遍历算法 – 数据结构和算法47
- js中获得当前时间
- iOS学习笔记43-iOS9新特性和开发中常见的问题大总结