Ubuntu 14.04+Cuda 7.0+Opencv2.4.10+Cudnn+(PNG++)+Torch7配置
2015-11-16 16:46
375 查看
Ubuntu 14.04+Cuda 7.0+Opencv2.4.10+Cudnn+(PNG++)+Torch7配置
由于要做深度学习的实验,买了个GTX980,很兴奋的装上去,却被配置环境给难住,囧。第一次使用Linux,所以配置过程折腾了将近一个周,重装数十次,好在最终还是成功了,下面分享(折腾日记 = =)一下我的配置方法,其实网上有很多方法,但是总会出现一些小错误。安装顺序
1.NVIDIA显示卡驱动安装2.Cuda 7.0安装
3.Opencv2.4.10安装
4.Cudnn安装
5.PNG++安装
6.Torch7安装
在安装之前,最好能够更新以下源,之前由于源的问题,很多依赖都装不上,困扰了很久,可以根据不同的网络,选择不同的源。
http://chenrongya.blog.163.com/blog/static/8747419620143185103297/
首先备份源列表:
sudo cp /etc/apt/sources.list /etc/apt/sources.list_backup
而后用gedit打开:
sudo gedit /etc/apt/sources.list
从下面列表中选择合适的源,替换掉文件中所有的内容,保存编辑好的文件,这里我选择的是厦大的资源:
厦门大学更新服务器,由厦门大学信息与网络中心维护,包含其他开源镜像:
( IPv4/v6 Both )

deb http://mirrors.xmu.edu.cn/ubuntu/archive/ trusty main restricted universe multiverse

deb http://mirrors.xmu.edu.cn/ubuntu/archive/ trusty-backports restricted universe multiverse

deb http://mirrors.xmu.edu.cn/ubuntu/archive/ trusty-proposed main restricted universe multiverse

deb http://mirrors.xmu.edu.cn/ubuntu/archive/ trusty-security main restricted universe multiverse

deb http://mirrors.xmu.edu.cn/ubuntu/archive/ trusty-updates main restricted universe multiverse

deb-src http://mirrors.xmu.edu.cn/ubuntu/archive/ trusty main restricted universe multiverse

deb-src http://mirrors.xmu.edu.cn/ubuntu/archive/ trusty-backports main restricted universe multiverse

deb-src http://mirrors.xmu.edu.cn/ubuntu/archive/ trusty-proposed main restricted universe multiverse

deb-src http://mirrors.xmu.edu.cn/ubuntu/archive/ trusty-security main restricted universe multiverse

deb-src http://mirrors.xmu.edu.cn/ubuntu/archive/ trusty-updates main restricted universe multiverse
然后,刷新列表:
sudo apt-get update
注意:一定要执行刷新
1.NVIDIA显示卡驱动安装
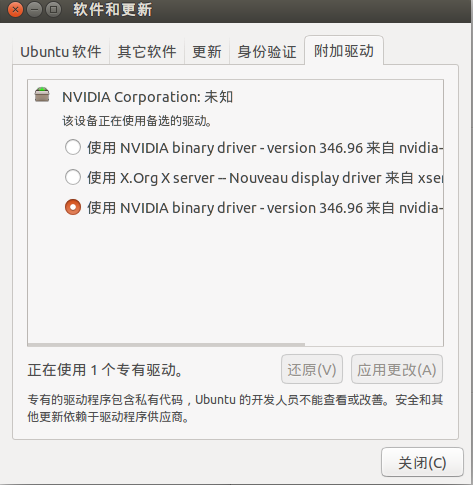
网上有很多NVIDIA驱动安装的方法,这里我推荐一种简单的方法。由于ubuntu14.04自带更新功能,我们只需打开<系统设置>-<软件和更新>-<附加驱动>,然后在对应的列表中选择你所需要的NVIDIA驱动,这里,我选择安装的是346.96版本,直接点击应用更改,等待安装完成。
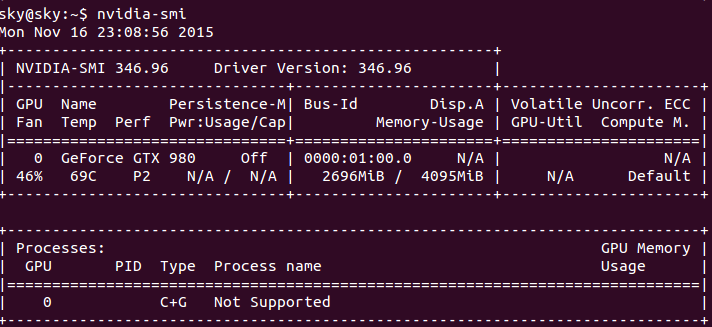
验证是否安装成功,输入命令:nvidia-smi
如果有出现显卡信息,说明安装成功,重启电脑。
以下是我输入后得到的信息:
2.Cuda 7.0安装
2.1. 安装build-essentials
安装开发所需要的一些基本包和依赖包sudo apt-get install build-essential sudo apt-get install freeglut3-dev build-essential libx11-dev libxmu-dev libxi-dev libglu1-mesa-dev
2.2.下载CUDA 7.0.
首先进入 https://developer.nvidia.com/cuda-toolkit-70,选择Ubuntu14.04的cuda_7.0.28_linux.run文件.通过下列命令安装CUDA7.0, 按照说明一步一步安装(记住不要选择安装显卡驱动):
sudo sh cuda_7.0.28_linux.run
2.3 添加环境变量
安装完成后需要在/etc/profile中添加环境变量,sudo gedit /etc/profile
在文件最后添加:
PATH=/usr/local/cuda-7.0/bin:$PATH
export PATH
保存后, 执行下列命令, 使环境变量立即生效
source /etc/profile
2.4 添加Lib库路径
在 /etc/ld.so.conf.d/加入文件 cuda.conf,cd /etc/ld.so.conf.d/ sudo gedit cuda.conf
加入以下内容:
/usr/local/cuda-7.0/lib64
保存后,执行下列命令使之立刻生效
sudo ldconfig
nvcc -V2.5 编译Sample
完成后编译Sample文件, 整个过程大概10分钟左右cd /usr/local/cuda-7.0/samples sudo make
全部编译完成后, 进入 samples/bin/x86_64/linux/release, sudo下运行deviceQuerysudo ./deviceQuery
如果出现下列显卡信息, 则驱动及显卡安装成功:./deviceQuery Starting... CUDA Device Query (Runtime API) version (CUDART static linking) Detected 1 CUDA Capable device(s) Device 0: "GeForce GTX 980" CUDA Driver Version / Runtime Version 7.0 / 7.0 CUDA Capability Major/Minor version number: 5.2 Total amount of global memory: 4095 MBytes (4294246400 bytes) (16) Multiprocessors, (128) CUDA Cores/MP: 2048 CUDA Cores GPU Max Clock rate: 1278 MHz (1.28 GHz) Memory Clock rate: 3505 Mhz Memory Bus Width: 256-bit L2 Cache Size: 2097152 bytes Maximum Texture Dimension Size (x,y,z) 1D=(65536), 2D=(65536, 65536), 3D=(4096, 4096, 4096) Maximum Layered 1D Texture Size, (num) layers 1D=(16384), 2048 layers Maximum Layered 2D Texture Size, (num) layers 2D=(16384, 16384), 2048 layers Total amount of constant memory: 65536 bytes Total amount of shared memory per block: 49152 bytes Total number of registers available per block: 65536 Warp size: 32 Maximum number of threads per multiprocessor: 2048 Maximum number of threads per block: 1024 Max dimension size of a thread block (x,y,z): (1024, 1024, 64) Max dimension size of a grid size (x,y,z): (2147483647, 65535, 65535) Maximum memory pitch: 2147483647 bytes Texture alignment: 512 bytes Concurrent copy and kernel execution: Yes with 2 copy engine(s) Run time limit on kernels: Yes Integrated GPU sharing Host Memory: No Support host page-locked memory mapping: Yes Alignment requirement for Surfaces: Yes Device has ECC support: Disabled Device supports Unified Addressing (UVA): Yes Device PCI Domain ID / Bus ID / location ID: 0 / 1 / 0 Compute Mode: < Default (multiple host threads can use ::cudaSetDevice() with device simultaneously) > deviceQuery, CUDA Driver = CUDART, CUDA Driver Version = 7.0, CUDA Runtime Version = 7.0, NumDevs = 1, Device0 = GeForce GTX 980 Result = PASS3.安装Opencv2.4.10
这个尽量不要手动安装, Github上有人已经写好了完整的安装脚本:https://github.com/jayrambhia/Install-OpenCV
下载该脚本,进入Ubuntu/2.4 目录, 给所有shell脚本加上可执行权限sudo chmod +x *.sh
然后安装最新版本 (当前为2.4.910)sudo sh ./opencv2_4_10.sh
脚本会自动安装依赖项,下载安装包,编译并安装OpenCV。整个过程大概半小时左右。测试opencv
www.tuicool.com/articles/nYJrYra4.安装Cudnn
为了加速Caffe,可以安装cuDNN。
首先在CUDNN官网下载 https://developer.nvidia.com/cuDNN,
解压并将头文件和lib文件复制到对应的cuda文件夹下tar -xzvf cudnn-7.0-linux-x64-v3.0-prod.tgz cd cudnn-7.0-linux-x64-v3.0-prod sudo cp lib* /usr/local/cuda/lib64/ sudo cp cudnn.h /usr/local/cuda/include/
这时还是不能使用lib文件,因为没有加入.o文件之间的软链接
我们先看一下cudnn/lib64下软链接的情况cd lib64 ls -al
可以看到以下两个软链接lrwxrwxrwx 1 sky sky 15 11月 12 21:28 libcudnn.so -> libcudnn.so.7.0 lrwxrwxrwx 1 sky sky 18 11月 12 21:28 libcudnn.so.7.0 -> libcudnn.so.7.0.64
而lib文件夹是在系统路径里的,用ls -al发现是文件权限的问题,因此用下述命令先删除软连接
cd /usr/local/cuda/lib64/
sudo rm -rf libcudnn.so libcudnn.so.6.5
因此我们需要在cuda/lib64/文件下,加入这三个文件之间的软链接关系cd cuda/lib64/ sudo ln -s libcudnn.so.7.0.64 libcudnn.so.7.0 sudo ln -s libcudnn.so.7.0 libcudnn.so
然后,更新库路径sudo ldconfig5.PNG++安装
我们首先安装libpng和zlib5.1安装libpng和zlib
由于PNG++是基于libpng-1.2.x的版本,所以这里我们下载1.2.53版本
下载地址:
http://sourceforge.net/projects/libpng/files/libpng12/1.2.53/libpng-1.2.53.tar.xz/download
解压后进入文件夹,编译./configure make check sudo make install make check sudo ldconfig5.2安装png++
首先,下载png++0.2.5版本
http://download.savannah.gnu.org/releases/pngpp/
解压后进入文件夹Issue make to test how it's doing: $ make This will compile examples in the example directory. If everything goes well, try $ make test (or make check which is the same as above) to run the test suite. If tests do not produce error messages then probably all is OK. Now you can create documentation (optional). Use $ make docs to run doxygen in the sources directory. Now it is time to become root and install png++ into your system. It's OK to issue make install under ordinary user permissions if you want to install png++ into your home directory. Run the following command: $ make install PREFIX=$HOME to copy png++ header files to ~/include/png++ and documentation files to ~/share/doc/png++-0.2.x. Without a PREFIX png++ installs to /usr/local.
随后可以根据http://www.nongnu.org/pngpp/doc/0.2.5/
测试是否安装成功:#include <png++/png.hpp> //... int main() { png::image< png::rgb_pixel > image(128, 128); for (png::uint_32 y = 0; y < image.get_height(); ++y) { for (png::uint_32 x = 0; x < image.get_width(); ++x) { image[y][x] = png::rgb_pixel(x, y, x + y); // non-checking equivalent of image.set_pixel(x, y, ...); } } image.write("rgb.png"); return 0; } Use the following command to compile your program: $ g++ -c example.cpp `libpng-config --cflags` and the following to link it: $ g++ -o example example.o `libpng-config --ldflags`
运行 example文件./example
如果能够生成一张图片,说明png++安装成功6.Torch7安装
安装Torch7比较简单,按照http://torch.ch/docs/getting-started.html 上的步骤安装即可。curl -s https://raw.githubusercontent.com/torch/ezinstall/master/install-deps | bash git clone https://github.com/torch/distro.git ~/torch --recursive cd ~/torch; ./install.sh source ~/.bashrc
输入th,如果出现下面字样,说明安装成功______ __ | Torch7 /_ __/__ ________/ / | Scientific computing for Lua. / / / _ \/ __/ __/ _ \ | /_/ \___/_/ \__/_//_/ | h 9ded ttps://github.com/torch | http://torch.ch
顺便测试下cudnn等有没有安装成功th>require‘cudnn’
如果出现‘true’说明cudnn等在torch7上安装成功。一些问题
其中有一个让我很不解的问题,就是每次在重启电脑后,都需要运行
sudo ./deviceQuery
才能够使用‘cudnn’等基于cuda的torch函数包。参考资料
[1]Caffe + Ubuntu 14.04 64bit + CUDA 6.5 配置说明http://www.cnblogs.com/platero/p/3993877.html
[2]cudnn安装http://www.linuxidc.com/Linux/2015-04/116445.htm
[3]cudnn安装http://www.cc.gatech.edu/~zk15/deep_learning/CUDAInstallationInstructions.txt
[4]Ubuntu14.04 LTS更新源 http://chenrongya.blog.163.com/blog/static/8747419620143185103297/
[5]libpng的安装和编译http://blog.csdn.net/kangear/article/details/38873179
[6]Torch7 http://torch.ch/docs/getting-started.html

相关文章推荐
- Ubuntu 默认壁纸历代记
- Ubuntu Remix Cinnamon 20.04 评测:Ubuntu 与 Cinnamon 的完美融合
- 关于Ubuntu 11.10启动提示waiting for the network configuration的问题
- 在 Ubuntu 桌面中使用文件和文件夹
- ubuntu下chrome无法同步问题解决
- Ubuntu Linux使用体验
- 使用 GNOME 优化工具自定义 Linux 桌面的 10 种方法
- 以Ubuntu 9.04为例 将工作环境迁移到 Linux
- VirtualBox虚拟机XP与宿主机Ubuntu互访共享文件夹
- 从USB安装Ubuntu Server 10.04.3 图文详解
- Ubuntu 15.04 正式版发布下载
- Linux-Ubuntu 10.04安装Cadence-ic610 方法总结图解
- Ubuntu 12.04和Windows 7双系统安装图解
- 开机出现:grub rescue的修复方法
- Ubuntu连接Android真机调试
- 你应该选择 Ubuntu 还是 Fedora?
- 100 个最佳 Ubuntu 应用(中)
- 看看我的Ubuntu Linux截图
- Ubuntu 12.04 LTS服务器版安装过程及使用图解
- Windows 7/8/8.1 硬盘安装 Ubuntu 14.04 实现双系统