Android读书笔记-----自定义View(2)实现
2015-11-08 21:01
706 查看
(内容来自于Android开发艺术探索以及csdn的博主Hongyang)
实现一些特定的View效果。一些不能通过组合控件实现的View.
2.继承特定的View(比如TextView)
一般是为了扩展一些现有View的功能
3.继承特定的ViewGroup(例如LinerLayout)
4.继承ViewGroup
2.如果要控件支持padding,需要再onDraw方法中对padding做处理。如果是继承ViewGroup 则需要再onLayout,onMeasure中考虑margin,和padding。
3.View的滑动冲突要考虑好
4.尽量不要在View中加入Handler
5.View中有线程或者动画需要及时停止。
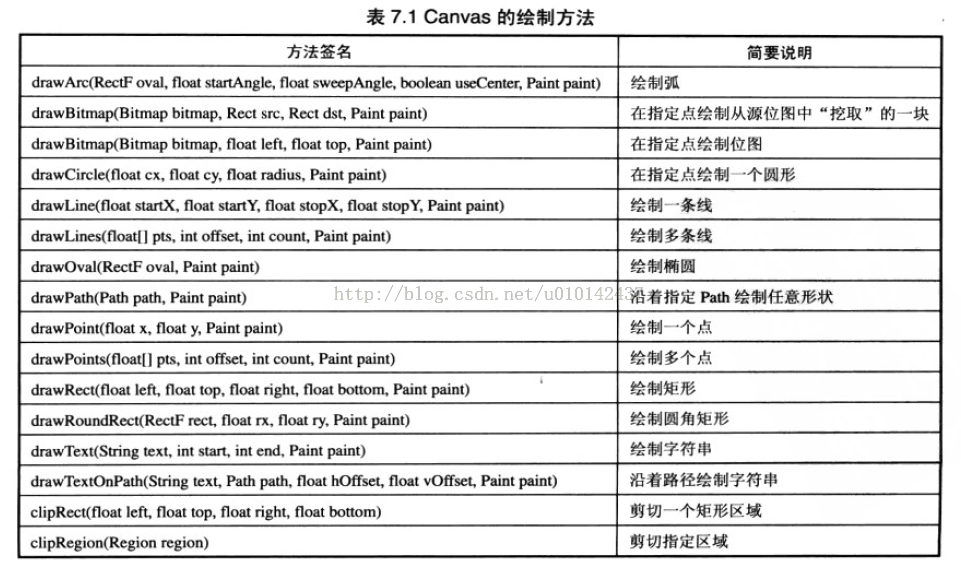
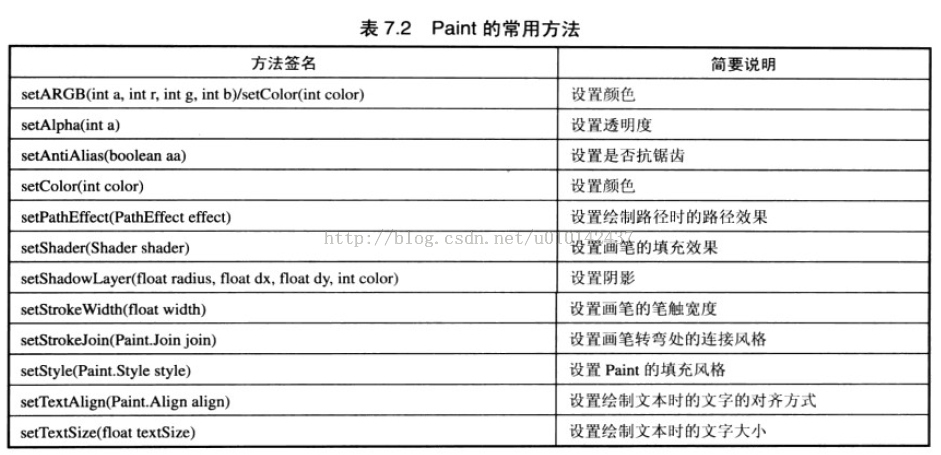
三、绘制View时常常用到的参数canvas paint
本段有内容来自于鸿洋的自定义View博客
http://blog.csdn.net/lmj623565791/article/details/24252901 如果有不知道他的一定要去看看!!!!大神!!!
1.自定义View的属性
1、自定义View的属性,首先在res/values/ 下建立一个attrs.xml ,声明我们抛给外部使用的属性。
这里的name不能随便命名,一定要和你定义的View名称相同,既View的类名。
两种写法
第二种写法 鸿洋写的 不知道为什么我这用会报错…
第二部在View的构造方法中解析属性
注意 TypedArray对象用完一定要recycle掉
一定要在其他的构造方法中,调用你的你解析参数的构造方法。
this(context, attrs, 0);
this(context,null);
2.onMeasure方法 测量自定义的控件
注意:一定要对wrap_content方法对应的AT_MOST类型做处理,否则wrap_content不生效。
setMeasuredDimension(width, height);最后写 设定View的宽高。
onDraw方法绘制控件
注意onDraw方法使用时,如果加入了padidng要考虑padding的因素
一、自定义View的分类
1.继承View重写onDraw方法实现一些特定的View效果。一些不能通过组合控件实现的View.
2.继承特定的View(比如TextView)
一般是为了扩展一些现有View的功能
3.继承特定的ViewGroup(例如LinerLayout)
4.继承ViewGroup
二、自定义View的注意点
1.如果需要控件支持wrap_content,需要用户在onMeasure方法里对自定义AT_MOST类型做处理。2.如果要控件支持padding,需要再onDraw方法中对padding做处理。如果是继承ViewGroup 则需要再onLayout,onMeasure中考虑margin,和padding。
3.View的滑动冲突要考虑好
4.尽量不要在View中加入Handler
5.View中有线程或者动画需要及时停止。
三、绘制View时常常用到的参数canvas paint
本段有内容来自于鸿洋的自定义View博客http://blog.csdn.net/lmj623565791/article/details/24252901 如果有不知道他的一定要去看看!!!!大神!!!
自定义View的方法
步骤是:自定义View属性,解析属性,测量控件,绘制控件1.自定义View的属性
1、自定义View的属性,首先在res/values/ 下建立一个attrs.xml ,声明我们抛给外部使用的属性。
这里的name不能随便命名,一定要和你定义的View名称相同,既View的类名。
两种写法
<resources>
<declare-styleable name="CustomerTextView">     <attr name="textsize" format="dimension"></attr>  <attr name="text" format="string"></attr>
attr name="textColor" format="color"></attr>
</declare-styleable>
</resources>
第二种写法 鸿洋写的 不知道为什么我这用会报错…
<?xml version="1.0" encoding="utf-8"?>
<resources>
<attr name="titleText" format="string" />
<attr name="titleTextColor" format="color" />  <attr name="titleTextSize" format="dimension" />
//引用属性
<declare-styleable name="CustomTitleView">
<attr name="titleText" />
<attr name="titleTextColor" />
<attr name="titleTextSize" />
</declare-styleable>
</resources>
第二部在View的构造方法中解析属性
注意 TypedArray对象用完一定要recycle掉
一定要在其他的构造方法中,调用你的你解析参数的构造方法。
this(context, attrs, 0);
this(context,null);
public CustomerView(Context context, AttributeSet attrs, int defStyleAttr) {
super(context, attrs, defStyleAttr);
//解析自定义的属性
TypedArray a = context.getTheme().obtainStyledAttributes(attrs, R.styleable.CustomTitleView, defStyle, 0);
int count_view = a.getIndexCount();
for (int i = 0; i < count_view; i++) {
//循环得到每一次的属性 attr=R.styleable.CustomerTextView_。。。。。
int attr = a.getIndex(i);
switch (attr) {
case R.styleable.CustomerTextView_text:
textTitle = a.getString(attr);
break;
caseR.styleable.CustomerTextView_textColor:
textColor = a.getInt(attr, Color.BLACK);
break;

case R.styleable.CustomerTextView_textsize:
//设置字体的大小
textSize =a.getDimensionPixelSize(attr,
(int)TypedValue.applyDimension(TypedValue.COMPLEX_UNIT_SP, 16, getResources().getDisplayMetrics()));
break;
}
//用完之后一定要循环
a.recycle();
2.onMeasure方法 测量自定义的控件
注意:一定要对wrap_content方法对应的AT_MOST类型做处理,否则wrap_content不生效。
setMeasuredDimension(width, height);最后写 设定View的宽高。
@Override
protected void onMeasure(int widthMeasureSpec, int heightMeasureSpec) {
super.onMeasure(widthMeasureSpec, heightMeasureSpec);
//得到外部设置的长宽的 类型 大小
// EXACTLY:一般是设置了明确的值或者是MATCH_PARENT,AT_MOST:表示子布局限制在一个最大值内,一般为WARP_CONTENT
// UNSPECIFIED:表示子布局想要多大就多大,很少使用
int heightModel = MeasureSpec.getMode(heightMeasureSpec);
int heightSize = MeasureSpec.getSize(heightMeasureSpec);
int widthModel = MeasureSpec.getMode(widthMeasureSpec);
int widthSize = MeasureSpec.getSize(widthMeasureSpec);
int width;
int height;
//如果外部设定了精确的值,那么就用精确的值
if (heightModel == MeasureSpec.EXACTLY) {
height = heightSize;
} else {
paint.setTextSize(textSize);
//将字写到rect上
paint.getTextBounds(textTitle, 0, textTitle.length(), rect);
float textheight = rect.height();
height = (int) (getPaddingTop() + textheight + getPaddingBottom());
}
if (widthModel == MeasureSpec.EXACTLY) {
width = widthSize;
} else {

paint.setTextSize(textSize);
paint.getTextBounds(textTitle, 0, textTitle.length(), rect);
float textwidth = rect.width();
width = (int) (textwidth + getPaddingLeft() + getPaddingRight());
}

//设置计算出的值
setMeasuredDimension(width, height);
}
onDraw方法绘制控件
注意onDraw方法使用时,如果加入了padidng要考虑padding的因素
protected void onDraw(Canvas canvas)
{
paint.setColor(Color.YELLOW);
canvas.drawRect(0, 0, getMeasuredWidth(), getMeasuredHeight(), paint);

paint.setColor(textColor);
canvas.drawText(textTitle, getWidth() / 2 - rect.width() / 2, getHeight() / 2 + rect.height() / 2, paint);
}

相关文章推荐
- 只需十分钟,结果大不同 |《深度思考》
- 《洋葱阅读法》读书笔记
- Jquery实战_读书笔记1―选择jQuery
- JavaScript 精粹读书笔记(1,2)
- JavaScript 权威指南(第四版) 读书笔记
- Terry七月Ruby读书笔记(比较详细)第1/4页
- 从「林」开始--C++ primer 读书笔记 -- Part II: Containers ...
- [读书笔记]Scrum 总结
- 《穷爸爸,富爸爸》读书笔记
- 《程序员的职业素养》读书笔记
- sniff读书笔记
- 《Zabbix监控系统深度实践》读书笔记
- 《DevOps故障排除:Linux服务器运维最佳实践》读书笔记
- 重学JS 1
- 《javascript高级程序设计》读书笔记——引用类型之Object类型(细节整理)
- 《HTML重构》读书笔记&思维导图
- 数据挖掘入门笔记(一)--认识数据
- 读书笔记 Visual C++ 编程之道
- 《算法竞赛入门经典》读书笔记(第一章)
- C# 读书笔记