Android自定义View(3)
2015-11-04 17:02
459 查看
定义组合控件
目标:实现textview和ImageButton组合,可以通过Xml设置自定义控件的属性。
通过代码或者通过xml设置自定义控件的属性
1.控件布局:以Linearlayout为根布局,一个TextView,一个ImageButton。
Xml代码
[html]
view plaincopy
< ?xml version="1.0" encoding="utf-8"?>
< LinearLayout xmlns:Android="http://schemas.android.com/apk/res/android"
android:layout_width="fill_parent" android:layout_height="fill_parent"
android:gravity="center_vertical">
< TextView android:layout_height="wrap_content" android:id="@+id/text1"
android:layout_width="wrap_content">< /TextView>
< ImageButton android:layout_width="wrap_content"
android:layout_height="wrap_content" android:id="@+id/btn1">< /ImageButton>
< /LinearLayout>
2.自定义控件代码,从LinearLayout继承:
Java代码
[java]
view plaincopy
public class ImageBtnWithText extends LinearLayout {
}
public ImageBtnWithText(Context context) {
this(context, null);
}
public ImageBtnWithText(Context context, AttributeSet attrs) {
super(context, attrs);
//在构造函数中将Xml中定义的布局解析出来。
LayoutInflater.from(context).inflate(R.layout.imagebtn_with_text, this, true);
}
}
3.在主界面布局xml中使用自定义控件:
Xml代码
[html]
view plaincopy
< com.demo.widget2.ImageBtnWithText
android:id="@+id/widget"
android:layout_width="fill_parent"
android:layout_height="fill_parent" />
即使用完整的自定义控件类路径:com.demo.widget2.ImageBtnWithText定义一个元素。
运行可以看到控件已经能够被加载到界面上。
4.给按钮设置图片和文本
如果图片是固定不变的,那么直接在控件布局中设置ImageButton的src属性即可。
4.1通过Java代码设置,在控件代码中提供函数接口:
Java代码
[java]
view plaincopy
public void setButtonImageResource(int resId) {
mBtn.setImageResource(resId);
}
public void setTextViewText(String text) {
mTv.setText(text);
}
然后再在主界面的onCreate()通过函数调用设置即可。
4.2通过Xml设置属性
4.2.1首先定义Xml可以设置的属性集合,在values下创建attrs.xml,文件名可随意,一般都叫attrs.xml
Xml代码
[html]
view plaincopy
< ?xml version="1.0" encoding="utf-8"?>
< resources>
< declare-styleable name="ImageBtnWithText">
< attr name="android:text"/>
< attr name="android:src"/>
< /declare-styleable>
< /resources>
属性集合名字:ImageBtnWithText,自己可根据实际来定义;
集合中包含的属性列表,每行一个属性。
4.2.2修改自定义控件实现代码,以获取xml中定义的属性
Java代码
[java]
view plaincopy
TypedArray a = context.obtainStyledAttributes(attrs, R.styleable.ImageBtnWithText);
CharSequence text = a.getText(R.styleable.ImageBtnWithText_android_text);
if(text != null) mTv.setText(text);
Drawable drawable = a.getDrawable(R.styleable.ImageBtnWithText_android_src);
if(drawable != null) mBtn.setImageDrawable(drawable);
a.recycle();
首先通过context.obtainStyledAttributes获得所有属性数组;
然后通过TypedArray类的getXXXX()系列接口获得相应的值。
4.2.3在主界面布局中设置自定义控件的属
android:text="ABC" android:src="@drawable/icon
4.3自定义名称属性:
在4.2中使用的属性名是Android系统命名空间的,都以android开头,比如android:text等。
实际开发中会自定义一些属性名,这些属性名仍然定义在4.2.1提到的attrs.xml中:
4.3.1定义属性名
Xml代码
[html]
view plaincopy
< attr name="appendText" format="string"/>
和直接使用系统的attr不同的是要增加一个format属性,说明此属性是什么格式的。format可选项可参见注1
4.3.2使用自定义属性
Xml代码
[html]
view plaincopy
< ?xml version="1.0" encoding="utf-8"?>
< LinearLayout xmlns:android="http://schemas.android.com/apk/res/android"
xmlns:myspace="http://schemas.android.com/apk/res/com.demo.customwidget"
android:orientation="vertical" android:layout_width="fill_parent"
android:layout_height="fill_parent">
< com.demo.widget2.ImageBtnWithText
android:text="ABC" android:src="@drawable/icon" android:id="@+id/widget"
android:layout_width="fill_parent" android:layout_gravity="center"
android:layout_height="fill_parent" myspace:appendText="123456">
< /com.demo.widget2.ImageBtnWithText>
< /LinearLayout>
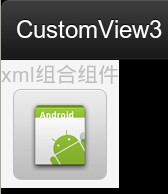
效果图
目标:实现textview和ImageButton组合,可以通过Xml设置自定义控件的属性。
通过代码或者通过xml设置自定义控件的属性
1.控件布局:以Linearlayout为根布局,一个TextView,一个ImageButton。
Xml代码
[html]
view plaincopy
< ?xml version="1.0" encoding="utf-8"?>
< LinearLayout xmlns:Android="http://schemas.android.com/apk/res/android"
android:layout_width="fill_parent" android:layout_height="fill_parent"
android:gravity="center_vertical">
< TextView android:layout_height="wrap_content" android:id="@+id/text1"
android:layout_width="wrap_content">< /TextView>
< ImageButton android:layout_width="wrap_content"
android:layout_height="wrap_content" android:id="@+id/btn1">< /ImageButton>
< /LinearLayout>
2.自定义控件代码,从LinearLayout继承:
Java代码
[java]
view plaincopy
public class ImageBtnWithText extends LinearLayout {
}
public ImageBtnWithText(Context context) {
this(context, null);
}
public ImageBtnWithText(Context context, AttributeSet attrs) {
super(context, attrs);
//在构造函数中将Xml中定义的布局解析出来。
LayoutInflater.from(context).inflate(R.layout.imagebtn_with_text, this, true);
}
}
3.在主界面布局xml中使用自定义控件:
Xml代码
[html]
view plaincopy
< com.demo.widget2.ImageBtnWithText
android:id="@+id/widget"
android:layout_width="fill_parent"
android:layout_height="fill_parent" />
即使用完整的自定义控件类路径:com.demo.widget2.ImageBtnWithText定义一个元素。
运行可以看到控件已经能够被加载到界面上。
4.给按钮设置图片和文本
如果图片是固定不变的,那么直接在控件布局中设置ImageButton的src属性即可。
4.1通过Java代码设置,在控件代码中提供函数接口:
Java代码
[java]
view plaincopy
public void setButtonImageResource(int resId) {
mBtn.setImageResource(resId);
}
public void setTextViewText(String text) {
mTv.setText(text);
}
然后再在主界面的onCreate()通过函数调用设置即可。
4.2通过Xml设置属性
4.2.1首先定义Xml可以设置的属性集合,在values下创建attrs.xml,文件名可随意,一般都叫attrs.xml
Xml代码
[html]
view plaincopy
< ?xml version="1.0" encoding="utf-8"?>
< resources>
< declare-styleable name="ImageBtnWithText">
< attr name="android:text"/>
< attr name="android:src"/>
< /declare-styleable>
< /resources>
属性集合名字:ImageBtnWithText,自己可根据实际来定义;
集合中包含的属性列表,每行一个属性。
4.2.2修改自定义控件实现代码,以获取xml中定义的属性
Java代码
[java]
view plaincopy
TypedArray a = context.obtainStyledAttributes(attrs, R.styleable.ImageBtnWithText);
CharSequence text = a.getText(R.styleable.ImageBtnWithText_android_text);
if(text != null) mTv.setText(text);
Drawable drawable = a.getDrawable(R.styleable.ImageBtnWithText_android_src);
if(drawable != null) mBtn.setImageDrawable(drawable);
a.recycle();
首先通过context.obtainStyledAttributes获得所有属性数组;
然后通过TypedArray类的getXXXX()系列接口获得相应的值。
4.2.3在主界面布局中设置自定义控件的属
android:text="ABC" android:src="@drawable/icon
4.3自定义名称属性:
在4.2中使用的属性名是Android系统命名空间的,都以android开头,比如android:text等。
实际开发中会自定义一些属性名,这些属性名仍然定义在4.2.1提到的attrs.xml中:
4.3.1定义属性名
Xml代码
[html]
view plaincopy
< attr name="appendText" format="string"/>
和直接使用系统的attr不同的是要增加一个format属性,说明此属性是什么格式的。format可选项可参见注1
4.3.2使用自定义属性
Xml代码
[html]
view plaincopy
< ?xml version="1.0" encoding="utf-8"?>
< LinearLayout xmlns:android="http://schemas.android.com/apk/res/android"
xmlns:myspace="http://schemas.android.com/apk/res/com.demo.customwidget"
android:orientation="vertical" android:layout_width="fill_parent"
android:layout_height="fill_parent">
< com.demo.widget2.ImageBtnWithText
android:text="ABC" android:src="@drawable/icon" android:id="@+id/widget"
android:layout_width="fill_parent" android:layout_gravity="center"
android:layout_height="fill_parent" myspace:appendText="123456">
< /com.demo.widget2.ImageBtnWithText>
< /LinearLayout>
效果图

相关文章推荐
- Android4.4编译错误(ubuntu 12.04 64位)lzop: not found
- Android 适配魅族去掉smartbar
- Android自定义view(2)
- 【FastDev4Android框架开发】消息总线EventBus源码分析以及与Otto框架对比(二十一)
- Android自定义View(1)
- android学习笔记1——Activity
- Android QQ登陆
- Android系统AlertDialog使用
- Android 待机功能流程分析
- 【学习之道】 Android学习资源整理
- Android内存泄露的原因
- 源码分享
- Android开发遇到的坑(1):Java中List的安全删除问题
- Android M 新的运行时权限开发者需要知道的一切
- 关于Android项目的目录结构说明
- android点击和滑动事件的处理
- Android 手势&触摸事件
- Android开发遇到的坑(1):Java中List的安全删除问题
- Android系列教程之GridView组件的使用
- Android唯一识别号(设备指纹)的生成