如何在Eclipse中开发并调试自己的插件(或者说如何将自己的代码插件化)
2015-10-27 09:38
756 查看
Setting up Eclipse to create and debug plugins for ImageJ
最近在做一个关于卫星遥感全链路仿真的项目,由于项目是基于ImageJ开发,而ImageJ提供了强大的插件机制,所以特来写一个东西说明如何将自己的代码转化为ImageJ的插件。
Alt-File –> New
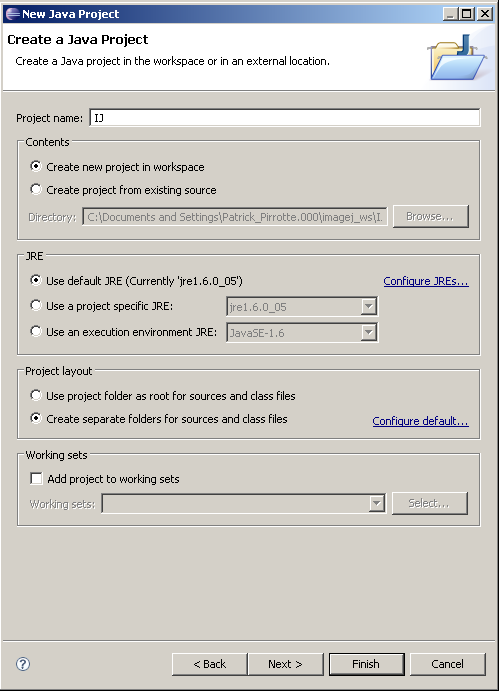
Select the Java Project wizard and click Next

Project name: IJ. Check Create separate folders for sources and class files. Click Next

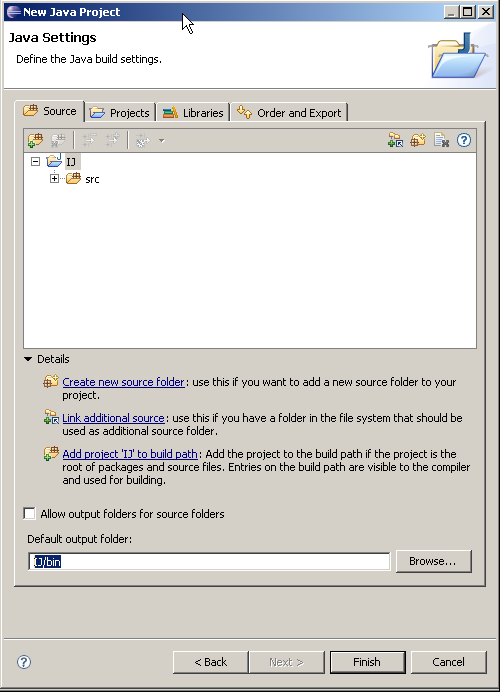
On the following panel, select Source tab and check if Default output folder is set to IJ/bin

On the Libraries tab click on Add external JARs, browse to your Java SDK library folder , select tools.jar, click Ok and click on Finish to create the project.
(on my computer the Java SDK library folder is located at C:\Program Files\Java\jdk1.6.0_02\lib)

Finally, get the latest copy of ij here, extract the zip
Copy the ij folder and its subfolders into the source folder
Copy the images, macros and plugins folder and only IJ_Props.txt to the IJ project root.
Click on F5 to tell Eclipse to refresh its Package list

Create a new plugin (or import your previously developed plugins).
Alt-File –> New
Select the Java Project wizard and click Next

Give your plugin a name (don't forget to add an underscore if you want it to appear in the ImageJ menu!)

On the Source tab, check that the output folder is set TestPlugin_/bin

On the Project tab, click Add… and select your previously created IJ project containing the ImageJ source.
Click Finish

Create your Java plugin files. In our example, I created a sample TESTPlugin_.java with the following content:
import ij.IJ;
import ij.plugin.PlugIn;
public class TestPlugin_ implements PlugIn {
public void run(String arg) {
IJ.error("Hello world!");
}
}

Create a file called build.xml in the project root folder. A sample build.xml file follows, which you should adapt to your needs.
<project name="TESTPlugin_" default="" basedir=".">
<description>
TESTPlugin_ build file
</description>
<property name="src" location="src" />
<property name="build" location="bin" />
<property name="dist" location="dist" />
<property name="pluginsDir" location="$basedir/../../IJ/plugins/" />
<property name="user.name" value="Patrick Pirrotte" />
<target name="main" depends="compress" description="Main target">
<echo>
Building the .jar file.
</echo>
</target>
<target name="compress" depends="" description="generate the distribution">
<jar jarfile="TESTPlugin_.jar">
<fileset dir="." includes="plugins.config" />
<fileset dir="${build}" includes="**/*.*" />
<manifest>
<attribute name="Built-By" value="${user.name}"/>
</manifest>
</jar>
<copy file="TESTPlugin_.jar" toDir="${pluginsDir}" />
</target>
</project>

In the Package Explorer, right click on the TESTPlugin_ project, click on Properties, select Builders, click New… and select Ant Builder

In the Main Tab, click Browse workspace and select the build.xml from your TESTPlugin_ project.

In the Targets tab, click Set Targets for both After clean and Auto build targets, and select both main and compress.
Click Ok twice to keep your changes.

Goto Run→ Debug Configurations and create a new Java Application Debug Configuration. Fill in IJ In the field Project, and ij.ImageJ in the field Main class.

Select the Source tab, then in the Source lookup path, Add→Add Java Project. Select the TestPlugin_ project. This step is crucial if you want to step into your plugin source during the debug phase. Apply the changes.

If you select Debug, ImageJ will start and your TESTPlugin_ will show up in the Plugins menu…
Set breakpoints in plugins or in the ImageJ source, the debugger should break accordingly.

后注:当然上文只是其中一种方法,也还有其他方法可以实现!!!
最近在做一个关于卫星遥感全链路仿真的项目,由于项目是基于ImageJ开发,而ImageJ提供了强大的插件机制,所以特来写一个东西说明如何将自己的代码转化为ImageJ的插件。
Alt-File –> New
Select the Java Project wizard and click Next

Project name: IJ. Check Create separate folders for sources and class files. Click Next

On the following panel, select Source tab and check if Default output folder is set to IJ/bin

On the Libraries tab click on Add external JARs, browse to your Java SDK library folder , select tools.jar, click Ok and click on Finish to create the project.
(on my computer the Java SDK library folder is located at C:\Program Files\Java\jdk1.6.0_02\lib)

Finally, get the latest copy of ij here, extract the zip
Copy the ij folder and its subfolders into the source folder
Copy the images, macros and plugins folder and only IJ_Props.txt to the IJ project root.
Click on F5 to tell Eclipse to refresh its Package list

Create a new plugin (or import your previously developed plugins).
Alt-File –> New
Select the Java Project wizard and click Next

Give your plugin a name (don't forget to add an underscore if you want it to appear in the ImageJ menu!)

On the Source tab, check that the output folder is set TestPlugin_/bin

On the Project tab, click Add… and select your previously created IJ project containing the ImageJ source.
Click Finish

Create your Java plugin files. In our example, I created a sample TESTPlugin_.java with the following content:
import ij.IJ;
import ij.plugin.PlugIn;
public class TestPlugin_ implements PlugIn {
public void run(String arg) {
IJ.error("Hello world!");
}
}

Create a file called build.xml in the project root folder. A sample build.xml file follows, which you should adapt to your needs.
<project name="TESTPlugin_" default="" basedir=".">
<description>
TESTPlugin_ build file
</description>
<property name="src" location="src" />
<property name="build" location="bin" />
<property name="dist" location="dist" />
<property name="pluginsDir" location="$basedir/../../IJ/plugins/" />
<property name="user.name" value="Patrick Pirrotte" />
<target name="main" depends="compress" description="Main target">
<echo>
Building the .jar file.
</echo>
</target>
<target name="compress" depends="" description="generate the distribution">
<jar jarfile="TESTPlugin_.jar">
<fileset dir="." includes="plugins.config" />
<fileset dir="${build}" includes="**/*.*" />
<manifest>
<attribute name="Built-By" value="${user.name}"/>
</manifest>
</jar>
<copy file="TESTPlugin_.jar" toDir="${pluginsDir}" />
</target>
</project>

In the Package Explorer, right click on the TESTPlugin_ project, click on Properties, select Builders, click New… and select Ant Builder

In the Main Tab, click Browse workspace and select the build.xml from your TESTPlugin_ project.

In the Targets tab, click Set Targets for both After clean and Auto build targets, and select both main and compress.
Click Ok twice to keep your changes.

Goto Run→ Debug Configurations and create a new Java Application Debug Configuration. Fill in IJ In the field Project, and ij.ImageJ in the field Main class.

Select the Source tab, then in the Source lookup path, Add→Add Java Project. Select the TestPlugin_ project. This step is crucial if you want to step into your plugin source during the debug phase. Apply the changes.

If you select Debug, ImageJ will start and your TESTPlugin_ will show up in the Plugins menu…
Set breakpoints in plugins or in the ImageJ source, the debugger should break accordingly.

后注:当然上文只是其中一种方法,也还有其他方法可以实现!!!
相关文章推荐
- 判断两个时间段,是否交集 java
- Java线程池 ExecutorService
- Java SSH 资料总结
- java三种循环的流程图画法总结(for,while,do-while循环)
- 【SDOI2013】【BZOJ3198】spring
- xampp结合chrome和eclipse调试php的配置步骤
- Spring 注解 hibernate 实体方法 <property name="packagesToScan" value="com.sise.domain"/>
- spring&dom4j
- java 类的实例化
- java 理解CAS
- java字节码(.class)文件深度解析
- java 算法实现字符串的匹配
- 第16章 Java内存模型
- 改善Java文档的理由、建议和技巧
- Java编程中的equals方法使用全解
- java IO流的分类和操作
- Java 多线程----synchronized关键字详解
- java对象引用-要掌握的细节2
- eclipse中安装svn插件实现版本控制
- Java常量池解析与字符串intern简介
