【iOS】【实例】自定义一个简单的TabBar
2015-10-22 12:46
771 查看
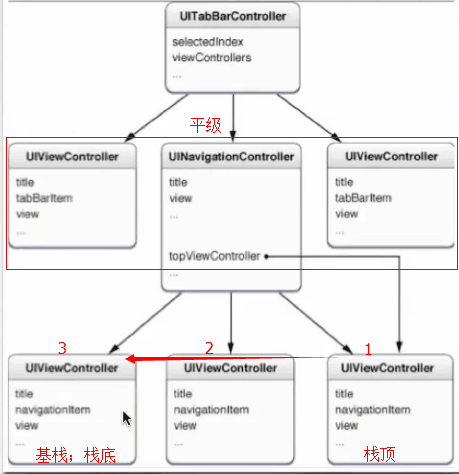
设置模块的时候,我们往往在UITabBarController下添加UINavigationController、UIViewController,其中UINavigationController又按栈排列UIViewController,举栗如图:
原图来源于网络,侵删。
UITabBarController的子视图是平级的,想点那个点那个,妈妈再也不用担心我的%#@¥。
UINavigationController的子视图是按栈排序的,遵循先进后出(LIFO—Last In First Out) ,简单说就是先进入的界面总是最后出来,类似于物流装箱,只在一端装入和搬出,先装的放里面,最后才搬出来。
一、创建若干个子视图、根视图

一般子视图五个即可,多余五个,ios会把4个以后的自动收起来,然后最后的那个按钮设置成“更多”,放在里面。
二、实例化视图控制器
先调用loadView初始化视图和背景颜色,再设置视图的标题等(这个视图会被赋在TabBar的UIBarButton上)
其他页类似。
三、在主视图中实例化各子视图
实例化信息页代码如下
四、创建数组,已创建的子视图添加到数组中的方法
将创建的视图在viewDidLoad抽出,放到一个方法中
后两个子视图的设置是在UITabBarITem时将title和image赋上去,除非子视图少,否则不建议这样使用。
五、创建UITabBarController实例的方法
六、添加到根视图中
差不多了,改天再补充
原图来源于网络,侵删。
UITabBarController的子视图是平级的,想点那个点那个,妈妈再也不用担心我的%#@¥。
UINavigationController的子视图是按栈排序的,遵循先进后出(LIFO—Last In First Out) ,简单说就是先进入的界面总是最后出来,类似于物流装箱,只在一端装入和搬出,先装的放里面,最后才搬出来。
一、创建若干个子视图、根视图
一般子视图五个即可,多余五个,ios会把4个以后的自动收起来,然后最后的那个按钮设置成“更多”,放在里面。
二、实例化视图控制器
//
//  MessageViewController.m
//  test
//   测试自定义tabBar的信息页
//  Created by zhaotong on 15/10/20.
//  Copyright © 2015年 zhaotong. All rights reserved.
//

#import "MessageViewController.h"

@interface MessageViewController ()

@end

@implementation MessageViewController

-(id)initWithNibName:(NSString *)nibNameOrNil bundle:(NSBundle *)nibBundleOrNil
{
self=[super initWithNibName:nibNameOrNil bundle:nibBundleOrNil];
if (self) {
self.title=@"新闻";
self.view.backgroundColor=[UIColor purpleColor];
}
return self;
}

-(void)loadView
{
UIView *view=[[UIView alloc]initWithFrame:[[UIScreen mainScreen] applicationFrame]];
view.backgroundColor=[UIColor redColor];
self.view=view;
}

- (void)viewDidLoad {
[super viewDidLoad];
// Do any additional setup after loading the view.

}
先调用loadView初始化视图和背景颜色,再设置视图的标题等(这个视图会被赋在TabBar的UIBarButton上)
其他页类似。
三、在主视图中实例化各子视图
实例化信息页代码如下
<pre name="code" class="objc">#import "MainViewController.h"
#import "MessageViewController.h"

@implementation MainViewController

- (void)viewDidLoad {
[super viewDidLoad];

MessageViewController *messageVC=[[MessageViewController alloc]init];
UINavigationController *messageNav=[[UINavigationController alloc]initWithRootViewController:messageVC];
UITabBarItem *messageItem =[[UITabBarItem alloc]initWithTabBarSystemItem:UITabBarSystemItemMostViewed tag:1];
messageVC.tabBarItem=messageItem;

}
四、创建数组,已创建的子视图添加到数组中的方法
将创建的视图在viewDidLoad抽出,放到一个方法中
-(void)loadViewControllers;
{

HomeViewController *homeVC=[[HomeViewController alloc]init];
UINavigationController *homeNav=[[UINavigationController alloc]initWithRootViewController:homeVC];
UITabBarItem *homeItem =[[UITabBarItem alloc]initWithTabBarSystemItem:UITabBarSystemItemFavorites tag:0];
homeVC.tabBarItem=homeItem;

MessageViewController *messageVC=[[MessageViewController alloc]init];
UINavigationController *messageNav=[[UINavigationController alloc]initWithRootViewController:messageVC];
UITabBarItem *messageItem =[[UITabBarItem alloc]initWithTabBarSystemItem:UITabBarSystemItemMostViewed tag:1];
messageVC.tabBarItem=messageItem;

SearchViewController *searchVC=[[SearchViewController alloc]init];
UINavigationController *searchNav=[[UINavigationController alloc]initWithRootViewController:searchVC];
UITabBarItem *searchItem =[[UITabBarItem alloc]initWithTabBarSystemItem:UITabBarSystemItemSearch tag:3];
searchVC.tabBarItem=searchItem;

HistoryViewController *historyVC=[[HistoryViewController alloc]init];
UINavigationController *historyNav=[[UINavigationController alloc]initWithRootViewController:historyVC];
UITabBarItem *historyItem=[[UITabBarItem alloc]initWithTitle:@"历史" image:[UIImage imageNamed:@"8-3.png"] tag:4];
historyVC.tabBarItem=historyItem;

SettingViewController *settingVC=[[SettingViewController alloc]init];
UINavigationController *settingNav=[[UINavigationController alloc]initWithRootViewController:settingVC];
UITabBarItem *settingItem=[[UITabBarItem alloc]initWithTitle:@"设置" image:[UIImage imageNamed:@"8-3.png"] tag:5];
settingVC.tabBarItem=settingItem;

NSArray *viewControllers=[NSArray arrayWithObjects:homeNav,messageNav,searchNav,historyNav,settingNav,nil];
[self setViewControllers:viewControllers animated:YES];
}
后两个子视图的设置是在UITabBarITem时将title和image赋上去,除非子视图少,否则不建议这样使用。
五、创建UITabBarController实例的方法
-(void)loadCustomTabBar
{
/*获取屏幕大小*/
float width = [[UIScreen mainScreen] bounds].size.width;
float height = [[UIScreen mainScreen] bounds].size.height;

/**
*层次:背景(最下面)、选中图片(中间)、按钮(最上面)
*写的顺序:背景、按钮、选中图片
*/

/**1、
初始化自定义TabBar背景
*/
_tabBarBG=[[UIImageView alloc]initWithFrame:CGRectMake(0, height/9, width, 49)];
_tabBarBG.userInteractionEnabled=YES;
_tabBarBG.image=[UIImage imageNamed:@"4购物娱乐02.png"];
//    tabBarBG.backgroundColor=[UIColor blackColor];
[self.view addSubview:_tabBarBG];

/**3、
初始化自定义按钮选中背景
*/
_selectView=[[UIImageView alloc]initWithFrame:CGRectMake(7, 49.0/2-45.0/2, 53,45)];
_selectView.image=[UIImage imageNamed:@"4购物娱乐_03@2x.png"];
[_selectView.layer setCornerRadius:8.0];
[_tabBarBG addSubview:_selectView];

/**2、
*  初始化自定义TabBarItem—>UIButton
*/
float coordinateX=0;
for (int index=0; index<5;index++)
{
//初始化TabBar上按钮的大小、颜色
UIButton *button=[UIButton buttonWithType:UIButtonTypeRoundedRect];
//        [button.layer setCornerRadius:8.0];
button.tag=index;
button.frame=CGRectMake(5+coordinateX, 49.0/2-20, 60, 40);
[button setTitleColor:[UIColor whiteColor] forState:UIControlStateNormal];

//为按钮填充名字
//NSDictionary *buttonName=[NSDictionary dictionaryWithObjectsAndKeys:@"购物",@"0",@"信息",@"1",@"搜索",@"2",@"历史",@"3",@"设置",@"4", nil];
//NSString *buttonNameUsed=[NSString stringWithFormat:@"%ld",(long)button.tag];
//[button setTitle:[buttonName objectForKey:buttonNameUsed] forState:UIControlStateNormal];

//为按钮填充背景色
NSString *imageName=[NSString stringWithFormat:@"%d",index+1];
[button setBackgroundImage:[UIImage imageNamed:imageName] forState:UIControlStateNormal];
[_tabBarBG addSubview:button];

//为按钮填加单击事件
[button addTarget:self action:@selector(changeViewController:) forControlEvents:UIControlEventTouchUpInside];
coordinateX+=62;
}
}
六、添加到根视图中
- (void)viewDidLoad {
[super viewDidLoad];
[self loadViewControllers];
[self loadCustomTabBar];
}
差不多了,改天再补充

相关文章推荐
- iOS获取当前连接的WiFi名称即SSID的方法
- iOS谓词使用--NSPredicate
- IOS 委托和协议区别和联系 (=)
- IOS --委托和协议区别和联系(一)
- iOS中button选择其中一个角改变弧度(适用其他控件)
- iOS property属性
- iOS获取手机型号
- ios -- ViewController跳转+传值(升级版)
- 工作备忘-ios应用安全防护oc源代码混淆,防止class-dump攻击
- 整理iOS9适配的一些坑
- IOS—使用Storyboard实现复杂界面
- ios学习规划
- iOS - 定位服务
- iOS如何把所有界面的状态栏的字体颜色都设置为白色
- iOS开发 字体适配
- IOS—两个ViewController间传值(逆向传值)
- iOS开发——文本高度
- iOS9适配常见问题
- vios 虚拟光驱 安装vioc
- iOS设置圆角矩形和阴影效果