华为USG防火墙基本配置
2015-10-20 09:12
721 查看
USG防火墙基本配置学习目的
掌握登陆USG防火墙的方法
掌握修改防火墙设备名的方法
掌握对防火墙的时间、时区进行修改的方法
掌握修改防火墙登陆标语信息的方法
掌握修改防火墙登陆密码的方法
掌握查看、保存和删除防火墙配置的方法
掌握在防火墙上配置vlan、地址接口、测试基本连通性的方法
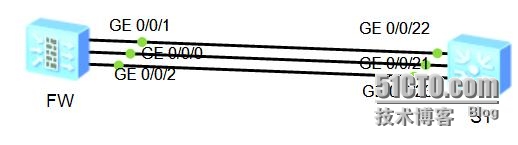
拓扑图
学习任务
步骤一.登陆缺省配置的防火墙并修改防火墙的名称
防火墙和路由器一样,有一个Console接口。使用console线缆将console接口和计算机的com口连接在一块。使用windows操作系统自带的超级终端软件,即可连接到防火墙。
防火墙的缺省配置中,包括了用户名和密码。其中用户名为admin、密码Admin@123,所以登录时需要输入用户名和密码信息,输入时注意区分大小写。
修改防火墙的名称的方法与修改路由器名称的方法一致。
另外需要注意的是,由于防火墙和路由器同样使用了VRP平台操作系统,所以在命令级别、命令帮助等,与路由器上相应操作相同。
<SRG>sys
13:47:28 2014/07/04
Enter system view, return user view withCtrl+Z.
[SRG]sysname FW
13:47:32 2014/07/04
步骤二.修改防火墙的时间和时区信息
默认情况下防火墙没有定义时区,系统保存的时间和实际时间可能不符。使用时应该根据实际的情况定义时间和时区信息。实验中我们将时区定义到东八区,并定义标准时间。
<FW>clock timezone 1 add 08:00:00
13:50:57 2014/07/04
<FW>dis clock
21:51:15 2014/07/03
2014-07-03 21:51:15
Thursday
Time Zone : 1 add 08:00:00
<FW>clock datetime 13:53:442014/07/04
21:53:29 2014/07/03
<FW>dis clock
13:54:04 2014/07/04
2014-07-04 13:54:04
Friday
Time Zone : 1 add 08:00:00
步骤三。修改防火墙登录标语信息
默认情况下,在登陆防火墙,登陆成功后有如下的标语信息。
Please Press ENTER.
Login authentication
Username:admin
Password:*********
NOTICE:This is a private communicationsystem.
Unauthorized access or use may lead to prosecution.
防火墙设备以此信息警告非授权的访问。
实际使用中,管理员可以根据需要修改默认的登陆标语信息。分为登录前提示信息和登陆成功后提示信息两种。
[FW]header login information ^
14:01:21 2014/07/04
Info: The banner text supports 220characters max, including the start and the en
d character.If you want to enter more thanthis, use banner file instead.
Input banner text, and quit with thecharacter '^':
Welcome to USG5500^
[FW]header shell information ^
14:02:54 2014/07/04
Info: The banner text supports 220characters max, including the start and the en
d character.If you want to enter more thanthis, use banner file instead.
Input banner text, and quit with thecharacter '^':
Welcome to USG5500
You are logining insystem Please do not delete system config files^
配置完成后,通过推出系统。然后重新登录,可以查看是否生效。
Please Press ENTER.
Welcome to USG5500
Login authentication
Username:admin
Password:*********
Welcome to USG5500
You are logining insystem Please do not delete system config files
NOTICE:This is a private communicationsystem.
Unauthorized access or use may lead to prosecution.
注意,默认达到NOTICE信息一般都会存在,不会消失或被代替。
步骤四.修改登陆防火墙的用户名和密码
防火墙默认使用的用户名admin。密码Admin@123。可以根据我们的需求进行修改。试验中我们新建一个用户,级别为level3.用户名为user1.密码:huawei@123.需要说明的是,默认情况下console接口登陆仅允许admin登陆。所以配置console接口登陆验证方式为aaa,才能确保新建的用户生效。在配置中,需要指定该配置的用户名的使用范围,本次实验中选择termianl,表示使用于通过console口登陆验证的凭据。
[FW]aaa
14:15:43 2014/07/04
[FW-aaa]local-user user1 pass
[FW-aaa]local-user user1 password cipherhuawei@123
14:16:08 2014/07/04
[FW-aaa]local-user user1 service-typeterminal
14:16:28 2014/07/04
[FW-aaa]local-user user1 level 3
14:16:38 2014/07/04
[FW-aaa]q
14:16:43 2014/07/04
[FW]user-interface console 0
14:16:57 2014/07/04
[FW-ui-console0]authenti
c327
cation-mode aaa
退出系统,测试新用户名和密码是否生效。
Please Press ENTER.
Welcome to USG5500
Login authentication
Username:user1
Password:**********
Welcome to USG5500
You are logining in system Please do notdelete system config files
NOTICE:This is a private communicationsystem.
Unauthorized access or use may lead to prosecution.
<FW>
步骤五.掌握查看、保存、和删除配置的方法。
在防火墙上使用命令查看运行的配置和已经保存的配置。其中使用display current-configuration命令查看运行配置,使用displaysaved-configuration命令查看已经保存的配置。
<FW>dis current-configuration
14:27:01 2014/07/04
#
stp region-configuration
region-name f0a7e2157008
active region-configuration
#
interface GigabitEthernet0/0/0
alias GE0/MGMT
ipaddress 192.168.0.1 255.255.255.0
dhcpselect interface
dhcpserver gateway-list 192.168.0.1
#
interface GigabitEthernet0/0/1
#
interface GigabitEthernet0/0/2
#
interface GigabitEthernet0/0/3
#
interface GigabitEthernet0/0/4
#
interface GigabitEthernet0/0/5
#
interface GigabitEthernet0/0/6
#
interface GigabitEthernet0/0/7
#
interface GigabitEthernet0/0/8
#
interface NULL0
alias NULL0
#
firewall zone local
setpriority 100
#
firewall zone trust
setpriority 85
addinterface GigabitEthernet0/0/0
#
firewall zone untrust
setpriority 5
#
firewall zone dmz
setpriority 50
#
aaa
local-user admin password cipher%$%$s$]c%^XV6(/|BaQ$[T;X"G>5%$%$
local-user admin service-type web terminaltelnet
local-user admin level 15
local-user user1 password cipher%$%$tY4Z:`xG0/G!1^C)2[48"%yp%$%$
local-user user1 service-type terminal
local-user user1 level 3
authentication-scheme default
#
authorization-scheme default
#
accounting-scheme default
#
domain default
#
#
nqa-jitter tag-version 1
#
header shell information "Welcome toUSG5500
You are logining in system Please do notdelete system config files"
header login information "Welcome toUSG5500"
banner enable
#
user-interface con 0
authentication-mode aaa
user-interface vty 0 4
authentication-mode none
protocol inbound all
#
slb
#
right-manager server-group
#
sysname FW
#
l2tpdomain suffix-separator @
#
firewall packet-filter default permitinterzone local trust direction inbound
firewall packet-filter default permitinterzone local trust direction outbound
firewall packet-filter default permitinterzone local untrust direction outbound
firewall packet-filter default permitinterzone local dmz direction outbound
#
ipdf-unreachables enable
#
firewall ipv6 session link-state check
firewall ipv6 statistic system enable
#
dnsresolve
#
firewall statistic system enable
#
pkiocsp response cache refresh interval 0
pkiocsp response cache number 0
#
undodns proxy
#
license-server domain lic.huawei.com
#
web-manager enable
#
return
保存配置,并查看以保存的配置信息。
<FW> sa
14:29:29 2014/07/04
The current configuration will be writtento the device.
Are you sure to continue?[Y/N]y
2014-07-04 14:29:31 FW %%01CFM/4/SAVE(l):When deciding whether to save configura
tion to the device, the user chose Y.
Do you want to synchronically save theconfiguration to the startup saved-configu
ration file on peer device?[Y/N]:y
Now saving the current configuration to thedevice...
Info:The current configuration was saved tothe device successfully.
<FW>dis saved-configuration
14:27:48 2014/07/04
# CLI_VERSION=V300R001
# Last configuration was changed at2014/07/04 13:56:09 from console0
#*****BEGIN****public****#
#
interface GigabitEthernet0/0/0
alias GE0/MGMT
ipaddress 192.168.0.1 255.255.255.0
dhcpselect interface
dhcpserver gateway-list 192.168.0.1
#
interface GigabitEthernet0/0/1
#
interface GigabitEthernet0/0/2
#
interface GigabitEthernet0/0/3
#
interface GigabitEthernet0/0/4
#
interface GigabitEthernet0/0/5
#
interface GigabitEthernet0/0/6
#
interface GigabitEthernet0/0/7
#
interface GigabitEthernet0/0/8
#
interface NULL0
alias NULL0
#
firewall zone local
setpriority 100
#
firewall zone trust
setpriority 85
addinterface GigabitEthernet0/0/0
#
firewall zone untrust
setpriority 5
#
firewall zone dmz
setpriority 50
#
aaa
local-user admin password cipher%$%$s$]c%^XV6(/|BaQ$[T;X"G>5%$%$
local-user admin service-type web terminaltelnet
local-useradmin level 15
authentication-scheme default
#
authorization-scheme default
#
accounting-scheme default
#
domain default
#
#
nqa-jitter tag-version 1
#
banner enable
#
user-interface con 0
authentication-mode none
user-interface vty 0 4
authentication-mode none
protocol inbound all
#
slb
#
right-manager server-group
#
sysname FW
#
l2tpdomain suffix-separator @
#
firewall packet-filter default permitinterzone local trust direction inbound
firewall packet-filter default permitinterzone local trust direction outbound
firewall packet-filter default permitinterzone local untrust direction outbound
firewall packet-filter default permitinterzone local dmz direction outbound
#
ipdf-unreachables enable
#
firewall ipv6 session link-state check
firewall ipv6 statistic system enable
#
dnsresolve
#
firewall statistic system enable
#
pkiocsp response cache refresh interval 0
pkiocsp response cache number 0
#
undodns proxy
#
license-server domain lic.huawei.com
#
web-manager enable
#
return
#-----END----#
使用delete Flash:/vrpcfg.zip命令删除保存的配置。
<FW>delete flash:/vrpcfg.cfg
14:31:42 2014/07/04
Be Careful! Deleting the next startupconfig file will lose your configuration.
Delete flash:/vrpcfg.cfg?[Y/N]:y
%Deleting file flash:/vrpcfg.cfg...Done!
步骤六.配置接口地址
配置G0/0/1:10.0.2.1/24;G0/0/0:10.0.1.1/24;G0/0/2:10.0.3.1/24.
[FW] interface g0/0/2
16:12:58 2014/07/04
[FW-GigabitEthernet0/0/2]ip add 10.0.3.1 24
16:13:21 2014/07/04
[FW-GigabitEthernet0/0/2]interface g0/0/0
16:13:32 2014/07/04
[FW-GigabitEthernet0/0/0]undo ip add
16:14:02 2014/07/04
[FW-GigabitEthernet0/0/0]ip add 10.0.1.1 24
16:14:14 2014/07/04
[FW-GigabitEthernet0/0/0]interface g0/0/1
16:14:36 2014/07/04
[FW-GigabitEthernet0/0/1]ip add 10.0.2.1 24
16:14:50 2014/07/04
[FW-GigabitEthernet0/0/1]q
16:14:52 2014/07/04
[FW]
在交换机S1上配置接口G0/0/21属于vlan1、G0/0/22属于vlan2、G0/0/23属于vlan3.vlanif接口配置IP地址10.0.1.2/24、vlanif2接口配置IP地址10.0.2.2/24、vlanif3接口配置IP地址10.0.3.2/24。
[Huawei]sysname S1
[S1]vlan batch 2 3
[S1]interface g0/0/21
[S1-GigabitEthernet0/0/21]port link-typeaccess
[S1-GigabitEthernet0/0/21]port default vlan1
[S1-GigabitEthernet0/0/21]interface g0/0/22
[S1-GigabitEthernet0/0/22]port link-typeaccess
[S1-GigabitEthernet0/0/22]port default vlan2
[S1-GigabitEthernet0/0/22]interface g0/0/23
[S1-GigabitEthernet0/0/23]port link-typeaccess
[S1-GigabitEthernet0/0/23]port default vlan3
[S1-GigabitEthernet0/0/23]interface vlanif1
[S1-Vlanif1]ip add 10.0.1.2 24
[S1-Vlanif1]interface vlanif 2
[S1-Vlanif2]ip add 10.0.2.2 24
[S1-Vlanif2]interface vlanif 3
[S1-Vlanif3]ip add 10.0.3.2 24
将G0/0/0、G0/0/1、G0/0/2添加到trust区。在测试三口的连通性(在添加到trust区以前先确认这些端口不在untrust区)
[FW]firewall zone trust
16:39:40 2014/07/04
[FW-zone-trust]add interface g0/0/2
16:40:05 2014/07/04
[FW-zone-trust]add interface g0/0/3
16:41:59 2014/07/04
[FW-zone-trust]add interface g0/0/1
[FW-zone-trust]q
[S1]ping -c 1 10.0.1.1
PING 10.0.1.1: 56 data bytes,press CTRL_C to break
Reply from 10.0.1.1: bytes=56 Sequence=1 ttl=255 time=50 ms
---10.0.1.1 ping statistics ---
1packet(s) transmitted
1packet(s) received
0.00% packet loss
round-trip min/avg/max = 50/50/50 ms
[S1]ping -c 1 10.0.2.1
PING 10.0.2.1: 56 data bytes,press CTRL_C to break
Reply from 10.0.2.1: bytes=56 Sequence=1 ttl=255 time=50 ms
---10.0.2.1 ping statistics ---
1packet(s) transmitted
1packet(s) received
0.00% packet loss
round-trip min/avg/max = 50/50/50 ms
[S1]ping -c 1 10.0.3.1
PING 10.0.3.1: 56 data bytes,press CTRL_C to break
Reply from 10.0.3.1: bytes=56 Sequence=1 ttl=255 time=60 ms
---10.0.3.1 ping statistics ---
1packet(s) transmitted
1packet(s) received
0.00% packet loss
round-trip min/avg/max = 60/60/60 ms
本文出自 “思科实验linux” 博客,请务必保留此出处http://1054054.blog.51cto.com/1044054/1434993
掌握登陆USG防火墙的方法
掌握修改防火墙设备名的方法
掌握对防火墙的时间、时区进行修改的方法
掌握修改防火墙登陆标语信息的方法
掌握修改防火墙登陆密码的方法
掌握查看、保存和删除防火墙配置的方法
掌握在防火墙上配置vlan、地址接口、测试基本连通性的方法
拓扑图
学习任务
步骤一.登陆缺省配置的防火墙并修改防火墙的名称
防火墙和路由器一样,有一个Console接口。使用console线缆将console接口和计算机的com口连接在一块。使用windows操作系统自带的超级终端软件,即可连接到防火墙。
防火墙的缺省配置中,包括了用户名和密码。其中用户名为admin、密码Admin@123,所以登录时需要输入用户名和密码信息,输入时注意区分大小写。
修改防火墙的名称的方法与修改路由器名称的方法一致。
另外需要注意的是,由于防火墙和路由器同样使用了VRP平台操作系统,所以在命令级别、命令帮助等,与路由器上相应操作相同。
<SRG>sys
13:47:28 2014/07/04
Enter system view, return user view withCtrl+Z.
[SRG]sysname FW
13:47:32 2014/07/04
步骤二.修改防火墙的时间和时区信息
默认情况下防火墙没有定义时区,系统保存的时间和实际时间可能不符。使用时应该根据实际的情况定义时间和时区信息。实验中我们将时区定义到东八区,并定义标准时间。
<FW>clock timezone 1 add 08:00:00
13:50:57 2014/07/04
<FW>dis clock
21:51:15 2014/07/03
2014-07-03 21:51:15
Thursday
Time Zone : 1 add 08:00:00
<FW>clock datetime 13:53:442014/07/04
21:53:29 2014/07/03
<FW>dis clock
13:54:04 2014/07/04
2014-07-04 13:54:04
Friday
Time Zone : 1 add 08:00:00
步骤三。修改防火墙登录标语信息
默认情况下,在登陆防火墙,登陆成功后有如下的标语信息。
Please Press ENTER.
Login authentication
Username:admin
Password:*********
NOTICE:This is a private communicationsystem.
Unauthorized access or use may lead to prosecution.
防火墙设备以此信息警告非授权的访问。
实际使用中,管理员可以根据需要修改默认的登陆标语信息。分为登录前提示信息和登陆成功后提示信息两种。
[FW]header login information ^
14:01:21 2014/07/04
Info: The banner text supports 220characters max, including the start and the en
d character.If you want to enter more thanthis, use banner file instead.
Input banner text, and quit with thecharacter '^':
Welcome to USG5500^
[FW]header shell information ^
14:02:54 2014/07/04
Info: The banner text supports 220characters max, including the start and the en
d character.If you want to enter more thanthis, use banner file instead.
Input banner text, and quit with thecharacter '^':
Welcome to USG5500
You are logining insystem Please do not delete system config files^
配置完成后,通过推出系统。然后重新登录,可以查看是否生效。
Please Press ENTER.
Welcome to USG5500
Login authentication
Username:admin
Password:*********
Welcome to USG5500
You are logining insystem Please do not delete system config files
NOTICE:This is a private communicationsystem.
Unauthorized access or use may lead to prosecution.
注意,默认达到NOTICE信息一般都会存在,不会消失或被代替。
步骤四.修改登陆防火墙的用户名和密码
防火墙默认使用的用户名admin。密码Admin@123。可以根据我们的需求进行修改。试验中我们新建一个用户,级别为level3.用户名为user1.密码:huawei@123.需要说明的是,默认情况下console接口登陆仅允许admin登陆。所以配置console接口登陆验证方式为aaa,才能确保新建的用户生效。在配置中,需要指定该配置的用户名的使用范围,本次实验中选择termianl,表示使用于通过console口登陆验证的凭据。
[FW]aaa
14:15:43 2014/07/04
[FW-aaa]local-user user1 pass
[FW-aaa]local-user user1 password cipherhuawei@123
14:16:08 2014/07/04
[FW-aaa]local-user user1 service-typeterminal
14:16:28 2014/07/04
[FW-aaa]local-user user1 level 3
14:16:38 2014/07/04
[FW-aaa]q
14:16:43 2014/07/04
[FW]user-interface console 0
14:16:57 2014/07/04
[FW-ui-console0]authenti
c327
cation-mode aaa
退出系统,测试新用户名和密码是否生效。
Please Press ENTER.
Welcome to USG5500
Login authentication
Username:user1
Password:**********
Welcome to USG5500
You are logining in system Please do notdelete system config files
NOTICE:This is a private communicationsystem.
Unauthorized access or use may lead to prosecution.
<FW>
步骤五.掌握查看、保存、和删除配置的方法。
在防火墙上使用命令查看运行的配置和已经保存的配置。其中使用display current-configuration命令查看运行配置,使用displaysaved-configuration命令查看已经保存的配置。
<FW>dis current-configuration
14:27:01 2014/07/04
#
stp region-configuration
region-name f0a7e2157008
active region-configuration
#
interface GigabitEthernet0/0/0
alias GE0/MGMT
ipaddress 192.168.0.1 255.255.255.0
dhcpselect interface
dhcpserver gateway-list 192.168.0.1
#
interface GigabitEthernet0/0/1
#
interface GigabitEthernet0/0/2
#
interface GigabitEthernet0/0/3
#
interface GigabitEthernet0/0/4
#
interface GigabitEthernet0/0/5
#
interface GigabitEthernet0/0/6
#
interface GigabitEthernet0/0/7
#
interface GigabitEthernet0/0/8
#
interface NULL0
alias NULL0
#
firewall zone local
setpriority 100
#
firewall zone trust
setpriority 85
addinterface GigabitEthernet0/0/0
#
firewall zone untrust
setpriority 5
#
firewall zone dmz
setpriority 50
#
aaa
local-user admin password cipher%$%$s$]c%^XV6(/|BaQ$[T;X"G>5%$%$
local-user admin service-type web terminaltelnet
local-user admin level 15
local-user user1 password cipher%$%$tY4Z:`xG0/G!1^C)2[48"%yp%$%$
local-user user1 service-type terminal
local-user user1 level 3
authentication-scheme default
#
authorization-scheme default
#
accounting-scheme default
#
domain default
#
#
nqa-jitter tag-version 1
#
header shell information "Welcome toUSG5500
You are logining in system Please do notdelete system config files"
header login information "Welcome toUSG5500"
banner enable
#
user-interface con 0
authentication-mode aaa
user-interface vty 0 4
authentication-mode none
protocol inbound all
#
slb
#
right-manager server-group
#
sysname FW
#
l2tpdomain suffix-separator @
#
firewall packet-filter default permitinterzone local trust direction inbound
firewall packet-filter default permitinterzone local trust direction outbound
firewall packet-filter default permitinterzone local untrust direction outbound
firewall packet-filter default permitinterzone local dmz direction outbound
#
ipdf-unreachables enable
#
firewall ipv6 session link-state check
firewall ipv6 statistic system enable
#
dnsresolve
#
firewall statistic system enable
#
pkiocsp response cache refresh interval 0
pkiocsp response cache number 0
#
undodns proxy
#
license-server domain lic.huawei.com
#
web-manager enable
#
return
保存配置,并查看以保存的配置信息。
<FW> sa
14:29:29 2014/07/04
The current configuration will be writtento the device.
Are you sure to continue?[Y/N]y
2014-07-04 14:29:31 FW %%01CFM/4/SAVE(l):When deciding whether to save configura
tion to the device, the user chose Y.
Do you want to synchronically save theconfiguration to the startup saved-configu
ration file on peer device?[Y/N]:y
Now saving the current configuration to thedevice...
Info:The current configuration was saved tothe device successfully.
<FW>dis saved-configuration
14:27:48 2014/07/04
# CLI_VERSION=V300R001
# Last configuration was changed at2014/07/04 13:56:09 from console0
#*****BEGIN****public****#
#
interface GigabitEthernet0/0/0
alias GE0/MGMT
ipaddress 192.168.0.1 255.255.255.0
dhcpselect interface
dhcpserver gateway-list 192.168.0.1
#
interface GigabitEthernet0/0/1
#
interface GigabitEthernet0/0/2
#
interface GigabitEthernet0/0/3
#
interface GigabitEthernet0/0/4
#
interface GigabitEthernet0/0/5
#
interface GigabitEthernet0/0/6
#
interface GigabitEthernet0/0/7
#
interface GigabitEthernet0/0/8
#
interface NULL0
alias NULL0
#
firewall zone local
setpriority 100
#
firewall zone trust
setpriority 85
addinterface GigabitEthernet0/0/0
#
firewall zone untrust
setpriority 5
#
firewall zone dmz
setpriority 50
#
aaa
local-user admin password cipher%$%$s$]c%^XV6(/|BaQ$[T;X"G>5%$%$
local-user admin service-type web terminaltelnet
local-useradmin level 15
authentication-scheme default
#
authorization-scheme default
#
accounting-scheme default
#
domain default
#
#
nqa-jitter tag-version 1
#
banner enable
#
user-interface con 0
authentication-mode none
user-interface vty 0 4
authentication-mode none
protocol inbound all
#
slb
#
right-manager server-group
#
sysname FW
#
l2tpdomain suffix-separator @
#
firewall packet-filter default permitinterzone local trust direction inbound
firewall packet-filter default permitinterzone local trust direction outbound
firewall packet-filter default permitinterzone local untrust direction outbound
firewall packet-filter default permitinterzone local dmz direction outbound
#
ipdf-unreachables enable
#
firewall ipv6 session link-state check
firewall ipv6 statistic system enable
#
dnsresolve
#
firewall statistic system enable
#
pkiocsp response cache refresh interval 0
pkiocsp response cache number 0
#
undodns proxy
#
license-server domain lic.huawei.com
#
web-manager enable
#
return
#-----END----#
使用delete Flash:/vrpcfg.zip命令删除保存的配置。
<FW>delete flash:/vrpcfg.cfg
14:31:42 2014/07/04
Be Careful! Deleting the next startupconfig file will lose your configuration.
Delete flash:/vrpcfg.cfg?[Y/N]:y
%Deleting file flash:/vrpcfg.cfg...Done!
步骤六.配置接口地址
配置G0/0/1:10.0.2.1/24;G0/0/0:10.0.1.1/24;G0/0/2:10.0.3.1/24.
[FW] interface g0/0/2
16:12:58 2014/07/04
[FW-GigabitEthernet0/0/2]ip add 10.0.3.1 24
16:13:21 2014/07/04
[FW-GigabitEthernet0/0/2]interface g0/0/0
16:13:32 2014/07/04
[FW-GigabitEthernet0/0/0]undo ip add
16:14:02 2014/07/04
[FW-GigabitEthernet0/0/0]ip add 10.0.1.1 24
16:14:14 2014/07/04
[FW-GigabitEthernet0/0/0]interface g0/0/1
16:14:36 2014/07/04
[FW-GigabitEthernet0/0/1]ip add 10.0.2.1 24
16:14:50 2014/07/04
[FW-GigabitEthernet0/0/1]q
16:14:52 2014/07/04
[FW]
在交换机S1上配置接口G0/0/21属于vlan1、G0/0/22属于vlan2、G0/0/23属于vlan3.vlanif接口配置IP地址10.0.1.2/24、vlanif2接口配置IP地址10.0.2.2/24、vlanif3接口配置IP地址10.0.3.2/24。
[Huawei]sysname S1
[S1]vlan batch 2 3
[S1]interface g0/0/21
[S1-GigabitEthernet0/0/21]port link-typeaccess
[S1-GigabitEthernet0/0/21]port default vlan1
[S1-GigabitEthernet0/0/21]interface g0/0/22
[S1-GigabitEthernet0/0/22]port link-typeaccess
[S1-GigabitEthernet0/0/22]port default vlan2
[S1-GigabitEthernet0/0/22]interface g0/0/23
[S1-GigabitEthernet0/0/23]port link-typeaccess
[S1-GigabitEthernet0/0/23]port default vlan3
[S1-GigabitEthernet0/0/23]interface vlanif1
[S1-Vlanif1]ip add 10.0.1.2 24
[S1-Vlanif1]interface vlanif 2
[S1-Vlanif2]ip add 10.0.2.2 24
[S1-Vlanif2]interface vlanif 3
[S1-Vlanif3]ip add 10.0.3.2 24
将G0/0/0、G0/0/1、G0/0/2添加到trust区。在测试三口的连通性(在添加到trust区以前先确认这些端口不在untrust区)
[FW]firewall zone trust
16:39:40 2014/07/04
[FW-zone-trust]add interface g0/0/2
16:40:05 2014/07/04
[FW-zone-trust]add interface g0/0/3
16:41:59 2014/07/04
[FW-zone-trust]add interface g0/0/1
[FW-zone-trust]q
[S1]ping -c 1 10.0.1.1
PING 10.0.1.1: 56 data bytes,press CTRL_C to break
Reply from 10.0.1.1: bytes=56 Sequence=1 ttl=255 time=50 ms
---10.0.1.1 ping statistics ---
1packet(s) transmitted
1packet(s) received
0.00% packet loss
round-trip min/avg/max = 50/50/50 ms
[S1]ping -c 1 10.0.2.1
PING 10.0.2.1: 56 data bytes,press CTRL_C to break
Reply from 10.0.2.1: bytes=56 Sequence=1 ttl=255 time=50 ms
---10.0.2.1 ping statistics ---
1packet(s) transmitted
1packet(s) received
0.00% packet loss
round-trip min/avg/max = 50/50/50 ms
[S1]ping -c 1 10.0.3.1
PING 10.0.3.1: 56 data bytes,press CTRL_C to break
Reply from 10.0.3.1: bytes=56 Sequence=1 ttl=255 time=60 ms
---10.0.3.1 ping statistics ---
1packet(s) transmitted
1packet(s) received
0.00% packet loss
round-trip min/avg/max = 60/60/60 ms
本文出自 “思科实验linux” 博客,请务必保留此出处http://1054054.blog.51cto.com/1044054/1434993

相关文章推荐
- 华为广域网帧中继(背靠背)配置
- 华为路由交换VRRP配置
- 华为三层交换机
- 华为三层交换Vlan配置
- 华为三层交换机STP配置
- 华为路由RIP OSPF相互引入路由
- Android源码分析-Activity的启动过程
- 华为OSPF多区域、认证配置
- 华为RIPv2配置
- 华为OSPF配置
- 华为RIPv1实验
- 华为静态、默认、备用路由配置
- vsphere4.1vcenter install
- vsphere4.1-3-sql2008安装
- vsphere4.1-2-DC安装
- redhad5 配置多用户同时登陆vnc各自界面
- Android Studio中获取sha1证书的方法
- 使用StyleCop进行代码审查
- 蜂窝六边形的六边形消除高分秘籍
- vpshere4.1安装