centos架设pptp服务:并测试windos客户端、Linux客户端!
2015-10-15 15:15
841 查看
PPTP(Point to Point Tunneling Protocol,点对点隧道协议)
默认端口号:1723PPTP,
即PPTF协议。该协议是在PPP协议的基础上开发的一种新的增强型安全协议,支持多协议虚拟专用网(***),可以通过密码身份验证协议(PAP)、可
扩展身份验证协议(EAP)等方法增强安全性。可以使远程用户通过拨入ISP、通过直接连接Internet或其他网络安全地访问企业网。点
对点隧道协议(PPTP)是一种支持多协议虚拟专用网络的网络技术,它工作在第二层。通过该协议,远程用户能够通过 Microsoft Windows
NT工作站、Windows xp 、Windows 2000
和windows2003、windows7操作系统以及其它装有点对点协议的系统安全访问公司网络,并能拨号连入本地ISP,通过Internet
安全链接到公司网络。PPTP协议是点对点隧道协议,其将控制包与数据包分开,控制包采用TCP控制。PPTP使用TCP协议,适合在没有防火墙限制的网络中使用。 一、pptp服务器部署操作:
1、检查系统内核是否支持MPPE补丁
# 显示ok则系统支持MPPE补丁,如不支持,需先安装kernel-devel
安装命令:
2、检查系统是否开启TUN/TAP支持
cat: /dev/net/tun: File descriptor in bad state # 如果显示这条信息,则表明通过
3、检查系统是否开启ppp支持
4、安装pptp依赖包ppp
5、安装pptpd
6.编辑/etc/ppp/options.pptpd文件。
ms-dns 172.16.1.5 #我这里内网因为有dns服务器,所以填写的是内网dns服务器地址,如果没有内网dns需要填写供应商提供的dns地址;
ms-dns172.16.1.7 #备用dns
7.编辑/etc/pptpd.conf 文件。
localip 10.0.0.1 #***拨入用户服务器IP地址,(也可以写成10.0.0.1-100,这样每个客户端都会对应一个单独的服务器IP)
remoteip 10.0.0.101-200 # ***拨入用户客户端动态分配地址池
8.设置***账号密码,编辑/etc/ppp/chap-secrets这个文件。
9.修改内核设置,使其支持转发,编辑/etc/sysctl.conf 文件。
[root@server05~]# sysctl -p
#如果报错:
error:"net.bridge.bridge-nf-call-ip6tables" is an unknown key
error: "net.bridge.bridge-nf-call-iptables"is an unknown key
error:"net.bridge.bridge-nf-call-arptables" is an unknown key
# 解决方法
10、启动pptpd
State Recv-Q Send-Q LocalAddress:Port Peer Address:Port
LISTEN 0 3 *:1723 *:*
11.设置iptables策略
[root@server05 ~]# iptables -F #清楚现有的iptables策略;
[root@server05 ~]# iptables -tnat -A POSTROUTING -s 10.0.0.0/24 -j MASQUERADE #设置IPTABLES转发策略;
[root@server05 ~]# serviceiptables save #保存iptables设置
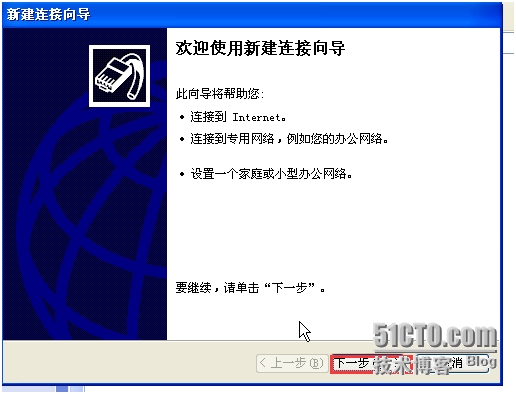
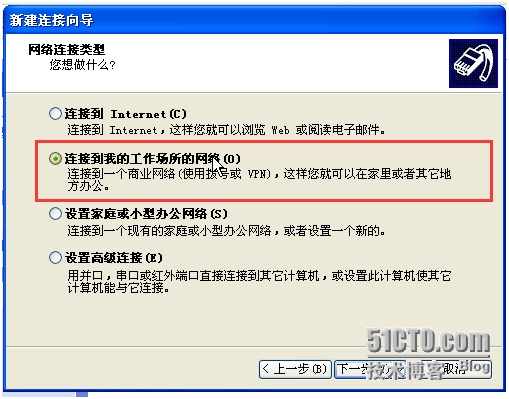
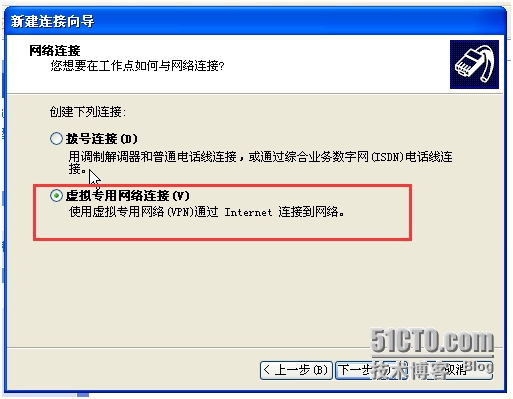
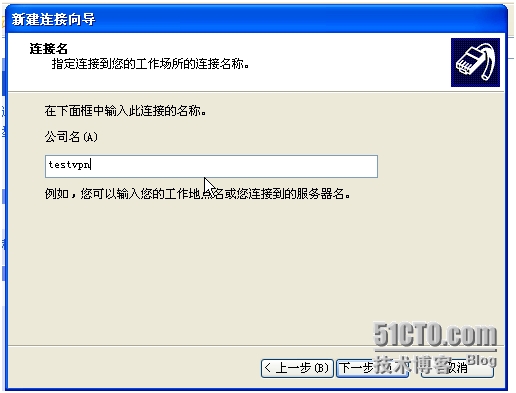
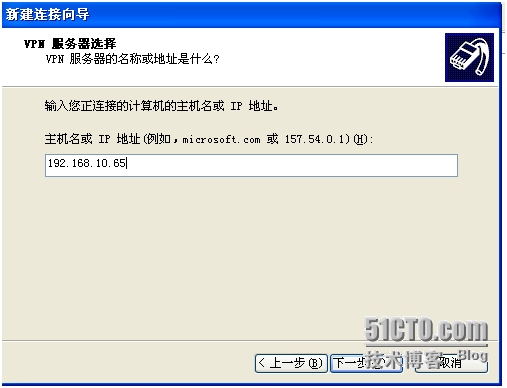
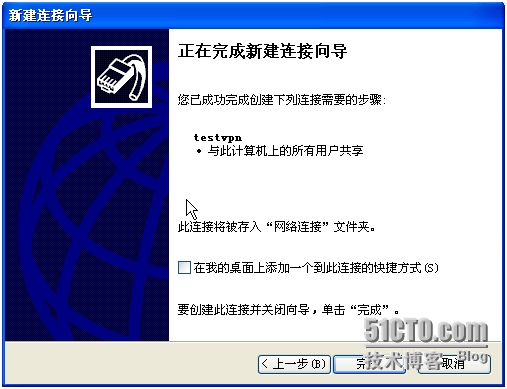
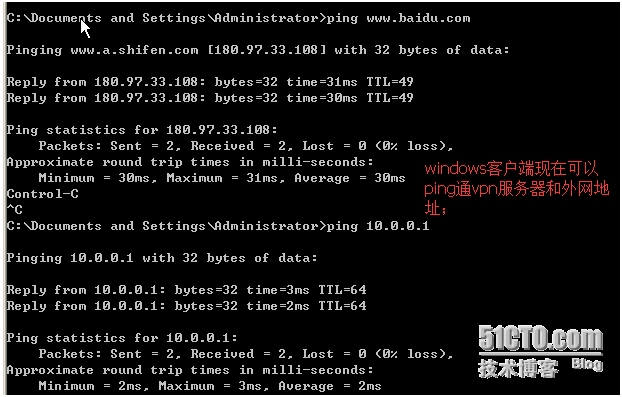
二、xp客户端测试(我的服务器和测试机器处于同一局域网):

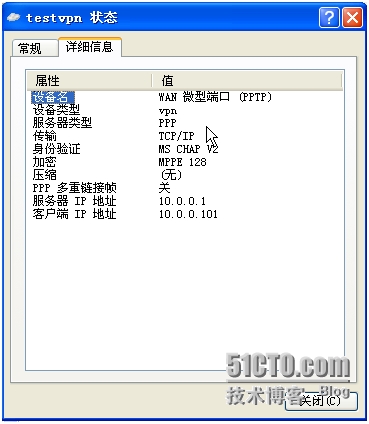
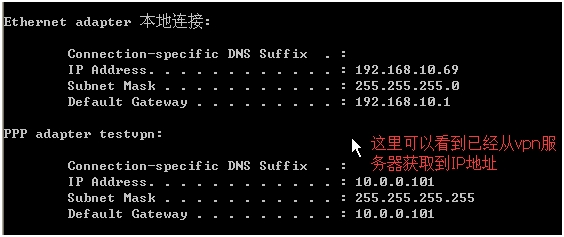
再从服务器这边查看IP地址,也可以看到客户端的IP地址;
三、Linux客户端连接***服务器:
尝试断开连接并重新连接:
测试完毕!!!!
原文地址http://dragondragon.blog.51cto.com/6170889/1672921
默认端口号:1723PPTP,
即PPTF协议。该协议是在PPP协议的基础上开发的一种新的增强型安全协议,支持多协议虚拟专用网(***),可以通过密码身份验证协议(PAP)、可
扩展身份验证协议(EAP)等方法增强安全性。可以使远程用户通过拨入ISP、通过直接连接Internet或其他网络安全地访问企业网。点
对点隧道协议(PPTP)是一种支持多协议虚拟专用网络的网络技术,它工作在第二层。通过该协议,远程用户能够通过 Microsoft Windows
NT工作站、Windows xp 、Windows 2000
和windows2003、windows7操作系统以及其它装有点对点协议的系统安全访问公司网络,并能拨号连入本地ISP,通过Internet
安全链接到公司网络。PPTP协议是点对点隧道协议,其将控制包与数据包分开,控制包采用TCP控制。PPTP使用TCP协议,适合在没有防火墙限制的网络中使用。 一、pptp服务器部署操作:
| 服务器 | IP地址 | 描述 |
| Server05 (centos6.6) | 192.168.10.65(***:10.0.0.1) | ***-server服务器 |
| Windows-xp | 192.168.10.69 | ***-client客户端 |
| Server06 (centos6.6) | 192.168.10.66 | ***-client客户端 |
[root@server05 ~]# modprobe ppp-compress-18 && echo ok
# 显示ok则系统支持MPPE补丁,如不支持,需先安装kernel-devel
安装命令:
yum install kernel-devel
2、检查系统是否开启TUN/TAP支持
[root@server05 ~]# cat /dev/net/tun
cat: /dev/net/tun: File descriptor in bad state # 如果显示这条信息,则表明通过
3、检查系统是否开启ppp支持
[root@server05 ~]# cat /dev/ppp
cat: /dev/ppp: No such deviceor address        # 如果显示这条信息,则表明通过
注意:上面三条必须同时满足,否则不能安装pptp***。
4、安装pptp依赖包ppp
[root@server05 ~]# yum install ppp
5、安装pptpd
[root@server05 ~]# yum installpptpd
6.编辑/etc/ppp/options.pptpd文件。
[root@server05~]# vim /etc/ppp/options.pptpd
ms-dns 172.16.1.5 #我这里内网因为有dns服务器,所以填写的是内网dns服务器地址,如果没有内网dns需要填写供应商提供的dns地址;
ms-dns172.16.1.7 #备用dns
7.编辑/etc/pptpd.conf 文件。
[root@server05 ~]# vim /etc/pptpd.conf
localip 10.0.0.1 #***拨入用户服务器IP地址,(也可以写成10.0.0.1-100,这样每个客户端都会对应一个单独的服务器IP)
remoteip 10.0.0.101-200 # ***拨入用户客户端动态分配地址池
8.设置***账号密码,编辑/etc/ppp/chap-secrets这个文件。
[root@server05~]# vim  /etc/ppp/chap-secrets

#client    server  secret          IPaddresses
test        pptpd   123456    *
test***        pptpd   123456    *
#第1列是***客户端登录的用户名,第3列是***客户端登录的密码,第4列是登录的用户的主机的IP地址定义,"*"表示可以是任意的IP地址。
9.修改内核设置,使其支持转发,编辑/etc/sysctl.conf 文件。
[root@server05~]# vim /etc/sysctl.conf

net.ipv4.ip_forward = 1   #将“net.ipv4.ip_forward”的值改为1
使修改的配置生效:
[root@server05~]# sysctl -p
#如果报错:
error:"net.bridge.bridge-nf-call-ip6tables" is an unknown key
error: "net.bridge.bridge-nf-call-iptables"is an unknown key
error:"net.bridge.bridge-nf-call-arptables" is an unknown key
# 解决方法
[root@server05 ~]# modprobe bridge
[root@server05 ~]# lsmod |grep bridge  #查看
[root@server05 ~]# sysctl -p        #重新加载配置文件
10、启动pptpd
[root@server05 ~]# service pptpd start      #启动服务

Starting pptpd:                                           [  OK  ]
[root@server05 ~]# chkconfig pptpd on       #加入开机启动项
[root@server05 ~]# chkconfig --list pptpd   #查看开机启动
[root@server05 ~]# ss -tnl  #pptpd服务监听1723端口
State Recv-Q Send-Q LocalAddress:Port Peer Address:Port
LISTEN 0 3 *:1723 *:*
11.设置iptables策略
[root@server05 ~]# iptables -F #清楚现有的iptables策略;
[root@server05 ~]# iptables -tnat -A POSTROUTING -s 10.0.0.0/24 -j MASQUERADE #设置IPTABLES转发策略;
[root@server05 ~]# serviceiptables save #保存iptables设置
二、xp客户端测试(我的服务器和测试机器处于同一局域网):
再从服务器这边查看IP地址,也可以看到客户端的IP地址;
[root@server05 ~]# ip addr
1: lo:<LOOPBACK,UP,LOWER_UP> mtu 65536 qdisc noqueue state UNKNOWN
link/loopback 00:00:00:00:00:00 brd00:00:00:00:00:00
inet 127.0.0.1/8 scope host lo
inet6 ::1/128 scope host
valid_lft forever preferred_lft forever
2: eth1: <BROADCAST,MULTICAST,UP,LOWER_UP>mtu 1500 qdisc pfifo_fast state UP qlen 1000
link/ether 08:00:27:8d:6d:c9 brdff:ff:ff:ff:ff:ff
inet 192.168.10.65/24 brd 192.168.10.255scope global eth1
inet6 fe80::a00:27ff:fe8d:6dc9/64 scopelink
valid_lft forever preferred_lft forever
3: ppp0:<POINTOPOINT,MULTICAST,NOARP,UP,LOWER_UP> mtu 1396 qdisc pfifo_fast stateUNKNOWN qlen 3
link/ppp
inet 10.0.0.1 peer 10.0.0.101/32 scopeglobal ppp0
[root@server05 ~]# ping 10.0.0.101      #服务器端也可以和客户端通信;

PING 10.0.0.100 (10.0.0.100)56(84) bytes of data.
64 bytes from 10.0.0.100:icmp_seq=1 ttl=128 time=1.80 ms
64 bytes from 10.0.0.100:icmp_seq=2 ttl=128 time=3.02 ms
64 bytes from 10.0.0.100:icmp_seq=3 ttl=128 time=2.82 ms
64 bytes from 10.0.0.100:icmp_seq=4 ttl=128 time=1.93 ms
--- 10.0.0.100 ping statistics---
4 packets transmitted, 4received, 0% packet loss, time 3286ms
rtt min/avg/max/mdev =1.807/2.398/3.027/0.535 ms
三、Linux客户端连接***服务器:
[root@server06 ~]# iptables –F #清空iptables默认规则
[root@server06 ~]# yum -y install ppp pptp pptp-setup   #安装相关包
[root@server06 ~]# pptpsetup --create test*** --server 192.168.10.65 --username test --password 123456  --start    #创建名为test***的***连接

Using interface ppp0
Connect: ppp0 <-->/dev/pts/1
CHAP authentication succeeded
MPPE 128-bit statelesscompression enabled
local  IP address 10.0.0.100
remote IP address 10.0.0.1
[root@server06 ~]# cat/etc/ppp/peers/test***   #这个文件是上一步命令生成的***连接信息;
[root@server06 ~]# ip add       #查看IP,已经可以看到PPP0获取到了*** 的IP地址;

1: lo:<LOOPBACK,UP,LOWER_UP> mtu 65536 qdisc noqueue state UNKNOWN
link/loopback 00:00:00:00:00:00 brd00:00:00:00:00:00
inet 127.0.0.1/8 scope host lo
inet6 ::1/128 scope host
valid_lft forever preferred_lft forever
2: eth1: <BROADCAST,MULTICAST,UP,LOWER_UP>mtu 1500 qdisc pfifo_fast state UP qlen 1000
link/ether 08:00:27:d2:d5:71 brdff:ff:ff:ff:ff:ff
inet 192.168.10.66/24 brd 192.168.10.255scope global eth1
inet6 fe80::a00:27ff:fed2:d571/64 scopelink
valid_lft forever preferred_lft forever
8: ppp0:<POINTOPOINT,MULTICAST,NOARP,UP,LOWER_UP> mtu 1496 qdisc pfifo_fast stateUNKNOWN qlen 3
link/ppp
inet10.0.0.100 peer 10.0.0.1/32 scope global ppp0
[root@server 06 ~]# route add-net 0.0.0.0 dev ppp0     #添加默认路由,如果不添加,则无法实现与其他***客户端的通信

[root@server06 ~]# ping10.0.0.1        #测试是否能够成功连接服务器

PING 10.0.0.1 (10.0.0.1)56(84) bytes of data.
64 bytes from 10.0.0.1:icmp_seq=1 ttl=64 time=2.39 ms
[root@server06 ~]# ping10.0.0.101      #测试连接其它***客户端

PING 10.0.0.101 (10.0.0.101)56(84) bytes of data.
64 bytes from 10.0.0.101:icmp_seq=1 ttl=127 time=8.72 ms
64 bytes from 10.0.0.101:icmp_seq=2 ttl=127 time=5.73 ms
尝试断开连接并重新连接:
[root@server06 ~]# ps aux | grep ***

root      1968  0.0  0.0  26564   772 ?        Ss   14:34   0:00 pppd call *** updetach
root      2089  0.0  0.0 103244   856 pts/0    S+   15:16   0:00 grep ***
[root@server06 ~]# kill 1968
[root@server06 ~]# ip add  #再次查看就没有这个IP了!!!
[root@server06 ~]# pppd call test***  #重新连接***服务器,这里的test***是刚才第一次创建时生成的连接文件;
注意:再次获取到IP地址;但是这个时候是无法连接其它***客户端的,因为默认路由没有了!!!!需要重新添加默认路由!!!
[root@server06 ~]# route add -net 0.0.0.0 dev ppp0
[root@server06 ~]# ping 10.0.0.101

PING 10.0.0.101 (10.0.0.101) 56(84) bytes of data.
64 bytes from 10.0.0.101: icmp_seq=1 ttl=127 time=5.67 ms
64 bytes from 10.0.0.101: icmp_seq=2 ttl=127 time=4.87 ms
测试完毕!!!!
原文地址http://dragondragon.blog.51cto.com/6170889/1672921

相关文章推荐
- linux route 添加路由
- linux中yum安装openJDK
- linux内核参数注释与优化(转载)
- MacOSX中设置和改变$PATH变量
- Linux/Windows下 C/C++开发的差异
- grep文本搜索命令+正则表达式搜索详解
- linux 信号与软中断
- Linux 基础知识: GPT分区基础知识及如何在GPT分区上安装WIN7
- linux 下 postgres 的使用总结
- linux mount (挂载命令)详解
- Linux进程实践(3) --进程终止与exec函数族
- 解决linux buffer/cache 消耗内存过高引发的问题
- CentOS 7 移植到了 32位(i386)
- linux下的C语言开发(线程互斥)
- linux下的C语言开发(线程等待)
- linux下的C语言开发(多线程编程)
- linux下的C语言开发(管道通信)
- linux下的C语言开发(信号处理)
- linux下的C语言开发(进程创建及等待)
- linux下的C语言开发(自动编译工具)