10.6 CheckButtonTest工程
2015-10-06 13:41
591 查看
虽然还有N多作业没写,但是还是忍不住再尝试一个项目。这次是《疯狂Android讲义》的P75实例:利用单选钮、复选框获取用户信息。
首先照着案例把代码敲进去。这次我没有删掉生成Blank Activity时自动添加的activity_main.xml和content_main.xml这两个文件,布局管理是在content_main.xml里面添加的,这样也是想让自己看看有什么区别,更好地理解。
另外我发现MarkDown编辑器好像华丽一点,但是粘贴代码的时候不能显示出代码类型,不如原始的编辑器好。
代码:
MainActivity.java(自己更改package名称)
activity_main.xml文件:
content_main.xml
下面是就这个工程做的一些简单分析:
1. 在content_main.xml中有一些警告,如Hardcoded string “**”, should use @string resource。可参见书的P54,写道:文本直接写在布局文件中,不是一种好的做法,因为iAndroid推荐将这些字符串集中放到XML文件中管理。
将工程运行在真机上,整体表现如图:
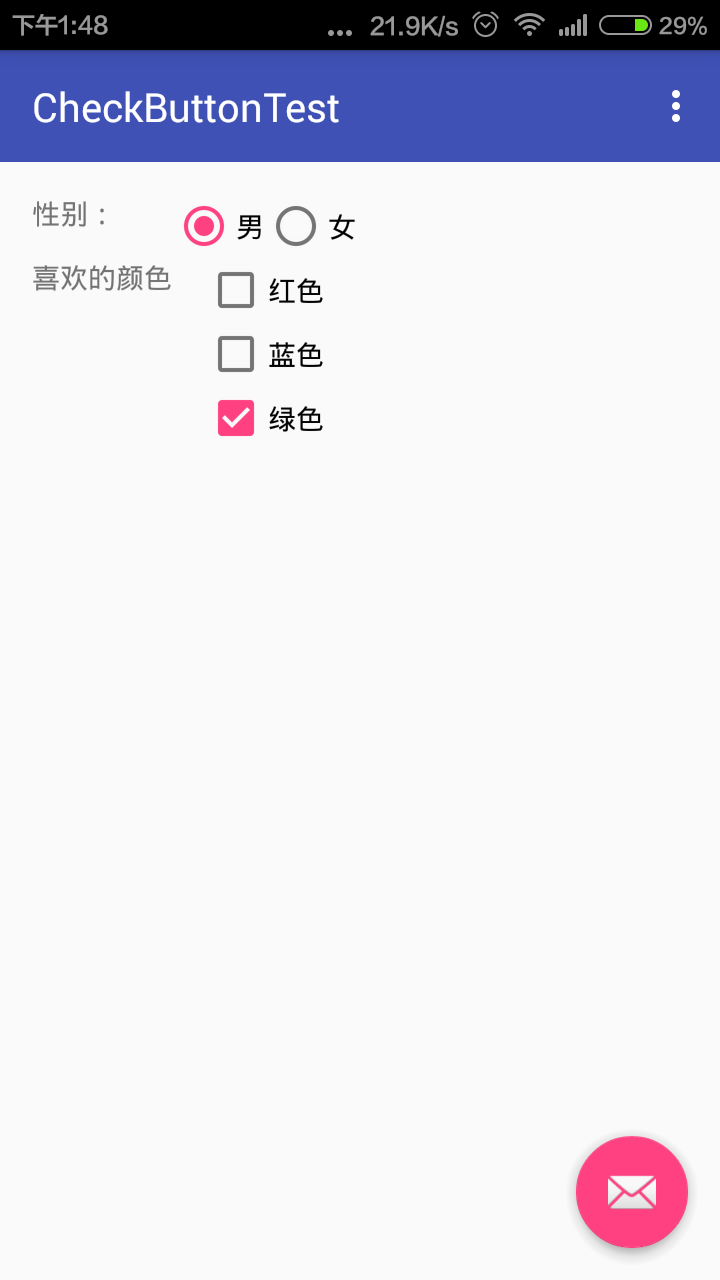
可以看到,首先标题栏是比较鲜艳的蓝色,与一开始的不一样。并且右下角有一个邮件图标,并没有任何功能,是悬浮的,点击会显示Replace with your own action.经检查是activity_main中的一个ID为fab(floating action button)的CustomView组件。可以添加相应功能,下来可以删掉。
书上写的都是MainActivity extends Activity,而默认生成的都是MainActivity extends AppCompatActivity。比较一下两者的区别,首先将工程中的AppCompatActivity替换成Activity,开头会引入import android.app.Activity,并且setSupportActionBar(toolbar)一句报错,表示不能解析setSupportActionBar方法,将这句话注释掉,发现没有问题。可以看到AppCompatActivity只与ActionBar组件有关。执行APP观察情况。
标题栏上没有文字,菜单也没有了,或许跟注释掉的语句有关,而且原来按钮选中是粉色的,现在按钮选中是黑色的。
恢复AppCompatActivity,注释掉java文件中除了我们手动输入的内容之外的函数等等,即Toolbar和Settings部分,执行,发现标题栏也没有了名字,并且没有了菜单。
更改后的代码:
将setContentView(R.layout.activity_main)的activity_main改成content_main,结果是没有了标题栏,也没有了那个邮件的图标。
开发这个项目最重要的还是学习程序的编写。首先看java程序的编写,大致结构都是
今天学习的内容大致就是这样。
首先照着案例把代码敲进去。这次我没有删掉生成Blank Activity时自动添加的activity_main.xml和content_main.xml这两个文件,布局管理是在content_main.xml里面添加的,这样也是想让自己看看有什么区别,更好地理解。
另外我发现MarkDown编辑器好像华丽一点,但是粘贴代码的时候不能显示出代码类型,不如原始的编辑器好。
代码:
MainActivity.java(自己更改package名称)
package monrother.com.checkbuttontest;

import android.app.Activity;
import android.os.Bundle;
import android.support.design.widget.FloatingActionButton;
import android.support.design.widget.Snackbar;
import android.support.v7.app.AppCompatActivity;
import android.support.v7.widget.Toolbar;
import android.view.View;
import android.view.Menu;
import android.view.MenuItem;
import android.widget.RadioGroup;
import android.widget.TextView;

public class MainActivity extends AppCompatActivity {
RadioGroup rg;
TextView show;

@Override
protected void onCreate(Bundle savedInstanceState) {
super.onCreate(savedInstanceState);
setContentView(R.layout.activity_main);
Toolbar toolbar = (Toolbar) findViewById(R.id.toolbar);
setSupportActionBar(toolbar);

FloatingActionButton fab = (FloatingActionButton) findViewById(R.id.fab);
fab.setOnClickListener(new View.OnClickListener() {
@Override
public void onClick(View view) {
Snackbar.make(view, "Replace with your own action", Snackbar.LENGTH_LONG)
.setAction("Action", null).show();
}
});

rg = (RadioGroup) findViewById(R.id.rg);
show = (TextView) findViewById(R.id.show);

rg.setOnCheckedChangeListener(new RadioGroup.OnCheckedChangeListener() {
@Override
public void onCheckedChanged(RadioGroup group, int checkedId) {
String tip = checkedId == R.id.male ? "您的性别是男人" : "您的性别是女人";
show.setText(tip);
}
});

}

@Override
public boolean onCreateOptionsMenu(Menu menu) {
// Inflate the menu; this adds items to the action bar if it is present.
getMenuInflater().inflate(R.menu.menu_main, menu);
return true;
}

@Override
public boolean onOptionsItemSelected(MenuItem item) {
// Handle action bar item clicks here. The action bar will
// automatically handle clicks on the Home/Up button, so long
// as you specify a parent activity in AndroidManifest.xml.
int id = item.getItemId();

//noinspection SimplifiableIfStatement
if (id == R.id.action_settings) {
return true;
}

return super.onOptionsItemSelected(item);
}
}
activity_main.xml文件:
<?xml version="1.0" encoding="utf-8"?>
<android.support.design.widget.CoordinatorLayout
xmlns:android="http://schemas.android.com/apk/res/android"
xmlns:app="http://schemas.android.com/apk/res-auto"
xmlns:tools="http://schemas.android.com/tools" android:layout_width="match_parent"
android:layout_height="match_parent" android:fitsSystemWindows="true"
tools:context=".MainActivity">

<android.support.design.widget.AppBarLayout android:layout_height="wrap_content"
android:layout_width="match_parent" android:theme="@style/AppTheme.AppBarOverlay">

<android.support.v7.widget.Toolbar android:id="@+id/toolbar"
android:layout_width="match_parent" android:layout_height="?attr/actionBarSize"
android:background="?attr/colorPrimary" app:popupTheme="@style/AppTheme.PopupOverlay" />

</android.support.design.widget.AppBarLayout>

<include layout="@layout/content_main" />

<android.support.design.widget.FloatingActionButton android:id="@+id/fab"
android:layout_width="wrap_content" android:layout_height="wrap_content"
android:layout_gravity="bottom|end" android:layout_margin="@dimen/fab_margin"
android:src="@android:drawable/ic_dialog_email" />

</android.support.design.widget.CoordinatorLayout>
content_main.xml
<?xml version="1.0" encoding="utf-8"?>
<TableLayout xmlns:android="http://schemas.android.com/apk/res/android"
xmlns:tools="http://schemas.android.com/tools"
xmlns:app="http://schemas.android.com/apk/res-auto" android:layout_width="match_parent"
android:layout_height="match_parent" android:paddingLeft="@dimen/activity_horizontal_margin"
android:paddingRight="@dimen/activity_horizontal_margin"
android:paddingTop="@dimen/activity_vertical_margin"
android:paddingBottom="@dimen/activity_vertical_margin"
app:layout_behavior="@string/appbar_scrolling_view_behavior"
tools:showIn="@layout/activity_main" tools:context=".MainActivity">

<TableRow>
<TextView android:layout_width="wrap_content"
android:layout_height="wrap_content"
android:text="性别:" />

<RadioGroup
android:id="@+id/rg"
android:orientation="horizontal"
android:layout_gravity="center_horizontal">

<RadioButton
android:layout_width="wrap_content"
android:layout_height="wrap_content"
android:text="男"
android:id="@+id/male"
android:checked="true" />

<RadioButton
android:layout_width="wrap_content"
android:layout_height="wrap_content"
android:text="女"
android:id="@+id/female" />
</RadioGroup>

</TableRow>

<TableRow>

<TextView
android:layout_width="wrap_content"
android:layout_height="wrap_content"
android:text="喜欢的颜色" />

<LinearLayout
android:orientation="vertical"
android:layout_width="wrap_content"
android:layout_height="wrap_content"
android:layout_gravity="center_horizontal">

<CheckBox
android:layout_width="wrap_content"
android:layout_height="wrap_content"
android:text="红色"
android:checked="true" />

<CheckBox
android:layout_width="wrap_content"
android:layout_height="wrap_content"
android:text="蓝色" />

<CheckBox
android:layout_width="wrap_content"
android:layout_height="wrap_content"
android:text="绿色" />
</LinearLayout>
</TableRow>

<TextView
android:layout_width="wrap_content"
android:layout_height="wrap_content"
android:id="@+id/show" />

</TableLayout>
下面是就这个工程做的一些简单分析:
1. 在content_main.xml中有一些警告,如Hardcoded string “**”, should use @string resource。可参见书的P54,写道:文本直接写在布局文件中,不是一种好的做法,因为iAndroid推荐将这些字符串集中放到XML文件中管理。
将工程运行在真机上,整体表现如图:
可以看到,首先标题栏是比较鲜艳的蓝色,与一开始的不一样。并且右下角有一个邮件图标,并没有任何功能,是悬浮的,点击会显示Replace with your own action.经检查是activity_main中的一个ID为fab(floating action button)的CustomView组件。可以添加相应功能,下来可以删掉。
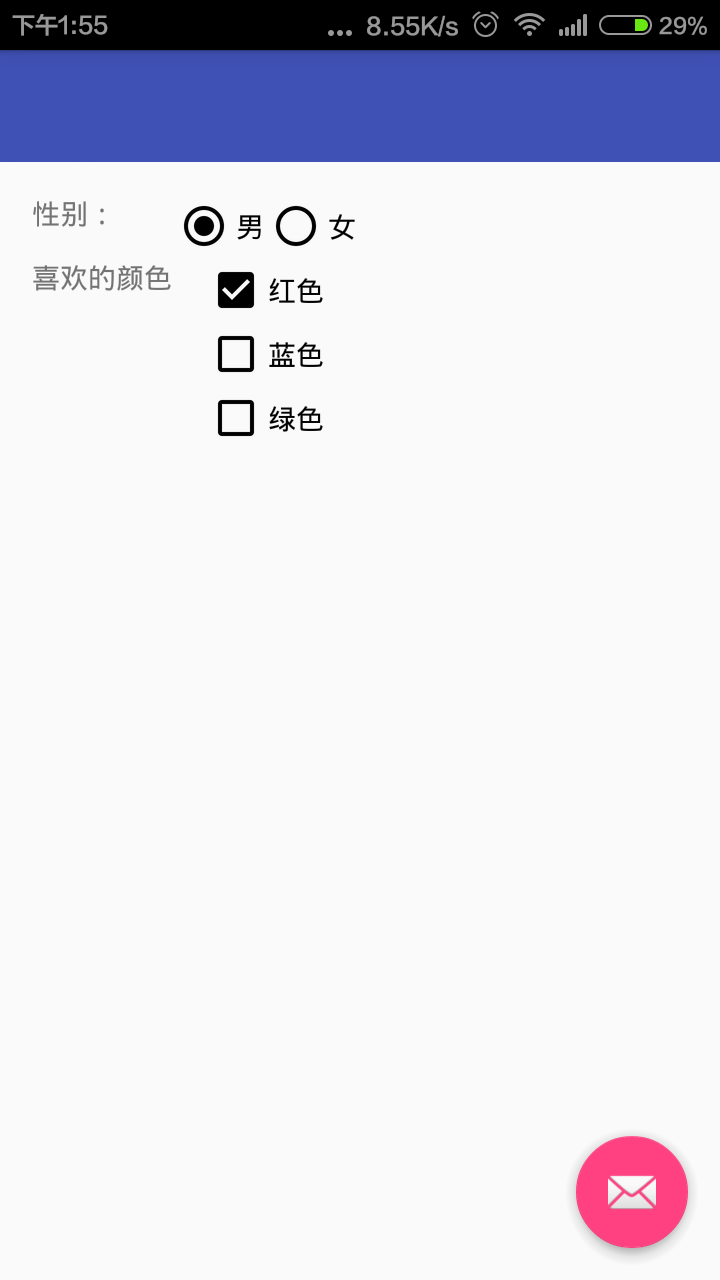
书上写的都是MainActivity extends Activity,而默认生成的都是MainActivity extends AppCompatActivity。比较一下两者的区别,首先将工程中的AppCompatActivity替换成Activity,开头会引入import android.app.Activity,并且setSupportActionBar(toolbar)一句报错,表示不能解析setSupportActionBar方法,将这句话注释掉,发现没有问题。可以看到AppCompatActivity只与ActionBar组件有关。执行APP观察情况。
标题栏上没有文字,菜单也没有了,或许跟注释掉的语句有关,而且原来按钮选中是粉色的,现在按钮选中是黑色的。
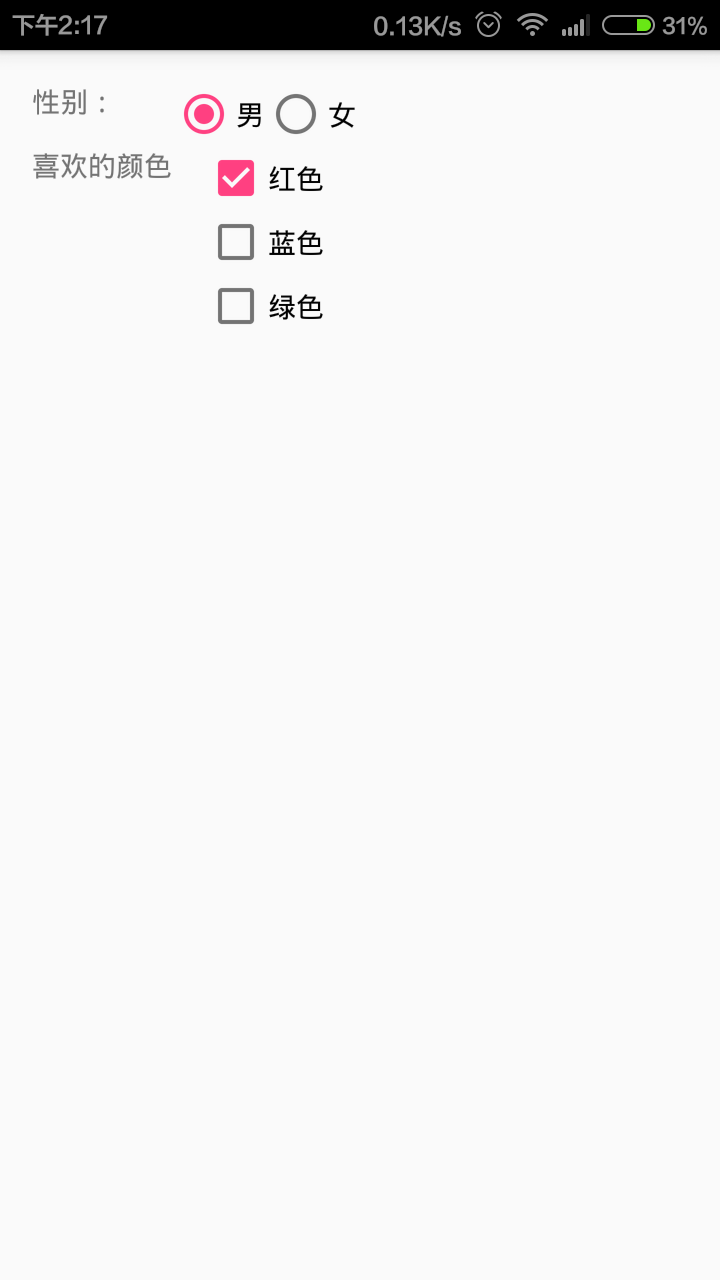
恢复AppCompatActivity,注释掉java文件中除了我们手动输入的内容之外的函数等等,即Toolbar和Settings部分,执行,发现标题栏也没有了名字,并且没有了菜单。
更改后的代码:
package monrother.com.checkbuttontest;

import android.app.Activity;
import android.os.Bundle;
import android.support.design.widget.FloatingActionButton;
import android.support.design.widget.Snackbar;
import android.support.v7.app.AppCompatActivity;
import android.support.v7.widget.Toolbar;
import android.view.View;
import android.view.Menu;
import android.view.MenuItem;
import android.widget.RadioGroup;
import android.widget.TextView;

public class MainActivity extends AppCompatActivity {
RadioGroup rg;
TextView show;

@Override
protected void onCreate(Bundle savedInstanceState) {
super.onCreate(savedInstanceState);
setContentView(R.layout.content_main);
//        Toolbar toolbar = (Toolbar) findViewById(R.id.toolbar);
//        setSupportActionBar(toolbar);
//
//        FloatingActionButton fab = (FloatingActionButton) findViewById(R.id.fab);
//        fab.setOnClickListener(new View.OnClickListener() {
//            @Override
//            public void onClick(View view) {
//                Snackbar.make(view, "Replace with your own action", Snackbar.LENGTH_LONG)
//                        .setAction("Action", null).show();
//            }
//        });
rg = (RadioGroup) findViewById(R.id.rg);
show = (TextView) findViewById(R.id.show);

rg.setOnCheckedChangeListener(new RadioGroup.OnCheckedChangeListener() {
@Override
public void onCheckedChanged(RadioGroup group, int checkedId) {
String tip = checkedId == R.id.male ? "您的性别是男人" : "您的性别是女人";
show.setText(tip);
}
});

}
//    @Override
//    public boolean onCreateOptionsMenu(Menu menu) {
//        // Inflate the menu; this adds items to the action bar if it is present.
//        getMenuInflater().inflate(R.menu.menu_main, menu);
//        return true;
//    }
//
//    @Override
//    public boolean onOptionsItemSelected(MenuItem item) {
//        // Handle action bar item clicks here. The action bar will
//        // automatically handle clicks on the Home/Up button, so long
//        // as you specify a parent activity in AndroidManifest.xml.
//        int id = item.getItemId();
//
//        //noinspection SimplifiableIfStatement
//        if (id == R.id.action_settings) {
//            return true;
//        }
//
//        return super.onOptionsItemSelected(item);
//    }
}
将setContentView(R.layout.activity_main)的activity_main改成content_main,结果是没有了标题栏,也没有了那个邮件的图标。
开发这个项目最重要的还是学习程序的编写。首先看java程序的编写,大致结构都是
public class MainActivity extends AppCompatActivity {
// 添加变量

@Override
protected void onCreate(Bundle savedInstanceState) {
super.onCreate(savedInstanceState);
setContentView(R.layout.activity_main);
Toolbar toolbar = (Toolbar) findViewById(R.id.toolbar);
setSupportActionBar(toolbar);
// 获取界面上的组件
rg = (RadioGroup) findViewById(R.id.rg);
show = (TextView) findViewById(R.id.show);
// 为事件绑定事件监听器
rg.setOnCheckedChangeListener(new RadioGroup.OnCheckedChangeListener() {

@Override
public void onCheckedChanged(RadioGroup group, int checkedId) {
// 动作
String tip = checkedId == R.id.male ? "您的性别是男人" : "您的性别是女人";
show.setText(tip);
}
});
}
}
今天学习的内容大致就是这样。

相关文章推荐
- 使用C++实现JNI接口需要注意的事项
- Android IPC进程间通讯机制
- Android Manifest 用法
- [转载]Activity中ConfigChanges属性的用法
- Android之获取手机上的图片和视频缩略图thumbnails
- Android之使用Http协议实现文件上传功能
- Android学习笔记(二九):嵌入浏览器
- android string.xml文件中的整型和string型代替
- i-jetty环境搭配与编译
- android之定时器AlarmManager
- android wifi 无线调试
- Android Native 绘图方法
- Android java 与 javascript互访(相互调用)的方法例子
- android 代码实现控件之间的间距
- android FragmentPagerAdapter的“标准”配置
- Android"解决"onTouch和onClick的冲突问题
- android:installLocation简析
- android searchView的关闭事件
- SourceProvider.getJniDirectories