DirectX11 板条箱示例Demo
2015-10-03 22:45
323 查看
板条箱Demo
1. 指定贴图坐标
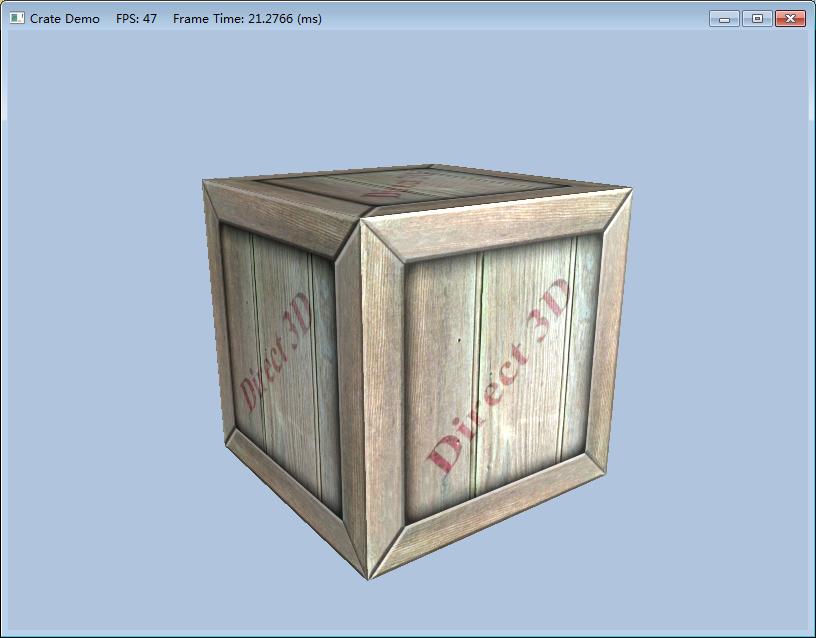
GeometryGenerator::CreateBox产生箱子的贴图坐标,使得整个贴图图像都映射到箱子的每一面。为了简便起见,我们只显示前面、后面和顶面。注意这里我们省略了顶点结构的法线和切线向量的坐标。void GeometryGe ne rator::Cre ateBox(float width, float height, float depth,
MeshData& me shData)
{
Vertex v[24];
float w2 = 0.5f*width;
float h2 = 0.5f*height;
float d2 = 0.5f*depth;
// Fill in the front face vertex data.
v[0] = Vertex(-w2, -h2, -d2, ..., 0.0f, 1.0f);
v[1] = Vertex(-w2, +h2, -d2, ..., 0.0f, 0.0f);
v[2] = Vertex(+w2, +h2, -d2, ..., 1.0f, 0.0f);
v[3] = Vertex(+w2, -h2, -d2, ..., 1.0f, 1.0f);
// Fill in the back face vertex data.
v[4] = Vertex(-w2, -h2, +d2, ..., 1.0f, 1.0f);
v[5] = Ve rte x(+w2, -h2, +d2, ..., 0.0f, 1.0f);
v[6] = Ve rte x(+w2, +h2, +d2, ..., 0.0f, 0.0f);
v[7] = Vertex(-w2, +h2, +d2, ..., 1.0f, 0.0f);
// Fill in the top face vertex data.
v[8] = Vertex(-w2, +h2, -d2, ..., 0.0f, 1.0f);
v[9] = Vertex(-w2, +h2, +d2, ..., 0.0f, 0.0f);
v[10] = Ve rte x(+w2, +h2, +d2, ..., 1.0f, 0.0f);
v[11] = Vertex(+w2, +h2, -d2, ..., 1.0f, 1.0f);2. 创建纹理
我们在初始化的时候从一个文件中创建纹理(技术上说纹理就是着色器资源视图):// CrateApp 数据成员
ID3D11ShaderResourceView* mDiffuseMapSRV;
bool CrateApp::Init()
{
if(!D3DApp::Init())
return false;
// 因为输入布局依赖着色器签名,因此必须在创建输入布局之前初始化Effects对象
Effects::InitAll(md3dDevice);
InputLayouts::InitAll(md3dDevice);
HR(D3DX11CreateShaderResourceViewFromFile(md3dDevice, L"Te xtures/WoodCrate01.dds ", 0, 0, &mDiffuseMapSRV, 0));
BuildGeometryBuffers();
return true;
}3. 设置纹理
纹理数据通常在像素着色器中访问。为了像素着色器访问它,我们需要设置贴图视图(ID3D11ShaderResourceView)到.fx的Texture2D对象。// BasicEffect成员
ID3DX11EffectShader ResourceVariable *Diffuse Map;
// 获得指向effect文件的指针变量
Diffuse Map = mFX->GetVariableByName("gDiffuse Map")->AsShaderResource ();
void BasicEffect::SetDiffuse Map(ID3D11Shade rResource Vie w* te x)
{
Diffuse Map->SetResource (te x);
}
// [.FX 代码]
// 效果文件的贴图变量
Texture2D gDiffuseMap;4. 更新Basic特效文件
下面是修改后的basic.fx文件,现在支持纹理://=============================================================================
// Basic.fx by Frank Luna (C) 2011 All Rights Reserved.
//
// Basic effect that currently supports transformations, lighting, and texturing.
//=============================================================================
#include "LightHelper.fx"
cbuffer cbPerFrame
{
DirectionalLight gDirLights[3];
float3 gEyePosW;
float gFogStart;
float gFogRange;
float4 gFogColor;
};
cbuffer cbPerObject
{
float4x4 gWorld;
float4x4 gWorldInvTranspose;
float4x4 gWorldViewProj;
float4x4 gTexTransform;
Material gMaterial;
};
// Nonnumeric values cannot be added to a cbuffer.
Texture2D gDiffuseMap;
SamplerState samAnisotropic
{
Filter = ANISOTROPIC;
MaxAnisotropy = 4;
AddressU = WRAP;
AddressV = WRAP;
};
struct VertexIn
{
float3 PosL : POSITION;
float3 NormalL : NORMAL;
float2 Tex : TEXCOORD;
};
struct VertexOut
{
float4 PosH : SV_POSITION;
float3 PosW : POSITION;
float3 NormalW : NORMAL;
float2 Tex : TEXCOORD;
};
VertexOut VS(VertexIn vin)
{
VertexOut vout;
// Transform to world space space.
vout.PosW = mul(float4(vin.PosL, 1.0f), gWorld).xyz;
vout.NormalW = mul(vin.NormalL, (float3x3)gWorldInvTranspose);
// Transform to homogeneous clip space.
vout.PosH = mul(float4(vin.PosL, 1.0f), gWorldViewProj);
// Output vertex attributes for interpolation across triangle.
vout.Tex = mul(float4(vin.Tex, 0.0f, 1.0f), gTexTransform).xy;
return vout;
}
float4 PS(VertexOut pin, uniform int gLightCount, uniform bool gUseTexure) : SV_Target
{
// Interpolating normal can unnormalize it, so normalize it.
pin.NormalW = normalize(pin.NormalW);
// The toEye vector is used in lighting.
float3 toEye = gEyePosW - pin.PosW;
// Cache the distance to the eye from this surface point.
float distToEye = length(toEye);
// Normalize.
toEye /= distToEye;
// Default to multiplicative identity.
float4 texColor = float4(1, 1, 1, 1);
if(gUseTexure)
{
// Sample texture.
texColor = gDiffuseMap.Sample( samAnisotropic, pin.Tex );
}
//
// Lighting.
//
float4 litColor = texColor;
if( gLightCount > 0 )
{
// Start with a sum of zero.
float4 ambient = float4(0.0f, 0.0f, 0.0f, 0.0f);
float4 diffuse = float4(0.0f, 0.0f, 0.0f, 0.0f);
float4 spec = float4(0.0f, 0.0f, 0.0f, 0.0f);
// Sum the light contribution from each light source.
[unroll]
for(int i = 0; i < gLightCount; ++i)
{
float4 A, D, S;
ComputeDirectionalLight(gMaterial, gDirLights[i], pin.NormalW, toEye,
A, D, S);
ambient += A;
diffuse += D;
spec += S;
}
// Modulate with late add.
litColor = texColor*(ambient + diffuse) + spec;
}
// Common to take alpha from diffuse material and texture.
litColor.a = gMaterial.Diffuse.a * texColor.a;
return litColor;
}
technique11 Light1
{
pass P0
{
SetVertexShader( CompileShader( vs_5_0, VS() ) );
SetGeometryShader( NULL );
SetPixelShader( CompileShader( ps_5_0, PS(1, false) ) );
}
}
technique11 Light2
{
pass P0
{
SetVertexShader( CompileShader( vs_5_0, VS() ) );
SetGeometryShader( NULL );
SetPixelShader( CompileShader( ps_5_0, PS(2, false) ) );
}
}
technique11 Light3
{
pass P0
{
SetVertexShader( CompileShader( vs_5_0, VS() ) );
SetGeometryShader( NULL );
SetPixelShader( CompileShader( ps_5_0, PS(3, false) ) );
}
}
technique11 Light0Tex
{
pass P0
{
SetVertexShader( CompileShader( vs_5_0, VS() ) );
SetGeometryShader( NULL );
SetPixelShader( CompileShader( ps_5_0, PS(0, true) ) );
}
}
technique11 Light1Tex
{
pass P0
{
SetVertexShader( CompileShader( vs_5_0, VS() ) );
SetGeometryShader( NULL );
SetPixelShader( CompileShader( ps_5_0, PS(1, true) ) );
}
}
technique11 Light2Tex
{
pass P0
{
SetVertexShader( CompileShader( vs_5_0, VS() ) );
SetGeometryShader( NULL );
SetPixelShader( CompileShader( ps_5_0, PS(2, true) ) );
}
}
technique11 Light3Tex
{
pass P0
{
SetVertexShader( CompileShader( vs_5_0, VS() ) );
SetGeometryShader( NULL );
SetPixelShader( CompileShader( ps_5_0, PS(3, true) ) );
}
}观察Basic.fx的带有纹理和不带纹理的techniques技术,通过使用uniform参数gUseTexture实现。这样,如果我们需要渲染一些东西但不需要纹理,我们可以选择不带纹理的techniques,因此没有必要付出纹理的开销。通用我们可以选择我们使用的光源数量,所以我们不用为不需要的额外光源计算付出开销。
有一个我们没有讨论的常量缓存gTexTransform。这个遍历被用在顶点着色器的转换输入纹理坐标:
vout.Tex = mul(float4(vin.Tex, 0.0f, 1.0f), gTe xTransform).xy;
纹理坐标是在贴图平面上2D的点。因此我们可以平移,旋转和缩放它们就像我们操作其他点一样。在这个Demo里,我们使用单位矩阵变换,使得输入纹理坐标是左边未修改的。注意变换2D贴图坐标是通过4X4矩阵的,我们将它扩大到4D向量:
vin.Tex ---> float4(vin. Tex, 0.0f, 1.0f)
在乘法运算完成后,通过丢弃Z和W分量来使得4D向量转换回2D向量。也就是:
vout.Tex = mul(float4(vin. Te x, 0.0f, 1.0f), gTe xTransform).xy;
5. 程序运行结果截图
完整项目源代码请自行到DirectX11龙书官网下载。
相关文章推荐
- 功能测试 黑盒测试方法
- ZOJ3822-Domination 概率DP
- 动态计算UITableViewCell高度详解
- hdu 1242 Rescue(bfs+优先队列)
- Hadoop学习笔记(六)启动Shell分析
- Python文件名称与将导入的模块名相同会出现的问题
- SPOJ QTREE - Query on a tree(树链剖分)
- SGU 258 Almost Lucky Numbers 接近幸运数(数位DP)
- 项目问题思考之策略模式
- 找出第二个文本抄袭第一个文本的所有位置和长度 后缀数组 UVA 10526 - Intellectual Property
- 【bzoj3034】Heaven Cow与God Bull
- 剑指offer—从上往下打印二叉树
- UVA 11121 Base -2
- 数据库的事物隔离级别通俗理解
- Intel收购威睿,中国应该加速放弃CDMA网络
- 多线程概念的理解——代码验证之耗时操作练习
- 异常
- 对象状态
- 剑指offer—栈的压入、弹出序列
- [深入理解Java虚拟机]第一章实战 自己编译JDK
