Spring 3 hello world example
2015-09-16 02:58
519 查看
This tutorial shows you how to create a simple hello world example in Spring 3.0.
Technologies used in this article :
Spring 3.0.5.RELEASE
Maven 3.0.3
Eclipse 3.6
JDK 1.6.0.13
P.S Spring 3.0, at least JDK 1.5 is required to work.
File :
File :
Spring 3 : Hello ! Mkyong
“`
Technologies used in this article :
Spring 3.0.5.RELEASE
Maven 3.0.3
Eclipse 3.6
JDK 1.6.0.13
P.S Spring 3.0, at least JDK 1.5 is required to work.
Spring 3.0 dependencies
In Spring 2.5.x, almost the entire Spring modules are grouped into a singlespring.jarfile. Since Spring 3.0, every modules are split into an individual jar file, for example,
spring-core,
spring-expression,
spring-context,
spring-aopand etc.
1. Generate project structure with Maven
Issue below Maven command to create a standard Java project structure.mvn archetype:generate -DgroupId=com.mkyong.core -DartifactId=Spring3Example -DarchetypeArtifactId=maven-archetype-quickstart -DinteractiveMode=false
2. Convert to Eclipse project
Convert Maven style project to Eclipse’s style project, and import into Eclipse IDE.mvn eclipse:eclipse
2. Add Spring 3.0 dependency
Add the Spring 3.0 dependencies listed below in Maven’spom.xmlfile. The Spring dependencies are available for download via Maven central repository.
File : pom.xml
<project xmlns="http://maven.apache.org/POM/4.0.0"
xmlns:xsi="http://www.w3.org/2001/XMLSchema-instance"
xsi:schemaLocation="http://maven.apache.org/POM/4.0.0 http://maven.apache.org/maven-v4_0_0.xsd"> <modelVersion>4.0.0</modelVersion>
<groupId>com.mkyong.core</groupId>
<artifactId>Spring3Example</artifactId>
<packaging>jar</packaging>
<version>1.0-SNAPSHOT</version>
<name>Spring3Example</name>
<url>http://maven.apache.org</url>

<properties>
<spring.version>3.0.5.RELEASE</spring.version>
</properties>

<dependencies>

<!-- Spring 3 dependencies -->
<dependency>
<groupId>org.springframework</groupId>
<artifactId>spring-core</artifactId>
<version>${spring.version}</version>
</dependency>

<dependency>
<groupId>org.springframework</groupId>
<artifactId>spring-context</artifactId>
<version>${spring.version}</version>
</dependency>

</dependencies>
</project>
3. Spring bean
A simple Spring bean.package com.mkyong.core;
/**
* Spring bean
*
*/
public class HelloWorld {
private String name;
public void setName(String name) {
this.name = name;
}
public void printHello() {
System.out.println("Spring 3 : Hello ! " + name);
}
}4. Spring bean configuration file
Create a Spring configuration file, and declare all the available Spring beans.File : SpringBeans.xml
<beans xmlns="http://www.springframework.org/schema/beans"
xmlns:xsi="http://www.w3.org/2001/XMLSchema-instance"
xsi:schemaLocation="http://www.springframework.org/schema/beans http://www.springframework.org/schema/beans/spring-beans-3.0.xsd">
<bean id="helloBean" class="com.mkyong.core.HelloWorld">
<property name="name" value="Mkyong" />
</bean>

</beans>
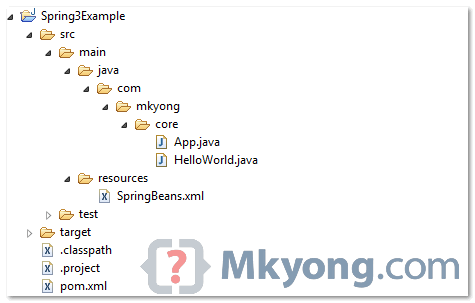
5. Review project structure
Review directory structure as follows6. Run It
Run it.package com.mkyong.core;
import org.springframework.context.ApplicationContext;
import org.springframework.context.support.ClassPathXmlApplicationContext;
public class App {
public static void main(String[] args) {
ApplicationContext context = new ClassPathXmlApplicationContext(
"SpringBeans.xml");
HelloWorld obj = (HelloWorld) context.getBean("helloBean");
obj.printHello();
}
}7. Output
“Spring 3 : Hello ! Mkyong
“`

相关文章推荐
- maven学习
- 一个jar包里的网站
- 一个jar包里的网站之文件上传
- 一个jar包里的网站之返回对媒体类型
- maven插件maven-war-plugin的使用
- jenkins------部署项目到jboss eap下
- maven使用经验集
- MyEclipse Web Project转Eclipse Dynamic Web Project
- Windows Clang开发环境备忘
- Ubuntu 安装 JDK 问题
- 傻瓜式用Eclipse连接MySQL数据库
- 让Flex Builder 3.0与Eclipse3.4整合起来
- Eclipse配置Javascript开发环境图文教程
- 使用zend studio for eclipse不能激活代码提示功能的解决办法
- spring+html5实现安全传输随机数字密码键盘
- Spring中属性注入详解
- 图解Eclipse j2ee开发环境的搭建过程
- struts2 spring整合fieldError问题
- ext for eclipse插件安装方法
- 解决Fedora14下eclipse进行android开发,ibus提示没有输入窗口的方法详解