Maven + Spring hello world example
2015-09-16 02:54
344 查看
This quick guide example uses Maven to generate a simple Java project structure, and demonstrates how to retrieve Spring bean and prints a “
Technologies used in this article :
Spring 2.5.6
Maven 3.0.3
Eclipse 3.6
JDK 1.6.0.13
Maven will generate all the Java’s standard folders structure for you (besides
Later, import the converted project into Eclipse IDE.
Create a
Create a resources “
File :
Issue “
File :
File :
hello world” string.
Technologies used in this article :
Spring 2.5.6
Maven 3.0.3
Eclipse 3.6
JDK 1.6.0.13
1. Generate project structure with Maven
In command prompt, issue following Maven command :mvn archetype:generate -DgroupId=com.mkyong.common -DartifactId=SpringExamples -DarchetypeArtifactId=maven-archetype-quickstart -DinteractiveMode=false
Maven will generate all the Java’s standard folders structure for you (besides
resourcesfolder, which you need to create it manually)
2. Convert to Eclipse project
Type “mvn eclipse:eclipse” to convert the newly generated Maven style project to Eclipse’s style project.
mvn eclipse:eclipse
Later, import the converted project into Eclipse IDE.
Create a
resourcesfolder
Create a resources “
/src/main/resources” folder, the Spring’s bean xml configuration file will put here later. Maven will treat all files under this “
resources” folder as resources files, and copy it to output classes automatically.
3. Add Spring dependency
Add Spring dependency in Maven’spom.xmlfile.
File : pom.xml
<project xmlns="http://maven.apache.org/POM/4.0.0"
xmlns:xsi="http://www.w3.org/2001/XMLSchema-instance"
xsi:schemaLocation="http://maven.apache.org/POM/4.0.0 http://maven.apache.org/maven-v4_0_0.xsd"> <modelVersion>4.0.0</modelVersion>
<groupId>com.mkyong.common</groupId>
<artifactId>SpringExamples</artifactId>
<packaging>jar</packaging>
<version>1.0-SNAPSHOT</version>
<name>SpringExamples</name>
<url>http://maven.apache.org</url>
<dependencies>

<!-- Spring framework -->
<dependency>
<groupId>org.springframework</groupId>
<artifactId>spring</artifactId>
<version>2.5.6</version>
</dependency>

</dependencies>
</project>
Issue “
mvn eclipse:eclipse” again, Maven will download the Spring dependency libraries automatically and put it into your Maven’s local repository. At the same time, Maven will add the downloaded libraries into Eclipse “
.classpath” for dependency purpose.
4. Spring bean (Java class)
Create a normal Java class (HelloWorld.java) at “
src/main/java/com/mkyong/common/HelloWorld.java”. Spring’s bean is just a normal Java class, and declare in Spring bean configuration file later.
package com.mkyong.common;

/**
* Spring bean
*
*/
public class HelloWorld {
private String name;

public void setName(String name) {
this.name = name;
}

public void printHello() {
System.out.println("Hello ! " + name);
}
}
5. Spring bean configuration file
Create an xml file (Spring-Module.xml) at “
src/main/resources/Spring-Module.xml“. This is the Spring’s bean configuration file, which declares all the available Spring beans.
File : Spring-Module.xml
<beans xmlns="http://www.springframework.org/schema/beans"
xmlns:xsi="http://www.w3.org/2001/XMLSchema-instance"
xsi:schemaLocation="http://www.springframework.org/schema/beans http://www.springframework.org/schema/beans/spring-beans-2.5.xsd">
<bean id="helloBean" class="com.mkyong.common.HelloWorld">
<property name="name" value="Mkyong" />
</bean>

</beans>
4000
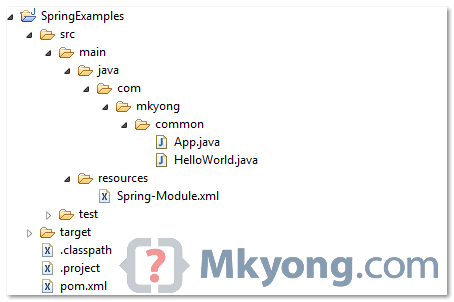
6. Review project structure
Review it and make sure the folder structure as follows7. Run It
RunApp.java, it will load the Spring bean configuration file (
Spring-Module.xml) and retrieve the Spring bean via
getBean()method.
File : App.java
package com.mkyong.common;

import org.springframework.context.ApplicationContext;
import org.springframework.context.support.ClassPathXmlApplicationContext;

public class App {
public static void main(String[] args) {
ApplicationContext context = new ClassPathXmlApplicationContext(
"Spring-Module.xml");

HelloWorld obj = (HelloWorld) context.getBean("helloBean");
obj.printHello();
}
}
8. Output
Hello ! Mkyong

相关文章推荐
- java对世界各个时区(TimeZone)的通用转换处理方法(转载)
- java-注解annotation
- java-模拟tomcat服务器
- java-用HttpURLConnection发送Http请求.
- java-WEB中的监听器Lisener
- Android IPC进程间通讯机制
- Android Native 绘图方法
- Android java 与 javascript互访(相互调用)的方法例子
- 介绍一款信息管理系统的开源框架---jeecg
- 聚类算法之kmeans算法java版本
- java实现 PageRank算法
- PropertyChangeListener简单理解
- maven学习
- 插入排序
- 冒泡排序
- 堆排序
- 快速排序
- 二叉查找树