Android透明状态栏和沉浸式状态栏实现
2015-09-12 10:16
686 查看
首先我们得了解什么是透明状态栏以及什么是沉浸式状态栏,以及其区别,国内习惯称透明状态栏为沉浸式状态栏,但是两者是有本质区别的。
先来看看什么是沉浸式模式。
Android 4.4中,沉浸式体验得到了再次强化,提供了一种“全屏模式”(Full-screen Immersive Mode)。全屏模式又分两种,一种叫后撤式 (Lean Back),另一种叫做沉浸式(Immersive)。后撤式已经在之前的系统中被广泛使用了——当你在优酷APP中观看视频时,大部分时间手指是不会去碰屏幕的。这种情况下,虚拟键和状态栏都会自动隐藏,但当你触摸屏幕的时候,它们又会出现。而新加入的沉浸式则不太一样,在沉浸式全屏状态下,对屏幕的操作并不会唤出系统栏。想要唤出系统栏,你必须从屏幕的上/下边缘向屏幕内划入。沉浸式的全屏状态更适合游戏和阅读这样的应用。
但沉浸模式和普通全屏不同点在于,沉浸模式通过下滑屏幕上方或者下方可以调出虚拟键和状态栏。
比如多看阅读,下图是在阅读时沉浸模式下全屏。

然后从屏幕上方下滑或者下方上划,虚拟键和状态栏出现了。但却是直接覆盖在程序文字上的。

而沉浸式状态栏的来源就是很多手机用的是实体按键,没有虚拟键,于是开了沉浸模式就只有状态栏消失了。于是沉浸模式成了沉浸式状态栏。
Android 4.4 一个很重要的改变就是透明系统栏.。新的系统栏是渐变透明的, 可以最大限度的允许屏幕显示更多内容, 也可以让系统栏和 Action Bar 融为一体, 仅仅留下最低限度的背景保护以免通知通知栏内容和 Action Bar 文字/图标难以识别。谷歌把这种效果称之为:Translucent Bar。
Translucent Bar 是 Android 对 Edge to Edge 尝试中的一个, 也是最容易被用户注意到的. 它的初始目的就是要最大化可视面积和淡化系统界面的存在感。
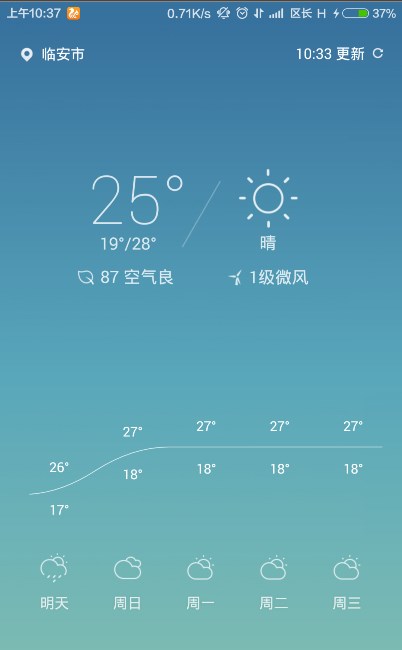
其实简单一点就是布局延伸到状态栏,状态栏背景与应用背景相同,这就是*透明状态栏*。最直接的例子就是UC浏览器的天气界面,其布局延伸到状态栏,但是状态栏与应用同背景,如图所示
但是这样有时候会把状态栏颜色变得和应用的背景颜色一样,但是实际上只是修改了状态栏的颜色,我们称它为变色状态栏
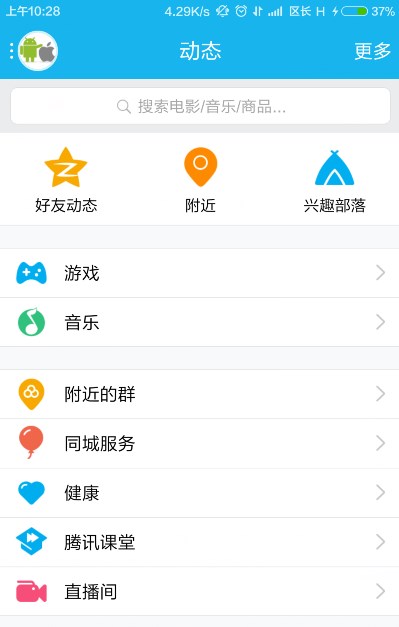
而现在大家所在用的QQ等软件,状态栏与软件颜色融为一体,其实就是变色状态栏。而小米MIUI的自带应用,也都是变色状态栏或者是透明状态栏,而并非是沉浸式状态栏。

这里我们姑且称变色状态栏为透明状态栏的一种,本篇文章就是带大家实现这种透明状态栏。
由于这种效果只有在4.4及以上有效,所以本篇文章的效果只有在4.4及以上有效。
首先应用主题
然后我们在res下新建一个values-v19的目录,代表最低API为19,新建一个style.xml,下面的代码是透明状态栏的关键
我们禁用了系统的ActionBar,使用ToolBar代替,布局代码如下
细心的你会发现在Toolbar中加入了android:fitsSystemWindows=”true”属性,这就是将布局延伸到状态栏,这时候你运行一下,会发现Toolbar上移到了状态栏的位置。上移的高度刚好是状态栏的高度。
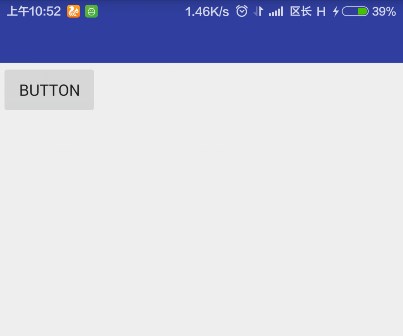
但是我们并不想它移动到上面,只是想它状态栏和Toolbar颜色一样,要怎么做的,很简单,在代码中通过setSupportActionBar设置到ActionBar的位置即可。
之后的效果就是这样的。
很明显的看到,ToolBar就是之前的高度,但是状态栏也变色了。
但是我们又怎么能满足于此呢。在Android 5.0上,我们的状态栏的颜色是要比Toolbar的颜色要深的。就像这样。
我们还要进一步修饰,需要对状态栏着色,这里需要用到一个开源库SystemBarTint
加入依赖
之后再设置布局后加入以下代码
最终效果就是上图所示
先来看看什么是沉浸式模式。
Android 4.4中,沉浸式体验得到了再次强化,提供了一种“全屏模式”(Full-screen Immersive Mode)。全屏模式又分两种,一种叫后撤式 (Lean Back),另一种叫做沉浸式(Immersive)。后撤式已经在之前的系统中被广泛使用了——当你在优酷APP中观看视频时,大部分时间手指是不会去碰屏幕的。这种情况下,虚拟键和状态栏都会自动隐藏,但当你触摸屏幕的时候,它们又会出现。而新加入的沉浸式则不太一样,在沉浸式全屏状态下,对屏幕的操作并不会唤出系统栏。想要唤出系统栏,你必须从屏幕的上/下边缘向屏幕内划入。沉浸式的全屏状态更适合游戏和阅读这样的应用。
但沉浸模式和普通全屏不同点在于,沉浸模式通过下滑屏幕上方或者下方可以调出虚拟键和状态栏。
比如多看阅读,下图是在阅读时沉浸模式下全屏。
然后从屏幕上方下滑或者下方上划,虚拟键和状态栏出现了。但却是直接覆盖在程序文字上的。
而沉浸式状态栏的来源就是很多手机用的是实体按键,没有虚拟键,于是开了沉浸模式就只有状态栏消失了。于是沉浸模式成了沉浸式状态栏。
Android 4.4 一个很重要的改变就是透明系统栏.。新的系统栏是渐变透明的, 可以最大限度的允许屏幕显示更多内容, 也可以让系统栏和 Action Bar 融为一体, 仅仅留下最低限度的背景保护以免通知通知栏内容和 Action Bar 文字/图标难以识别。谷歌把这种效果称之为:Translucent Bar。
Translucent Bar 是 Android 对 Edge to Edge 尝试中的一个, 也是最容易被用户注意到的. 它的初始目的就是要最大化可视面积和淡化系统界面的存在感。
其实简单一点就是布局延伸到状态栏,状态栏背景与应用背景相同,这就是*透明状态栏*。最直接的例子就是UC浏览器的天气界面,其布局延伸到状态栏,但是状态栏与应用同背景,如图所示
但是这样有时候会把状态栏颜色变得和应用的背景颜色一样,但是实际上只是修改了状态栏的颜色,我们称它为变色状态栏
而现在大家所在用的QQ等软件,状态栏与软件颜色融为一体,其实就是变色状态栏。而小米MIUI的自带应用,也都是变色状态栏或者是透明状态栏,而并非是沉浸式状态栏。
这里我们姑且称变色状态栏为透明状态栏的一种,本篇文章就是带大家实现这种透明状态栏。
由于这种效果只有在4.4及以上有效,所以本篇文章的效果只有在4.4及以上有效。
首先应用主题
<code class="hljs xml has-numbering" style="display: block; padding: 0px; background-color: transparent; color: inherit; box-sizing: border-box; font-family: 'Source Code Pro', monospace;font-size:undefined; white-space: pre; border-top-left-radius: 0px; border-top-right-radius: 0px; border-bottom-right-radius: 0px; border-bottom-left-radius: 0px; word-wrap: normal; background-position: initial initial; background-repeat: initial initial;"><span class="hljs-tag" style="color: rgb(0, 102, 102); box-sizing: border-box;"><<span class="hljs-title" style="box-sizing: border-box; color: rgb(0, 0, 136);">resources</span>></span>

<span class="hljs-tag" style="color: rgb(0, 102, 102); box-sizing: border-box;"><<span class="hljs-title" style="box-sizing: border-box; color: rgb(0, 0, 136);">style</span> <span class="hljs-attribute" style="box-sizing: border-box; color: rgb(102, 0, 102);">name</span>=<span class="hljs-value" style="box-sizing: border-box; color: rgb(0, 136, 0);">"AppTheme"</span> <span class="hljs-attribute" style="box-sizing: border-box; color: rgb(102, 0, 102);">parent</span>=<span class="hljs-value" style="box-sizing: border-box; color: rgb(0, 136, 0);">"@style/BaseTheme"</span>></span><span class="css" style="box-sizing: border-box;">

</span><span class="hljs-tag" style="color: rgb(0, 102, 102); box-sizing: border-box;"></<span class="hljs-title" style="box-sizing: border-box; color: rgb(0, 0, 136);">style</span>></span>
<span class="hljs-tag" style="color: rgb(0, 102, 102); box-sizing: border-box;"><<span class="hljs-title" style="box-sizing: border-box; color: rgb(0, 0, 136);">style</span> <span class="hljs-attribute" style="box-sizing: border-box; color: rgb(102, 0, 102);">name</span>=<span class="hljs-value" style="box-sizing: border-box; color: rgb(0, 136, 0);">"BaseTheme"</span> <span class="hljs-attribute" style="box-sizing: border-box; color: rgb(102, 0, 102);">parent</span>=<span class="hljs-value" style="box-sizing: border-box; color: rgb(0, 136, 0);">"Theme.AppCompat.Light.NoActionBar"</span>></span><span class="css" style="box-sizing: border-box;">
<<span class="hljs-tag" style="color: rgb(0, 0, 0); box-sizing: border-box;">item</span> <span class="hljs-tag" style="color: rgb(0, 0, 0); box-sizing: border-box;">name</span>="<span class="hljs-tag" style="color: rgb(0, 0, 0); box-sizing: border-box;">colorPrimary</span>"><span class="hljs-at_rule" style="box-sizing: border-box;">@<span class="hljs-keyword" style="color: rgb(0, 0, 136); box-sizing: border-box;">color/colorPrimary</item></span>
<item name=<span class="hljs-string" style="color: rgb(0, 136, 0); box-sizing: border-box;">"colorPrimaryDark"</span>>@color/colorPrimaryDark</item>
</span></span><span class="hljs-tag" style="color: rgb(0, 102, 102); box-sizing: border-box;"></<span class="hljs-title" style="box-sizing: border-box; color: rgb(0, 0, 136);">style</span>></span>

<span class="hljs-tag" style="color: rgb(0, 102, 102); box-sizing: border-box;"></<span class="hljs-title" style="box-sizing: border-box; color: rgb(0, 0, 136);">resources</span>></span>
</code><ul class="pre-numbering" style="box-sizing: border-box; position: absolute; width: 50px; background-color: rgb(238, 238, 238); top: 0px; left: 0px; margin: 0px; padding: 6px 0px 40px; border-right-width: 1px; border-right-style: solid; border-right-color: rgb(221, 221, 221); list-style: none; text-align: right;"><li style="box-sizing: border-box; padding: 0px 5px;">1</li><li style="box-sizing: border-box; padding: 0px 5px;">2</li><li style="box-sizing: border-box; padding: 0px 5px;">3</li><li style="box-sizing: border-box; padding: 0px 5px;">4</li><li style="box-sizing: border-box; padding: 0px 5px;">5</li><li style="box-sizing: border-box; padding: 0px 5px;">6</li><li style="box-sizing: border-box; padding: 0px 5px;">7</li><li style="box-sizing: border-box; padding: 0px 5px;">8</li><li style="box-sizing: border-box; padding: 0px 5px;">9</li><li style="box-sizing: border-box; padding: 0px 5px;">10</li><li style="box-sizing: border-box; padding: 0px 5px;">11</li><li style="box-sizing: border-box; padding: 0px 5px;">12</li></ul>
然后我们在res下新建一个values-v19的目录,代表最低API为19,新建一个style.xml,下面的代码是透明状态栏的关键
<code class="hljs applescript has-numbering" style="display: block; padding: 0px; background-color: transparent; color: inherit; box-sizing: border-box; font-family: 'Source Code Pro', monospace;font-size:undefined; white-space: pre; border-top-left-radius: 0px; border-top-right-radius: 0px; border-bottom-right-radius: 0px; border-bottom-left-radius: 0px; word-wrap: normal; background-position: initial initial; background-repeat: initial initial;"><resources>

<style <span class="hljs-property" style="box-sizing: border-box;">name</span>=<span class="hljs-string" style="color: rgb(0, 136, 0); box-sizing: border-box;">"AppTheme"</span> parent=<span class="hljs-string" style="color: rgb(0, 136, 0); box-sizing: border-box;">"@style/BaseTheme"</span>>
<<span class="hljs-property" style="box-sizing: border-box;">item</span> <span class="hljs-property" style="box-sizing: border-box;">name</span>=<span class="hljs-string" style="color: rgb(0, 136, 0); box-sizing: border-box;">"android:windowTranslucentNavigation"</span>><span class="hljs-constant" style="box-sizing: border-box;">true</span></<span class="hljs-property" style="box-sizing: border-box;">item</span>>
<<span class="hljs-property" style="box-sizing: border-box;">item</span> <span class="hljs-property" style="box-sizing: border-box;">name</span>=<span class="hljs-string" style="color: rgb(0, 136, 0); box-sizing: border-box;">"android:windowTranslucentStatus"</span>><span class="hljs-constant" style="box-sizing: border-box;">true</span></<span class="hljs-property" style="box-sizing: border-box;">item</span>>
</style>

</resources>
</code><ul class="pre-numbering" style="box-sizing: border-box; position: absolute; width: 50px; background-color: rgb(238, 238, 238); top: 0px; left: 0px; margin: 0px; padding: 6px 0px 40px; border-right-width: 1px; border-right-style: solid; border-right-color: rgb(221, 221, 221); list-style: none; text-align: right;"><li style="box-sizing: border-box; padding: 0px 5px;">1</li><li style="box-sizing: border-box; padding: 0px 5px;">2</li><li style="box-sizing: border-box; padding: 0px 5px;">3</li><li style="box-sizing: border-box; padding: 0px 5px;">4</li><li style="box-sizing: border-box; padding: 0px 5px;">5</li><li style="box-sizing: border-box; padding: 0px 5px;">6</li><li style="box-sizing: border-box; padding: 0px 5px;">7</li><li style="box-sizing: border-box; padding: 0px 5px;">8</li><li style="box-sizing: border-box; padding: 0px 5px;">9</li></ul>
我们禁用了系统的ActionBar,使用ToolBar代替,布局代码如下
<code class="hljs avrasm has-numbering" style="display: block; padding: 0px; background-color: transparent; color: inherit; box-sizing: border-box; font-family: 'Source Code Pro', monospace;font-size:undefined; white-space: pre; border-top-left-radius: 0px; border-top-right-radius: 0px; border-bottom-right-radius: 0px; border-bottom-left-radius: 0px; word-wrap: normal; background-position: initial initial; background-repeat: initial initial;"><LinearLayout
xmlns:android=<span class="hljs-string" style="color: rgb(0, 136, 0); box-sizing: border-box;">"http://schemas.android.com/apk/res/android"</span>
android:layout_width=<span class="hljs-string" style="color: rgb(0, 136, 0); box-sizing: border-box;">"match_parent"</span>
android:layout_height=<span class="hljs-string" style="color: rgb(0, 136, 0); box-sizing: border-box;">"match_parent"</span>
android:orientation=<span class="hljs-string" style="color: rgb(0, 136, 0); box-sizing: border-box;">"vertical"</span>>

<android<span class="hljs-preprocessor" style="color: rgb(68, 68, 68); box-sizing: border-box;">.support</span><span class="hljs-preprocessor" style="color: rgb(68, 68, 68); box-sizing: border-box;">.v</span>7<span class="hljs-preprocessor" style="color: rgb(68, 68, 68); box-sizing: border-box;">.widget</span><span class="hljs-preprocessor" style="color: rgb(68, 68, 68); box-sizing: border-box;">.Toolbar</span>
android:id=<span class="hljs-string" style="color: rgb(0, 136, 0); box-sizing: border-box;">"@+id/toolbar"</span>
android:layout_width=<span class="hljs-string" style="color: rgb(0, 136, 0); box-sizing: border-box;">"match_parent"</span>
android:layout_height=<span class="hljs-string" style="color: rgb(0, 136, 0); box-sizing: border-box;">"wrap_content"</span>
android:background=<span class="hljs-string" style="color: rgb(0, 136, 0); box-sizing: border-box;">"?attr/colorPrimary"</span>
android:fitsSystemWindows=<span class="hljs-string" style="color: rgb(0, 136, 0); box-sizing: border-box;">"true"</span>
></android<span class="hljs-preprocessor" style="color: rgb(68, 68, 68); box-sizing: border-box;">.support</span><span class="hljs-preprocessor" style="color: rgb(68, 68, 68); box-sizing: border-box;">.v</span>7<span class="hljs-preprocessor" style="color: rgb(68, 68, 68); box-sizing: border-box;">.widget</span><span class="hljs-preprocessor" style="color: rgb(68, 68, 68); box-sizing: border-box;">.Toolbar</span>>

</LinearLayout>
</code><ul class="pre-numbering" style="box-sizing: border-box; position: absolute; width: 50px; background-color: rgb(238, 238, 238); top: 0px; left: 0px; margin: 0px; padding: 6px 0px 40px; border-right-width: 1px; border-right-style: solid; border-right-color: rgb(221, 221, 221); list-style: none; text-align: right;"><li style="box-sizing: border-box; padding: 0px 5px;">1</li><li style="box-sizing: border-box; padding: 0px 5px;">2</li><li style="box-sizing: border-box; padding: 0px 5px;">3</li><li style="box-sizing: border-box; padding: 0px 5px;">4</li><li style="box-sizing: border-box; padding: 0px 5px;">5</li><li style="box-sizing: border-box; padding: 0px 5px;">6</li><li style="box-sizing: border-box; padding: 0px 5px;">7</li><li style="box-sizing: border-box; padding: 0px 5px;">8</li><li style="box-sizing: border-box; padding: 0px 5px;">9</li><li style="box-sizing: border-box; padding: 0px 5px;">10</li><li style="box-sizing: border-box; padding: 0px 5px;">11</li><li style="box-sizing: border-box; padding: 0px 5px;">12</li><li style="box-sizing: border-box; padding: 0px 5px;">13</li><li style="box-sizing: border-box; padding: 0px 5px;">14</li><li style="box-sizing: border-box; padding: 0px 5px;">15</li><li style="box-sizing: border-box; padding: 0px 5px;">16</li></ul>
细心的你会发现在Toolbar中加入了android:fitsSystemWindows=”true”属性,这就是将布局延伸到状态栏,这时候你运行一下,会发现Toolbar上移到了状态栏的位置。上移的高度刚好是状态栏的高度。
但是我们并不想它移动到上面,只是想它状态栏和Toolbar颜色一样,要怎么做的,很简单,在代码中通过setSupportActionBar设置到ActionBar的位置即可。
<code class="hljs avrasm has-numbering" style="display: block; padding: 0px; background-color: transparent; color: inherit; box-sizing: border-box; font-family: 'Source Code Pro', monospace;font-size:undefined; white-space: pre; border-top-left-radius: 0px; border-top-right-radius: 0px; border-bottom-right-radius: 0px; border-bottom-left-radius: 0px; word-wrap: normal; background-position: initial initial; background-repeat: initial initial;">Toolbar mToolbar = (Toolbar) findViewById(R<span class="hljs-preprocessor" style="color: rgb(68, 68, 68); box-sizing: border-box;">.id</span><span class="hljs-preprocessor" style="color: rgb(68, 68, 68); box-sizing: border-box;">.toolbar</span>)<span class="hljs-comment" style="color: rgb(136, 0, 0); box-sizing: border-box;">;</span>
setSupportActionBar(mToolbar)<span class="hljs-comment" style="color: rgb(136, 0, 0); box-sizing: border-box;">;</span></code><ul class="pre-numbering" style="box-sizing: border-box; position: absolute; width: 50px; background-color: rgb(238, 238, 238); top: 0px; left: 0px; margin: 0px; padding: 6px 0px 40px; border-right-width: 1px; border-right-style: solid; border-right-color: rgb(221, 221, 221); list-style: none; text-align: right;"><li style="box-sizing: border-box; padding: 0px 5px;">1</li><li style="box-sizing: border-box; padding: 0px 5px;">2</li></ul>
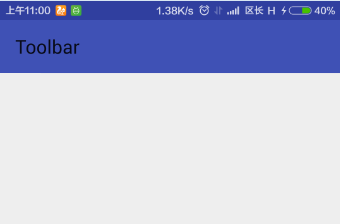
之后的效果就是这样的。
很明显的看到,ToolBar就是之前的高度,但是状态栏也变色了。
但是我们又怎么能满足于此呢。在Android 5.0上,我们的状态栏的颜色是要比Toolbar的颜色要深的。就像这样。
我们还要进一步修饰,需要对状态栏着色,这里需要用到一个开源库SystemBarTint
加入依赖
<code class="hljs bash has-numbering" style="display: block; padding: 0px; background-color: transparent; color: inherit; box-sizing: border-box; font-family: 'Source Code Pro', monospace;font-size:undefined; white-space: pre; border-top-left-radius: 0px; border-top-right-radius: 0px; border-bottom-right-radius: 0px; border-bottom-left-radius: 0px; word-wrap: normal; background-position: initial initial; background-repeat: initial initial;"> compile <span class="hljs-string" style="color: rgb(0, 136, 0); box-sizing: border-box;">'com.readystatesoftware.systembartint:systembartint:1.0.3'</span></code><ul class="pre-numbering" style="box-sizing: border-box; position: absolute; width: 50px; background-color: rgb(238, 238, 238); top: 0px; left: 0px; margin: 0px; padding: 6px 0px 40px; border-right-width: 1px; border-right-style: solid; border-right-color: rgb(221, 221, 221); list-style: none; text-align: right;"><li style="box-sizing: border-box; padding: 0px 5px;">1</li></ul>
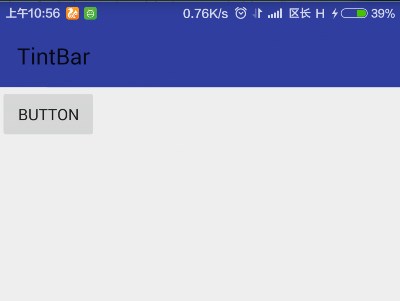
之后再设置布局后加入以下代码
<code class="hljs avrasm has-numbering" style="display: block; padding: 0px; background-color: transparent; color: inherit; box-sizing: border-box; font-family: 'Source Code Pro', monospace;font-size:undefined; white-space: pre; border-top-left-radius: 0px; border-top-right-radius: 0px; border-bottom-right-radius: 0px; border-bottom-left-radius: 0px; word-wrap: normal; background-position: initial initial; background-repeat: initial initial;">SystemBarTintManager tintManager=new SystemBarTintManager(this)<span class="hljs-comment" style="color: rgb(136, 0, 0); box-sizing: border-box;">;</span>
tintManager<span class="hljs-preprocessor" style="color: rgb(68, 68, 68); box-sizing: border-box;">.setStatusBarTintResource</span>(R<span class="hljs-preprocessor" style="color: rgb(68, 68, 68); box-sizing: border-box;">.color</span><span class="hljs-preprocessor" style="color: rgb(68, 68, 68); box-sizing: border-box;">.colorPrimaryDark</span>)<span class="hljs-comment" style="color: rgb(136, 0, 0); box-sizing: border-box;">;</span>
tintManager<span class="hljs-preprocessor" style="color: rgb(68, 68, 68); box-sizing: border-box;">.setStatusBarTintEnabled</span>(true)<span class="hljs-comment" style="color: rgb(136, 0, 0); box-sizing: border-box;">;</span></code><ul class="pre-numbering" style="box-sizing: border-box; position: absolute; width: 50px; background-color: rgb(238, 238, 238); top: 0px; left: 0px; margin: 0px; padding: 6px 0px 40px; border-right-width: 1px; border-right-style: solid; border-right-color: rgb(221, 221, 221); list-style: none; text-align: right;"><li style="box-sizing: border-box; padding: 0px 5px;">1</li><li style="box-sizing: border-box; padding: 0px 5px;">2</li><li style="box-sizing: border-box; padding: 0px 5px;">3</li></ul>
最终效果就是上图所示

相关文章推荐
- 使用C++实现JNI接口需要注意的事项
- Android IPC进程间通讯机制
- Android Manifest 用法
- [转载]Activity中ConfigChanges属性的用法
- Android之获取手机上的图片和视频缩略图thumbnails
- Android之使用Http协议实现文件上传功能
- Android学习笔记(二九):嵌入浏览器
- android string.xml文件中的整型和string型代替
- i-jetty环境搭配与编译
- android之定时器AlarmManager
- android wifi 无线调试
- Android Native 绘图方法
- Android java 与 javascript互访(相互调用)的方法例子
- android 代码实现控件之间的间距
- android FragmentPagerAdapter的“标准”配置
- Android"解决"onTouch和onClick的冲突问题
- android:installLocation简析
- android searchView的关闭事件
- SourceProvider.getJniDirectories