IOS图形绘制
2015-09-09 11:53
477 查看
import UIKit
class drawView: UIView {
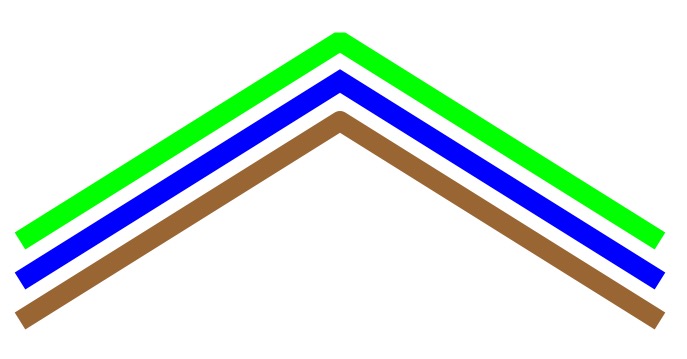
//定义一个画两条边的方法,传入中心点和线的连接方式。
func drawTwoLines (point:CGPoint,lineJoin:CGLineJoin){
//获取用于绘制图形的上下文
let context = UIGraphicsGetCurrentContext()
//设置连接点类型
CGContextSetLineJoin(context, lineJoin)
//设置边的宽度
CGContextSetLineWidth(context, 10)
//绘制直线
CGContextMoveToPoint(context, point.x - 160 , point.y + 100)
CGContextAddLineToPoint(context, point.x, point.y)
CGContextAddLineToPoint(context, point.x + 160, point.y + 100)
//填充路径
CGContextStrokePath(context)
}
override func drawRect(rect: CGRect) {
UIColor.greenColor().set()
drawTwoLines(CGPoint(x: 180, y: 200), lineJoin: kCGLineJoinBevel)
UIColor.blueColor().set()
drawTwoLines(CGPoint(x: 180, y: 220), lineJoin: kCGLineJoinMiter)
UIColor.brownColor().set()
drawTwoLines(CGPoint(x: 180, y: 240), lineJoin: kCGLineJoinRound)
}
}
//运行效果
2.绘制文本
let string1 = "I m Super Man" as NSString
let fontname = "HelveticaNeue-Bold"
let bold = UIFont(name: fontname, size: 22)
string1.drawAtPoint(CGPoint(x: 20,
y: 20), withAttributes: [NSForegroundColorAttributeName:UIColor.brownColor(),NSFontAttributeName:bold!])
//运行效果

class drawView: UIView {
//定义一个画两条边的方法,传入中心点和线的连接方式。
func drawTwoLines (point:CGPoint,lineJoin:CGLineJoin){
//获取用于绘制图形的上下文
let context = UIGraphicsGetCurrentContext()
//设置连接点类型
CGContextSetLineJoin(context, lineJoin)
//设置边的宽度
CGContextSetLineWidth(context, 10)
//绘制直线
CGContextMoveToPoint(context, point.x - 160 , point.y + 100)
CGContextAddLineToPoint(context, point.x, point.y)
CGContextAddLineToPoint(context, point.x + 160, point.y + 100)
//填充路径
CGContextStrokePath(context)
}
override func drawRect(rect: CGRect) {
UIColor.greenColor().set()
drawTwoLines(CGPoint(x: 180, y: 200), lineJoin: kCGLineJoinBevel)
UIColor.blueColor().set()
drawTwoLines(CGPoint(x: 180, y: 220), lineJoin: kCGLineJoinMiter)
UIColor.brownColor().set()
drawTwoLines(CGPoint(x: 180, y: 240), lineJoin: kCGLineJoinRound)
}
}
//运行效果
2.绘制文本
let string1 = "I m Super Man" as NSString
let fontname = "HelveticaNeue-Bold"
let bold = UIFont(name: fontname, size: 22)
string1.drawAtPoint(CGPoint(x: 20,
y: 20), withAttributes: [NSForegroundColorAttributeName:UIColor.brownColor(),NSFontAttributeName:bold!])
//运行效果

相关文章推荐
- ios开发,真机调试报The executable was signed with invalid entitlements.错误
- iOS学习笔记-核心动画
- iOS调用程序外地图导航
- ios 播放声音文件
- ios 本地存储之NSUserDefaults
- ios- 音乐播放器(1)
- 给学习iOS开发同学的建议
- 零基础学iOS开发
- IOS中Json解析的四种方法
- iOS测试总结
- 给学习iOS开发同学的建议
- (译文)IOS block编程指南 4 声明和创建blocks
- IOS之NSSTRING
- Xamarin.iOS推送deviceToken获取
- iOS开发-------手写一个数据持久化(Coredata)的类
- ios开发介绍
- iOS 处理键盘遮挡TextField、TextView问题
- 截图功能实现
- (译文)IOS block编程指南 3 概念总览
- iOS应用程序生命周期