设计模式之-代理模式(Proxy)
2015-09-06 10:46
399 查看
1,简介
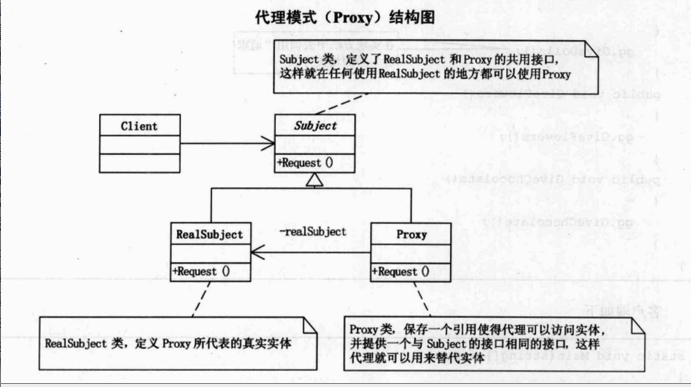
定义:为其他对象提供一种代理,以控制对这个对象的访问。 代理模式中的角色:
抽象角色:声明真实对象和代理对象的共同接口;
代理角色:代理对象角色内部含有对真实对象的引用,从而可以操作真实对象,同时代理对象提供与真实对象相同的接口以便在任何时刻都能代替真实对象。同时,代理对象可以在执行真实对象操作时,附加其他的操作,相当于对真实对象进行封装。
真实角色:代理角色所代表的真实对象,是我们最终要引用的对象。
代理模式结构图如下:
2,代理模式的优点
(1).职责清晰真实的角色就是实现实际的业务逻辑,不用关心其他非本职责的事务,通过后期的代理完成一件完成事务,附带的结果就是编程简洁清晰。
(2).代理对象可以在客户端和目标对象之间起到中介的作用,这样起到了中介的作用和保护了目标对象的作用。
(3).高扩展性
3,OC代理模式Demo
1)协议类 抽象角色

2)代理角色 MyView (代理类)
MyView.h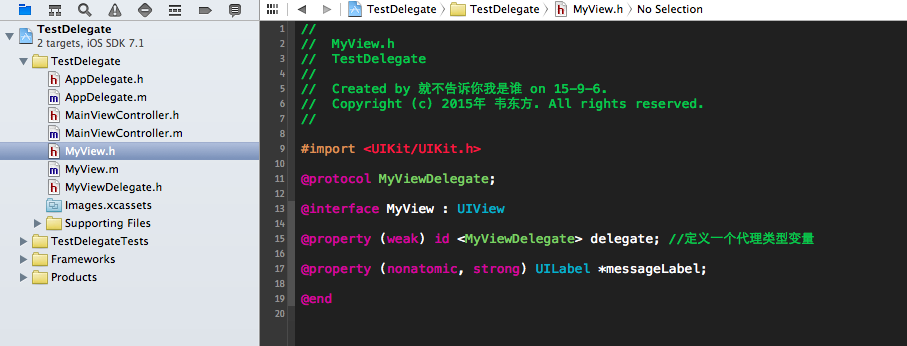
MyView.m
#import "MyView.h"
#import "MyViewDelegate.h"
@implementation MyView
//子控件的初始化方法
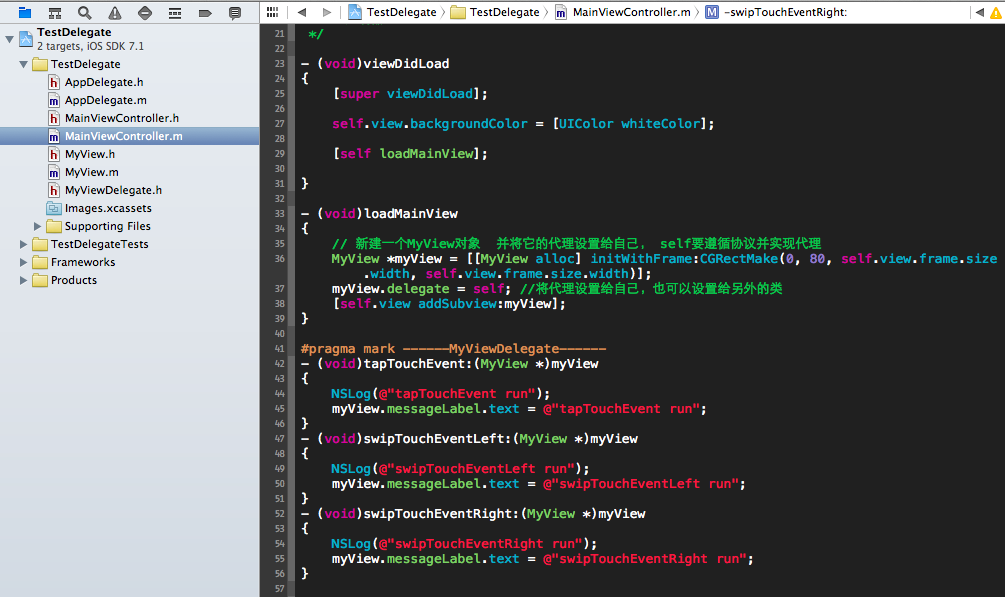
//子控件view上 添加了三个手势,一个点击,一个左划,一个右划, 还有一个label,label上有两个手势,上划,下划
- (id)initWithFrame:(CGRect)frame
{
self = [super initWithFrame:frame];
if (self) {
self.backgroundColor = [UIColor lightGrayColor];
_messageLabel = [[UILabel alloc] initWithFrame:CGRectMake(25, 25, 120, 120)];
_messageLabel.text = @"No Message";
_messageLabel.backgroundColor = [UIColor grayColor];
_messageLabel.font = [UIFont systemFontOfSize:14];
_messageLabel.textAlignment = UITextAlignmentCenter;
_messageLabel.textColor = [UIColor whiteColor];
_messageLabel.userInteractionEnabled = YES;
//定义一个滑动的手势, initWithTarget:self, 这里一定是self,而不能是_messageLabel
UISwipeGestureRecognizer *swipUp = [[UISwipeGestureRecognizer alloc]initWithTarget:self action:@selector(swipUpGestureUp:)];
//设置手势的滑动方向
swipUp.direction = UISwipeGestureRecognizerDirectionUp;
UISwipeGestureRecognizer *swipDown = [[UISwipeGestureRecognizer alloc]initWithTarget:self action:@selector(swipDownGestureDown:)];
swipDown.direction = UISwipeGestureRecognizerDirectionDown;
//将手势添加到label上
[_messageLabel addGestureRecognizer:swipUp];
[_messageLabel addGestureRecognizer:swipDown];
[self addSubview:_messageLabel];
UITapGestureRecognizer *tapGesture = [[UITapGestureRecognizer alloc] initWithTarget:self action:@selector(tapGestureEvent:)];
tapGesture.numberOfTapsRequired = 1;
tapGesture.numberOfTouchesRequired = 1;
[self addGestureRecognizer:tapGesture];
UISwipeGestureRecognizer *swipGesture1 = [[UISwipeGestureRecognizer alloc] initWithTarget:self action:@selector(swipGestureEvent1:)];
swipGesture1.direction = UISwipeGestureRecognizerDirectionLeft;
[self addGestureRecognizer:swipGesture1];
UISwipeGestureRecognizer *swipGesture2 = [[UISwipeGestureRecognizer alloc] initWithTarget:self action:@selector(swipGestureEvent2:)];
swipGesture2.direction = UISwipeGestureRecognizerDirectionRight;
[self addGestureRecognizer:swipGesture2];
}
return self;
}
//点击手势
- (void)tapGestureEvent:(UIGestureRecognizer *)tapGesture
{
// 先判断自己的代理中是否实现了协议中的方法,如果实现了就去执行,如果没有实现,自己做处理。
if ([self.delegate respondsToSelector:@selector(tapTouchEvent:)]) {
[self.delegate tapTouchEvent:self];
}else{
NSLog(@"tapTouchEvent Not Found");
}
}
//左划手势
- (void)swipGestureEvent1:(UIGestureRecognizer *)swipGesture1
{
if ([self.delegate respondsToSelector:@selector(swipTouchEventLeft:)]) {
[self.delegate swipTouchEventLeft:self];
}else{
NSLog(@"swipTouchEventLeft Not Found");
}
}
//右划手势
- (void)swipGestureEvent2:(UIGestureRecognizer *)swipGesture2
{
if ([self.delegate respondsToSelector:@selector(swipTouchEventRight:)]) {
[self.delegate swipTouchEventRight:self];
}else{
NSLog(@"swipTouchEventRight Not Found");
}
}
//上划手势
- (void)swipUpGestureUp:(UISwipeGestureRecognizer *)swipUpGesture
{
NSLog(@"messageLabel swipUpGesture");
}
//下划手势
- (void)swipDownGestureDown:(UISwipeGestureRecognizer *)swipDownGesture
{
NSLog(@"messageLabel swipDownGesture");
}3)真实角色 (实现类)
Demo:
http://download.csdn.net/detail/walden00/9081615
相关文章推荐
- 生成密钥方法
- 欢迎使用CSDN-markdown编辑器
- IOC容器的基本原理
- SOAPUI系列02-SOAPUI PRO 破解
- java 编译 解释执行 基于栈和基于寄存器
- [LeetCode-7] Reverse Integer(反转整数)
- PHP用301重定向根域名到www域名
- Javascript模块化编程-初识[1]
- [LeetCode#29]Divide Two Integers
- IP包解析
- 重新学习JAVA
- 现有P2P协议分类与简介
- SOAPUI系列01-SOAPUI 安装
- UVA 10881 Piotr's Ants
- Android笔记(十八)加速度传感器
- 使ROW_NUMBER() OVER给查询结果集添加序号
- HDU 5212 Code (容斥 莫比乌斯反演基础题)
- Xshell中输入rz提示:-bash: rz: command not found
- hdu5327 Olympiad(数组前缀和+set判重)
- werwfw