Reveal详细安装教程
2015-08-28 16:36
387 查看
Reveal的详细安装使用
标签: Reveal 工具 调试 iOS一、终端的操作
首先最重要的一点,要先把Reveal软件放到Application中,否则路径是错的,后面的设置也就没有作用了打开终端,输入
vim ~/.lldbinit
接着输入
command alias reveal_load_sim expr (void*)dlopen("/Applications/Reveal.app/Contents/SharedSupport/iOS-Libraries/libReveal.dylib", 0x2);
command alias reveal_load_dev expr (void*)dlopen([(NSString*)[(NSBundle*)[NSBundle mainBundle]               pathForResource:@"libReveal" ofType:@"dylib"] cStringUsingEncoding:0x4], 0x2);
command alias reveal_start expr (void)[(NSNotificationCenter*)[NSNotificationCenter defaultCenter]           postNotificationName:@"IBARevealRequestStart" object:nil];
command alias reveal_stop expr (void)[(NSNotificationCenter*)[NSNotificationCenter defaultCenter]            postNotificationName:@"IBARevealRequestStop" object:nil];
此时终端属于 insert 状态 按
ESC退出插入状态
接下来 就要退出终端了
shift+
q键入命令行状态
在终端输入
wq即保存退出
二、xcode内的设置
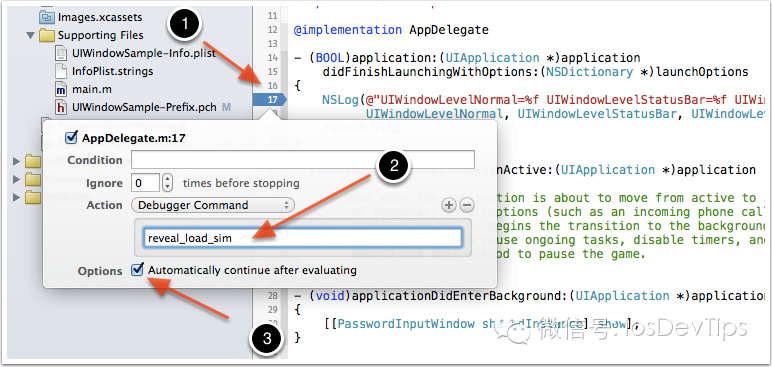
点击该方法左边的行号区域,增加一个断点,之后右击该断点,选择Edit Breakpoint
点击
Action项边右的
Add Action,然后输入
reveal_load_sim
勾选上
Options上的
Automatically continue after evaluating选项 如下图
三、见证神奇的时刻
现在我们可以运行模拟器,然后打开Reveal,就可以在Reveal界面的左上角,看到有模拟器可以连接调试,选择它,则可以在Reveal中查看和调试该iOS程序的界面了。
相关文章推荐
- mapreduce任务中Shuffle和排序的过程
- LinkCode-寻找缺失的数
- 走迷宫
- http://www.freebuf.com/
- Xcode6中自动布局autolayout和sizeclass的使用
- Ccos2d-X打包环境配置步骤
- arm-linux内核start_kernel之前启动分析(3)-开启MMU,走进新时代
- [原创]MongoDB C++ 驱动部分问题解决方案(MongoDB C++ Driver)
- [原创]编译CLANG时遇到问题的解决办法
- Linux 下从头再走 GTK+-3.0 (六)
- Android中设置屏幕显示的一些方法
- 如何在CentOS 5/6上安装EPEL源
- 进程间通信------FIFO
- 浅析Android事件分发
- Android Service完全解析,关于服务你所需知道的一切(下)
- 【原创测试】MongoDB千万级插入数据测试(MMO在线游戏应用场合)
- Response.End(); 用HttpContext.Current.ApplicationInstance.CompleteRequest 代替
- 【云快讯】《选择视频监控云11个理由》
- 如何下载国家标准分幅影像地图
- Android Studio App EditText获取输入的文字