nginx利用proxy_cache来缓存文件
2015-07-26 16:22
956 查看
nginx可以用proxy_cache来缓存文件,具体可以查询
http://nginx.org/en/docs/http/ngx_http_proxy_module.html#proxy_cache_path
具体操作如下:
1、proxy_cache_path指定缓存路径,在http中添加:
proxy_cache_path /usr/local/ngin/proxy_cache levels=1:2 keys_zone=first:20m inactive=1d max_size=100m;
/*levels设置目录层次
keys_zone设置缓存名字和共享内存大小
inactive在指定时间内没人访问则被删除在这里是1天
max_size最大缓存空间*/
2、在location定义:
proxy_cache first; //根keys_zone后的内容对应
proxy_cache_valid 200 304 301 302 10d; //哪些状态缓存多长时间
proxy_cache_valid any 1d; //其他的缓存多长时间
proxy_cache_key $host$uri$is_args$args; //通过key来hash,定义KEY的值
3、可以在location使用add_header指定头信息,方便浏览器查看:
add_header X-Via $server_addr;
add_header X-Cache $upstream_cache_status;
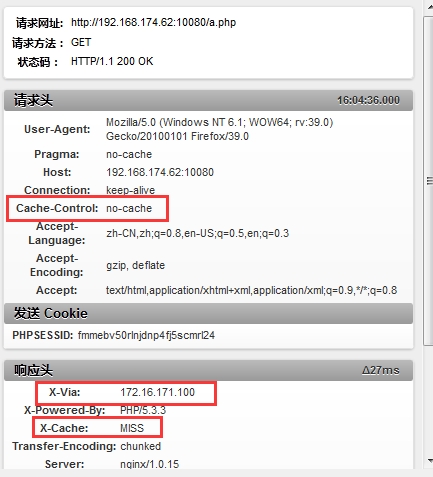
4、浏览器前端使用开发者工具进行查看:
第一次访问,状态为MISS,没有命中。
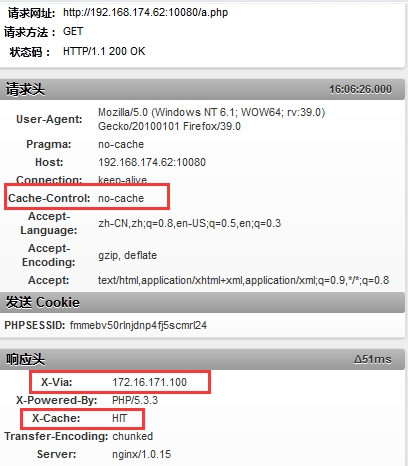
使用ctrl+F5(不使用本地浏览器缓存),返回状态为HIT,命中。
4、使用proxy_cache_purge进行缓存清理:
下载ngx_cache_purge-2.3 并对nginx进行重新编译安装。
./configure –add-module=/root/ngx_cache_purge-2.3
然后对进行如下配置:
proxy_cache_path /opt/nginx/cache levels=1:2:1 keys_zone=first:10m max_size=1g;
upstream yunwei {
server 172.16.171.100:8000 ;
server 172.16.171.110:80 fail_timeout=5s max_fails=3;
server 172.16.171.120:80 ;
server 172.16.171.100:80 backup;
}
server {
listen 80;
server_name localhost;
location /test/ {
proxy_pass http://yunwei/; proxy_set_header X-Forwarded-For $proxy_add_x_forwarded_for;
proxy_cache first;
proxy_cache_valid 200 302 1m;
proxy_cache_key $uri$is_args$args;
add_header X-Via $server_addr;
add_header X-Cache $upstream_cache_status;
}
location ~ /purge(/.*) {
proxy_cache_purge first $1$is_args$args;
allow all;
}
其中proxy_cache_key 也可以为 $host$uri$is_args$args;
proxy_cache_purge也可以为 first $host$1$is_args$args;
对页面进行访问:http://192.168.174.62:10080/test/a.txt
清理页面访问:http://192.168.174.62:10080/purge/test/a.txt
本文出自 “秋天的童话” 博客,请务必保留此出处http://wushank.blog.51cto.com/3489095/1678480
http://nginx.org/en/docs/http/ngx_http_proxy_module.html#proxy_cache_path
具体操作如下:
1、proxy_cache_path指定缓存路径,在http中添加:
proxy_cache_path /usr/local/ngin/proxy_cache levels=1:2 keys_zone=first:20m inactive=1d max_size=100m;
/*levels设置目录层次
keys_zone设置缓存名字和共享内存大小
inactive在指定时间内没人访问则被删除在这里是1天
max_size最大缓存空间*/
2、在location定义:
proxy_cache first; //根keys_zone后的内容对应
proxy_cache_valid 200 304 301 302 10d; //哪些状态缓存多长时间
proxy_cache_valid any 1d; //其他的缓存多长时间
proxy_cache_key $host$uri$is_args$args; //通过key来hash,定义KEY的值
3、可以在location使用add_header指定头信息,方便浏览器查看:
add_header X-Via $server_addr;
add_header X-Cache $upstream_cache_status;
4、浏览器前端使用开发者工具进行查看:
第一次访问,状态为MISS,没有命中。
使用ctrl+F5(不使用本地浏览器缓存),返回状态为HIT,命中。
4、使用proxy_cache_purge进行缓存清理:
下载ngx_cache_purge-2.3 并对nginx进行重新编译安装。
./configure –add-module=/root/ngx_cache_purge-2.3
然后对进行如下配置:
proxy_cache_path /opt/nginx/cache levels=1:2:1 keys_zone=first:10m max_size=1g;
upstream yunwei {
server 172.16.171.100:8000 ;
server 172.16.171.110:80 fail_timeout=5s max_fails=3;
server 172.16.171.120:80 ;
server 172.16.171.100:80 backup;
}
server {
listen 80;
server_name localhost;
location /test/ {
proxy_pass http://yunwei/; proxy_set_header X-Forwarded-For $proxy_add_x_forwarded_for;
proxy_cache first;
proxy_cache_valid 200 302 1m;
proxy_cache_key $uri$is_args$args;
add_header X-Via $server_addr;
add_header X-Cache $upstream_cache_status;
}
location ~ /purge(/.*) {
proxy_cache_purge first $1$is_args$args;
allow all;
}
其中proxy_cache_key 也可以为 $host$uri$is_args$args;
proxy_cache_purge也可以为 first $host$1$is_args$args;
对页面进行访问:http://192.168.174.62:10080/test/a.txt
清理页面访问:http://192.168.174.62:10080/purge/test/a.txt
本文出自 “秋天的童话” 博客,请务必保留此出处http://wushank.blog.51cto.com/3489095/1678480

相关文章推荐
- 源码编译lnmp(Nginx 1.8 + MySQL5.5 + PHP 5.3)
- CentOS7 安装Nginx
- Nginx 笔记与总结(4)配置 server 访问日志
- Nginx DHCP TFTP Kickstart搭建自动安装系统
- 解剖Nginx·自动脚本篇(1)解析配置选项脚本 auto/options
- 安装Nginx服务器及简单优化
- nginx防御ab,webbench,jmeter攻击
- nginx转发及后端服务器获取真实client的IP
- Linux系统架构(LB-HA集群)-nginx负载均衡集群配置
- nginx 安装 php
- nginx rtmp代码架构1 hook点总结
- 高流量站点NGINX与PHP-fpm配置优化(译)
- 关于nginx
- Nginx.conf 配置文件详解
- CentOS 安装 Nginx
- NGINX最新版正式增加了对reuseport (SO_REUSEPORT) 的支持,正式补丁代码分析
- 一个nginx_reuseport 简单补丁实现
- Nginx+Keepalived
- 将nginx配置成url_hash转发方式
- Nginx上传文件提示413 Request Entity Too Large