Fragment
2015-07-26 15:54
453 查看
Fragment基础
Fragment 介绍
Fragment 的版本
Fragment 的创建
Fragment 的生命周期
Fragment 和 Activity 间的关系
Fragment 的加载方式
Fragment应用场景
在实际开发过程中,V4 包中Fragment 得到广泛使用
重写
注意:
中的 参数 必须为 false.
生命周期的含义
fragment 与 宿主Activity 关联时调用。
在创建fragment时系统会调用此方法。
fragment 的视图 挂载到到宿主Activity的视图上时调用。
宿主Activity 的onCreate()方法执行完成返回后调用。
当 fragment 相对于用户而言,往可见方向的过程中,此时用户可见但不可操作时 调用。
当 fragment 相对于用户而言,往可见方向的过程中,此时用户可见也可操作时 调用。
当 fragment 相对于用户而言,往不可见方向的过程中,此时用户可见但不可操作时 调用。
当 fragment 相对于用户而言,往不可见方向的过程中,此时用户不可见也不可操作时 调用。
fragment 的视图 从到宿主Activity的视图中 移除 时调用。
fragment 销毁时调用。
fragment 与 宿主Activity 解除关联时调用。
但是Fragment 不能单独存在,必须寄宿在Activity中;
一个Activity实例 中 可以寄宿多个Fragment实例;
一个Fragment实例 只能 有一个 Activity实例作为 宿主;
Activity通过 FragmentManager来管理Fragment;
创建 Activity
MainActivity.java
创建 Fragment
LeftFragment.java
RightFragment.java
创建 Fragment 的XML布局
left_fragment.xml
right_fragment.xml
创建 Activity的布局
配置过程中注意事项
在Activity 的布局文件 中,必须指定 fragment的
通过XML方式配置Fragment的不足
fragment的类型必须指定,因此通用性,灵活性不强。
作用
将Fragment 添加到 Activity的 视图中来,或是从Activity中移除。
如何拿到FragmentMannager
由 FragmentManager 的作用可以 了解到,FragmentManager 是 Activity的一个工具,用来添加和移除 Fragment的 工具,因此 FragmentManager 是 在Activity中用的,也是在Activity中获得的。
SDK >= 11
通用V4包:(Activity 必须继承 FragmentActivity)
[b]Fragment 的添加,移除[/b]
Fragment添加
步骤:
为 Activity 新建 布局文件
采用FrameLayout;
给布局一个唯一id;
在 Activity 的 onCreate()方法中 加载Fragment
[b]Fragment 的动画切换效果[/b]
[b]Fragment 的回退栈[/b]
Fragment 介绍
Fragment 的版本
Fragment 的创建
Fragment 的生命周期
Fragment 和 Activity 间的关系
Fragment 的加载方式
Fragment应用场景
Fragment 基础
Fragment 介绍
Fragment ,碎片的意思, Android在3.0版本 后引入的功能. 有点类似于Activity,有自己的布局,有自己的生命周期,可以处理用户事件。 初期是为了解决平板的用户体验问题(经典的案例就是 list和detail 数据的展示及交互问题), 由于Fragment 与Activity具有相似性,而且能在Activity中进行灵活切换,现在fragment大量的应用在手机平板间.Fragment 版本
由于Fragment是在 3.0 后才有的,要使用 Fragment SDK 版本需要 大于 11; 由于Fragment的广泛使用,google 后期在V4包中提供了 Fragment的支持.在实际开发过程中,V4 包中Fragment 得到广泛使用
Fragment 的创建
新建Class 继承android.app.Fragment(sdk >= 11) 或
android.support.v4.app.Fragment(通用,
建议使用)
重写
onCreateView方法:
@Override
public View onCreateView(LayoutInflater inflater, ViewGroup container,
Bundle savedInstanceState) {
/**
* 为此fragment 加载 你定义的布局文件
*/
return inflater.inflate(R.layout.your_fragment_layout, container, false);
}
注意:
inflater.inflate(R.layout.your_fragment_layout, container, false);
中的 参数 必须为 false.
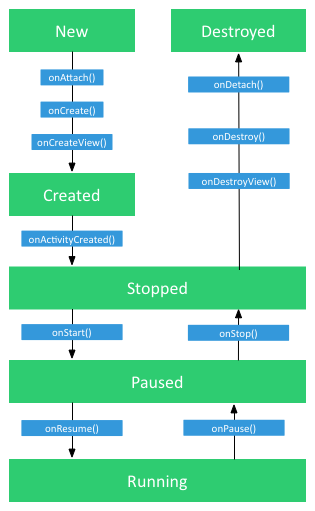
Fragment 的生命周期
生命周期图生命周期的含义
onAttach()
fragment 与 宿主Activity 关联时调用。
onCreate()
在创建fragment时系统会调用此方法。
onCreateView()
fragment 的视图 挂载到到宿主Activity的视图上时调用。
onActivityCreated()
宿主Activity 的onCreate()方法执行完成返回后调用。
onStart()
当 fragment 相对于用户而言,往可见方向的过程中,此时用户可见但不可操作时 调用。
onResume()
当 fragment 相对于用户而言,往可见方向的过程中,此时用户可见也可操作时 调用。
onPause()
当 fragment 相对于用户而言,往不可见方向的过程中,此时用户可见但不可操作时 调用。
onStop()
当 fragment 相对于用户而言,往不可见方向的过程中,此时用户不可见也不可操作时 调用。
onDestroyView()
fragment 的视图 从到宿主Activity的视图中 移除 时调用。
onDestroy()
fragment 销毁时调用。
onDetach()
fragment 与 宿主Activity 解除关联时调用。
Fragment 和 Activity 间的关系
与 Activity 类似,Fragment 的设计是用来提供 用户交互 接口的;但是Fragment 不能单独存在,必须寄宿在Activity中;
一个Activity实例 中 可以寄宿多个Fragment实例;
一个Fragment实例 只能 有一个 Activity实例作为 宿主;
Activity通过 FragmentManager来管理Fragment;
Fragment 的加载方式
XML配置加载
配置的步骤创建 Activity
MainActivity.java
public class MainActivity extends FragmentActivity {

@Override
protected void onCreate(Bundle savedInstanceState) {
super.onCreate(savedInstanceState);
setContentView(R.layout.activity_main);
}
}
创建 Fragment
LeftFragment.java
public class LeftFragment extends Fragment {
@Override
public View onCreateView(LayoutInflater inflater, ViewGroup container,Bundle savedInstanceState) {
/**
* Inflate the layout for this fragment
*/
return inflater.inflate(R.layout.left_fragment, container, false);
}
}
RightFragment.java
public class RightFragment extends Fragment {
@Override
public View onCreateView(LayoutInflater inflater, ViewGroup container,Bundle savedInstanceState) {
/**
* Inflate the layout for this fragment
*/
return inflater.inflate(R.layout.right_fragment, container, false);
}
}
创建 Fragment 的XML布局
left_fragment.xml
<?xml version="1.0" encoding="utf-8"?>
<LinearLayout xmlns:android="http://schemas.android.com/apk/res/android"
android:layout_width="fill_parent"
android:layout_height="fill_parent"
android:background="#77777777"
android:gravity="center"
android:orientation="vertical" >

<TextView
android:layout_width="wrap_content"
android:layout_height="wrap_content"
android:layout_gravity="center"
android:text="Left"
android:textColor="#000000"
android:textSize="30sp" />

<!-- More GUI components go here -->

</LinearLayout>
right_fragment.xml
<?xml version="1.0" encoding="utf-8"?>
<LinearLayout xmlns:android="http://schemas.android.com/apk/res/android"
android:layout_width="fill_parent"
android:layout_height="fill_parent"
android:background="#FF123456"
android:gravity="center"
android:orientation="vertical" >

<TextView
android:layout_width="wrap_content"
android:layout_height="wrap_content"
android:layout_gravity="center"

a6c2
android:text="Right"
android:textColor="#FFFFFFFF"
android:textSize="30sp" />

<!-- More GUI components go here -->

</LinearLayout>
创建 Activity的布局
<?xml version="1.0" encoding="utf-8"?>
<LinearLayout
xmlns:android="http://schemas.android.com/apk/res/android"
xmlns:tools="http://schemas.android.com/tools"
android:layout_width="fill_parent"
android:layout_height="fill_parent"
android:orientation="horizontal">

<fragment
android:id="@+id/left_fragment"
class="org.heima.fragment.LeftFragment"
android:layout_width="0dp"
android:layout_height="match_parent"
android:layout_weight="1" />

<fragment
android:id="@+id/right_fragment"
class="org.heima.fragment.RightFragment"
android:layout_width="0dp"
android:layout_height="match_parent"
android:layout_weight="2" />

</LinearLayout>
配置过程中注意事项
在Activity 的布局文件 中,必须指定 fragment的
class或
android:name为对应的Fragment的全包名类名。
通过XML方式配置Fragment的不足
fragment的类型必须指定,因此通用性,灵活性不强。
动态加载
[b]FragmentManager[/b]作用
将Fragment 添加到 Activity的 视图中来,或是从Activity中移除。
如何拿到FragmentMannager
由 FragmentManager 的作用可以 了解到,FragmentManager 是 Activity的一个工具,用来添加和移除 Fragment的 工具,因此 FragmentManager 是 在Activity中用的,也是在Activity中获得的。
SDK >= 11
FragmentManager fm = getFragmentManager();
通用V4包:(Activity 必须继承 FragmentActivity)
FragmentManager fm = getSupportFragmentManager();
[b]Fragment 的添加,移除[/b]
Fragment添加
步骤:
为 Activity 新建 布局文件
<?xml version="1.0" encoding="utf-8"?>
<FrameLayout xmlns:android="http://schemas.android.com/apk/res/android"
android:id="@+id/activity_add_container"
android:layout_width="match_parent"
android:layout_height="match_parent" />
采用FrameLayout;
给布局一个唯一id;
在 Activity 的 onCreate()方法中 加载Fragment
@Override
protected void onCreate(Bundle bundle) {
super.onCreate(bundle);
setContentView(R.layout.activity_add);

FragmentManager fm = getSupportFragmentManager();

FragmentTransaction ft = fm.beginTransaction();
ft.add(R.id.activity_add_container, new LeftFragment(), "left");
ft.commit();
}
[b]Fragment 的动画切换效果[/b]
[b]Fragment 的回退栈[/b]
Fragment 应用场景
模块化的构建用户交互
Fragment与ViewPager的结合使用
Fragment与SlidingPaneLayout的结合使用

相关文章推荐
- Servlet3.1应用生命周期事件 (转载)
- 使用C++实现JNI接口需要注意的事项
- Android IPC进程间通讯机制
- Android Manifest 用法
- [转载]Activity中ConfigChanges属性的用法
- Android之获取手机上的图片和视频缩略图thumbnails
- Android之使用Http协议实现文件上传功能
- Android学习笔记(二九):嵌入浏览器
- android string.xml文件中的整型和string型代替
- i-jetty环境搭配与编译
- android之定时器AlarmManager
- android wifi 无线调试
- Android Native 绘图方法
- Android java 与 javascript互访(相互调用)的方法例子
- android 代码实现控件之间的间距
- android FragmentPagerAdapter的“标准”配置
- Android"解决"onTouch和onClick的冲突问题
- android:installLocation简析
- android searchView的关闭事件