Xcode6中如何使用自定义的类模板
2015-07-16 12:02
309 查看
说到IOS类的模板,有些人感觉很陌生,但是只要有开发过IOS程序的人,其实都用过类的模板,只不过是用的系统自带的类的模板。
例如创建一个ClassTemplateVC继承于UIViewController 创建出来的ClassTemplateVC如下:
会有viewDidLoad 和 didReceiveMemoryWarning方法,其实我们无时不刻的使用系统给咱们提供的类模板。
使用类的模板会提高开发的效率,例如在一些大的项目中,我们经常封装一个出一个VC,让其他VC都继承于这个VC 在这个VC中实现基本的方法和逻辑。这样在Xcode中添加自定义的类模板时,其他人继承这个VC的时候,这些基本的方法和逻辑就不用写了。
那如何添加自定义的类模板呢??
举个简单的例子,在一个VC中经常有点击按钮返回上一级页面的操作。要想以后继承这个VC的时候都会有下面新添加的方法
第一步:添加想要的方法和逻辑
第二步:把.h文件替换成如下的代码(粘贴复制即可)
第三步:把对应的.m文件的后替换成如下代码:
第四步:在桌面上或者其他地方新建一个文件夹如下图

命名规范为:类模板的名(ClassTemplateVC)+Objective-C
第五步:把刚才修改的.h,.m文件复制到第四步创建的文件夹中如下图

第六步:把.h,.m文件命名为如下:

注:每个类模板的文件夹下面都是这样命名的___FILEBASENAME___.h,___FILEBASENAME___.m(复制粘贴即可)
第七步:找到系统类模板存放的目录
这里是Xcode6类模板的路径:/Applications/Xcode.app/Contents/Developer/Platforms/iPhoneOS.platform/Developer/Library/Xcode/Templates/File Templates/Source
图片如下:

注:这个路径是Xcode6中的路径。以后有可能会变的。
第八步:修改系统的模板配置文件(或者把TemplateInfo.plist文件复制出来修改完成后,替换原有的,这时候需要输入密码)
利用上面的路径找到TemplateInfo.plist文件如下图

打开这个文件点击Option->Item 1->Suffixes/Values
1.在Suffixes里面添加自定义的模板类的类名以及模板类所继承的类名
2.在Values下面添加自定义模板类的类名
如下图:
第九步:把第四步创建的文件夹复制到第七步的路径下(TemplateInfo.plist 同级目录下)
大功告成。。。。
测试一下新建一个 ClassTemplateTestVC如下:

成功创建后:
ClassTemplateTestVC.m里面的内容如下:
有了刚才的- (void)backBtnClick:(UIButton *)sender方法了。说明添加自定义类模板已成功。。。
测试工程的目录如下:
以上就是自定义模板的全过程。希望对大家有所帮助。
例如创建一个ClassTemplateVC继承于UIViewController 创建出来的ClassTemplateVC如下:
#import "ClassTemplateVC.h"

@interface  ()

@end

@implementation ClassTemplateVC

- (void)viewDidLoad {
[super viewDidLoad];
// Do any additional setup after loading the view.
}

- (void)didReceiveMemoryWarning {
[super didReceiveMemoryWarning];
// Dispose of any resources that can be recreated.
}

/*
#pragma mark - Navigation

// In a storyboard-based application, you will often want to do a little preparation before navigation
- (void)prepareForSegue:(UIStoryboardSegue *)segue sender:(id)sender {
// Get the new view controller using [segue destinationViewController].
// Pass the selected object to the new view controller.
}
*/

@end
会有viewDidLoad 和 didReceiveMemoryWarning方法,其实我们无时不刻的使用系统给咱们提供的类模板。
使用类的模板会提高开发的效率,例如在一些大的项目中,我们经常封装一个出一个VC,让其他VC都继承于这个VC 在这个VC中实现基本的方法和逻辑。这样在Xcode中添加自定义的类模板时,其他人继承这个VC的时候,这些基本的方法和逻辑就不用写了。
那如何添加自定义的类模板呢??
举个简单的例子,在一个VC中经常有点击按钮返回上一级页面的操作。要想以后继承这个VC的时候都会有下面新添加的方法
第一步:添加想要的方法和逻辑
- (void)viewDidLoad {
[super viewDidLoad];
// Do any additional setup after loading the view.
}

// 新添加的方法
- (void)backBtnClick:(UIButton *)sender
{
[self.navigationController popViewControllerAnimated:YES];
}

- (void)didReceiveMemoryWarning {
[super didReceiveMemoryWarning];
// Dispose of any resources that can be recreated.
}
第二步:把.h文件替换成如下的代码(粘贴复制即可)
//
//  ___FILENAME___
//  ___PROJECTNAME___
//
//  Created by ___FULLUSERNAME___ on ___DATE___.
//___COPYRIGHT___
//

___IMPORTHEADER_cocoaTouchSubclass___

@interface ___FILEBASENAMEASIDENTIFIER___ : ___VARIABLE_cocoaTouchSubclass___

@end
第三步:把对应的.m文件的后替换成如下代码:
//
//  ___FILENAME___
//  ___PROJECTNAME___
//
//  Created by ___FULLUSERNAME___ on ___DATE___.
//___COPYRIGHT___
//

#import "___FILEBASENAME___.h"

@interface ___FILEBASENAMEASIDENTIFIER___ ()

@end

@implementation ___FILEBASENAMEASIDENTIFIER___

- (void)viewDidLoad {
[super viewDidLoad];
// Do any additional setup after loading the view.
}

// 新添加的方法
- (void)backBtnClick:(UIButton *)sender
{
[self.navigationController popViewControllerAnimated:YES];
}

- (void)didReceiveMemoryWarning {
[super didReceiveMemoryWarning];
// Dispose of any resources that can be recreated.
}

/*
#pragma mark - Navigation

// In a storyboard-based application, you will often want to do a little preparation before navigation
- (void)prepareForSegue:(UIStoryboardSegue *)segue sender:(id)sender {
// Get the new view controller using [segue destinationViewController].
// Pass the selected object to the new view controller.
}
*/

@end
第四步:在桌面上或者其他地方新建一个文件夹如下图
命名规范为:类模板的名(ClassTemplateVC)+Objective-C
第五步:把刚才修改的.h,.m文件复制到第四步创建的文件夹中如下图
第六步:把.h,.m文件命名为如下:
注:每个类模板的文件夹下面都是这样命名的___FILEBASENAME___.h,___FILEBASENAME___.m(复制粘贴即可)
第七步:找到系统类模板存放的目录
这里是Xcode6类模板的路径:/Applications/Xcode.app/Contents/Developer/Platforms/iPhoneOS.platform/Developer/Library/Xcode/Templates/File Templates/Source
图片如下:
注:这个路径是Xcode6中的路径。以后有可能会变的。
第八步:修改系统的模板配置文件(或者把TemplateInfo.plist文件复制出来修改完成后,替换原有的,这时候需要输入密码)
利用上面的路径找到TemplateInfo.plist文件如下图
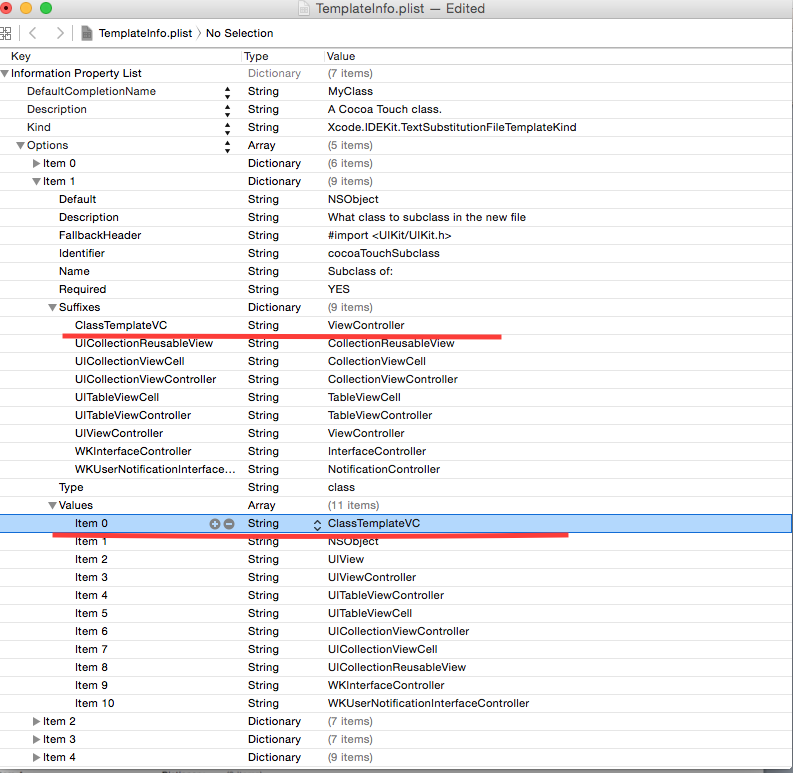
打开这个文件点击Option->Item 1->Suffixes/Values
1.在Suffixes里面添加自定义的模板类的类名以及模板类所继承的类名
2.在Values下面添加自定义模板类的类名
如下图:
第九步:把第四步创建的文件夹复制到第七步的路径下(TemplateInfo.plist 同级目录下)
大功告成。。。。
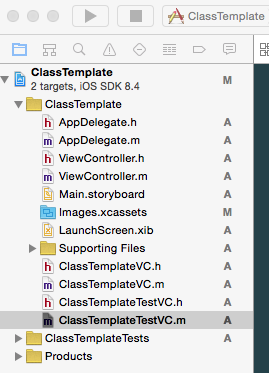
测试一下新建一个 ClassTemplateTestVC如下:
成功创建后:
ClassTemplateTestVC.m里面的内容如下:
//
//  ClassTemplateTestVC.m
//  ClassTemplate
//
//  Created by StephenLi  on 15/7/16.
//  Copyright (c) 2015年 StephenLi . All rights reserved.
//

#import "ClassTemplateTestVC.h"

@interface ClassTemplateTestVC ()

@end

@implementation ClassTemplateTestVC

- (void)viewDidLoad {
[super viewDidLoad];
// Do any additional setup after loading the view.
}

// 新添加的方法
- (void)backBtnClick:(UIButton *)sender
{
[self.navigationController popViewControllerAnimated:YES];
}

- (void)didReceiveMemoryWarning {
[super didReceiveMemoryWarning];
// Dispose of any resources that can be recreated.
}

/*
#pragma mark - Navigation

// In a storyboard-based application, you will often want to do a little preparation before navigation
- (void)prepareForSegue:(UIStoryboardSegue *)segue sender:(id)sender {
// Get the new view controller using [segue destinationViewController].
// Pass the selected object to the new view controller.
}
*/

@end
有了刚才的- (void)backBtnClick:(UIButton *)sender方法了。说明添加自定义类模板已成功。。。
测试工程的目录如下:
以上就是自定义模板的全过程。希望对大家有所帮助。

相关文章推荐
- 使用PHPMailer发送邮件
- pythone 请求响应字典
- 黑马程序员--第五天(多态)
- 双机高可用,负载均衡,MySQL(读写分离、主从自动切换)架构设计
- 用JS 这些实现左右滑动 上下滑动
- linux管道的那点事
- linux下php安装
- GRE写作必备句型
- Codeforces Round #312 (Div. 2) C. Amr and Chemistry(技巧)
- 关于 += 运算符
- WebMagic中RedisScheduler队列实现 ---bug修改
- python学习之--SyntaxError: Non-ASCII character '\xe5'
- PyCharm 教程(三)Hello world!
- 当出现ntdll!KiUserExceptionDispatcher时,如何用windbg 定位正确堆栈
- Dom
- System.Web Namespce
- 简单shiro扩展实现NOT、AND、OR权限验证
- 网络图片查看器
- 模仿jquery框架源码
- 使用ajax实现城市下拉框