你知道汽车租赁系统的关键点吗?
2015-07-12 19:54
399 查看
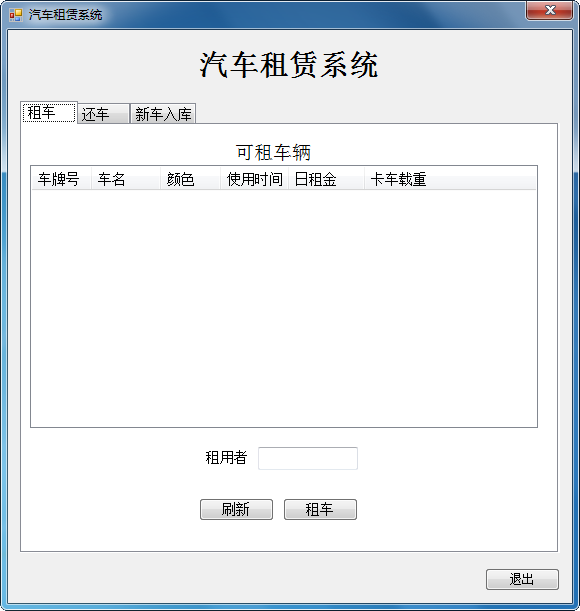
汽车租赁系统
主界面如下:
关键点一:怎样理清各个类之间的关系?
一共需要4个类:Car 类,Truck类,Vehicle类,VehicleUtil类
Car类:小汽车类 主要包括小汽车价格的计算方法
Truck类:货车类 主要包括货车费用的计算方法
Vehicle类:车辆类 描述车辆的一些基本信息
VehicleUtil类:工具类 创建汽车对象
下面附上一张类图:

关键点二:租车事件
首先要有两道验证:即 “输入出租人姓名验证” 和 “选择车辆验证”,代码如下:
租车完整代码如下:
关键点三:还车事件
开始依然是两道验证,模式如上。


验证“选择车辆” 和 “输入租车天数” 关键代码:
完整还车结算代码如下:
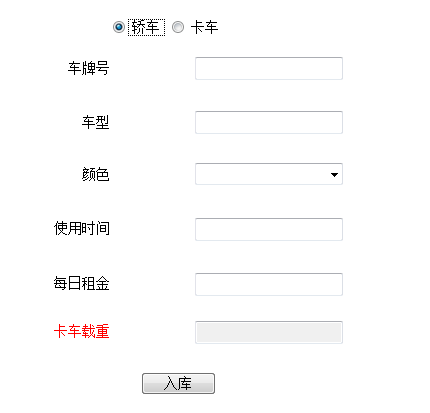
关键点四:新车入库

这里要注意的是:选择轿车单选钮的时候,卡车载重文本框是不可用状态。选择卡车单选钮则是可用状态

关键代码如下:
新车入库完整代码如下:
关键点五:刷新
首先要把listView的项清一下:
刷新关键代码如下:
再在按钮中调用方法:
知识回顾:窗体传值
主界面如下:
关键点一:怎样理清各个类之间的关系?
一共需要4个类:Car 类,Truck类,Vehicle类,VehicleUtil类
Car类:小汽车类 主要包括小汽车价格的计算方法
Truck类:货车类 主要包括货车费用的计算方法
Vehicle类:车辆类 描述车辆的一些基本信息
VehicleUtil类:工具类 创建汽车对象
下面附上一张类图:
关键点二:租车事件
首先要有两道验证:即 “输入出租人姓名验证” 和 “选择车辆验证”,代码如下:
if (String.IsNullOrEmpty(this.txtRenter.Text))
{
MessageBox.Show("请输入租车人姓名","提示!",MessageBoxButtons.OK,MessageBoxIcon.Information);
return;
}
if (this.lvRent.SelectedItems.Count == 0)
{
MessageBox.Show("请选择车辆", "提示!", MessageBoxButtons.OK, MessageBoxIcon.Information);
}
租车完整代码如下:
private void btnRent_Click(object sender, EventArgs e)
{
string key = null;
if (String.IsNullOrEmpty(this.txtRenter.Text))
{
MessageBox.Show("请输入租车人姓名","提示!",MessageBoxButtons.OK,MessageBoxIcon.Information);
return;
}
if (this.lvRent.SelectedItems.Count == 0)
{
MessageBox.Show("请选择车辆", "提示!", MessageBoxButtons.OK, MessageBoxIcon.Information);
}
else
{
key = lvRent.SelectedItems[0].Text;
vehicles[key].RentUser = this.txtRenter.Text;
rentVehicles.Add(vehicles[key].LicenseNO, vehicles[key]);
if(vehicles.ContainsKey(key))
{
vehicles.Remove(key);
}
PrintVehicles(vehicles, lvRent);
MessageBox.Show("已出租。", "提示!", MessageBoxButtons.OK, MessageBoxIcon.Information);
}
}
关键点三:还车事件
开始依然是两道验证,模式如上。
验证“选择车辆” 和 “输入租车天数” 关键代码:
if (String.IsNullOrEmpty(this.txtRentDate.Text))
{
MessageBox.Show("请输入租车天数", "提示!", MessageBoxButtons.OK, MessageBoxIcon.Information);
return;
}
if (this.lvReturn.SelectedItems.Count == 0)
{
MessageBox.Show("请选择车辆", "提示!", MessageBoxButtons.OK, MessageBoxIcon.Information);
}
完整还车结算代码如下:
     private void btnCompute_Click(object sender, EventArgs e)
{
double totalPrice = 0;
string key = null;
if (String.IsNullOrEmpty(this.txtRentDate.Text))
{
MessageBox.Show("请输入租车天数", "提示!", MessageBoxButtons.OK, MessageBoxIcon.Information);
return;
}
if (this.lvReturn.SelectedItems.Count == 0)
{
MessageBox.Show("请选择车辆", "提示!", MessageBoxButtons.OK, MessageBoxIcon.Information);
}
else
{
key = lvReturn.SelectedItems[0].Text;
rentVehicles[key].RentDate = int.Parse(this.txtRentDate.Text);
//调用抽象方法
totalPrice = rentVehicles[key].CalcPrice();
string msg = string.Format("您的总价是{0}。", totalPrice.ToString());
MessageBox.Show(msg, "提示!", MessageBoxButtons.OK, MessageBoxIcon.Information);

vehicles.Add(rentVehicles[key].LicenseNO, rentVehicles[key]);

if (rentVehicles.ContainsKey(key))
{
rentVehicles.Remove(key);
}
this.PrintVehicles(rentVehicles, lvReturn);
}
}
关键点四:新车入库
这里要注意的是:选择轿车单选钮的时候,卡车载重文本框是不可用状态。选择卡车单选钮则是可用状态
关键代码如下:
          if (rdoCar.Checked)
{
type = "car";
}
if (rdoTruck.Checked)
{
type = "truck";
load = int.Parse(this.txtLoad.Text);
}
新车入库完整代码如下:
     private void btnAdd_Click(object sender, EventArgs e)
{
try
{
string LicenseNO = this.txtAutoNum.Text;
string name = this.txtName.Text;
string color = this.cobColor.Text;
int years = int.Parse(this.txtYears.Text);
double DailyRent = double.Parse(this.txtLetting.Text);
int load = 0;
string type = null;
if (rdoCar.Checked)
{
type = "car";
}
if (rdoTruck.Checked)
{
type = "truck";
load = int.Parse(this.txtLoad.Text);
}
Vehicle auto = VehicleUtil.CreateVehicle(LicenseNO, name, color, years, DailyRent, load, type);
vehicles.Add(auto.LicenseNO, auto);
MessageBox.Show("添加成功。","提示!",MessageBoxButtons.OK,MessageBoxIcon.Information);
}
catch (Exception ex)
{
MessageBox.Show("入库数据不正确!","错误!",MessageBoxButtons.OK,MessageBoxIcon.Error);
}
finally
{
this.txtAutoNum.Text = "";
this.txtLetting.Text = "";
this.txtLoad.Text = "";
this.txtName.Text = "";
this.txtRentDate.Text = "";
this.txtRenter.Text = "";
this.txtYears.Text = "";
}
}
关键点五:刷新
首先要把listView的项清一下:
listView.Items.Clear();
刷新关键代码如下:
private void PrintVehicles(Dictionary<string, Vehicle> autos, ListView listView)
{
listView.Items.Clear();
if (autos.Count == 0)
{
MessageBox.Show("没有数据", "提示!", MessageBoxButtons.OK, MessageBoxIcon.Information);
}
else
{
foreach (Vehicle auto in autos.Values)
{
ListViewItem item = new ListViewItem(auto.LicenseNO);
if (auto is Car)
{
item.SubItems.AddRange(new string[]{auto.Name,auto.Color,auto.YearsOfService.ToString(),
auto.DailyRent.ToString(),"无"});
}
if (auto is Truck)
{
item.SubItems.AddRange(new string[]{auto.Name,auto.Color,auto.YearsOfService.ToString(),
auto.DailyRent.ToString(),((Truck)auto).Load.ToString()});
}
listView.Items.Add(item);
}
}
}
再在按钮中调用方法:
private void btnQueryRent_Click(object sender, EventArgs e)
{
this.PrintVehicles(vehicles, lvRent);
}
知识回顾:窗体传值
方法一、利用属性传值
BackGround:①点击 Button按钮,将主窗体Form1中textBox1 中的值传到 Form2中的textBox2中。② 点击Form2中的按钮,将Form2中textBox的值传给主窗体的文本框。
1、    在Form2中定义一个字段,封装成属性:
private string flag;
/// <summary>
/// 接收传过来的值
/// </summary>
public string Flag
{
get { return flag; }
set { flag = value; }
}
2、    在Form1 Button按钮事件中,实例化一个Form2 窗体对象,并将textBox1中的值赋给 Form2中的Flag,这样在窗体Form2的登录事件中就可以获取到窗体Form1传过来的值。
窗体:Form1中的代码:
private void button1_Click(object sender, EventArgs e)
{
Form2 f2 = new Form2();
f2.Flag = textBox1.Text;
//关键地方 ↓
if (f2.ShowDialog() == DialogResult.OK)
{
textBox1.Text = f2.Flag;
}
}
窗体:Form2的Load()事件
private void Form2_Load(object sender, EventArgs e)
{
textBox1.Text = this.flag;
}
3、    子窗体传值给父窗体(回传) 点击Form2中的button按钮将Form2中textBox的值传给父窗体Form1.
窗体:Form2中的代码
private void button1_Click(object sender, EventArgs e)
{
flag = this.textBox1.Text;
//关键地方 ↓
this.DialogResult = DialogResult.OK;
}
方法二、利用子窗体中的构造函数 (实现了父窗体给子窗体的传值,但是子窗体的值回传暂未实现)
1、    重载窗体Form2中的 构造函数
string str = String.Empty;//接收传过来的值
public Form2(string textValue)
{
InitializeComponent();
this.str = textValue;
}
2、    主窗体调用子窗体时候传参数:主窗体Form1的Button事件
Form2 f2 = new Form2(textBox1.Text);
f2.ShowDialog();

相关文章推荐
- 慕容小匹夫
- PAT 数据结构 04-树7. Search in a Binary Search Tree (25)
- CDQZ 数据结构 1004
- 学习PrintWriter类
- shell 编程基础
- 归并排序
- spiritwolf的博客
- java基础
- 目标文件和可执行文件的区别
- 二叉搜索树C++实现
- awk基本用法简介
- Android 核心分析 之Android的启动过程
- 第三章——目标文件里有什么
- 解析目标文件
- 进程同步及避免死锁经典问题
- ORACLE经常使用的命令
- 大整数除法
- MySQL系列之B------MySQL安装
- hdu 4864 Task(贪心)
- Java语言基础1--专题课 拆数