【只需3步】源码手动安装Apache以及配置(亲测可行)
2015-07-10 19:12
609 查看
作者小波/QQ463431476欢迎转载!
redhat6采用centos yum源。
第一步下载apache依赖的软件包并安装
[b]安装 apr
下载地址:http://apr.apache.org/download.cgi[/b]
解压包:tar -jxvf apr-1.5.0.tar.bz2 注意:这里的包的格式是tar.bz2格式,如果是.tar格式的用 tar -zxvf +包的名字 命令解压。
进入该包的文件夹内,依次执行以下命令:
./configure --prefix=/work/installed/apr (注意:configure安装的文件夹目录可以自己定义)
make
make install
[b][b]安装 apr-util[/b]
下载地址:http://apr.apache.org/download.cgi
解压包: tar -jxvf apr-util-1.5.3.tar.bz2
[/b]
[b]进入该文件夹并依次执行:[/b]
./configure --prefix=/work/installed/apr-util --with-apr=/work/installed/apr
make
make install
[b][b]安装 pcre[/b]
下载地址:http://pcre.org/
解压包:tar -jxvf pcre-8.35.tar.bz2
[/b]
./configure --prefix=/work/installed/pcre
make
make install
[b]注意:如果在安装 pcre 时,遇到问题:configure: error: You need a C++ compiler for C++ support.
ubuntu的解决方法:sudo apt-get install build-essential[/b]
安装:
下载地址:http://httpd.apache.org/
解压:tar -jxvf httpd-2.4.9.tar.bz2
进入解压后的文件内并执行:
./configure --prefix=/work/installed/apache --with-apr=/work/installed/apr --with-apr-util=/work/installed/apr-util --with- pcre=/work/installed/pcre --enable-module=shared
其中--enable-module=shared表示Apache可以动态的加载模块,为以后安装php铺垫。
make
make install
注意:如果安装错误,想重新装的话,先删除安装的文件夹,然后在解压后的文件夹内执行清除编译:make clean all
第三步配置Apache:
修改配置文件,如果不修改的话就启动了apache服务的话就会出现问题:
AH00558: httpd: Could not reliably determine the server's fully qualified domain name, using 127.0.1.1. Set the 'ServerName' directive globally to suppress this message
解决方法:
在安装的目录下修改文件:
命令:vim /work/installed/apache/conf/httpd.conf
把:
# ServerName www.example.com:80
改为:
ServerName localhost:80
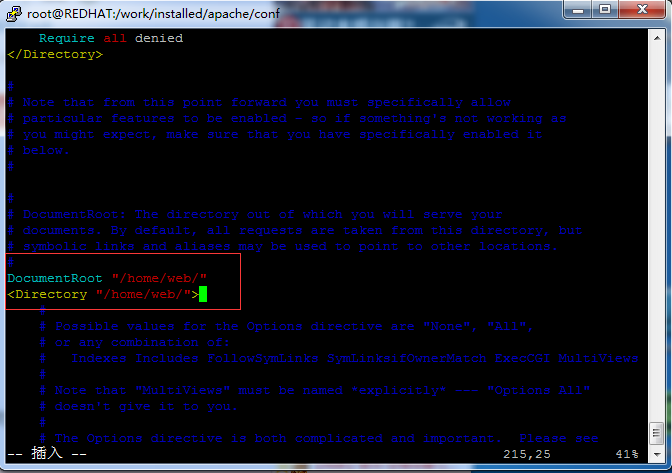
然后也可以配置自己的发布主页目录:
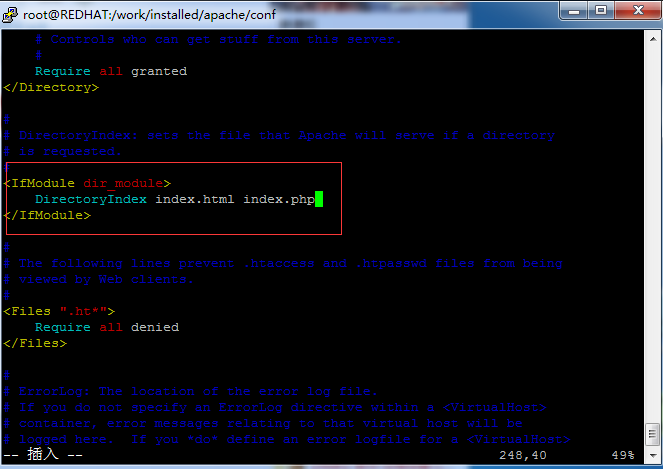
同时也可以添加php的主页:
如果 /etc/下有hosts文件的话修改:
修改文件: vi /etc/hosts
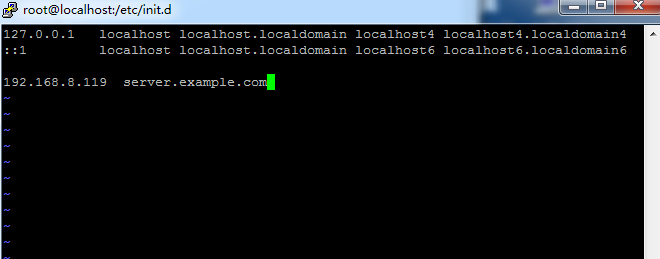
在后面输入:192.168.8.119 server.example.com
IP地址改成自己的ip就行了。
启动apache服务:
输入命令:/work/installed/apache/bin/apachectl start
开机自动启动:vim etc/rc.local
添加:[b]/work/installed/apache/bin/apachectl start 这里是apache的安装目录里面的配置文件,让它开机自动启动就行啦![/b]
如果不行的话关闭防火墙:iptables -F
输入IP地址可以看到:it works!

[b]但是这种情况必须关闭防火墙,所以需要配置防火墙:[/b]
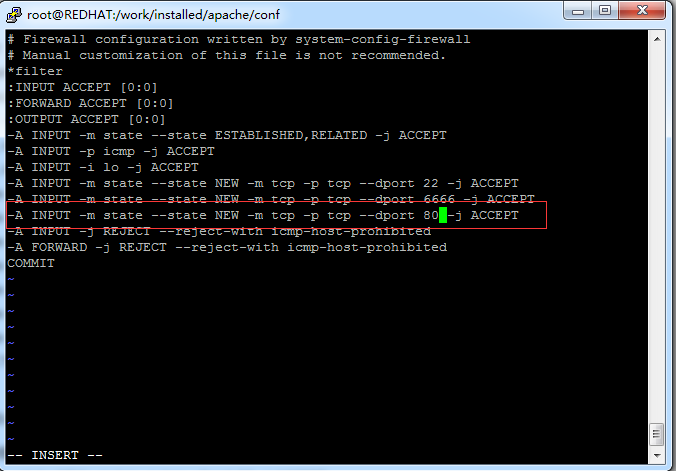
打开iptables的配置文件:vi /etc/sysconfig/iptables
添加一条80端口:(如果自己自定义端口的话,填写自己的端口)
-A RH-Firewall-1-INPUT -m state –state NEW -m tcp -p tcp –dport 80 -j ACCEPT
另外一篇yum安装Apache以及Apache的配置,仅仅提供参考:
/article/5248605.html
redhat6采用centos yum源。
第一步下载apache依赖的软件包并安装
[b]安装 apr
下载地址:http://apr.apache.org/download.cgi[/b]
解压包:tar -jxvf apr-1.5.0.tar.bz2 注意:这里的包的格式是tar.bz2格式,如果是.tar格式的用 tar -zxvf +包的名字 命令解压。
进入该包的文件夹内,依次执行以下命令:
./configure --prefix=/work/installed/apr (注意:configure安装的文件夹目录可以自己定义)
make
make install
[b][b]安装 apr-util[/b]
下载地址:http://apr.apache.org/download.cgi
解压包: tar -jxvf apr-util-1.5.3.tar.bz2
[/b]
[b]进入该文件夹并依次执行:[/b]
./configure --prefix=/work/installed/apr-util --with-apr=/work/installed/apr
make
make install
[b][b]安装 pcre[/b]
下载地址:http://pcre.org/
解压包:tar -jxvf pcre-8.35.tar.bz2
[/b]
./configure --prefix=/work/installed/pcre
make
make install
[b]注意:如果在安装 pcre 时,遇到问题:configure: error: You need a C++ compiler for C++ support.
ubuntu的解决方法:sudo apt-get install build-essential[/b]
redhat6/centos6 解决方法 :yum安装包即可:yum install gcc gcc-c++ kernel-devel
第二步安装Apache并配置:安装:
下载地址:http://httpd.apache.org/
解压:tar -jxvf httpd-2.4.9.tar.bz2
进入解压后的文件内并执行:
./configure --prefix=/work/installed/apache --with-apr=/work/installed/apr --with-apr-util=/work/installed/apr-util --with- pcre=/work/installed/pcre --enable-module=shared
其中--enable-module=shared表示Apache可以动态的加载模块,为以后安装php铺垫。
make
make install
注意:如果安装错误,想重新装的话,先删除安装的文件夹,然后在解压后的文件夹内执行清除编译:make clean all
第三步配置Apache:
修改配置文件,如果不修改的话就启动了apache服务的话就会出现问题:
AH00558: httpd: Could not reliably determine the server's fully qualified domain name, using 127.0.1.1. Set the 'ServerName' directive globally to suppress this message
解决方法:
在安装的目录下修改文件:
命令:vim /work/installed/apache/conf/httpd.conf
把:
# ServerName www.example.com:80
改为:
ServerName localhost:80
然后也可以配置自己的发布主页目录:
同时也可以添加php的主页:
如果 /etc/下有hosts文件的话修改:
修改文件: vi /etc/hosts
在后面输入:192.168.8.119 server.example.com
IP地址改成自己的ip就行了。
启动apache服务:
输入命令:/work/installed/apache/bin/apachectl start
开机自动启动:vim etc/rc.local
添加:[b]/work/installed/apache/bin/apachectl start 这里是apache的安装目录里面的配置文件,让它开机自动启动就行啦![/b]
如果不行的话关闭防火墙:iptables -F
输入IP地址可以看到:it works!
[b]但是这种情况必须关闭防火墙,所以需要配置防火墙:[/b]
打开iptables的配置文件:vi /etc/sysconfig/iptables
添加一条80端口:(如果自己自定义端口的话,填写自己的端口)
-A RH-Firewall-1-INPUT -m state –state NEW -m tcp -p tcp –dport 80 -j ACCEPT
另外一篇yum安装Apache以及Apache的配置,仅仅提供参考:
/article/5248605.html

相关文章推荐
- 使用apache设置绑定多个域名或网站
- org.apache.commons.lang.StringUtils中isEmpty和isBlank的区别
- Apache服务器的404页面的设置
- Apache配置多个监听端口和不同的网站目录的简单方法
- apache日志切割
- Apache 隐藏入口文件 index.php
- Apache Camel的Java编程入门指南
- Apache 重写机制
- 18-org.apache.catalina.util.DefaultAnnotationProcessor cannot be cast to org.apache.AnnotationProces
- 用apache在局域网里其他用户访问IP来访问网站
- Apache实现负载均衡
- windos环境apache+mysql+php+Discuz的安装配置
- Apache服务器一个IP多个站点的配置方法示例
- Spark交互式分析平台Apache Zeppelin的安装
- Exception in thread "main" java.lang.UnsupportedClassVersionError: org/apache/ma ven/cli/Maven
- Visual Studio Tools for Apache Cordova 入门
- PHP与apache环境配置
- yum 安装Apache
- org.apache.commons.fileupload实现文件上传
- 二、linux下apache2.2.11+php5.6.3的环境配置