TQIMX6Q的Linux平台SD卡自动烧写方法
2015-07-07 00:00
609 查看
在 linux 平台,使用 SD 卡自动烧写方法。在烧写之前请确认以下物件:
按下图拔动启动掩码,关于掩码更详细说明请查看《4.1 开机拔码说明》
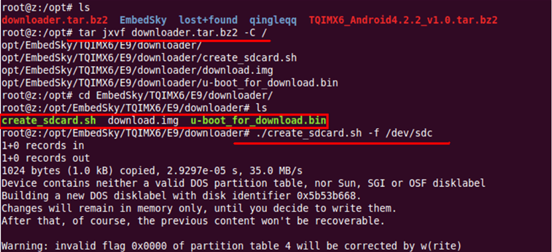
制作启动卡:
将做好的相关制作工具与镜像解压到任意目录下。
#tar jxvf downloader.tar.bz2 -C /
到相关目录下
#./create_sdcard.sh -f /dev/sdc


准备烧写镜像:
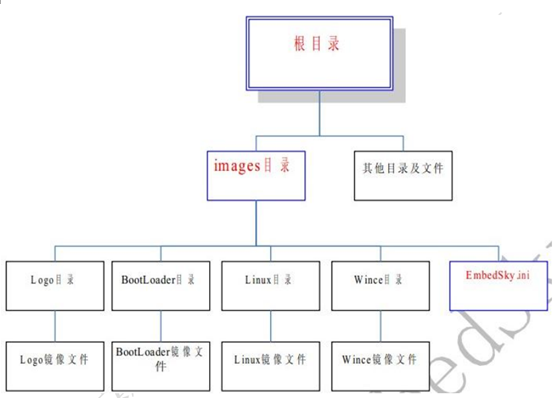
SD 卡自动烧写,是根据 SD 启动卡中根目录下的 images 目录里面的 EmbedSky.ini 文件的内容,进行判断,选择是否烧写和烧写哪些镜像的。EmbedSky.ini 文件务必放到 SD 卡中的images 目录中,如果 SD 卡中没有该目录,请新建一个这样的目录。
烧写 ubuntu 镜像:
复制镜像:
先将光盘中提供的 ubuntu 镜像:u-boot_ IMX6_CoreC_for -ubuntu_v1.0.bin ,uImage_
IMX6_CoreC_for -ubuntu_v1.0,oneiric_IMX6_CoreC_for -ubuntu_v1.0.tgz 分别拷贝到 SD 卡images\bootloader\与 images\ubuntu 目录下,去掉镜像的_ IMX6_CoreC_for -ubuntu_v1.0 后缀,拷贝完成后对应的烧写文件在 SD 卡中应该是:

修改 EmbedSky.ini 文件:
说明 1:该文件格式不能随意变动,=后面不能有空格,也不可以任意增加一行或者删除一行。
说明 2:以下的“//XXX”只用作注释,真实使用时不可以出现这些内容。不然会导致出错。
说明 3:用户在烧写 ubuntu 时只要关注下面有注释的行,并根据实际情况进行修改就可以了。其它不用修改。
说明 4:对于不用更新的镜像,直接设置为空即可,如:“Kernel=”后面为空 。
#### This is E9 SD config files ####
operating condition=install
OS Type=ubuntu //操作系统指示
LED indicator=off
Beep=off
extern_indication=partition //外加操作指示,partition 表示要重新分区,建议加上
#### Others ####
bootloader=images\bootloader\u-boot.bin //u-boot 镜像存放路径
LOGO=
#### Others end ####
#### Linux ####
kernel=images\
rootfs=images\
#### Linux end ####
#### Windows CE ####
NK=images\wince\NK.bin
#### Windows CE end ####
#### Android ####
boot_img=images/android/boot.img
system_img=images/android/system.img
recovery_img=images/android/recovery.img
#### Android end ####
#### Ubuntu ####
kernel=images/ubuntu/uImage //ubuntu 的 uImage 的存放路径
rootfs=images/ubuntu/oneiric.tgz //ubuntu 的 rootfs 的存放路径
#### Ubuntu end ####
#### uCOS-II ####
uCOS-II Image=images\uCOS-II\TQ6410_UCOS-II.bin
#### uCOS-II end ####
#### User Application ####
Application Image=images\UserAPPS\TQ6410_Test.bin
#### User Application end #####
烧写系统:
J6 为系统启动方式选择的接口,不同的拔码方式可以实现不同的启动方式。因为使用的 sd 卡烧写,所以还是使用 sd 卡启动。将拔码打到 1 on 其它 off。关于启动方式更多的说明用户可以查看 4.1 章节。
整个烧写过程大概需要 20~30 分钟,但是因各人电脑配置不同,时间会有所变化,请耐心等待!
| 烧写工具包 | 在光盘中“IMX6_CoreC_CD/Linux 平台工具/downloader.tar.bz2” |
| 内核映像 | uImage |
| u-boot 映像 | u-boot.bin |
| 文件系统 | oneiric.tgz |
| IMX6_CoreC 主板 | 一块 |
| sd 卡 | 一张 |
| sd 读卡器 | 一个 |
| 12V-2A 直流电源 | 一个 |
制作启动卡:
将做好的相关制作工具与镜像解压到任意目录下。
#tar jxvf downloader.tar.bz2 -C /
到相关目录下
#./create_sdcard.sh -f /dev/sdc
准备烧写镜像:
SD 卡自动烧写,是根据 SD 启动卡中根目录下的 images 目录里面的 EmbedSky.ini 文件的内容,进行判断,选择是否烧写和烧写哪些镜像的。EmbedSky.ini 文件务必放到 SD 卡中的images 目录中,如果 SD 卡中没有该目录,请新建一个这样的目录。
烧写 ubuntu 镜像:
复制镜像:
先将光盘中提供的 ubuntu 镜像:u-boot_ IMX6_CoreC_for -ubuntu_v1.0.bin ,uImage_
IMX6_CoreC_for -ubuntu_v1.0,oneiric_IMX6_CoreC_for -ubuntu_v1.0.tgz 分别拷贝到 SD 卡images\bootloader\与 images\ubuntu 目录下,去掉镜像的_ IMX6_CoreC_for -ubuntu_v1.0 后缀,拷贝完成后对应的烧写文件在 SD 卡中应该是:
修改 EmbedSky.ini 文件:
说明 1:该文件格式不能随意变动,=后面不能有空格,也不可以任意增加一行或者删除一行。
说明 2:以下的“//XXX”只用作注释,真实使用时不可以出现这些内容。不然会导致出错。
说明 3:用户在烧写 ubuntu 时只要关注下面有注释的行,并根据实际情况进行修改就可以了。其它不用修改。
说明 4:对于不用更新的镜像,直接设置为空即可,如:“Kernel=”后面为空 。
#### This is E9 SD config files ####
operating condition=install
OS Type=ubuntu //操作系统指示
LED indicator=off
Beep=off
extern_indication=partition //外加操作指示,partition 表示要重新分区,建议加上
#### Others ####
bootloader=images\bootloader\u-boot.bin //u-boot 镜像存放路径
LOGO=
#### Others end ####
#### Linux ####
kernel=images\
rootfs=images\
#### Linux end ####
#### Windows CE ####
NK=images\wince\NK.bin
#### Windows CE end ####
#### Android ####
boot_img=images/android/boot.img
system_img=images/android/system.img
recovery_img=images/android/recovery.img
#### Android end ####
#### Ubuntu ####
kernel=images/ubuntu/uImage //ubuntu 的 uImage 的存放路径
rootfs=images/ubuntu/oneiric.tgz //ubuntu 的 rootfs 的存放路径
#### Ubuntu end ####
#### uCOS-II ####
uCOS-II Image=images\uCOS-II\TQ6410_UCOS-II.bin
#### uCOS-II end ####
#### User Application ####
Application Image=images\UserAPPS\TQ6410_Test.bin
#### User Application end #####
烧写系统:
J6 为系统启动方式选择的接口,不同的拔码方式可以实现不同的启动方式。因为使用的 sd 卡烧写,所以还是使用 sd 卡启动。将拔码打到 1 on 其它 off。关于启动方式更多的说明用户可以查看 4.1 章节。
整个烧写过程大概需要 20~30 分钟,但是因各人电脑配置不同,时间会有所变化,请耐心等待!

相关文章推荐
- Linux 实现cp 命令
- Linux 实现cp 命令
- Linux 实现cp 命令
- Linux 实现cp 命令
- centos 6.5编译安装courier-authlib编译异常结束make失败
- linux下文件夹的创建、复制、剪切、重命名、清空和删除命令
- Linux下C语言调试(3)
- Redhat Linux RPM包安装软件及其管理
- 摘录:Linux打Patch的方法
- Ubuntu14.04及以上操作系统鼠标闪烁问题
- linux 修改home 目录
- Linux下C语言的调试(2)
- linux下C语言的调试(1)
- CentOS操作系统的log日志
- Centos防火墙设置
- linux 系统下查看raid信息,以及磁盘信息
- linux下proc里关于磁盘性能的参数
- linux程序设计——线程的属性(第十二章)
- CentOS 6.4下编译安装MySQL 5.6.14
- linux下mysql的卸载、安装全过程