应用如何去调用系统中的应用
2015-06-30 10:28
337 查看
如何在一个应用中 通过某个事件,而去启动另外一个已安装的应用。所以愿意和大家分享一下!
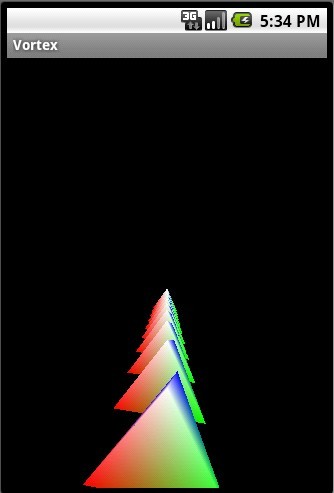
而为了能让大家更加容易的理解,我写了一个简单的Demo,我们的程序有俩个按钮,其中一个点击会启动我自己写的应用(一个3D应用为例),而另外一个按钮会启动系统自带的应用(如,日历,闹钟,计算器等等).这里我一日历为例子!
首先看一下我们的效果图(点击第一个按钮为例):
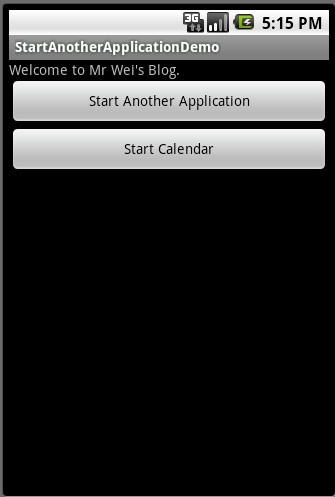
下面是Demo的详细步骤:
一、新建一个Android工程命名为StartAnotherApplicationDemo.
二、修改main.xml布局,代码如下:
[java] view
plaincopy
<?xml version="1.0" encoding="utf-8"?>
<LinearLayout xmlns:android="http://schemas.android.com/apk/res/android"
android:orientation="vertical"
android:layout_width="fill_parent"
android:layout_height="fill_parent"
>
<TextView
android:layout_width="fill_parent"
android:layout_height="wrap_content"
android:text="Welcome to Mr Wei's Blog."
/>
<Button
android:id="@+id/button"
android:layout_width="fill_parent"
android:layout_height="wrap_content"
android:text="Start Another Application"
/>
<Button
android:id="@+id/start_calender"
android:layout_width="fill_parent"
android:layout_height="wrap_content"
android:text="Start Calendar"
/>
</LinearLayout>
三、修改主程序StartAnotherApplicationDemo.java代码如下:
[java] view
plaincopy
package com.android.tutor;
import android.app.Activity;
import android.content.ComponentName;
import android.content.Intent;
import android.os.Bundle;
import android.view.View;
import android.widget.Button;
public class StartAnotherApplicationDemo extends Activity {
private Button mButton01,mButton02;
public void onCreate(Bundle savedInstanceState) {
super.onCreate(savedInstanceState);
setContentView(R.layout.main);
mButton01 = (Button)findViewById(R.id.button);
mButton02 = (Button)findViewById(R.id.start_calender);
//-----启动我们自身写的程序------------------
mButton01.setOnClickListener(new Button.OnClickListener(){
public void onClick(View v) {
//-----核心部分----- 前名一个参数是应用程序的包名,后一个是这个应用程序的主Activity名
Intent intent=new Intent();
intent.setComponent(new ComponentName("com.droidnova.android.games.vortex",
"com.droidnova.android.games.vortex..Vortex"));
startActivity(intent);
}
});
//-----启动系统自带的应用程序------------------
mButton02.setOnClickListener(new Button.OnClickListener(){
public void onClick(View v) {
Intent intent=new Intent();
intent.setComponent(new ComponentName("com.android.calendar", "com.android.calendar.LaunchActivity"));
startActivity(intent);
}
});
}
}
四、执行之,将得到如上效果!
好了今天就到这里了,夜深了,收工睡觉!有什么不明白的,希望大家多留言,我会耐心解答!谢谢~
版权声明:本文为博主原创文章,未经博主允许不得转载。
而为了能让大家更加容易的理解,我写了一个简单的Demo,我们的程序有俩个按钮,其中一个点击会启动我自己写的应用(一个3D应用为例),而另外一个按钮会启动系统自带的应用(如,日历,闹钟,计算器等等).这里我一日历为例子!
首先看一下我们的效果图(点击第一个按钮为例):
下面是Demo的详细步骤:
一、新建一个Android工程命名为StartAnotherApplicationDemo.
二、修改main.xml布局,代码如下:
[java] view
plaincopy
<?xml version="1.0" encoding="utf-8"?>
<LinearLayout xmlns:android="http://schemas.android.com/apk/res/android"
android:orientation="vertical"
android:layout_width="fill_parent"
android:layout_height="fill_parent"
>
<TextView
android:layout_width="fill_parent"
android:layout_height="wrap_content"
android:text="Welcome to Mr Wei's Blog."
/>
<Button
android:id="@+id/button"
android:layout_width="fill_parent"
android:layout_height="wrap_content"
android:text="Start Another Application"
/>
<Button
android:id="@+id/start_calender"
android:layout_width="fill_parent"
android:layout_height="wrap_content"
android:text="Start Calendar"
/>
</LinearLayout>
三、修改主程序StartAnotherApplicationDemo.java代码如下:
[java] view
plaincopy
package com.android.tutor;
import android.app.Activity;
import android.content.ComponentName;
import android.content.Intent;
import android.os.Bundle;
import android.view.View;
import android.widget.Button;
public class StartAnotherApplicationDemo extends Activity {
private Button mButton01,mButton02;
public void onCreate(Bundle savedInstanceState) {
super.onCreate(savedInstanceState);
setContentView(R.layout.main);
mButton01 = (Button)findViewById(R.id.button);
mButton02 = (Button)findViewById(R.id.start_calender);
//-----启动我们自身写的程序------------------
mButton01.setOnClickListener(new Button.OnClickListener(){
public void onClick(View v) {
//-----核心部分----- 前名一个参数是应用程序的包名,后一个是这个应用程序的主Activity名
Intent intent=new Intent();
intent.setComponent(new ComponentName("com.droidnova.android.games.vortex",
"com.droidnova.android.games.vortex..Vortex"));
startActivity(intent);
}
});
//-----启动系统自带的应用程序------------------
mButton02.setOnClickListener(new Button.OnClickListener(){
public void onClick(View v) {
Intent intent=new Intent();
intent.setComponent(new ComponentName("com.android.calendar", "com.android.calendar.LaunchActivity"));
startActivity(intent);
}
});
}
}
四、执行之,将得到如上效果!
好了今天就到这里了,夜深了,收工睡觉!有什么不明白的,希望大家多留言,我会耐心解答!谢谢~
版权声明:本文为博主原创文章,未经博主允许不得转载。

相关文章推荐
- javaScript注意技巧
- 动态规划三部曲之01背包问题的分析和实现(二)
- 黑马程序员——Java基础之多态、内部类
- [MFC] 关于OnPaint()
- 大型商贸系统(进货管理)技术解析(五)自营无订单进仓冲红单
- bzoj3632
- WebService(2)-XML系列之Java和Xml之间相互转换
- word转成pdf有什么方法
- brk()和sbrk()函数的使用
- 删除重复项的几种方法
- mysql安装最后一步 Apply Security Settings 出错
- 07、在 Windows10 上获得屏幕分辨率
- 实现输入图片地址浏览图片功能
- IOS的iPhone5s模拟器只显示3.5寸解决方法
- Spring MVC-HandlerAdapter
- Java程序设计——第十六周周五:数据库的连接与随机数使用
- what is archeage honor weapons?
- 在js中使用createElement创建HTML对象和元素
- C++ MFC 中使用多线程操作实例
- CMD命令名详细大全