Android中Broadcast Receiver组件详解
2015-06-15 23:59
721 查看
BroadcastReceiver(广播***)是Android中的四大组件之一。
下面是Android Doc中关于BroadcastReceiver的概述:
①广播***是一个专注于接收广播通知信息,并做出对应处理的组件。很多广播是源自于系统代码的──比如,通知时区改变、电池电量低、拍摄了一张照片或者用户改变了语言选项。应用程序也可以进行广播──比如说,通知其它应用程序一些数据下载完成并处于可用状态。
②应用程序可以拥有任意数量的广播***以对所有它感兴趣的通知信息予以响应。所有的***均继承自BroadcastReceiver基类。
③广播***没有用户界面。然而,它们可以启动一个activity来响应它们收到的信息,或者用NotificationManager来通知用户。通知可以用很多种方式来吸引用户的注意力──闪动背灯、震动、播放声音等等。一般来说是在状态栏上放一个持久的图标,用户可以打开它并获取消息。
Android中的广播事件有两种,一种就是系统广播事件,比如:ACTION_BOOT_COMPLETED(系统启动完成后触发),ACTION_TIME_CHANGED(系统时间改变时触发),ACTION_BATTERY_LOW(电量低时触发)等等。另外一种是我们自定义的广播事件。
广播事件的流程
①注册广播事件:注册方式有两种,一种是静态注册,就是在AndroidManifest.xml文件中定义,注册的广播***必须要继承BroadcastReceiver;另一种是动态注册,是在程序中使用Context.registerReceiver注册,注册的广播***相当于一个匿名类。两种方式都需要IntentFIlter。
②发送广播事件:通过Context.sendBroadcast来发送,由Intent来传递注册时用到的Action。
③接收广播事件:当发送的广播被***监听到后,会调用它的onReceive()方法,并将包含消息的Intent对象传给它。onReceive中代码的执行时间不要超过5s,否则Android会弹出超时dialog。
下面我通过代码演示自定义广播事件和系统广播事件的使用。完整代码下载地址:android_broadcastreceiver.rar
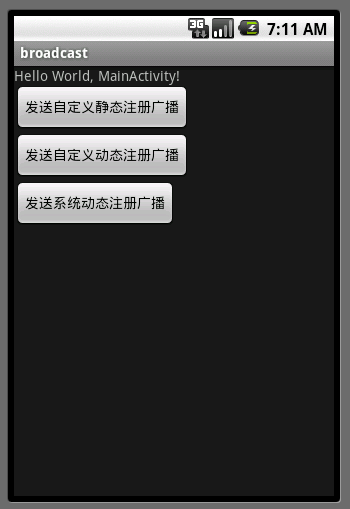
Step1:在MainActivity的onStart方法中注册广播事件。静态注册方式是在AndroidManifest.xml文件中。
Step2: 点击相应按钮后会触发相应的方式来发送广播消息。
[java] view
plaincopy
/**
* MainActivity
* @author zuolongsnail
*
*/
public class MainActivity extends Activity {
private Button sendStaticBtn;
private Button sendDynamicBtn;
private Button sendSystemBtn;
private static final String STATICACTION = "com.byread.static";
private static final String DYNAMICACTION = "com.byread.dynamic";
// USB设备连接
private static final String SYSTEMACTION = Intent.ACTION_POWER_CONNECTED;
@Override
public void onCreate(Bundle savedInstanceState) {
super.onCreate(savedInstanceState);
setContentView(R.layout.main);
sendStaticBtn = (Button) findViewById(R.id.send_static);
sendDynamicBtn = (Button) findViewById(R.id.send_dynamic);
sendSystemBtn = (Button) findViewById(R.id.send_system);
sendStaticBtn.setOnClickListener(new MyOnClickListener());
sendDynamicBtn.setOnClickListener(new MyOnClickListener());
sendSystemBtn.setOnClickListener(new MyOnClickListener());
}
class MyOnClickListener implements OnClickListener{
@Override
public void onClick(View v) {
// 发送自定义静态注册广播消息
if(v.getId() == R.id.send_static){
Log.e("MainActivity", "发送自定义静态注册广播消息");
Intent intent = new Intent();
intent.setAction(STATICACTION);
intent.putExtra("msg", "接收静态注册广播成功!");
sendBroadcast(intent);
}
// 发送自定义动态注册广播消息
else if(v.getId() == R.id.send_dynamic){
Log.e("MainActivity", "发送自定义动态注册广播消息");
Intent intent = new Intent();
intent.setAction(DYNAMICACTION);
intent.putExtra("msg", "接收动态注册广播成功!");
sendBroadcast(intent);
}
// 发送系统动态注册广播消息。当手机连接充电设备时会由系统自己发送广播消息。
else if(v.getId() == R.id.send_system){
Log.e("MainActivity", "发送系统动态注册广播消息");
Intent intent = new Intent();
intent.setAction(SYSTEMACTION);
intent.putExtra("msg", "正在充电。。。。");
}
}
}
@Override
protected void onStart() {
super.onStart();
Log.e("MainActivity", "注册广播事件");
// 注册自定义动态广播消息
IntentFilter filter_dynamic = new IntentFilter();
filter_dynamic.addAction(DYNAMICACTION);
registerReceiver(dynamicReceiver, filter_dynamic);
// 注册系统动态广播消息
IntentFilter filter_system = new IntentFilter();
filter_system.addAction(SYSTEMACTION);
registerReceiver(systemReceiver, filter_system);
}
private BroadcastReceiver dynamicReceiver = new BroadcastReceiver() {
@Override
public void onReceive(Context context, Intent intent) {
Log.e("MainActivity", "接收自定义动态注册广播消息");
if(intent.getAction().equals(DYNAMICACTION)){
String msg = intent.getStringExtra("msg");
Toast.makeText(context, msg, Toast.LENGTH_SHORT).show();
}
}
};
private BroadcastReceiver systemReceiver = new BroadcastReceiver() {
@Override
public void onReceive(Context context, Intent intent) {
Log.e("MainActivity", "接收系统动态注册广播消息");
if(intent.getAction().equals(SYSTEMACTION)){
String msg = intent.getStringExtra("msg");
Toast.makeText(context, msg, Toast.LENGTH_SHORT).show();
}
}
};
}
Step3:接收广播消息。以下为两个静态注册的广播***。
[java] view
plaincopy
/**
* 自定义静态注册广播消息***
* @author zuolongsnail
*
*/
public class StaticReceiver extends BroadcastReceiver {
@Override
public void onReceive(Context context, Intent intent) {
String msg = intent.getStringExtra("msg");
Toast.makeText(context, msg, Toast.LENGTH_SHORT).show();
}
}
[java] view
plaincopy
/**
* 系统静态注册广播消息***
*
* @author zuolongsnail
*
*/
public class SystemReceiver extends BroadcastReceiver {
@Override
public void onReceive(Context context, Intent intent) {
if (intent.getAction().equals(Intent.ACTION_BATTERY_LOW)) {
Log.e("SystemReceiver", "电量低提示");
Toast.makeText(context, "您的手机电量偏低,请及时充电", Toast.LENGTH_SHORT).show();
}
}
}
下面是AndroidManifest.xml文件:
[xhtml] view
plaincopy
<?xml version="1.0" encoding="utf-8"?>
<manifest xmlns:android="http://schemas.android.com/apk/res/android"
package="com.byread" android:versionCode="1" android:versionName="1.0">
<application android:icon="@drawable/icon" android:label="@string/app_name">
<activity android:name=".MainActivity" android:label="@string/app_name">
<intent-filter>
<action android:name="android.intent.action.MAIN" />
<category android:name="android.intent.category.LAUNCHER" />
</intent-filter>
</activity>
<!-- 注册自定义静态广播*** -->
<receiver android:name=".StaticReceiver">
<intent-filter>
<action android:name="com.byread.static" />
</intent-filter>
</receiver>
<!-- 注册系统静态广播*** -->
<receiver android:name=".SystemReceiver">
<intent-filter>
<action android:name="android.intent.action.BATTERY_LOW" />
</intent-filter>
</receiver>
</application>
</manifest>
界面布局文件main.xml
[xhtml] view
plaincopy
<?xml version="1.0" encoding="utf-8"?>
<LinearLayout xmlns:android="http://schemas.android.com/apk/res/android"
android:orientation="vertical" android:layout_width="fill_parent"
android:layout_height="fill_parent">
<TextView android:layout_width="fill_parent"
android:layout_height="wrap_content" android:text="@string/hello" />
<Button android:id="@+id/send_static" android:layout_width="wrap_content"
android:layout_height="wrap_content" android:text="发送自定义静态注册广播" />
<Button android:id="@+id/send_dynamic" android:layout_width="wrap_content"
android:layout_height="wrap_content" android:text="发送自定义动态注册广播" />
<Button android:id="@+id/send_system" android:layout_width="wrap_content"
android:layout_height="wrap_content" android:text="发送系统动态注册广播" />
</LinearLayout>
讲解结束,不过有一点我自己也没弄清楚,这个系统广播事件如果我在程序中sendBroadcast的话,那就是自定义广播了。如果不写的话,那是不是系统自己来发送对应Action广播呢?有知道的同学请告诉我一下,再此先谢过。
运行界面:
在 Android 中使用 Activity, Service, Broadcast, BroadcastReceiver
活动(Activity) - 用于表现功能
服务(Service) - 相当于后台运行的 Activity
广播(Broadcast) - 用于发送广播
广播***(BroadcastReceiver) - 用于接收广播
Intent - 用于连接以上各个组件,并在其间传递消息
==========================================================================
BroadcastReceiver:
在Android中,Broadcast是一种广泛运用的在应用程序之间传输信息的机制。而BroadcastReceiver是对发送出来的 Broadcast进行过滤接受并响应的一类组件。下面将详细的阐述如何发送Broadcast和使用BroadcastReceiver过滤接收的过程:
首先在需要发送信息的地方,把要发送的信息和用于过滤的信息(如Action、Category)装入一个Intent对象,然后通过调用 Context.sendBroadcast()、sendOrderBroadcast()或sendStickyBroadcast()方法,把 Intent对象以广播方式发送出去。
当Intent发送以后,所有已经注册的BroadcastReceiver会检查注册时的IntentFilter是否与发送的Intent相匹配,若匹配则就会调用BroadcastReceiver的onReceive()方法。所以当我们定义一个BroadcastReceiver的时候,都需要实现onReceive()方法。
注册BroadcastReceiver有两种方式:
一种方式是,静态的在AndroidManifest.xml中用<receiver>标签生命注册,并在标签内用<intent- filter>标签设置过滤器。
另一种方式是,动态的在代码中先定义并设置好一个 IntentFilter 对象,然后在需要注册的地方调Context.registerReceiver()方法,如果取消时就调用 Context.unregisterReceiver()方法。如果用动态方式注册的BroadcastReceiver的Context对象被销毁时,BroadcastReceiver也就自动取消注册了。(特别注意,有些可能需要后台监听的,如短信消息)
另外,若在使用sendBroadcast()的方法是指定了接收权限,则只有在AndroidManifest.xml中用<uses- permission>标签声明了拥有此权限的BroascastReceiver才会有可能接收到发送来的Broadcast。同样,若在注册BroadcastReceiver时指定了可接收的Broadcast的权限,则只有在包内的AndroidManifest.xml中 用<uses-permission>标签声明了,拥有此权限的Context对象所发送的Broadcast才能被这个
BroadcastReceiver所接收。
1.静态注册BroadcastReceiver:
静态注册比动态注册麻烦点,先新建一个类继承BroadcastReceiver,如:
clsReceiver2.java

然后到AndroidManifest.xml 添加receive标签
第一个name是类名,即你的继承BroadcastReceiver的类的名字,里面实现了BroadcastReceive的onReceive()方法,来处理你接到消息的动作。
第二个name是action的名称,即你要监听的消息名字(其它消息都会被过滤不监听)。
2.动态注册BroadcastReceiver:
主要代码部分为:
IntentFilter intentFilter = new IntentFilter();
intentFilter.addAction(String); //为BroadcastReceiver指定action,即要监听的消息名字。
registerReceiver(MyBroadcastReceiver,intentFilter); //注册监听
unregisterReceiver(MyBroadcastReceiver); //取消监听
(一般:在onStart中注册,onStop中取消unregisterReceiver)
private class MyBroadcastReceive extends BroadcastReceiver
{
public void onReceive(Context context, Intent intent)
{
String action = intent.getAction();
if(intent.ACTION_BATTERY_CHANGED.equals(action)) //判断是否接到电池变换消息
{
//处理内容
}
}
}
========================================================================
Broadcast:
发送广播消息,把要发送的信息和用于过滤的信息(如Action、Category)装入一个Intent对象,然后通过调用 Context.sendBroadcast()、sendOrderBroadcast()或sendStickyBroadcast()方法,把 Intent对象以广播方式发送出去。
例如:
在Android系统中,广播(Broadcast)是在组件之间传播数据(Intent)的一种机制;这些组件甚至是可以位于不同的进程中,这样它就像Binder机制一样,起到进程间通信的作用;本文通过一个简单的例子来学习Android系统的广播机制,为后续分析广播机制的源代码作准备。
在Android系统中,为什么需要广播机制呢?广播机制,本质上它就是一种组件间的通信方式,如果是两个组件位于不同的进程当中,那么可以用Binder机制来实现,如果两个组件是在同一个进程中,那么它们之间可以用来通信的方式就更多了,这样看来,广播机制似乎是多余的。然而,广播机制却是不可替代的,它和Binder机制不一样的地方在于,广播的发送者和接收者事先是不需要知道对方的存在的,这样带来的好处便是,系统的各个组件可以松耦合地组织在一起,这样系统就具有高度的可扩展性,容易与其它系统进行集成。
在软件工程中,是非常强调模块之间的高内聚低耦合性的,不然的话,随着系统越来越庞大,就会面临着越来越难维护的风险,最后导致整个项目的失败。Android应用程序的组织方式,可以说是把这种高内聚低耦合性的思想贯彻得非常透彻,在任何一个Activity中,都可以使用一个简单的Intent,通过startActivity或者startService,就可以把另外一个Activity或者Service启动起来为它服务,而且它根本上不依赖这个Activity或者Service的实现,只需要知道它的字符串形式的名字即可,而广播机制更绝,它连接收者的名字都不需要知道。
不过话又说回来,广播机制在Android系统中,也不算是什么创新的东西。如果读者了解J2EE或者COM,就会知道,在J2EE中,提供了消息驱动Bean(Message-Driven Bean),用来实现应用程序各个组件之间的消息传递;而在COM中,提供了连接点(Connection Point)的概念,也是用来在应用程序各个组间间进行消息传递。无论是J2EE中的消息驱动Bean,还是COM中的连接点,或者Android系统的广播机制,它们的实现机理都是消息发布/订阅模式的事件驱动模型,消息的生产者发布事件,而使用者订阅感兴趣的事件。
废话说了一大堆,现在开始进入主题了,和前面的文章一样,我们通过具体的例子来介绍Android系统的广播机制。在这个例子中,有一个Service,它在另外一个线程中实现了一个计数器服务,每隔一秒钟就自动加1,然后将结果不断地反馈给应用程序中的界面线程,而界面线程中的Activity在得到这个反馈后,就会把结果显示在界面上。为什么要把计数器服务放在另外一个线程中进行呢?我们可以把这个计数器服务想象成是一个耗时的计算型逻辑,如果放在界面线程中去实现,那么势必就会导致应用程序不能响应界面事件,最后导致应用程序产生ANR(Application
Not Responding)问题。计数器线程为了把加1后的数字源源不断地反馈给界面线程,这时候就可以考虑使用广播机制了。
首先在Android源代码工程中创建一个Android应用程序工程,名字就称为Broadcast吧。关于如何获得Android源代码工程,请参考在Ubuntu上下载、编译和安装Android最新源代码一文;关于如何在Android源代码工程中创建应用程序工程,请参考在Ubuntu上为Android系统内置Java应用程序测试Application
Frameworks层的硬件服务一文。这个应用程序工程定义了一个名为shy.luo.broadcast的package,这个例子的源代码主要就是实现在这里了。下面,将会逐一介绍这个package里面的文件。
首先,我们在src/shy/luo/broadcast/ICounterService.java文件中定义计数器的服务接口:
[java] view
plaincopy


package shy.luo.broadcast;
public interface ICounterService {
public void startCounter(int initVal);
public void stopCounter();
}
这个接口很简单,它只有两个成员函数,分别用来启动和停止计数器;启动计数时,还可以指定计数器的初始值。
接着,我们来看一个应用程序的默认Activity的实现,在src/shy/luo/broadcast/MainActivity.java文件中:
[java] view
plaincopy
package shy.luo.broadcast;
import android.app.Activity;
import android.content.BroadcastReceiver;
import android.content.ComponentName;
import android.content.Context;
import android.content.Intent;
import android.content.IntentFilter;
import android.content.ServiceConnection;
import android.os.Bundle;
import android.os.IBinder;
import android.util.Log;
import android.view.View;
import android.view.View.OnClickListener;
import android.widget.Button;
import android.widget.TextView;
public class MainActivity extends Activity implements OnClickListener {
private final static String LOG_TAG = "shy.luo.broadcast.MainActivity";
private Button startButton = null;
private Button stopButton = null;
private TextView counterText = null;
private ICounterService counterService = null;
@Override
public void onCreate(Bundle savedInstanceState) {
super.onCreate(savedInstanceState);
setContentView(R.layout.main);
startButton = (Button)findViewById(R.id.button_start);
stopButton = (Button)findViewById(R.id.button_stop);
counterText = (TextView)findViewById(R.id.textview_counter);
startButton.setOnClickListener(this);
stopButton.setOnClickListener(this);
startButton.setEnabled(true);
stopButton.setEnabled(false);
Intent bindIntent = new Intent(MainActivity.this, CounterService.class);
bindService(bindIntent, serviceConnection, Context.BIND_AUTO_CREATE);
Log.i(LOG_TAG, "Main Activity Created.");
}
@Override
public void onResume() {
super.onResume();
IntentFilter counterActionFilter = new IntentFilter(CounterService.BROADCAST_COUNTER_ACTION);
registerReceiver(counterActionReceiver, counterActionFilter);
}
@Override
public void onPause() {
super.onPause();
unregisterReceiver(counterActionReceiver);
}
@Override
public void onDestroy() {
super.onDestroy();
unbindService(serviceConnection);
}
@Override
public void onClick(View v) {
if(v.equals(startButton)) {
if(counterService != null) {
counterService.startCounter(0);
startButton.setEnabled(false);
stopButton.setEnabled(true);
}
} else if(v.equals(stopButton)) {
if(counterService != null) {
counterService.stopCounter();
startButton.setEnabled(true);
stopButton.setEnabled(false);
}
}
}
private BroadcastReceiver counterActionReceiver = new BroadcastReceiver(){
public void onReceive(Context context, Intent intent) {
int counter = intent.getIntExtra(CounterService.COUNTER_VALUE, 0);
String text = String.valueOf(counter);
counterText.setText(text);
Log.i(LOG_TAG, "Receive counter event");
}
};
private ServiceConnection serviceConnection = new ServiceConnection() {
public void onServiceConnected(ComponentName className, IBinder service) {
counterService = ((CounterService.CounterBinder)service).getService();
Log.i(LOG_TAG, "Counter Service Connected");
}
public void onServiceDisconnected(ComponentName className) {
counterService = null;
Log.i(LOG_TAG, "Counter Service Disconnected");
}
};
}
MainActivity的实现也很简单,它在创建(onCreate)的时候,会调用bindService函数来把计数器服务(CounterService)启动起来,它的第二个参数serviceConnection是一个ServiceConnection实例。计数器服务启动起来后,系统会调用这个实例的onServiceConnected函数将一个Binder对象传回来,通过调用这个Binder对象的getService函数,就可以获得计数器服务接口。这里,把这个计数器服务接口保存在MainActivity的counterService成员变量中。同样,当我们调用unbindService停止计数器服务时,系统会调用这个实例的onServiceDisconnected函数告诉MainActivity,它与计数器服务的连接断开了。
注意,这里通过调用bindService函数来启动Service时,这个Service与启动它的Activity是位于同一个进程中,它不像我们在前面一篇文章Android系统在新进程中启动自定义服务过程(startService)的原理分析中所描述那样在新的进程中启动服务,后面我们再写一篇文章来分析bindService启动服务的过程。
在MainActivity的onResume函数中,通过调用registerReceiver函数注册了一个广播***counterActionReceiver,它是一个BroadcastReceiver实例,并且指定了这个广播***只对CounterService.BROADCAST_COUNTER_ACTION类型的广播感兴趣。当CounterService发出一个CounterService.BROADCAST_COUNTER_ACTION类型的广播时,系统就会把这个广播发送到counterActionReceiver实例的onReceiver函数中去。在onReceive函数中,从参数intent中取出计数器当前的值,显示在界面上。
MainActivity界面上有两个按钮,分别是Start Counter和Stop Counter按钮,点击前者开始计数,而点击后者则停止计数。
计数器服务CounterService实现在src/shy/luo/broadcast/CounterService.java文件中:
[java] view
plaincopy
package shy.luo.broadcast;
import android.app.Service;
import android.content.Intent;
import android.os.AsyncTask;
import android.os.Binder;
import android.os.IBinder;
import android.util.Log;
public class CounterService extends Service implements ICounterService {
private final static String LOG_TAG = "shy.luo.broadcast.CounterService";
public final static String BROADCAST_COUNTER_ACTION = "shy.luo.broadcast.COUNTER_ACTION";
public final static String COUNTER_VALUE = "shy.luo.broadcast.counter.value";
private boolean stop = false;
private final IBinder binder = new CounterBinder();
public class CounterBinder extends Binder {
public CounterService getService() {
return CounterService.this;
}
}
@Override
public IBinder onBind(Intent intent) {
return binder;
}
@Override
public void onCreate() {
super.onCreate();
Log.i(LOG_TAG, "Counter Service Created.");
}
@Override
public void onDestroy() {
Log.i(LOG_TAG, "Counter Service Destroyed.");
}
public void startCounter(int initVal) {
AsyncTask<Integer, Integer, Integer> task = new AsyncTask<Integer, Integer, Integer>() {
@Override
protected Integer doInBackground(Integer... vals) {
Integer initCounter = vals[0];
stop = false;
while(!stop) {
publishProgress(initCounter);
try {
Thread.sleep(1000);
} catch (InterruptedException e) {
e.printStackTrace();
}
initCounter++;
}
return initCounter;
}
@Override
protected void onProgressUpdate(Integer... values) {
super.onProgressUpdate(values);
int counter = values[0];
Intent intent = new Intent(BROADCAST_COUNTER_ACTION);
intent.putExtra(COUNTER_VALUE, counter);
sendBroadcast(intent);
}
@Override
protected void onPostExecute(Integer val) {
int counter = val;
Intent intent = new Intent(BROADCAST_COUNTER_ACTION);
intent.putExtra(COUNTER_VALUE, counter);
sendBroadcast(intent);
}
};
task.execute(0);
}
public void stopCounter() {
stop = true;
}
}
这个计数器服务实现了ICounterService接口。当这个服务被binderService函数启动时,系统会调用它的onBind函数,这个函数返回一个Binder对象给系统。上面我们说到,当MainActivity调用bindService函数来启动计数器服务器时,系统会调用MainActivity的ServiceConnection实例serviceConnection的onServiceConnected函数通知MainActivity,这个服务已经连接上了,并且会通过这个函数传进来一个Binder远程对象,这个Binder远程对象就是来源于这里的onBind的返回值了。
函数onBind返回的Binder对象是一个自定义的CounterBinder实例,它实现了一个getService成员函数。当系统通知MainActivity,计数器服务已经启动起来并且连接成功后,并且将这个Binder对象传给MainActivity时,MainActivity就会把这个Binder对象强制转换为CounterBinder实例,然后调用它的getService函数获得服务接口。这样,MainActivity就通过这个Binder对象和CounterService关联起来了。
当MainActivity调用计数器服务接口的startCounter函数时,计数器服务并不是直接进入计数状态,而是通过使用异步任务(AsyncTask)在后台线程中进行计数。这里为什么要使用异步任务来在后台线程中进行计数呢?前面我们说过,这个计数过程是一个耗时的计算型逻辑,不能把它放在界面线程中进行,因为这里的CounterService启动时,并没有在新的进程中启动,它与MainActivity一样,运行在应用程序的界面线程中,因此,这里需要使用异步任务在在后台线程中进行计数。
异步任务AsyncTask的具体用法可以参考官方文档http://developer.android.com/reference/android/os/AsyncTask.html。它的大概用法是,当我们调用异步任务实例的execute(task.execute)方法时,当前调用线程就返回了,系统启动一个后台线程来执行这个异步任务实例的doInBackground函数,这个函数就是我们用来执行耗时计算的地方了,它会进入到一个循环中,每隔1秒钟就把计数器加1,然后进入休眠(Thread.sleep),醒过来,再重新这个计算过程。在计算的过程中,可以通过调用publishProgress函数来通知调用者当前计算的进度,好让调用者来更新界面,调用publishProgress函数的效果最终就是直入到这个异步任务实例的onProgressUpdate函数中,这里就可以把这个进度值以广播的形式(sendBroadcast)发送出去了,这里的进度值就定义为当前计数服务的计数值。
当MainActivity调用计数器服务接口的stopCounter函数时,会告诉函数doInBackground停止执行计数(stop = true),于是,函数doInBackground就退出计数循环,然后将最终计数结果返回了,返回的结果最后进入到onPostExecute函数中,这个函数同样通过广播的形式(sendBroadcast)把这个计数结果广播出去。
计算器服务就介绍到这里了,下面我们看看应用程序的配置文件AndroidManifest.xml:
[html] view
plaincopy
<?xml version="1.0" encoding="utf-8"?>
<manifest xmlns:android="http://schemas.android.com/apk/res/android"
package="shy.luo.broadcast"
android:versionCode="1"
android:versionName="1.0">
<application android:icon="@drawable/icon" android:label="@string/app_name">
<activity android:name=".MainActivity"
android:label="@string/app_name">
<intent-filter>
<action android:name="android.intent.action.MAIN" />
<category android:name="android.intent.category.LAUNCHER" />
</intent-filter>
</activity>
<service android:name=".CounterService"
android:enabled="true">
</service>
</application>
</manifest>
这个配置文件很简单,只是告诉系统,它有一个Activity和一个Service。
再来看MainActivity的界面文件,它定义在res/layout/main.xml文件中:
[html] view
plaincopy
<?xml version="1.0" encoding="utf-8"?>
<LinearLayout xmlns:android="http://schemas.android.com/apk/res/android"
android:orientation="vertical"
android:layout_width="fill_parent"
android:layout_height="fill_parent"
android:gravity="center">
<LinearLayout
android:layout_width="fill_parent"
android:layout_height="wrap_content"
android:layout_marginBottom="10px"
android:orientation="horizontal"
android:gravity="center">
<TextView
android:layout_width="wrap_content"
android:layout_height="wrap_content"
android:layout_marginRight="4px"
android:gravity="center"
android:text="@string/counter">
</TextView>
<TextView
android:id="@+id/textview_counter"
android:layout_width="wrap_content"
android:layout_height="wrap_content"
android:gravity="center"
android:text="0">
</TextView>
</LinearLayout>
<LinearLayout
android:layout_width="fill_parent"
android:layout_height="wrap_content"
android:orientation="horizontal"
android:gravity="center">
<Button
android:id="@+id/button_start"
android:layout_width="wrap_content"
android:layout_height="wrap_content"
android:gravity="center"
android:text="@string/start">
</Button>
<Button
android:id="@+id/button_stop"
android:layout_width="wrap_content"
android:layout_height="wrap_content"
android:gravity="center"
android:text="@string/stop" >
</Button>
</LinearLayout>
</LinearLayout>
这个界面配置文件也很简单,等一下我们在模拟器把这个应用程序启动起来后,就可以看到它的截图了。
应用程序用到的字符串资源文件位于res/values/strings.xml文件中:
[html] view
plaincopy
<?xml version="1.0" encoding="utf-8"?>
<resources>
<string name="app_name">Broadcast</string>
<string name="counter">Counter: </string>
<string name="start">Start Counter</string>
<string name="stop">Stop Counter</string>
</resources>
最后,我们还要在工程目录下放置一个编译脚本文件Android.mk:
[html] view
plaincopy
LOCAL_PATH:= $(call my-dir)
include $(CLEAR_VARS)
LOCAL_MODULE_TAGS := optional
LOCAL_SRC_FILES := $(call all-subdir-java-files)
LOCAL_PACKAGE_NAME := Broadcast
include $(BUILD_PACKAGE)
接下来就要编译了。有关如何单独编译Android源代码工程的模块,以及如何打包system.img,请参考如何单独编译Android源代码中的模块一文。
执行以下命令进行编译和打包:
[html] view
plaincopy
USER-NAME@MACHINE-NAME:~/Android$ mmm packages/experimental/Broadcast
USER-NAME@MACHINE-NAME:~/Android$ make snod
这样,打包好的Android系统镜像文件system.img就包含我们前面创建的Broadcast应用程序了。
再接下来,就是运行模拟器来运行我们的例子了。关于如何在Android源代码工程中运行模拟器,请参考在Ubuntu上下载、编译和安装Android最新源代码一文。
执行以下命令启动模拟器:
[html] view
plaincopy
USER-NAME@MACHINE-NAME:~/Android$ emulator
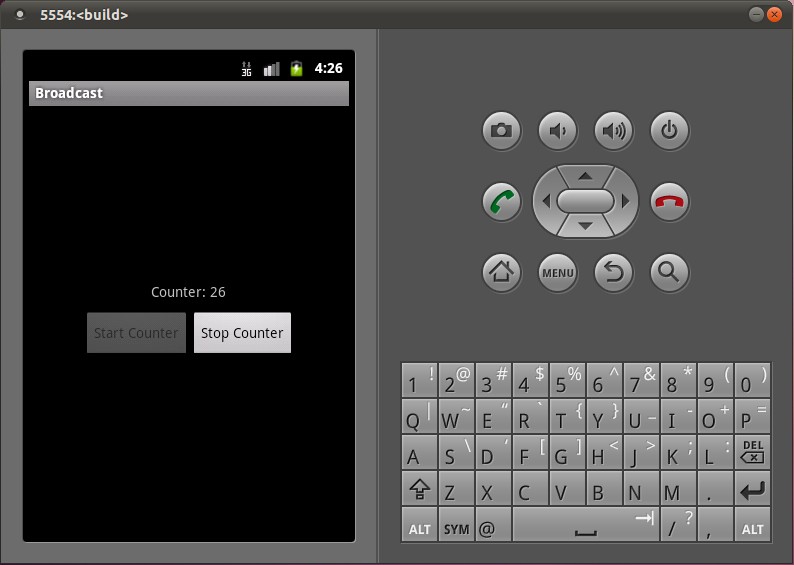
模拟器启动起,就可以App Launcher中找到Broadcast应用程序图标,接着把它启动起来,然后点击界面上的Start Counter按钮,就可以把计数器服务启动起来了,计数器服务又通过广播把计数值反馈给MainActivity,于是,我们就会在MainActivity界面看到计数器的值不断地增加了:
这样,使用广播的例子就介绍完了。回顾一下,使用广播的两个步骤:
1. 广播的接收者需要通过调用registerReceiver函数告诉系统,它对什么样的广播有兴趣,即指定IntentFilter,并且向系统注册广播***,即指定BroadcastReceiver:
[java] view
plaincopy
IntentFilter counterActionFilter = new IntentFilter(CounterService.BROADCAST_COUNTER_ACTION);
registerReceiver(counterActionReceiver, counterActionFilter);
这里,指定感兴趣的广播就是CounterService.BROADCAST_COUNTER_ACTION了,而指定的广播***就是counterActonReceiver,它是一个BroadcastReceiver类型的实例。
2. 广播的发送者通过调用sendBroadcast函数来发送一个指定的广播,并且可以指定广播的相关参数:
[java] view
plaincopy
Intent intent = new Intent(BROADCAST_COUNTER_ACTION);
intent.putExtra(COUNTER_VALUE, counter);
sendBroadcast(intent)
这里,指定的广播为CounterService.BROADCAST_COUNTER_ACTION,并且附带的带参数当前的计数器值counter。调用了sendBroadcast函数之后,所有注册了CounterService.BROADCAST_COUNTER_ACTION广播的接收者便可以收到这个广播了。
在第1步中,广播的接收者把广播***注册到ActivityManagerService中;在第2步中,广播的发送者同样是把广播发送到ActivityManagerService中,由ActivityManagerService去查找注册了这个广播的接收者,然后把广播分发给它们。
在第2步的分发的过程,其实就是把这个广播转换成一个消息,然后放入到***所在的线程消息队列中去,最后就可以在消息循环中调用***的onReceive函数了。这里有一个要非常注意的地方是,由于ActivityManagerService把这个广播放进***所在的线程消息队列后,就返回了,它不关心这个消息什么时候会被处理,因此,对广播的处理是异步的,即调用sendBroadcast时,这个函数不会等待这个广播被处理完后才返回。
下面,我们以一个序列图来总结一下,广播的注册和发送的过程:
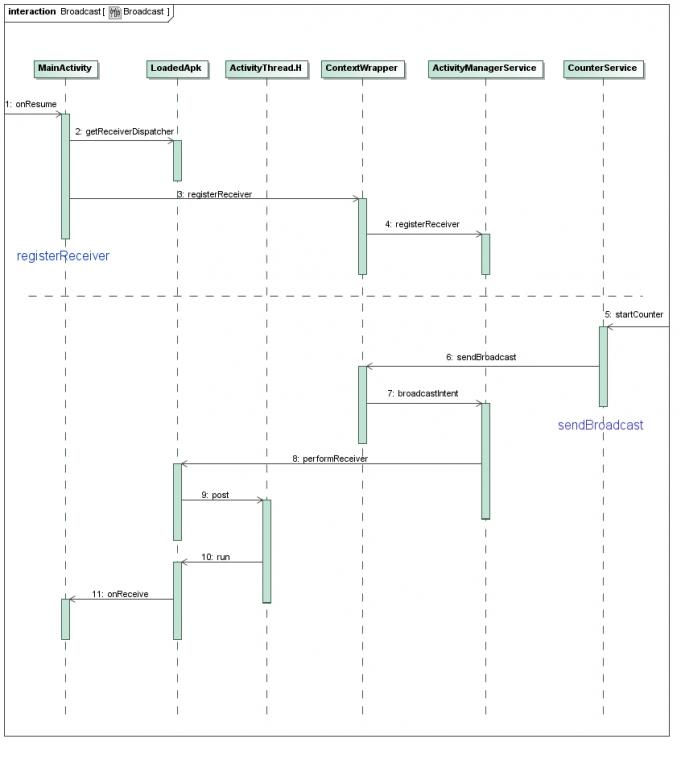
虚线上面Step 1到Step 4步是注册广播***的过程,其中Step 2通过LoadedApk.getReceiverDispatcher在LoadedApk内部创建了一个IIntentReceiver接口,并且传递给ActivityManagerService;虚线下面的Step 5到Step 11是发送广播的过程,在Step 8中,ActivityManagerService利用上面得到的IIntentReceiver远程接口,调用LoadedApk.performReceiver接口,LoadedApk.performReceiver接口通过ActivityThread.H接口的post函数将这个广播消息放入到ActivityThread的消息队列中去,最后这个消息在LoadedApk的Args.run函数中处理,LoadedApk.Args.run函数接着调用MainActivity.BroadcastReceiver的onReceive函数来最终处理这个广播。
文章开始的时候,我们提到,举这个例子的最终目的,是为了进一步学习Android系统的广播机制,因此,在接下来的两篇文章中,我们将详细描述上述注册广播***和发送广播的过程:
1. Android应用程序注册广播***(registerReceiver)的过程分析;
2. Android应用程序发送广播(sendBroadcast)的过程分析。
相信学习完这两篇文章后,能够加深对Android系统广播机制的了解,敬请关注。
如果你是在你的应用之内使用广播,即不需要跨进程,考虑使用
下面介绍更一般的方法。
广播有静态和动态两种注册方法:
静态注册:在AndroidManifest.xml中加上
动态注册:通过
附上例子(例子中的布局、MyReceiver类,常量类都是相同的,在前面列出):
布局文件都一样:
自己写的Receiver类:
应用常量:
下面就是不同的部分了!
静态注册的实例代码:
静态注册是在manifest文件中进行:
所以Java代码:
动态注册的实例代码:
动态注册是在Java代码中进行:
所以Manifest文件中不需要添加标签,正常就行。
通过
这样更有效率,但是也意味着***不能传递结果,也不能退出广播。
通过
由于每个***按顺序执行,它可以向下一个***传递结果,也可以退出广播不再传递给其他***。
***运行的顺序可以通过
一个BroadcastReceiver的对象只在
这对你在onReceive中能做什么有很大的影响:不能做任何需要的操作(anything that requires asynchronous operation is not available)。
因为你需要从方法返回去进行你的异步操作,而返回时BroadcastReceiver的对象已经不再活跃了,系统可以(在异步操作完成前)任意杀死它的进程。
特别地,不可以在BroadcastReceiver中显示对话框或者绑定一个service,前者应该用
官方文档BroadcastReceiver:
http://developer.android.com/reference/android/content/BroadcastReceiver.html
LocalBroadcastManager:
http://developer.android.com/reference/android/support/v4/content/LocalBroadcastManager.html
Training: Manipulating Broadcast Receivers On Demand
http://developer.android.com/training/monitoring-device-state/manifest-receivers.html
receiver标签
http://developer.android.com/guide/topics/manifest/receiver-element.html
下面是Android Doc中关于BroadcastReceiver的概述:
①广播***是一个专注于接收广播通知信息,并做出对应处理的组件。很多广播是源自于系统代码的──比如,通知时区改变、电池电量低、拍摄了一张照片或者用户改变了语言选项。应用程序也可以进行广播──比如说,通知其它应用程序一些数据下载完成并处于可用状态。
②应用程序可以拥有任意数量的广播***以对所有它感兴趣的通知信息予以响应。所有的***均继承自BroadcastReceiver基类。
③广播***没有用户界面。然而,它们可以启动一个activity来响应它们收到的信息,或者用NotificationManager来通知用户。通知可以用很多种方式来吸引用户的注意力──闪动背灯、震动、播放声音等等。一般来说是在状态栏上放一个持久的图标,用户可以打开它并获取消息。
Android中的广播事件有两种,一种就是系统广播事件,比如:ACTION_BOOT_COMPLETED(系统启动完成后触发),ACTION_TIME_CHANGED(系统时间改变时触发),ACTION_BATTERY_LOW(电量低时触发)等等。另外一种是我们自定义的广播事件。
广播事件的流程
①注册广播事件:注册方式有两种,一种是静态注册,就是在AndroidManifest.xml文件中定义,注册的广播***必须要继承BroadcastReceiver;另一种是动态注册,是在程序中使用Context.registerReceiver注册,注册的广播***相当于一个匿名类。两种方式都需要IntentFIlter。
②发送广播事件:通过Context.sendBroadcast来发送,由Intent来传递注册时用到的Action。
③接收广播事件:当发送的广播被***监听到后,会调用它的onReceive()方法,并将包含消息的Intent对象传给它。onReceive中代码的执行时间不要超过5s,否则Android会弹出超时dialog。
下面我通过代码演示自定义广播事件和系统广播事件的使用。完整代码下载地址:android_broadcastreceiver.rar
Step1:在MainActivity的onStart方法中注册广播事件。静态注册方式是在AndroidManifest.xml文件中。
Step2: 点击相应按钮后会触发相应的方式来发送广播消息。
[java] view
plaincopy
/**
* MainActivity
* @author zuolongsnail
*
*/
public class MainActivity extends Activity {
private Button sendStaticBtn;
private Button sendDynamicBtn;
private Button sendSystemBtn;
private static final String STATICACTION = "com.byread.static";
private static final String DYNAMICACTION = "com.byread.dynamic";
// USB设备连接
private static final String SYSTEMACTION = Intent.ACTION_POWER_CONNECTED;
@Override
public void onCreate(Bundle savedInstanceState) {
super.onCreate(savedInstanceState);
setContentView(R.layout.main);
sendStaticBtn = (Button) findViewById(R.id.send_static);
sendDynamicBtn = (Button) findViewById(R.id.send_dynamic);
sendSystemBtn = (Button) findViewById(R.id.send_system);
sendStaticBtn.setOnClickListener(new MyOnClickListener());
sendDynamicBtn.setOnClickListener(new MyOnClickListener());
sendSystemBtn.setOnClickListener(new MyOnClickListener());
}
class MyOnClickListener implements OnClickListener{
@Override
public void onClick(View v) {
// 发送自定义静态注册广播消息
if(v.getId() == R.id.send_static){
Log.e("MainActivity", "发送自定义静态注册广播消息");
Intent intent = new Intent();
intent.setAction(STATICACTION);
intent.putExtra("msg", "接收静态注册广播成功!");
sendBroadcast(intent);
}
// 发送自定义动态注册广播消息
else if(v.getId() == R.id.send_dynamic){
Log.e("MainActivity", "发送自定义动态注册广播消息");
Intent intent = new Intent();
intent.setAction(DYNAMICACTION);
intent.putExtra("msg", "接收动态注册广播成功!");
sendBroadcast(intent);
}
// 发送系统动态注册广播消息。当手机连接充电设备时会由系统自己发送广播消息。
else if(v.getId() == R.id.send_system){
Log.e("MainActivity", "发送系统动态注册广播消息");
Intent intent = new Intent();
intent.setAction(SYSTEMACTION);
intent.putExtra("msg", "正在充电。。。。");
}
}
}
@Override
protected void onStart() {
super.onStart();
Log.e("MainActivity", "注册广播事件");
// 注册自定义动态广播消息
IntentFilter filter_dynamic = new IntentFilter();
filter_dynamic.addAction(DYNAMICACTION);
registerReceiver(dynamicReceiver, filter_dynamic);
// 注册系统动态广播消息
IntentFilter filter_system = new IntentFilter();
filter_system.addAction(SYSTEMACTION);
registerReceiver(systemReceiver, filter_system);
}
private BroadcastReceiver dynamicReceiver = new BroadcastReceiver() {
@Override
public void onReceive(Context context, Intent intent) {
Log.e("MainActivity", "接收自定义动态注册广播消息");
if(intent.getAction().equals(DYNAMICACTION)){
String msg = intent.getStringExtra("msg");
Toast.makeText(context, msg, Toast.LENGTH_SHORT).show();
}
}
};
private BroadcastReceiver systemReceiver = new BroadcastReceiver() {
@Override
public void onReceive(Context context, Intent intent) {
Log.e("MainActivity", "接收系统动态注册广播消息");
if(intent.getAction().equals(SYSTEMACTION)){
String msg = intent.getStringExtra("msg");
Toast.makeText(context, msg, Toast.LENGTH_SHORT).show();
}
}
};
}
Step3:接收广播消息。以下为两个静态注册的广播***。
[java] view
plaincopy
/**
* 自定义静态注册广播消息***
* @author zuolongsnail
*
*/
public class StaticReceiver extends BroadcastReceiver {
@Override
public void onReceive(Context context, Intent intent) {
String msg = intent.getStringExtra("msg");
Toast.makeText(context, msg, Toast.LENGTH_SHORT).show();
}
}
[java] view
plaincopy
/**
* 系统静态注册广播消息***
*
* @author zuolongsnail
*
*/
public class SystemReceiver extends BroadcastReceiver {
@Override
public void onReceive(Context context, Intent intent) {
if (intent.getAction().equals(Intent.ACTION_BATTERY_LOW)) {
Log.e("SystemReceiver", "电量低提示");
Toast.makeText(context, "您的手机电量偏低,请及时充电", Toast.LENGTH_SHORT).show();
}
}
}
下面是AndroidManifest.xml文件:
[xhtml] view
plaincopy
<?xml version="1.0" encoding="utf-8"?>
<manifest xmlns:android="http://schemas.android.com/apk/res/android"
package="com.byread" android:versionCode="1" android:versionName="1.0">
<application android:icon="@drawable/icon" android:label="@string/app_name">
<activity android:name=".MainActivity" android:label="@string/app_name">
<intent-filter>
<action android:name="android.intent.action.MAIN" />
<category android:name="android.intent.category.LAUNCHER" />
</intent-filter>
</activity>
<!-- 注册自定义静态广播*** -->
<receiver android:name=".StaticReceiver">
<intent-filter>
<action android:name="com.byread.static" />
</intent-filter>
</receiver>
<!-- 注册系统静态广播*** -->
<receiver android:name=".SystemReceiver">
<intent-filter>
<action android:name="android.intent.action.BATTERY_LOW" />
</intent-filter>
</receiver>
</application>
</manifest>
界面布局文件main.xml
[xhtml] view
plaincopy
<?xml version="1.0" encoding="utf-8"?>
<LinearLayout xmlns:android="http://schemas.android.com/apk/res/android"
android:orientation="vertical" android:layout_width="fill_parent"
android:layout_height="fill_parent">
<TextView android:layout_width="fill_parent"
android:layout_height="wrap_content" android:text="@string/hello" />
<Button android:id="@+id/send_static" android:layout_width="wrap_content"
android:layout_height="wrap_content" android:text="发送自定义静态注册广播" />
<Button android:id="@+id/send_dynamic" android:layout_width="wrap_content"
android:layout_height="wrap_content" android:text="发送自定义动态注册广播" />
<Button android:id="@+id/send_system" android:layout_width="wrap_content"
android:layout_height="wrap_content" android:text="发送系统动态注册广播" />
</LinearLayout>
讲解结束,不过有一点我自己也没弄清楚,这个系统广播事件如果我在程序中sendBroadcast的话,那就是自定义广播了。如果不写的话,那是不是系统自己来发送对应Action广播呢?有知道的同学请告诉我一下,再此先谢过。
运行界面:
在 Android 中使用 Activity, Service, Broadcast, BroadcastReceiver
活动(Activity) - 用于表现功能
服务(Service) - 相当于后台运行的 Activity
广播(Broadcast) - 用于发送广播
广播***(BroadcastReceiver) - 用于接收广播
Intent - 用于连接以上各个组件,并在其间传递消息
==========================================================================
BroadcastReceiver:
在Android中,Broadcast是一种广泛运用的在应用程序之间传输信息的机制。而BroadcastReceiver是对发送出来的 Broadcast进行过滤接受并响应的一类组件。下面将详细的阐述如何发送Broadcast和使用BroadcastReceiver过滤接收的过程:
首先在需要发送信息的地方,把要发送的信息和用于过滤的信息(如Action、Category)装入一个Intent对象,然后通过调用 Context.sendBroadcast()、sendOrderBroadcast()或sendStickyBroadcast()方法,把 Intent对象以广播方式发送出去。
当Intent发送以后,所有已经注册的BroadcastReceiver会检查注册时的IntentFilter是否与发送的Intent相匹配,若匹配则就会调用BroadcastReceiver的onReceive()方法。所以当我们定义一个BroadcastReceiver的时候,都需要实现onReceive()方法。
注册BroadcastReceiver有两种方式:
一种方式是,静态的在AndroidManifest.xml中用<receiver>标签生命注册,并在标签内用<intent- filter>标签设置过滤器。
另一种方式是,动态的在代码中先定义并设置好一个 IntentFilter 对象,然后在需要注册的地方调Context.registerReceiver()方法,如果取消时就调用 Context.unregisterReceiver()方法。如果用动态方式注册的BroadcastReceiver的Context对象被销毁时,BroadcastReceiver也就自动取消注册了。(特别注意,有些可能需要后台监听的,如短信消息)
另外,若在使用sendBroadcast()的方法是指定了接收权限,则只有在AndroidManifest.xml中用<uses- permission>标签声明了拥有此权限的BroascastReceiver才会有可能接收到发送来的Broadcast。同样,若在注册BroadcastReceiver时指定了可接收的Broadcast的权限,则只有在包内的AndroidManifest.xml中 用<uses-permission>标签声明了,拥有此权限的Context对象所发送的Broadcast才能被这个
BroadcastReceiver所接收。
1.静态注册BroadcastReceiver:
静态注册比动态注册麻烦点,先新建一个类继承BroadcastReceiver,如:
clsReceiver2.java
package com.testBroadcastReceiver;

import android.content.BroadcastReceiver;
import android.content.Context;
import android.content.Intent;
import android.widget.Toast;

/*
 * 接收静态注册广播的BroadcastReceiver,
 * step1:要到AndroidManifest.xml这里注册消息
 *         <receiver android:name="clsReceiver2">
            <intent-filter>
                <action
                    android:name="com.testBroadcastReceiver.Internal_2"/>
            </intent-filter>
        </receiver>
    step2:定义消息的字符串
    step3:通过Intent传递消息来驱使BroadcastReceiver触发
 */
public class clsReceiver2 extends BroadcastReceiver{
    @Override
    public void onReceive(Context context, Intent intent) {
        String action = intent.getAction();
        Toast.makeText(context, "静态:"+action, 1000).show();

    }
}然后到AndroidManifest.xml 添加receive标签
<receiver android:name="clsReceiver2">
    <intent-filter>
        <action
            android:name="com.testBroadcastReceiver.Internal_2"/>
    </intent-filter>
</receiver>第一个name是类名,即你的继承BroadcastReceiver的类的名字,里面实现了BroadcastReceive的onReceive()方法,来处理你接到消息的动作。
第二个name是action的名称,即你要监听的消息名字(其它消息都会被过滤不监听)。
2.动态注册BroadcastReceiver:
主要代码部分为:
IntentFilter intentFilter = new IntentFilter();
intentFilter.addAction(String); //为BroadcastReceiver指定action,即要监听的消息名字。
registerReceiver(MyBroadcastReceiver,intentFilter); //注册监听
unregisterReceiver(MyBroadcastReceiver); //取消监听
(一般:在onStart中注册,onStop中取消unregisterReceiver)
private class MyBroadcastReceive extends BroadcastReceiver
{
public void onReceive(Context context, Intent intent)
{
String action = intent.getAction();
if(intent.ACTION_BATTERY_CHANGED.equals(action)) //判断是否接到电池变换消息
{
//处理内容
}
}
}
========================================================================
Broadcast:
发送广播消息,把要发送的信息和用于过滤的信息(如Action、Category)装入一个Intent对象,然后通过调用 Context.sendBroadcast()、sendOrderBroadcast()或sendStickyBroadcast()方法,把 Intent对象以广播方式发送出去。
例如:
Intent intent = new Intent(INTENAL_ACTION_3);
intent.putExtra("Name", "hellogv");
intent.putExtra("Blog", "http://blog.csdn.net/hellogv");
sendBroadcast(intent);//传递过去
在Android系统中,广播(Broadcast)是在组件之间传播数据(Intent)的一种机制;这些组件甚至是可以位于不同的进程中,这样它就像Binder机制一样,起到进程间通信的作用;本文通过一个简单的例子来学习Android系统的广播机制,为后续分析广播机制的源代码作准备。
在Android系统中,为什么需要广播机制呢?广播机制,本质上它就是一种组件间的通信方式,如果是两个组件位于不同的进程当中,那么可以用Binder机制来实现,如果两个组件是在同一个进程中,那么它们之间可以用来通信的方式就更多了,这样看来,广播机制似乎是多余的。然而,广播机制却是不可替代的,它和Binder机制不一样的地方在于,广播的发送者和接收者事先是不需要知道对方的存在的,这样带来的好处便是,系统的各个组件可以松耦合地组织在一起,这样系统就具有高度的可扩展性,容易与其它系统进行集成。
在软件工程中,是非常强调模块之间的高内聚低耦合性的,不然的话,随着系统越来越庞大,就会面临着越来越难维护的风险,最后导致整个项目的失败。Android应用程序的组织方式,可以说是把这种高内聚低耦合性的思想贯彻得非常透彻,在任何一个Activity中,都可以使用一个简单的Intent,通过startActivity或者startService,就可以把另外一个Activity或者Service启动起来为它服务,而且它根本上不依赖这个Activity或者Service的实现,只需要知道它的字符串形式的名字即可,而广播机制更绝,它连接收者的名字都不需要知道。
不过话又说回来,广播机制在Android系统中,也不算是什么创新的东西。如果读者了解J2EE或者COM,就会知道,在J2EE中,提供了消息驱动Bean(Message-Driven Bean),用来实现应用程序各个组件之间的消息传递;而在COM中,提供了连接点(Connection Point)的概念,也是用来在应用程序各个组间间进行消息传递。无论是J2EE中的消息驱动Bean,还是COM中的连接点,或者Android系统的广播机制,它们的实现机理都是消息发布/订阅模式的事件驱动模型,消息的生产者发布事件,而使用者订阅感兴趣的事件。
废话说了一大堆,现在开始进入主题了,和前面的文章一样,我们通过具体的例子来介绍Android系统的广播机制。在这个例子中,有一个Service,它在另外一个线程中实现了一个计数器服务,每隔一秒钟就自动加1,然后将结果不断地反馈给应用程序中的界面线程,而界面线程中的Activity在得到这个反馈后,就会把结果显示在界面上。为什么要把计数器服务放在另外一个线程中进行呢?我们可以把这个计数器服务想象成是一个耗时的计算型逻辑,如果放在界面线程中去实现,那么势必就会导致应用程序不能响应界面事件,最后导致应用程序产生ANR(Application
Not Responding)问题。计数器线程为了把加1后的数字源源不断地反馈给界面线程,这时候就可以考虑使用广播机制了。
首先在Android源代码工程中创建一个Android应用程序工程,名字就称为Broadcast吧。关于如何获得Android源代码工程,请参考在Ubuntu上下载、编译和安装Android最新源代码一文;关于如何在Android源代码工程中创建应用程序工程,请参考在Ubuntu上为Android系统内置Java应用程序测试Application
Frameworks层的硬件服务一文。这个应用程序工程定义了一个名为shy.luo.broadcast的package,这个例子的源代码主要就是实现在这里了。下面,将会逐一介绍这个package里面的文件。
首先,我们在src/shy/luo/broadcast/ICounterService.java文件中定义计数器的服务接口:
[java] view
plaincopy
package shy.luo.broadcast;
public interface ICounterService {
public void startCounter(int initVal);
public void stopCounter();
}
这个接口很简单,它只有两个成员函数,分别用来启动和停止计数器;启动计数时,还可以指定计数器的初始值。
接着,我们来看一个应用程序的默认Activity的实现,在src/shy/luo/broadcast/MainActivity.java文件中:
[java] view
plaincopy
package shy.luo.broadcast;
import android.app.Activity;
import android.content.BroadcastReceiver;
import android.content.ComponentName;
import android.content.Context;
import android.content.Intent;
import android.content.IntentFilter;
import android.content.ServiceConnection;
import android.os.Bundle;
import android.os.IBinder;
import android.util.Log;
import android.view.View;
import android.view.View.OnClickListener;
import android.widget.Button;
import android.widget.TextView;
public class MainActivity extends Activity implements OnClickListener {
private final static String LOG_TAG = "shy.luo.broadcast.MainActivity";
private Button startButton = null;
private Button stopButton = null;
private TextView counterText = null;
private ICounterService counterService = null;
@Override
public void onCreate(Bundle savedInstanceState) {
super.onCreate(savedInstanceState);
setContentView(R.layout.main);
startButton = (Button)findViewById(R.id.button_start);
stopButton = (Button)findViewById(R.id.button_stop);
counterText = (TextView)findViewById(R.id.textview_counter);
startButton.setOnClickListener(this);
stopButton.setOnClickListener(this);
startButton.setEnabled(true);
stopButton.setEnabled(false);
Intent bindIntent = new Intent(MainActivity.this, CounterService.class);
bindService(bindIntent, serviceConnection, Context.BIND_AUTO_CREATE);
Log.i(LOG_TAG, "Main Activity Created.");
}
@Override
public void onResume() {
super.onResume();
IntentFilter counterActionFilter = new IntentFilter(CounterService.BROADCAST_COUNTER_ACTION);
registerReceiver(counterActionReceiver, counterActionFilter);
}
@Override
public void onPause() {
super.onPause();
unregisterReceiver(counterActionReceiver);
}
@Override
public void onDestroy() {
super.onDestroy();
unbindService(serviceConnection);
}
@Override
public void onClick(View v) {
if(v.equals(startButton)) {
if(counterService != null) {
counterService.startCounter(0);
startButton.setEnabled(false);
stopButton.setEnabled(true);
}
} else if(v.equals(stopButton)) {
if(counterService != null) {
counterService.stopCounter();
startButton.setEnabled(true);
stopButton.setEnabled(false);
}
}
}
private BroadcastReceiver counterActionReceiver = new BroadcastReceiver(){
public void onReceive(Context context, Intent intent) {
int counter = intent.getIntExtra(CounterService.COUNTER_VALUE, 0);
String text = String.valueOf(counter);
counterText.setText(text);
Log.i(LOG_TAG, "Receive counter event");
}
};
private ServiceConnection serviceConnection = new ServiceConnection() {
public void onServiceConnected(ComponentName className, IBinder service) {
counterService = ((CounterService.CounterBinder)service).getService();
Log.i(LOG_TAG, "Counter Service Connected");
}
public void onServiceDisconnected(ComponentName className) {
counterService = null;
Log.i(LOG_TAG, "Counter Service Disconnected");
}
};
}
MainActivity的实现也很简单,它在创建(onCreate)的时候,会调用bindService函数来把计数器服务(CounterService)启动起来,它的第二个参数serviceConnection是一个ServiceConnection实例。计数器服务启动起来后,系统会调用这个实例的onServiceConnected函数将一个Binder对象传回来,通过调用这个Binder对象的getService函数,就可以获得计数器服务接口。这里,把这个计数器服务接口保存在MainActivity的counterService成员变量中。同样,当我们调用unbindService停止计数器服务时,系统会调用这个实例的onServiceDisconnected函数告诉MainActivity,它与计数器服务的连接断开了。
注意,这里通过调用bindService函数来启动Service时,这个Service与启动它的Activity是位于同一个进程中,它不像我们在前面一篇文章Android系统在新进程中启动自定义服务过程(startService)的原理分析中所描述那样在新的进程中启动服务,后面我们再写一篇文章来分析bindService启动服务的过程。
在MainActivity的onResume函数中,通过调用registerReceiver函数注册了一个广播***counterActionReceiver,它是一个BroadcastReceiver实例,并且指定了这个广播***只对CounterService.BROADCAST_COUNTER_ACTION类型的广播感兴趣。当CounterService发出一个CounterService.BROADCAST_COUNTER_ACTION类型的广播时,系统就会把这个广播发送到counterActionReceiver实例的onReceiver函数中去。在onReceive函数中,从参数intent中取出计数器当前的值,显示在界面上。
MainActivity界面上有两个按钮,分别是Start Counter和Stop Counter按钮,点击前者开始计数,而点击后者则停止计数。
计数器服务CounterService实现在src/shy/luo/broadcast/CounterService.java文件中:
[java] view
plaincopy
package shy.luo.broadcast;
import android.app.Service;
import android.content.Intent;
import android.os.AsyncTask;
import android.os.Binder;
import android.os.IBinder;
import android.util.Log;
public class CounterService extends Service implements ICounterService {
private final static String LOG_TAG = "shy.luo.broadcast.CounterService";
public final static String BROADCAST_COUNTER_ACTION = "shy.luo.broadcast.COUNTER_ACTION";
public final static String COUNTER_VALUE = "shy.luo.broadcast.counter.value";
private boolean stop = false;
private final IBinder binder = new CounterBinder();
public class CounterBinder extends Binder {
public CounterService getService() {
return CounterService.this;
}
}
@Override
public IBinder onBind(Intent intent) {
return binder;
}
@Override
public void onCreate() {
super.onCreate();
Log.i(LOG_TAG, "Counter Service Created.");
}
@Override
public void onDestroy() {
Log.i(LOG_TAG, "Counter Service Destroyed.");
}
public void startCounter(int initVal) {
AsyncTask<Integer, Integer, Integer> task = new AsyncTask<Integer, Integer, Integer>() {
@Override
protected Integer doInBackground(Integer... vals) {
Integer initCounter = vals[0];
stop = false;
while(!stop) {
publishProgress(initCounter);
try {
Thread.sleep(1000);
} catch (InterruptedException e) {
e.printStackTrace();
}
initCounter++;
}
return initCounter;
}
@Override
protected void onProgressUpdate(Integer... values) {
super.onProgressUpdate(values);
int counter = values[0];
Intent intent = new Intent(BROADCAST_COUNTER_ACTION);
intent.putExtra(COUNTER_VALUE, counter);
sendBroadcast(intent);
}
@Override
protected void onPostExecute(Integer val) {
int counter = val;
Intent intent = new Intent(BROADCAST_COUNTER_ACTION);
intent.putExtra(COUNTER_VALUE, counter);
sendBroadcast(intent);
}
};
task.execute(0);
}
public void stopCounter() {
stop = true;
}
}
这个计数器服务实现了ICounterService接口。当这个服务被binderService函数启动时,系统会调用它的onBind函数,这个函数返回一个Binder对象给系统。上面我们说到,当MainActivity调用bindService函数来启动计数器服务器时,系统会调用MainActivity的ServiceConnection实例serviceConnection的onServiceConnected函数通知MainActivity,这个服务已经连接上了,并且会通过这个函数传进来一个Binder远程对象,这个Binder远程对象就是来源于这里的onBind的返回值了。
函数onBind返回的Binder对象是一个自定义的CounterBinder实例,它实现了一个getService成员函数。当系统通知MainActivity,计数器服务已经启动起来并且连接成功后,并且将这个Binder对象传给MainActivity时,MainActivity就会把这个Binder对象强制转换为CounterBinder实例,然后调用它的getService函数获得服务接口。这样,MainActivity就通过这个Binder对象和CounterService关联起来了。
当MainActivity调用计数器服务接口的startCounter函数时,计数器服务并不是直接进入计数状态,而是通过使用异步任务(AsyncTask)在后台线程中进行计数。这里为什么要使用异步任务来在后台线程中进行计数呢?前面我们说过,这个计数过程是一个耗时的计算型逻辑,不能把它放在界面线程中进行,因为这里的CounterService启动时,并没有在新的进程中启动,它与MainActivity一样,运行在应用程序的界面线程中,因此,这里需要使用异步任务在在后台线程中进行计数。
异步任务AsyncTask的具体用法可以参考官方文档http://developer.android.com/reference/android/os/AsyncTask.html。它的大概用法是,当我们调用异步任务实例的execute(task.execute)方法时,当前调用线程就返回了,系统启动一个后台线程来执行这个异步任务实例的doInBackground函数,这个函数就是我们用来执行耗时计算的地方了,它会进入到一个循环中,每隔1秒钟就把计数器加1,然后进入休眠(Thread.sleep),醒过来,再重新这个计算过程。在计算的过程中,可以通过调用publishProgress函数来通知调用者当前计算的进度,好让调用者来更新界面,调用publishProgress函数的效果最终就是直入到这个异步任务实例的onProgressUpdate函数中,这里就可以把这个进度值以广播的形式(sendBroadcast)发送出去了,这里的进度值就定义为当前计数服务的计数值。
当MainActivity调用计数器服务接口的stopCounter函数时,会告诉函数doInBackground停止执行计数(stop = true),于是,函数doInBackground就退出计数循环,然后将最终计数结果返回了,返回的结果最后进入到onPostExecute函数中,这个函数同样通过广播的形式(sendBroadcast)把这个计数结果广播出去。
计算器服务就介绍到这里了,下面我们看看应用程序的配置文件AndroidManifest.xml:
[html] view
plaincopy
<?xml version="1.0" encoding="utf-8"?>
<manifest xmlns:android="http://schemas.android.com/apk/res/android"
package="shy.luo.broadcast"
android:versionCode="1"
android:versionName="1.0">
<application android:icon="@drawable/icon" android:label="@string/app_name">
<activity android:name=".MainActivity"
android:label="@string/app_name">
<intent-filter>
<action android:name="android.intent.action.MAIN" />
<category android:name="android.intent.category.LAUNCHER" />
</intent-filter>
</activity>
<service android:name=".CounterService"
android:enabled="true">
</service>
</application>
</manifest>
这个配置文件很简单,只是告诉系统,它有一个Activity和一个Service。
再来看MainActivity的界面文件,它定义在res/layout/main.xml文件中:
[html] view
plaincopy
<?xml version="1.0" encoding="utf-8"?>
<LinearLayout xmlns:android="http://schemas.android.com/apk/res/android"
android:orientation="vertical"
android:layout_width="fill_parent"
android:layout_height="fill_parent"
android:gravity="center">
<LinearLayout
android:layout_width="fill_parent"
android:layout_height="wrap_content"
android:layout_marginBottom="10px"
android:orientation="horizontal"
android:gravity="center">
<TextView
android:layout_width="wrap_content"
android:layout_height="wrap_content"
android:layout_marginRight="4px"
android:gravity="center"
android:text="@string/counter">
</TextView>
<TextView
android:id="@+id/textview_counter"
android:layout_width="wrap_content"
android:layout_height="wrap_content"
android:gravity="center"
android:text="0">
</TextView>
</LinearLayout>
<LinearLayout
android:layout_width="fill_parent"
android:layout_height="wrap_content"
android:orientation="horizontal"
android:gravity="center">
<Button
android:id="@+id/button_start"
android:layout_width="wrap_content"
android:layout_height="wrap_content"
android:gravity="center"
android:text="@string/start">
</Button>
<Button
android:id="@+id/button_stop"
android:layout_width="wrap_content"
android:layout_height="wrap_content"
android:gravity="center"
android:text="@string/stop" >
</Button>
</LinearLayout>
</LinearLayout>
这个界面配置文件也很简单,等一下我们在模拟器把这个应用程序启动起来后,就可以看到它的截图了。
应用程序用到的字符串资源文件位于res/values/strings.xml文件中:
[html] view
plaincopy
<?xml version="1.0" encoding="utf-8"?>
<resources>
<string name="app_name">Broadcast</string>
<string name="counter">Counter: </string>
<string name="start">Start Counter</string>
<string name="stop">Stop Counter</string>
</resources>
最后,我们还要在工程目录下放置一个编译脚本文件Android.mk:
[html] view
plaincopy
LOCAL_PATH:= $(call my-dir)
include $(CLEAR_VARS)
LOCAL_MODULE_TAGS := optional
LOCAL_SRC_FILES := $(call all-subdir-java-files)
LOCAL_PACKAGE_NAME := Broadcast
include $(BUILD_PACKAGE)
接下来就要编译了。有关如何单独编译Android源代码工程的模块,以及如何打包system.img,请参考如何单独编译Android源代码中的模块一文。
执行以下命令进行编译和打包:
[html] view
plaincopy
USER-NAME@MACHINE-NAME:~/Android$ mmm packages/experimental/Broadcast
USER-NAME@MACHINE-NAME:~/Android$ make snod
这样,打包好的Android系统镜像文件system.img就包含我们前面创建的Broadcast应用程序了。
再接下来,就是运行模拟器来运行我们的例子了。关于如何在Android源代码工程中运行模拟器,请参考在Ubuntu上下载、编译和安装Android最新源代码一文。
执行以下命令启动模拟器:
[html] view
plaincopy
USER-NAME@MACHINE-NAME:~/Android$ emulator
模拟器启动起,就可以App Launcher中找到Broadcast应用程序图标,接着把它启动起来,然后点击界面上的Start Counter按钮,就可以把计数器服务启动起来了,计数器服务又通过广播把计数值反馈给MainActivity,于是,我们就会在MainActivity界面看到计数器的值不断地增加了:
这样,使用广播的例子就介绍完了。回顾一下,使用广播的两个步骤:
1. 广播的接收者需要通过调用registerReceiver函数告诉系统,它对什么样的广播有兴趣,即指定IntentFilter,并且向系统注册广播***,即指定BroadcastReceiver:
[java] view
plaincopy
IntentFilter counterActionFilter = new IntentFilter(CounterService.BROADCAST_COUNTER_ACTION);
registerReceiver(counterActionReceiver, counterActionFilter);
这里,指定感兴趣的广播就是CounterService.BROADCAST_COUNTER_ACTION了,而指定的广播***就是counterActonReceiver,它是一个BroadcastReceiver类型的实例。
2. 广播的发送者通过调用sendBroadcast函数来发送一个指定的广播,并且可以指定广播的相关参数:
[java] view
plaincopy
Intent intent = new Intent(BROADCAST_COUNTER_ACTION);
intent.putExtra(COUNTER_VALUE, counter);
sendBroadcast(intent)
这里,指定的广播为CounterService.BROADCAST_COUNTER_ACTION,并且附带的带参数当前的计数器值counter。调用了sendBroadcast函数之后,所有注册了CounterService.BROADCAST_COUNTER_ACTION广播的接收者便可以收到这个广播了。
在第1步中,广播的接收者把广播***注册到ActivityManagerService中;在第2步中,广播的发送者同样是把广播发送到ActivityManagerService中,由ActivityManagerService去查找注册了这个广播的接收者,然后把广播分发给它们。
在第2步的分发的过程,其实就是把这个广播转换成一个消息,然后放入到***所在的线程消息队列中去,最后就可以在消息循环中调用***的onReceive函数了。这里有一个要非常注意的地方是,由于ActivityManagerService把这个广播放进***所在的线程消息队列后,就返回了,它不关心这个消息什么时候会被处理,因此,对广播的处理是异步的,即调用sendBroadcast时,这个函数不会等待这个广播被处理完后才返回。
下面,我们以一个序列图来总结一下,广播的注册和发送的过程:
虚线上面Step 1到Step 4步是注册广播***的过程,其中Step 2通过LoadedApk.getReceiverDispatcher在LoadedApk内部创建了一个IIntentReceiver接口,并且传递给ActivityManagerService;虚线下面的Step 5到Step 11是发送广播的过程,在Step 8中,ActivityManagerService利用上面得到的IIntentReceiver远程接口,调用LoadedApk.performReceiver接口,LoadedApk.performReceiver接口通过ActivityThread.H接口的post函数将这个广播消息放入到ActivityThread的消息队列中去,最后这个消息在LoadedApk的Args.run函数中处理,LoadedApk.Args.run函数接着调用MainActivity.BroadcastReceiver的onReceive函数来最终处理这个广播。
文章开始的时候,我们提到,举这个例子的最终目的,是为了进一步学习Android系统的广播机制,因此,在接下来的两篇文章中,我们将详细描述上述注册广播***和发送广播的过程:
1. Android应用程序注册广播***(registerReceiver)的过程分析;
2. Android应用程序发送广播(sendBroadcast)的过程分析。
相信学习完这两篇文章后,能够加深对Android系统广播机制的了解,敬请关注。
Android Broadcast 广播
进程内本地广播
如果你是在你的应用之内使用广播,即不需要跨进程,考虑使用LocalBroadcastManager,这样更有效率(因为不需要跨进程通信),并且你不用考虑一些其他应用可以发送或接收你的广播相关的安全问题。
下面介绍更一般的方法。
广播的两种注册方法
广播有静态和动态两种注册方法:静态注册:在AndroidManifest.xml中加上
<receiver>标签。
动态注册:通过
Context.registerReceiver()方法进行注册。比如在onResume中注册,在onPause中注销。
附上例子(例子中的布局、MyReceiver类,常量类都是相同的,在前面列出):
布局文件都一样:
<RelativeLayout xmlns:android="http://schemas.android.com/apk/res/android"
    xmlns:tools="http://schemas.android.com/tools"
    android:layout_width="match_parent"
    android:layout_height="match_parent"
    android:paddingBottom="@dimen/activity_vertical_margin"
    android:paddingLeft="@dimen/activity_horizontal_margin"
    android:paddingRight="@dimen/activity_horizontal_margin"
    android:paddingTop="@dimen/activity_vertical_margin"
    tools:context=".DemoBroadcastActivity" >

    <TextView
        android:id="@+id/helloText"
        android:layout_width="wrap_content"
        android:layout_height="wrap_content"
        android:text="@string/hello_world" />

    <Button
        android:id="@+id/sendBtn"
        android:layout_width="wrap_content"
        android:layout_height="wrap_content"
        android:layout_below="@id/helloText"
        android:text="@string/send" />

</RelativeLayout>
自己写的Receiver类:
import android.content.BroadcastReceiver;
import android.content.Context;
import android.content.Intent;
import android.util.Log;
import android.widget.Toast;

public class MyReceiver extends BroadcastReceiver
{


    public MyReceiver()
    {
        super();
        Log.d(AppConstants.LOG_TAG, "Receiver constructor");
    }

    @Override
    public void onReceive(Context context, Intent intent)
    {
        Log.d(AppConstants.LOG_TAG, "onReceive");
        String message = intent.getStringExtra(AppConstants.MSG_KEY);
        Log.i(AppConstants.LOG_TAG, message);
        Toast.makeText(context, "Received! msg: " + message, Toast.LENGTH_SHORT).show();
    }


}
应用常量:
public class AppConstants
{
    public static final String LOG_TAG = "Broadcast";
    public static final String MSG_KEY = "msg";

    public static final String BROADCAST_ACTION ="com.example.demobroadcast.BroadcastAction";

}
下面就是不同的部分了!
静态注册的实例代码:
静态注册是在manifest文件中进行:
<?xml version="1.0" encoding="utf-8"?>
<manifest xmlns:android="http://schemas.android.com/apk/res/android"
    package="com.example.demobroadcast"
    android:versionCode="1"
    android:versionName="1.0" >

    <uses-sdk
        android:minSdkVersion="8"
        android:targetSdkVersion="17" />

    <uses-permission android:name="android.permission.RECEIVE_SMS" />
    <uses-permission android:name="android.permission.SEND_SMS" />

    <application
        android:allowBackup="true"
        android:icon="@drawable/ic_launcher"
        android:label="@string/app_name"
        android:theme="@style/AppTheme" >
        <activity
            android:name="com.example.demobroadcast.DemoBroadcastActivity"
            android:label="@string/app_name" >
            <intent-filter android:priority="1000">
                <action android:name="android.intent.action.MAIN" />

                <category android:name="android.intent.category.LAUNCHER" />
            </intent-filter>
        </activity>

        <receiver
            android:name="com.example.demobroadcast.MyReceiver">
            <intent-filter  >
                <action android:name="com.example.demobroadcast.BroadcastAction" />
            </intent-filter>
        </receiver>
    </application>

</manifest>
所以Java代码:
package com.example.demobroadcast;

import android.os.Bundle;
import android.view.View;
import android.view.View.OnClickListener;
import android.widget.Button;
import android.widget.TextView;
import android.widget.Toast;
import android.app.Activity;
import android.content.Intent;

public class DemoBroadcastActivity extends Activity
{
    private Button sendBtn = null;

    @Override
    protected void onCreate(Bundle savedInstanceState)
    {
        super.onCreate(savedInstanceState);
        setContentView(R.layout.activity_demo_broadcast);

        sendBtn = (Button) findViewById(R.id.sendBtn);

        sendBtn.setOnClickListener(new OnClickListener()
        {

            @Override
            public void onClick(View v)
            {
                Intent intent = new Intent();
                intent.setAction(AppConstants.BROADCAST_ACTION);
                intent.putExtra("msg", "圣骑士wind");
                sendBroadcast(intent);

            }
        });
    }

}
动态注册的实例代码:
动态注册是在Java代码中进行:
package com.example.demobroadcast2;

import com.example.demobroadcast.R;

import android.os.Bundle;
import android.view.View;
import android.view.View.OnClickListener;
import android.widget.Button;
import android.widget.TextView;
import android.widget.Toast;
import android.app.Activity;
import android.content.Intent;
import android.content.IntentFilter;

public class DemoBroadcastActivity extends Activity
{
    private Button sendBtn = null;

    private MyReceiver mReceiver;

    @Override
    protected void onCreate(Bundle savedInstanceState)
    {
        super.onCreate(savedInstanceState);
        setContentView(R.layout.activity_demo_broadcast);

        sendBtn = (Button) findViewById(R.id.sendBtn);

        sendBtn.setOnClickListener(new OnClickListener()
        {

            @Override
            public void onClick(View v)
            {
                Intent intent = new Intent();
                intent.setAction(AppConstants.BROADCAST_ACTION);
                intent.putExtra("msg", "圣骑士wind");
                sendBroadcast(intent);

            }
        });
    }

    @Override
    protected void onResume()
    {
        super.onResume();

        mReceiver = new MyReceiver();
        IntentFilter intentFilter= new IntentFilter(AppConstants.BROADCAST_ACTION);
        registerReceiver(mReceiver, intentFilter);
    }

    @Override
    protected void onPause()
    {
        super.onPause();

        unregisterReceiver(mReceiver);
    }

    @Override
    protected void onDestroy()
    {
        super.onDestroy();
    }

}
所以Manifest文件中不需要添加标签,正常就行。
两种广播
Normal broadcasts
通过 Context.sendBroadcast发送,完全是异步的(asynchronous)。所有的***以不确定的顺序运行,通常是同时。
这样更有效率,但是也意味着***不能传递结果,也不能退出广播。
Ordered broadcasts
通过 Context.sendOrderedBroadcast发送。一次只向一个***发送。
由于每个***按顺序执行,它可以向下一个***传递结果,也可以退出广播不再传递给其他***。
***运行的顺序可以通过
android:priority属性来控制,相同优先级的***将会以随机的顺序运行。
***的生命周期
一个BroadcastReceiver的对象只在 onReceive(Context, Intent)被调用的期间有效,一旦从这个方法返回,系统就认为这个对象结束了,不再活跃。
这对你在onReceive中能做什么有很大的影响:不能做任何需要的操作(anything that requires asynchronous operation is not available)。
因为你需要从方法返回去进行你的异步操作,而返回时BroadcastReceiver的对象已经不再活跃了,系统可以(在异步操作完成前)任意杀死它的进程。
特别地,不可以在BroadcastReceiver中显示对话框或者绑定一个service,前者应该用
NotificationManager,后者应该用Context.startService()。
参考资料
官方文档BroadcastReceiver:http://developer.android.com/reference/android/content/BroadcastReceiver.html
LocalBroadcastManager:
http://developer.android.com/reference/android/support/v4/content/LocalBroadcastManager.html
Training: Manipulating Broadcast Receivers On Demand
http://developer.android.com/training/monitoring-device-state/manifest-receivers.html
receiver标签
http://developer.android.com/guide/topics/manifest/receiver-element.html

相关文章推荐
- Android开发之SQLite的使用方法
- Android 插件化 动态升级
- 基于XMPP协议的Android即时通信系
- Android源码分析-资源加载机制
- Android apk动态加载机制的研究(二):资源加载和activity生命周期管理
- Android Volley完全解析(四),带你从源码的角度理解Volley
- Android apk动态加载机制的研究
- Android Volley完全解析(一),初识Volley的基本用法
- Android中的类装载器DexClassLoader
- android基于类装载器DexClassloader设计“插件框架”
- Android类动态加载技术
- Android学习笔记--写文件
- Android fastjson多层嵌套解析出错解决方法
- Android高效加载大图、多图解决方案,有效避免程序OOM
- 【Android开发】多媒体应用开发-使用MediaPlayer播放音频
- Android模拟器横屏和竖屏的切换快捷方式
- Android ViewPager使用详解
- Android 学习项目1之简单运算器
- Android在跳转市场进行评分问题总结
- Android Service完全解析,关于服务你所需知道的一切(上)