Spring AOP实现方式三【附源码】
2015-04-18 23:18
288 查看
注解AOP实现
源码结构:
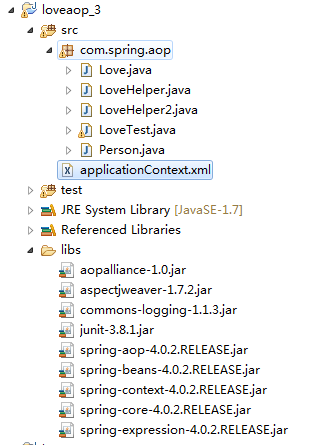
1、首先我们新建一个接口,love 谈恋爱接口。
package com.spring.aop;

/**
* 谈恋爱接口
*
* @author Administrator
*
*/
public interface Love
{

/*
* 谈恋爱方法
*/
void fallInLove();
void test() throws Exception;

}
.csharpcode, .csharpcode pre{
font-size: small;
color: black;
font-family: consolas, "Courier New", courier, monospace;
background-color: #ffffff;
/*white-space: pre;*/
}
.csharpcode pre { margin: 0em; }
.csharpcode .rem { color: #008000; }
.csharpcode .kwrd { color: #0000ff; }
.csharpcode .str { color: #006080; }
.csharpcode .op { color: #0000c0; }
.csharpcode .preproc { color: #cc6633; }
.csharpcode .asp { background-color: #ffff00; }
.csharpcode .html { color: #800000; }
.csharpcode .attr { color: #ff0000; }
.csharpcode .alt
{
background-color: #f4f4f4;
width: 100%;
margin: 0em;
}
.csharpcode .lnum { color: #606060; }
.csharpcode, .csharpcode pre
{
font-size: small;
color: black;
font-family: consolas, "Courier New", courier, monospace;
background-color: #ffffff;
/*white-space: pre;*/
}
.csharpcode pre { margin: 0em; }
.csharpcode .rem { color: #008000; }
.csharpcode .kwrd { color: #0000ff; }
.csharpcode .str { color: #006080; }
.csharpcode .op { color: #0000c0; }
.csharpcode .preproc { color: #cc6633; }
.csharpcode .asp { background-color: #ffff00; }
.csharpcode .html { color: #800000; }
.csharpcode .attr { color: #ff0000; }
.csharpcode .alt
{
background-color: #f4f4f4;
width: 100%;
margin: 0em;
}
.csharpcode .lnum { color: #606060; }
[/code]
.csharpcode, .csharpcode pre
{
font-size: small;
color: black;
font-family: consolas, "Courier New", courier, monospace;
background-color: #ffffff;
/*white-space: pre;*/
}
.csharpcode pre { margin: 0em; }
.csharpcode .rem { color: #008000; }
.csharpcode .kwrd { color: #0000ff; }
.csharpcode .str { color: #006080; }
.csharpcode .op { color: #0000c0; }
.csharpcode .preproc { color: #cc6633; }
.csharpcode .asp { background-color: #ffff00; }
.csharpcode .html { color: #800000; }
.csharpcode .attr { color: #ff0000; }
.csharpcode .alt
{
background-color: #f4f4f4;
width: 100%;
margin: 0em;
}
.csharpcode .lnum { color: #606060; }
2、我们写一个Person类实现Love接口
package com.spring.aop;

/**
* 人对象
*
* @author luwenbin006@163.com
*
*/
public class Person implements Love
{

/*
* 重写谈恋爱方法
*/
@Override
public void fallInLove()
{
System.out.println("谈恋爱了...");
}

@Override
public void test() throws Exception
{
// TODO Auto-generated method stub
throw new Exception("我就说你们在一起不会幸福的,你能拿我怎么滴?");
}

}
.csharpcode, .csharpcode pre
{
font-size: small;
color: black;
font-family: consolas, "Courier New", courier, monospace;
background-color: #ffffff;
/*white-space: pre;*/
}
.csharpcode pre { margin: 0em; }
.csharpcode .rem { color: #008000; }
.csharpcode .kwrd { color: #0000ff; }
.csharpcode .str { color: #006080; }
.csharpcode .op { color: #0000c0; }
.csharpcode .preproc { color: #cc6633; }
.csharpcode .asp { background-color: #ffff00; }
.csharpcode .html { color: #800000; }
.csharpcode .attr { color: #ff0000; }
.csharpcode .alt
{
background-color: #f4f4f4;
width: 100%;
margin: 0em;
}
.csharpcode .lnum { color: #606060; }
3、下面我们来写aop 注解通知类【执行方法前 执行方法后 执行方法前后也称为环绕方法 方法执行过程中抛出异常】
package com.spring.aop;

import org.aspectj.lang.JoinPoint;
import org.aspectj.lang.ProceedingJoinPoint;
import org.aspectj.lang.annotation.After;
import org.aspectj.lang.annotation.AfterThrowing;
import org.aspectj.lang.annotation.Around;
import org.aspectj.lang.annotation.Aspect;
import org.aspectj.lang.annotation.Before;
import org.aspectj.lang.annotation.Pointcut;

/**
* 注解方式 aop通知类
*
* @author luwenbin006@163.com
*
*/
@Aspect
public class LoveHelper
{

@Pointcut("execution(* com.spring.aop.*..*(..))")
private void loveMethod()
{
}// 定义一个切入点

// 在调用方法之前执行 执行拦截包com.spring.aop.*下所有的方法
@Before("execution(* com.spring.aop.*..*(..))")
public void before(JoinPoint point) throws Throwable
{
System.out.println("before::method "
+ point.getTarget().getClass().getName() + "."
+ point.getSignature().getName());
System.out.println("谈恋爱之前必须要彼此了解!");
}

// 在调用方法前后执行
@Around("execution(* com.spring.aop.*..*(..))")
public Object around(ProceedingJoinPoint point) throws Throwable
{
System.out.println("around::method "
+ point.getTarget().getClass().getName() + "."
+ point.getSignature().getName());
if (point.getArgs().length > 0)
{

return point.proceed(point.getArgs());

}
else
{

return point.proceed();
}
}

// 在调用方法之后执行
@After("execution(* com.spring.aop.*..*(..))")
public void afterReturning(JoinPoint point) throws Throwable
{
System.out.println("method " + point.getTarget().getClass().getName()
+ "." + point.getSignature().getName());
System.out.println("我们已经谈了5年了,最终还是分手了!");
// System.out.println("我们已经谈了5年了,最终步入了结婚的殿堂!");
}

// 当抛出异常时被调用
@AfterThrowing(value = "execution(* com.spring.aop.*..*(..))", throwing = "ex")
public void doThrowing(JoinPoint point, Throwable ex)
{
System.out.println("doThrowing::method "
+ point.getTarget().getClass().getName() + "."
+ point.getSignature().getName() + " throw exception");
System.out.println(ex.getMessage());
}

}
.csharpcode, .csharpcode pre
{
font-size: small;
color: black;
font-family: consolas, "Courier New", courier, monospace;
background-color: #ffffff;
/*white-space: pre;*/
}
.csharpcode pre { margin: 0em; }
.csharpcode .rem { color: #008000; }
.csharpcode .kwrd { color: #0000ff; }
.csharpcode .str { color: #006080; }
.csharpcode .op { color: #0000c0; }
.csharpcode .preproc { color: #cc6633; }
.csharpcode .asp { background-color: #ffff00; }
.csharpcode .html { color: #800000; }
.csharpcode .attr { color: #ff0000; }
.csharpcode .alt
{
background-color: #f4f4f4;
width: 100%;
margin: 0em;
}
.csharpcode .lnum { color: #606060; }
4、配置好application.xml 就配置好bean和aop通知类 加上一句启用注解模式配置。
<?xml version="1.0" encoding="UTF-8"?>
<beans xmlns="http://www.springframework.org/schema/beans"
xmlns:xsi="http://www.w3.org/2001/XMLSchema-instance" xmlns:p="http://www.springframework.org/schema/p"
xmlns:aop="http://www.springframework.org/schema/aop" xmlns:context="http://www.springframework.org/schema/context"
xmlns:jee="http://www.springframework.org/schema/jee" xmlns:tx="http://www.springframework.org/schema/tx"
xsi:schemaLocation=" http://www.springframework.org/schema/aop http://www.springframework.org/schema/aop/spring-aop-4.0.xsd http://www.springframework.org/schema/beans http://www.springframework.org/schema/beans/spring-beans-4.0.xsd http://www.springframework.org/schema/context http://www.springframework.org/schema/context/spring-context-4.0.xsd http://www.springframework.org/schema/jee http://www.springframework.org/schema/jee/spring-jee-4.0.xsd http://www.springframework.org/schema/tx http://www.springframework.org/schema/tx/spring-tx-4.0.xsd">

<!-- 配置bean -->
<bean id="person" class="com.spring.aop.Person">
</bean>

<!-- 配置通知方法类 -->
<bean id="loveHelper" class="com.spring.aop.LoveHelper">
</bean>

<aop:aspectj-autoproxy />

</beans>
.csharpcode, .csharpcode pre
{
font-size: small;
color: black;
font-family: consolas, "Courier New", courier, monospace;
background-color: #ffffff;
/*white-space: pre;*/
}
.csharpcode pre { margin: 0em; }
.csharpcode .rem { color: #008000; }
.csharpcode .kwrd { color: #0000ff; }
.csharpcode .str { color: #006080; }
.csharpcode .op { color: #0000c0; }
.csharpcode .preproc { color: #cc6633; }
.csharpcode .asp { background-color: #ffff00; }
.csharpcode .html { color: #800000; }
.csharpcode .attr { color: #ff0000; }
.csharpcode .alt
{
background-color: #f4f4f4;
width: 100%;
margin: 0em;
}
.csharpcode .lnum { color: #606060; }
5、写上我们的测试类 测试下效果 嘿嘿~~~
package com.spring.aop;

import org.springframework.context.ApplicationContext;
import org.springframework.context.support.ClassPathXmlApplicationContext;

import com.spring.aop.Love;

public class LoveTest
{

public static void main(String[] args)
{
ApplicationContext appCtx = new ClassPathXmlApplicationContext(
"applicationContext.xml");
Love love = (Love) appCtx.getBean("person");
love.fallInLove();
try
{
// 测试异常捕获
love.test();
}
catch (Exception e)
{
// TODO Auto-generated catch block
e.printStackTrace();
}
}
}
6、或者写上Junit测试类
package com.love.test;

import org.springframework.context.ApplicationContext;
import org.springframework.context.support.ClassPathXmlApplicationContext;

import com.spring.aop.Love;

import junit.framework.TestCase;

public class LoveAopTest extends TestCase
{

protected void setUp()
{
/* 开始test前的准备操作:初始化,获取数据连接... */

}

protected void tearDown()
{
/* 完成test后的清理工作:关闭文件, 关闭数据连接... */

}

public void testCase2()
{
ApplicationContext appCtx = new ClassPathXmlApplicationContext(
"applicationContext.xml");
Love love = (Love) appCtx.getBean("person");
love.fallInLove();
try
{
// 测试异常捕获
love.test();
}
catch (Exception e)
{
// TODO Auto-generated catch block
e.printStackTrace();
assertTrue(true);
}
}

}
.csharpcode, .csharpcode pre
{
font-size: small;
color: black;
font-family: consolas, "Courier New", courier, monospace;
background-color: #ffffff;
/*white-space: pre;*/
}
.csharpcode pre { margin: 0em; }
.csharpcode .rem { color: #008000; }
.csharpcode .kwrd { color: #0000ff; }
.csharpcode .str { color: #006080; }
.csharpcode .op { color: #0000c0; }
.csharpcode .preproc { color: #cc6633; }
.csharpcode .asp { background-color: #ffff00; }
.csharpcode .html { color: #800000; }
.csharpcode .attr { color: #ff0000; }
.csharpcode .alt
{
background-color: #f4f4f4;
width: 100%;
margin: 0em;
}
.csharpcode .lnum { color: #606060; }
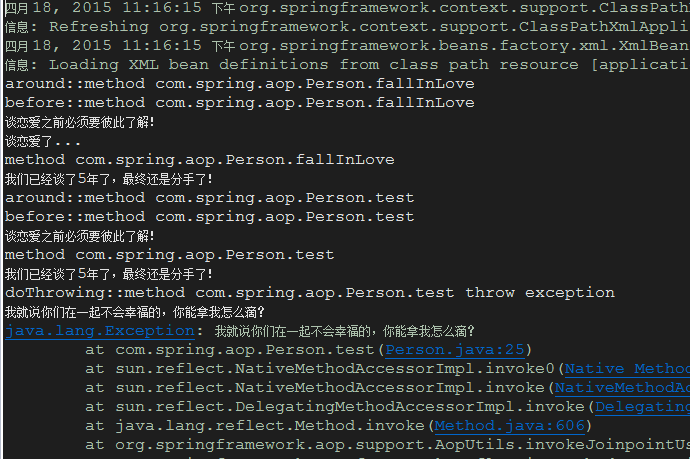
7、看控制台输出结果 调用了我们定义的aop拦截方法~~~ ok了
8、源码下载地址:源码下载
.csharpcode, .csharpcode pre
{
font-size: small;
color: black;
font-family: consolas, "Courier New", courier, monospace;
background-color: #ffffff;
/*white-space: pre;*/
}
.csharpcode pre { margin: 0em; }
.csharpcode .rem { color: #008000; }
.csharpcode .kwrd { color: #0000ff; }
.csharpcode .str { color: #006080; }
.csharpcode .op { color: #0000c0; }
.csharpcode .preproc { color: #cc6633; }
.csharpcode .asp { background-color: #ffff00; }
.csharpcode .html { color: #800000; }
.csharpcode .attr { color: #ff0000; }
.csharpcode .alt
{
background-color: #f4f4f4;
width: 100%;
margin: 0em;
}
.csharpcode .lnum { color: #606060; }

相关文章推荐
- Spring AOP实现方式三之自动扫描注入【附源码】
- spring源码分析之——spring 事务管理实现方式 (不太清晰,不明白aop会看不懂)
- Spring AOP实现方式四之注入式AspectJ切面【附源码】
- Spring AOP实现方式一【附源码】
- Spring AOP实现方式二【附源码】
- Spring-aop实现切面的四种方式 下篇 (源码)
- Spring源码分析之ProxyFactoryBean方式实现Aop功能的分析
- Spring AOP源码解析——AOP动态代理原理和实现方式
- springboot aop 自定义注解方式实现一套完善的日志记录(完整源码)
- Spring的AOP实现方式—ProxyFactoryBean配置方式实现源码剖析
- Spring源码阅读-注解实现AOP
- SpringAOP拦截Controller,Service实现日志管理(自定义注解的方式)
- Spring实现AOP的4种方式
- SpringAOP拦截Controller,Service实现日志管理(自定义注解的方式)
- Spring中AOP实现的两种方式之JDK和cglib的动态代理
- Spring实现AOP的4种方式
- SpringAOP拦截Controller,Service实现日志管理(自定义注解的方式)
- spring实现AOP的两种方式以及实现动态代理方式
- 使用Spring的注解方式实现AOP的细节
- SpringAOP拦截Controller,Service实现日志管理(自定义注解的方式)