如何使用 Android Studio 的 git hub 功能
2015-04-07 00:00
211 查看
How to use GitHub with Android Studio
This article will explain how to use GitHub with Android Studio.
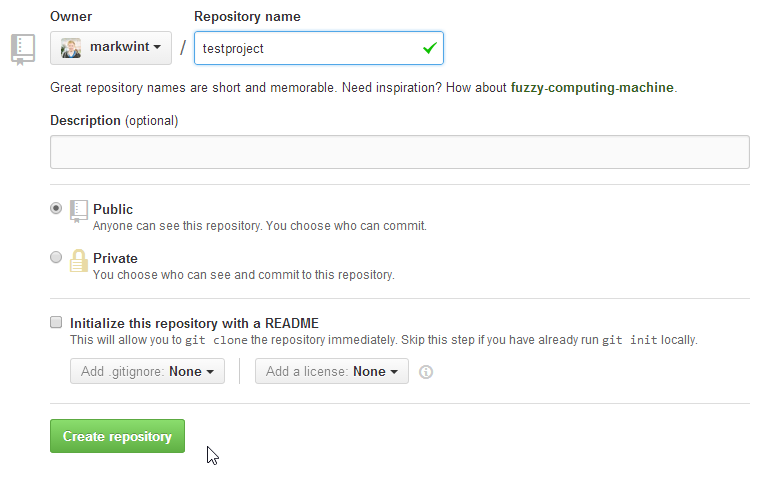
Firstly, let’s login to github.com and create a new repository. From the top right corner of the screen, click the +sign and select New repository.

Now complete the form to create a new repository called testproject. Leave the Initialize this repository with a README unticked.
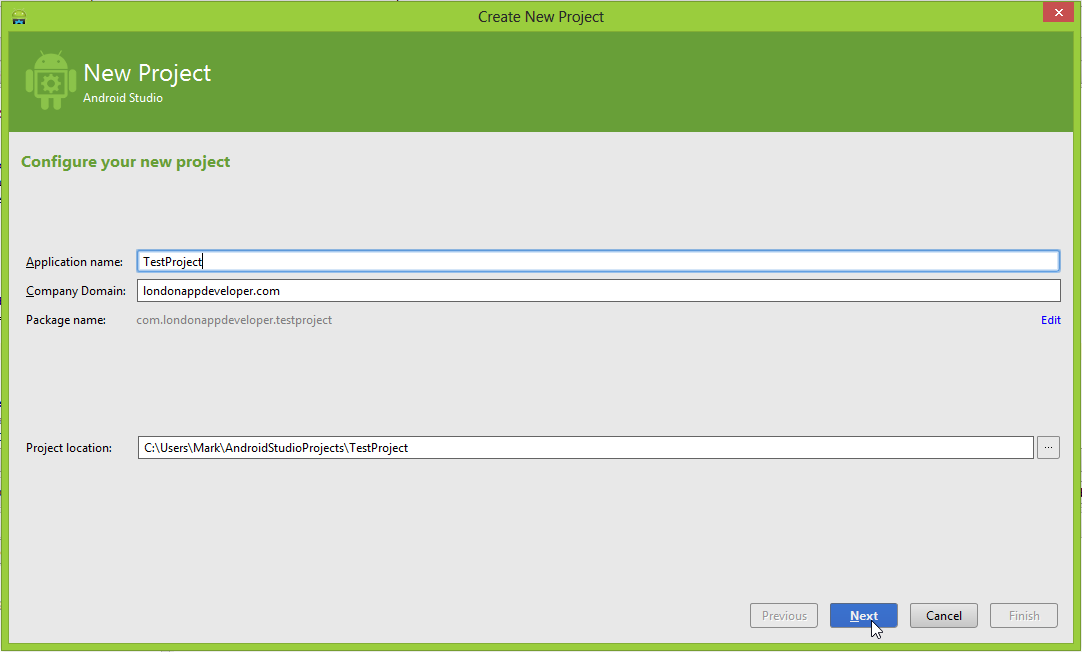
Next, open Android Studio and create a new project. Call your new application TestProject. Click Next to continue.

Leave the next page as default and click Next.

On the Add an activity to Mobile screen select Blank Activity and click Next.

In the next screen, leave the default activity name of MyActivity and click Finish.

Your new project will open in Android Studio. On the top menu, select VCS > Import into Version Control >Create Git Repository.

On the next screen, leave it all as default and click OK.

Now use Internet Explorer and navigate to the root of your projects folder. Right click and select Git Bash (If you do not see this option, then first install Git for Windows).
When the Git bash screen appears, type:
An example of a Git repository URL is: https://github.com/markwint/testproject.git

Then press enter. The GitHub remote will be added to your Git repository.
Next, jump back into Android Studio, right click your projects root directory and select Git > Add. This will add all your project files to your Git repository.
Add" option" src="http://static.oschina.net/uploads/img/201504/07224140_G2Bf.png">
It will seem like nothing has happened, but trust me, the project files are added.
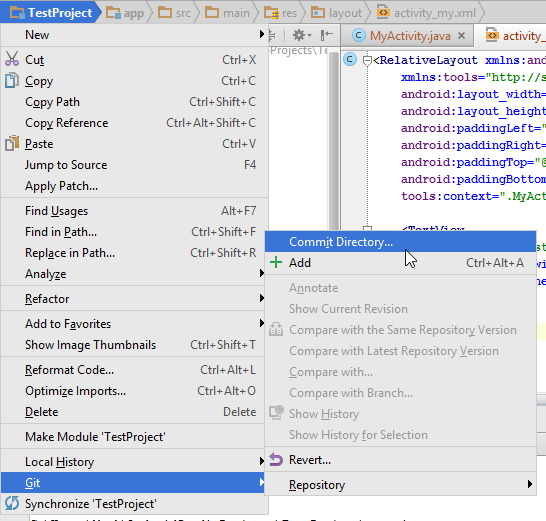
Now right click the project name again and this time select Git > Commit Directory.

In the next screen, type a Commit Message and select Commit.

If a Code Analysis warning appears, click Commit. (Unless it’s a real project, in which case review and fix the issue before committing!)

Now, right click the project name, select Git > Repository > Push.

Check the box Push current branch to alternative branch and leave the branch name as master. Then select push.

Now enter your GitHub Login (email address) and Password. Then click OK.

If it’s all good, you will see this message.

Now your code is pushed to your GitHub repository. Don’t believe me? Logon and check for yourself.

Hope that was helpful.
This article will explain how to use GitHub with Android Studio.
Firstly, let’s login to github.com and create a new repository. From the top right corner of the screen, click the +sign and select New repository.

Now complete the form to create a new repository called testproject. Leave the Initialize this repository with a README unticked.

Next, open Android Studio and create a new project. Call your new application TestProject. Click Next to continue.
Leave the next page as default and click Next.

On the Add an activity to Mobile screen select Blank Activity and click Next.

In the next screen, leave the default activity name of MyActivity and click Finish.

Your new project will open in Android Studio. On the top menu, select VCS > Import into Version Control >Create Git Repository.

On the next screen, leave it all as default and click OK.

Now use Internet Explorer and navigate to the root of your projects folder. Right click and select Git Bash (If you do not see this option, then first install Git for Windows).
When the Git bash screen appears, type:
| 1 | git remote add origin https: //github .com/[username]/[project_name].git |

Then press enter. The GitHub remote will be added to your Git repository.
Next, jump back into Android Studio, right click your projects root directory and select Git > Add. This will add all your project files to your Git repository.
Add" option" src="http://static.oschina.net/uploads/img/201504/07224140_G2Bf.png">
It will seem like nothing has happened, but trust me, the project files are added.
Now right click the project name again and this time select Git > Commit Directory.
In the next screen, type a Commit Message and select Commit.

If a Code Analysis warning appears, click Commit. (Unless it’s a real project, in which case review and fix the issue before committing!)

Now, right click the project name, select Git > Repository > Push.

Check the box Push current branch to alternative branch and leave the branch name as master. Then select push.

Now enter your GitHub Login (email address) and Password. Then click OK.

If it’s all good, you will see this message.

Now your code is pushed to your GitHub repository. Don’t believe me? Logon and check for yourself.

Hope that was helpful.

相关文章推荐
- 如何使用 Android Studio 的 git hub 功能
- 如何使用 Android Studio 的 git hub 功能
- 如何使用 Android Studio 的 git hub 功能
- Android studio下如何使用断点调试功能
- 如何使用Oracle全文检索功能
- 如何在eclipse中使用分支合并功能
- VC++ 6.0 中如何使用 CRT 调试功能来检测内存泄漏
- 如何解决eWebEditor在线编辑器的远程自动上传功能不能使用的问题?
- 使用DetailsView的数据插入功能时,如何初始化参数,如何取得新纪录的主键(主键类型为uniqueidentifier)
- [路由器]如何仅使用路由器中的交换机的功能
- 如何使用微软的SAPI实现发音功能?
- IE:如何使用断点续传功能
- 如何使用Loadrunner的IP欺骗功能
- 如何使用log4j设置tomcat 5.5版本的的日志功能
- VC++ 6.0 中如何使用 CRT 调试功能来检测内存泄漏
- VC6如何使用VS2005中的CImage类功能
- 如何使用单元测试 测试WEB组件方法中的含有Session、Cookie等HttpContext功能调用的方法?
- 如何让诊断功能不需要输入APPS口令 &监控用户当前在使用那个表单?
- 如何在eclipse中使用分支合并功能
- 如何解决eWebEditor在线编辑器的远程自动上传功能不能使用的问题?