Spring MVC中的IoC容器初始化
2015-04-02 00:56
337 查看
Spring Framework本身没有Web功能,Spring MVC使用WebApplicationContext类扩展ApplicationContext,使得拥有web功能。那么,Spring MVC是如何在web环境中创建IoC容器呢?web环境中的IoC容器的结构又是什么结构呢?web环境中,spring IoC容器是怎么启动呢?
先看一下WebApplicationContext是如何扩展ApplicationContext来添加对Web环境的支持的。WebApplicationContext接口定义如下:
[java] view
plaincopy
public interface WebApplicationContext extends ApplicationContext {
//根上下文在ServletContext中的名称
String ROOT_WEB_APPLICATION_CONTEXT_ATTRIBUTE = WebApplicationContext.class.getName() + ".ROOT";
//取得web容器的ServletContext
ServletContext getServletContext();
}
对于web容器中创建IoC容器的过程,我们从web.xml配置文件讲起。看一下Spring MVC的web.xml中的相关配置:
[xhtml] view
plaincopy
<context-param>
<param-name>contextConfigLocation</param-name>
<param-value>/WEB-INF/applicationContext.xml</param-value>
</context-param>
<listener>
<listener-class>org.springframework.web.context.ContextLoaderListener</listener-class>
</listener>
<!-- Handles all requests into the application -->
<servlet>
<servlet-name>Spring MVC Dispatcher Servlet</servlet-name>
<servlet-class>org.springframework.web.servlet.DispatcherServlet</servlet-class>
<init-param>
<param-name>contextConfigLocation</param-name>
<param-value>
/WEB-INF/spring/*.xml
</param-value>
</init-param>
<load-on-startup>1</load-on-startup>
</servlet>
<!-- Maps all /app requests to the DispatcherServlet for handling -->
<servlet-mapping>
<servlet-name>Spring MVC Dispatcher Servlet</servlet-name>
<url-pattern>/app/*</url-pattern>
</servlet-mapping>
在web.xml配置文件中,有两个主要的配置:ContextLoaderListener和DispatcherServlet。同样的关于spring配置文件的相关配置也有两部分:context-param和DispatcherServlet中的init-param。那么,这两部分的配置有什么区别呢?它们都担任什么样的职责呢?
在Spring MVC中,Spring Context是以父子的继承结构存在的。Web环境中存在一个ROOT Context,这个Context是整个应用的根上下文,是其他context的双亲Context。同时Spring MVC也对应的持有一个独立的Context,它是ROOT Context的子上下文。
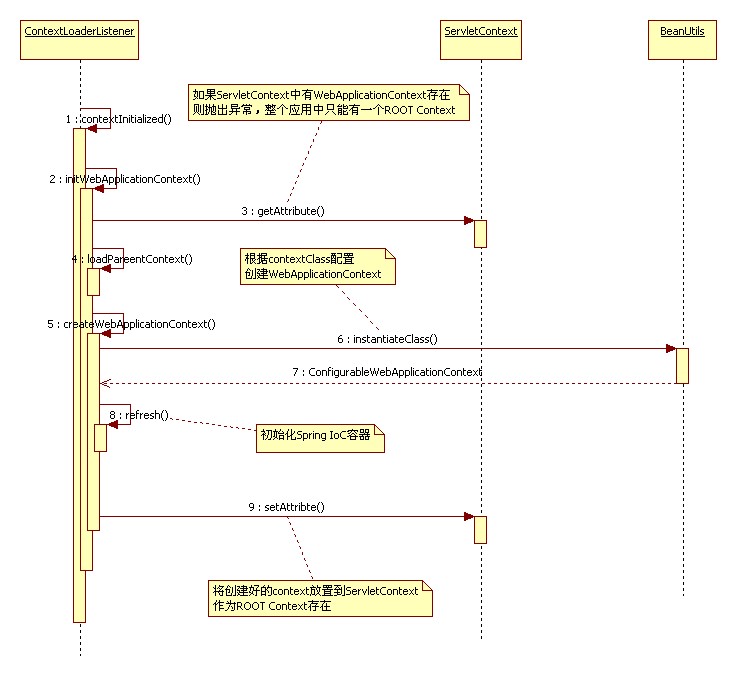
对于这样的Context结构在Spring MVC中是如何实现的呢?下面就先从ROOT Context入手,ROOT Context是在ContextLoaderListener中配置的,ContextLoaderListener读取context-param中的contextConfigLocation指定的配置文件,创建ROOT Context。下面看一下ContextLoaderListener中创建context的源码:
[java] view
plaincopy
/**
* Initialize Spring's web application context for the given servlet context,
* according to the "{@link #CONTEXT_CLASS_PARAM contextClass}" and
* "{@link #CONFIG_LOCATION_PARAM contextConfigLocation}" context-params.
* @param servletContext current servlet context
* @return the new WebApplicationContext
* @see #CONTEXT_CLASS_PARAM
* @see #CONFIG_LOCATION_PARAM
*/
public WebApplicationContext initWebApplicationContext(ServletContext servletContext) {
//PS : ROOT_WEB_APPLICATION_CONTEXT_ATTRIBUTE=WebApplicationContext.class.getName() + ".ROOT" 根上下文的名称
//PS : 默认情况下,配置文件的位置和名称是: DEFAULT_CONFIG_LOCATION = "/WEB-INF/applicationContext.xml"
//在整个web应用中,只能有一个根上下文
if (servletContext.getAttribute(WebApplicationContext.ROOT_WEB_APPLICATION_CONTEXT_ATTRIBUTE) != null) {
throw new IllegalStateException(
"Cannot initialize context because there is already a root application context present - " +
"check whether you have multiple ContextLoader* definitions in your web.xml!");
}
Log logger = LogFactory.getLog(ContextLoader.class);
servletContext.log("Initializing Spring root WebApplicationContext");
if (logger.isInfoEnabled()) {
logger.info("Root WebApplicationContext: initialization started");
}
long startTime = System.currentTimeMillis();
try {
// Determine parent for root web application context, if any.
ApplicationContext parent = loadParentContext(servletContext);
// Store context in local instance variable, to guarantee that
// it is available on ServletContext shutdown.
// 在这里执行了创建WebApplicationContext的操作
this.context = createWebApplicationContext(servletContext, parent);
//PS: 将根上下文放置在servletContext中
servletContext.setAttribute(WebApplicationContext.ROOT_WEB_APPLICATION_CONTEXT_ATTRIBUTE, this.context);
ClassLoader ccl = Thread.currentThread().getContextClassLoader();
if (ccl == ContextLoader.class.getClassLoader()) {
currentContext = this.context;
}
else if (ccl != null) {
currentContextPerThread.put(ccl, this.context);
}
if (logger.isDebugEnabled()) {
logger.debug("Published root WebApplicationContext as ServletContext attribute with name [" +
WebApplicationContext.ROOT_WEB_APPLICATION_CONTEXT_ATTRIBUTE + "]");
}
if (logger.isInfoEnabled()) {
long elapsedTime = System.currentTimeMillis() - startTime;
logger.info("Root WebApplicationContext: initialization completed in " + elapsedTime + " ms");
}
return this.context;
}
catch (RuntimeException ex) {
logger.error("Context initialization failed", ex);
servletContext.setAttribute(WebApplicationContext.ROOT_WEB_APPLICATION_CONTEXT_ATTRIBUTE, ex);
throw ex;
}
catch (Error err) {
logger.error("Context initialization failed", err);
servletContext.setAttribute(WebApplicationContext.ROOT_WEB_APPLICATION_CONTEXT_ATTRIBUTE, err);
throw err;
}
}
再看一下WebApplicationContext对象是如何创建的:
[java] view
plaincopy
protected WebApplicationContext createWebApplicationContext(ServletContext sc, ApplicationContext parent) {
//根据web.xml中的配置决定使用何种WebApplicationContext。默认情况下使用XmlWebApplicationContext
//web.xml中相关的配置context-param的名称“contextClass”
Class<?> contextClass = determineContextClass(sc);
if (!ConfigurableWebApplicationContext.class.isAssignableFrom(contextClass)) {
throw new ApplicationContextException("Custom context class [" + contextClass.getName() +
"] is not of type [" + ConfigurableWebApplicationContext.class.getName() + "]");
}
//实例化WebApplicationContext的实现类
ConfigurableWebApplicationContext wac =
(ConfigurableWebApplicationContext) BeanUtils.instantiateClass(contextClass);
// Assign the best possible id value.
if (sc.getMajorVersion() == 2 && sc.getMinorVersion() < 5) {
// Servlet <= 2.4: resort to name specified in web.xml, if any.
String servletContextName = sc.getServletContextName();
if (servletContextName != null) {
wac.setId(ConfigurableWebApplicationContext.APPLICATION_CONTEXT_ID_PREFIX + servletContextName);
}
else {
wac.setId(ConfigurableWebApplicationContext.APPLICATION_CONTEXT_ID_PREFIX);
}
}
else {
// Servlet 2.5's getContextPath available!
wac.setId(ConfigurableWebApplicationContext.APPLICATION_CONTEXT_ID_PREFIX + sc.getContextPath());
}
wac.setParent(parent);
wac.setServletContext(sc);
//设置spring的配置文件
wac.setConfigLocation(sc.getInitParameter(CONFIG_LOCATION_PARAM));
customizeContext(sc, wac);
//spring容器初始化
wac.refresh();
return wac;
}
以上是web容器中根上下文的加载与初始化,下面介绍一下Spring MVC对应的上下文是如何加载的。
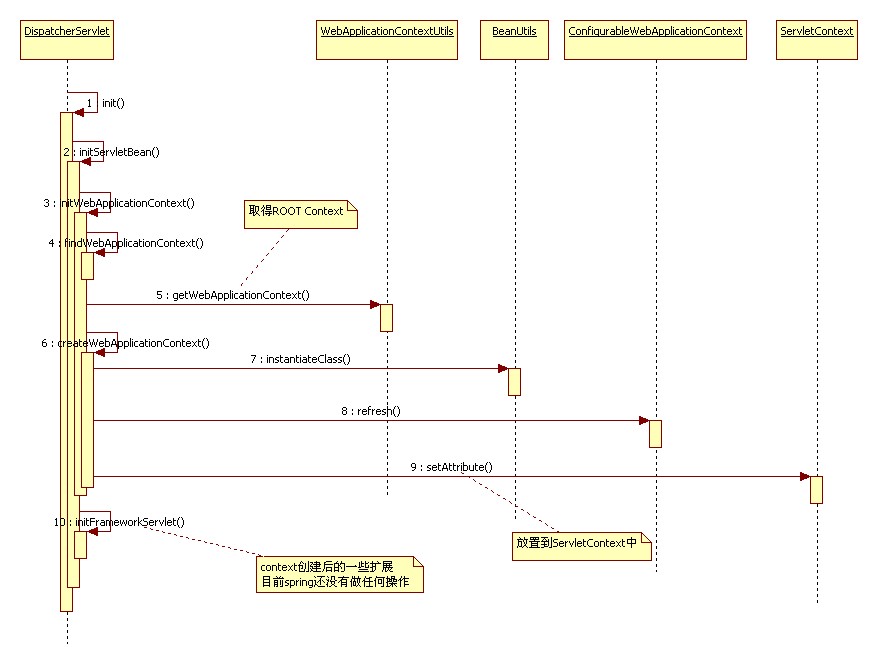
Spring MVC中核心的类是DispatcherServlet,在这个类中完成Spring context的加载与创建,并且能够根据Spring Context的内容将请求分发给各个Controller类。DispatcherServlet继承自HttpServlet,关于Spring Context的配置文件加载和创建是在init()方法中进行的,主要的调用顺序是init-->initServletBean-->initWebApplicationContext。
先来看一下initWebApplicationContext的实现
[java] view
plaincopy
/**
* Initialize and publish the WebApplicationContext for this servlet.
* <p>Delegates to {@link #createWebApplicationContext} for actual creation
* of the context. Can be overridden in subclasses.
* @return the WebApplicationContext instance
* @see #setContextClass
* @see #setContextConfigLocation
*/
protected WebApplicationContext initWebApplicationContext() {
//先从web容器的ServletContext中查找WebApplicationContext
WebApplicationContext wac = findWebApplicationContext();
if (wac == null) {
// No fixed context defined for this servlet - create a local one.
//从ServletContext中取得根上下文
WebApplicationContext parent =
WebApplicationContextUtils.getWebApplicationContext(getServletContext());
//创建Spring MVC的上下文,并将根上下文作为起双亲上下文
wac = createWebApplicationContext(parent);
}
if (!this.refreshEventReceived) {
// Apparently not a ConfigurableApplicationContext with refresh support:
// triggering initial onRefresh manually here.
onRefresh(wac);
}
if (this.publishContext) {
// Publish the context as a servlet context attribute.
// 取得context在ServletContext中的名称
String attrName = getServletContextAttributeName();
//将Spring MVC的Context放置到ServletContext中
getServletContext().setAttribute(attrName, wac);
if (this.logger.isDebugEnabled()) {
this.logger.debug("Published WebApplicationContext of servlet '" + getServletName() +
"' as ServletContext attribute with name [" + attrName + "]");
}
}
return wac;
}
通过initWebApplicationContext方法的调用,创建了DispatcherServlet对应的context,并将其放置到ServletContext中,这样就完成了在web容器中构建Spring IoC容器的过程。
最后,在分别给出ContextLoaderListener和DispatcherServlet构建context的时序。
ContextLoaderListener构建Root Context时序图:
DispatcherServlet创建context时序图:
先看一下WebApplicationContext是如何扩展ApplicationContext来添加对Web环境的支持的。WebApplicationContext接口定义如下:
[java] view
plaincopy
public interface WebApplicationContext extends ApplicationContext {
//根上下文在ServletContext中的名称
String ROOT_WEB_APPLICATION_CONTEXT_ATTRIBUTE = WebApplicationContext.class.getName() + ".ROOT";
//取得web容器的ServletContext
ServletContext getServletContext();
}
对于web容器中创建IoC容器的过程,我们从web.xml配置文件讲起。看一下Spring MVC的web.xml中的相关配置:
[xhtml] view
plaincopy
<context-param>
<param-name>contextConfigLocation</param-name>
<param-value>/WEB-INF/applicationContext.xml</param-value>
</context-param>
<listener>
<listener-class>org.springframework.web.context.ContextLoaderListener</listener-class>
</listener>
<!-- Handles all requests into the application -->
<servlet>
<servlet-name>Spring MVC Dispatcher Servlet</servlet-name>
<servlet-class>org.springframework.web.servlet.DispatcherServlet</servlet-class>
<init-param>
<param-name>contextConfigLocation</param-name>
<param-value>
/WEB-INF/spring/*.xml
</param-value>
</init-param>
<load-on-startup>1</load-on-startup>
</servlet>
<!-- Maps all /app requests to the DispatcherServlet for handling -->
<servlet-mapping>
<servlet-name>Spring MVC Dispatcher Servlet</servlet-name>
<url-pattern>/app/*</url-pattern>
</servlet-mapping>
在web.xml配置文件中,有两个主要的配置:ContextLoaderListener和DispatcherServlet。同样的关于spring配置文件的相关配置也有两部分:context-param和DispatcherServlet中的init-param。那么,这两部分的配置有什么区别呢?它们都担任什么样的职责呢?
在Spring MVC中,Spring Context是以父子的继承结构存在的。Web环境中存在一个ROOT Context,这个Context是整个应用的根上下文,是其他context的双亲Context。同时Spring MVC也对应的持有一个独立的Context,它是ROOT Context的子上下文。
对于这样的Context结构在Spring MVC中是如何实现的呢?下面就先从ROOT Context入手,ROOT Context是在ContextLoaderListener中配置的,ContextLoaderListener读取context-param中的contextConfigLocation指定的配置文件,创建ROOT Context。下面看一下ContextLoaderListener中创建context的源码:
[java] view
plaincopy
/**
* Initialize Spring's web application context for the given servlet context,
* according to the "{@link #CONTEXT_CLASS_PARAM contextClass}" and
* "{@link #CONFIG_LOCATION_PARAM contextConfigLocation}" context-params.
* @param servletContext current servlet context
* @return the new WebApplicationContext
* @see #CONTEXT_CLASS_PARAM
* @see #CONFIG_LOCATION_PARAM
*/
public WebApplicationContext initWebApplicationContext(ServletContext servletContext) {
//PS : ROOT_WEB_APPLICATION_CONTEXT_ATTRIBUTE=WebApplicationContext.class.getName() + ".ROOT" 根上下文的名称
//PS : 默认情况下,配置文件的位置和名称是: DEFAULT_CONFIG_LOCATION = "/WEB-INF/applicationContext.xml"
//在整个web应用中,只能有一个根上下文
if (servletContext.getAttribute(WebApplicationContext.ROOT_WEB_APPLICATION_CONTEXT_ATTRIBUTE) != null) {
throw new IllegalStateException(
"Cannot initialize context because there is already a root application context present - " +
"check whether you have multiple ContextLoader* definitions in your web.xml!");
}
Log logger = LogFactory.getLog(ContextLoader.class);
servletContext.log("Initializing Spring root WebApplicationContext");
if (logger.isInfoEnabled()) {
logger.info("Root WebApplicationContext: initialization started");
}
long startTime = System.currentTimeMillis();
try {
// Determine parent for root web application context, if any.
ApplicationContext parent = loadParentContext(servletContext);
// Store context in local instance variable, to guarantee that
// it is available on ServletContext shutdown.
// 在这里执行了创建WebApplicationContext的操作
this.context = createWebApplicationContext(servletContext, parent);
//PS: 将根上下文放置在servletContext中
servletContext.setAttribute(WebApplicationContext.ROOT_WEB_APPLICATION_CONTEXT_ATTRIBUTE, this.context);
ClassLoader ccl = Thread.currentThread().getContextClassLoader();
if (ccl == ContextLoader.class.getClassLoader()) {
currentContext = this.context;
}
else if (ccl != null) {
currentContextPerThread.put(ccl, this.context);
}
if (logger.isDebugEnabled()) {
logger.debug("Published root WebApplicationContext as ServletContext attribute with name [" +
WebApplicationContext.ROOT_WEB_APPLICATION_CONTEXT_ATTRIBUTE + "]");
}
if (logger.isInfoEnabled()) {
long elapsedTime = System.currentTimeMillis() - startTime;
logger.info("Root WebApplicationContext: initialization completed in " + elapsedTime + " ms");
}
return this.context;
}
catch (RuntimeException ex) {
logger.error("Context initialization failed", ex);
servletContext.setAttribute(WebApplicationContext.ROOT_WEB_APPLICATION_CONTEXT_ATTRIBUTE, ex);
throw ex;
}
catch (Error err) {
logger.error("Context initialization failed", err);
servletContext.setAttribute(WebApplicationContext.ROOT_WEB_APPLICATION_CONTEXT_ATTRIBUTE, err);
throw err;
}
}
再看一下WebApplicationContext对象是如何创建的:
[java] view
plaincopy
protected WebApplicationContext createWebApplicationContext(ServletContext sc, ApplicationContext parent) {
//根据web.xml中的配置决定使用何种WebApplicationContext。默认情况下使用XmlWebApplicationContext
//web.xml中相关的配置context-param的名称“contextClass”
Class<?> contextClass = determineContextClass(sc);
if (!ConfigurableWebApplicationContext.class.isAssignableFrom(contextClass)) {
throw new ApplicationContextException("Custom context class [" + contextClass.getName() +
"] is not of type [" + ConfigurableWebApplicationContext.class.getName() + "]");
}
//实例化WebApplicationContext的实现类
ConfigurableWebApplicationContext wac =
(ConfigurableWebApplicationContext) BeanUtils.instantiateClass(contextClass);
// Assign the best possible id value.
if (sc.getMajorVersion() == 2 && sc.getMinorVersion() < 5) {
// Servlet <= 2.4: resort to name specified in web.xml, if any.
String servletContextName = sc.getServletContextName();
if (servletContextName != null) {
wac.setId(ConfigurableWebApplicationContext.APPLICATION_CONTEXT_ID_PREFIX + servletContextName);
}
else {
wac.setId(ConfigurableWebApplicationContext.APPLICATION_CONTEXT_ID_PREFIX);
}
}
else {
// Servlet 2.5's getContextPath available!
wac.setId(ConfigurableWebApplicationContext.APPLICATION_CONTEXT_ID_PREFIX + sc.getContextPath());
}
wac.setParent(parent);
wac.setServletContext(sc);
//设置spring的配置文件
wac.setConfigLocation(sc.getInitParameter(CONFIG_LOCATION_PARAM));
customizeContext(sc, wac);
//spring容器初始化
wac.refresh();
return wac;
}
以上是web容器中根上下文的加载与初始化,下面介绍一下Spring MVC对应的上下文是如何加载的。
Spring MVC中核心的类是DispatcherServlet,在这个类中完成Spring context的加载与创建,并且能够根据Spring Context的内容将请求分发给各个Controller类。DispatcherServlet继承自HttpServlet,关于Spring Context的配置文件加载和创建是在init()方法中进行的,主要的调用顺序是init-->initServletBean-->initWebApplicationContext。
先来看一下initWebApplicationContext的实现
[java] view
plaincopy
/**
* Initialize and publish the WebApplicationContext for this servlet.
* <p>Delegates to {@link #createWebApplicationContext} for actual creation
* of the context. Can be overridden in subclasses.
* @return the WebApplicationContext instance
* @see #setContextClass
* @see #setContextConfigLocation
*/
protected WebApplicationContext initWebApplicationContext() {
//先从web容器的ServletContext中查找WebApplicationContext
WebApplicationContext wac = findWebApplicationContext();
if (wac == null) {
// No fixed context defined for this servlet - create a local one.
//从ServletContext中取得根上下文
WebApplicationContext parent =
WebApplicationContextUtils.getWebApplicationContext(getServletContext());
//创建Spring MVC的上下文,并将根上下文作为起双亲上下文
wac = createWebApplicationContext(parent);
}
if (!this.refreshEventReceived) {
// Apparently not a ConfigurableApplicationContext with refresh support:
// triggering initial onRefresh manually here.
onRefresh(wac);
}
if (this.publishContext) {
// Publish the context as a servlet context attribute.
// 取得context在ServletContext中的名称
String attrName = getServletContextAttributeName();
//将Spring MVC的Context放置到ServletContext中
getServletContext().setAttribute(attrName, wac);
if (this.logger.isDebugEnabled()) {
this.logger.debug("Published WebApplicationContext of servlet '" + getServletName() +
"' as ServletContext attribute with name [" + attrName + "]");
}
}
return wac;
}
通过initWebApplicationContext方法的调用,创建了DispatcherServlet对应的context,并将其放置到ServletContext中,这样就完成了在web容器中构建Spring IoC容器的过程。
最后,在分别给出ContextLoaderListener和DispatcherServlet构建context的时序。
ContextLoaderListener构建Root Context时序图:
DispatcherServlet创建context时序图:

相关文章推荐
- Spring MVC中的IoC容器初始化
- Spring MVC中的IoC容器初始化
- 读《Spring技术内幕》-总结3-IoC容器的初始化过程
- IOC容器在web容器中初始化——(一)两种配置方式
- Spring IOC容器的初始化过程--资源定位
- Spring初始化Ioc容器的三种方法
- Spring源码分析----IOC容器的实现(IoC容器的初始化过程(定位、载入解析、注册))
- Spring应用、原理以及粗读源码系列(一)--框架总述、以Bean为核心的机制(IoC容器初始化以及依赖注入)
- SpringFramework学习-(4)IOC容器初始化过程详解
- Spring IoC容器的初始化过程
- IOC_bean容器初始化
- IOC容器初始化过程
- Spring IOC学习心得之源码级分析ContextLoaderListener的作用(IOC容器初始化入口)
- IOC容器的初始化过程
- Spring源码阅读(二)—IOC容器初始化
- IoC容器的初始化过程
- Spring源码阅读(一):IOC容器的初始化
- Spring源码-IOC容器(五)-Bean的初始化
- Spring IOC 容器源码分析 - 余下的初始化工作
- Spring源码学习(一):IOC容器初始化