在MPLAB X IDE下用SEGGER J-LINK调试PIC32
2015-03-17 16:58
260 查看
总的来说,在MPLAB X IDE下用J-LINK调试PIC32会有一些限制;推荐的做法还是使用Microchip自己的调试工具。
以下是帮助文档中,关于J-LINK相关部分的节选。
SEGGER J-Link Debug Probes
SEGGER J-Link debug probes bring JTAG development to MPLAB X IDE.
J-Link Debug Probes Supported
The following J-Link probe versions and types have been tested and are supported in MPLAB X IDE:
Version 9 and newer: J-Link BASE
The following J-Link probe versions and types should work in MPLAB X IDE:
Version 9 and newer: J-Link PLUS, J-Link EDU
Version 4 and newer: J-Link ULTRA+, J-Link PRO
To determine your probe version, look at the label on the back side of the probe, which describes the serial number and hardware version.
If you have an older version of J-Link debug probe, SEGGER offers a trade-in program which permits you to upgrade to the latest hardware version. SEGGER provides a discounted rate of the current list cost for the unit being traded in.
Supported Microchip Devices
To see a list of Microchip devices supported by the probe, go to:
http://www.segger.com/jlink_supported_devices.html?m=Microchip
SEGGER J-Link Debug Probes : J-Link Microchip Adapter
J-Link Microchip Adapter
A adapter to use the J-Link probe with Microchip PIC32 devices is provided with a Segger J-Link probe purchased through Microchip. If you already own a supported Segger J-Link probe, you may purchase the adapter separately at:
Adapter configurations are shown in the figures below.
Figure: J-Link Microchip Adapter - 2-Wire JTAG
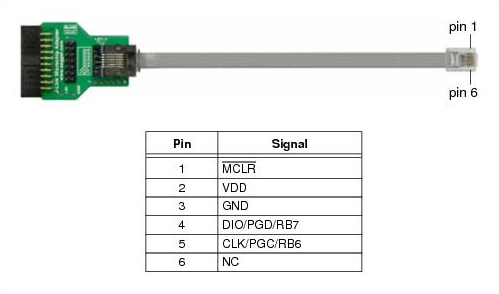
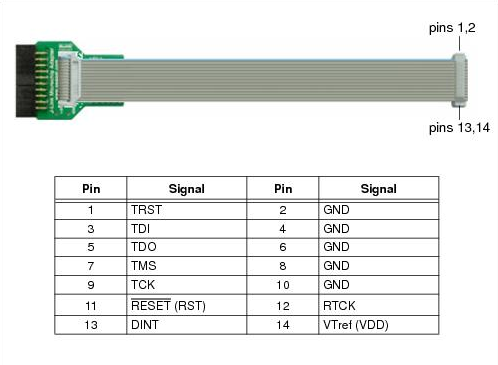
Figure: J-Link Microchip Adapter - 4-Wire JTAG
Available target interfaces
In general, there are three target interfaces available on PIC32 devices:
1. Debug via traditional 4-wire JTAG (IEEE1149.1)
2. Debug via Microchip proprietary 2-wire JTAG
3. Programming via Microchip proprietary 2-wire JTAG
(1) and (3) are supported by all PIC32 devices. (2) is supported by all later PIC32 devices, but not by some old ones. On such devices, debugging via 4-wire JTAG should be used. The following devices do not support full debugging via 2-wire JTAG:
• PIC32MX320 / 340 / 360 series devices
• PIC32MX420 / 440 / 460 series devices
• PIC32MX534 / 564 / 575 series devices
• PIC32MX664 / 675 / 695 series devices
• PIC32MX775 / 764 / 795 series devices
The J-Link PIC32 Adapter provides connectors for all commonly used headers for PIC32:
• 14-pin 0.1” connector for 4-wire JTAG
• RJ11 connector for 2-wire JTAG
• 6-pin PICkit connector (soldering option)
What is 2-wire JTAG?
2-wire JTAG is a proprietary debug interface defined by Microchip. Based on 4-wire JTAG device internally, using a 2-wire converter that multiplexes the TMS, TDI, TDO JTAG lines to a single data line to the outside and demultiplexes it to the inside. Requires a special conversion unit in the device. On older devices, this conversion unit was only activated in case the device was in the special 2-wire programming mode, but did not allow full debugging using the 2-wire protocol.
以下是帮助文档中,关于J-LINK相关部分的节选。
SEGGER J-Link Debug Probes
SEGGER J-Link debug probes bring JTAG development to MPLAB X IDE.
J-Link Debug Probes Supported
The following J-Link probe versions and types have been tested and are supported in MPLAB X IDE:
Version 9 and newer: J-Link BASE
The following J-Link probe versions and types should work in MPLAB X IDE:
Version 9 and newer: J-Link PLUS, J-Link EDU
Version 4 and newer: J-Link ULTRA+, J-Link PRO
To determine your probe version, look at the label on the back side of the probe, which describes the serial number and hardware version.
If you have an older version of J-Link debug probe, SEGGER offers a trade-in program which permits you to upgrade to the latest hardware version. SEGGER provides a discounted rate of the current list cost for the unit being traded in.
Supported Microchip Devices
To see a list of Microchip devices supported by the probe, go to:
http://www.segger.com/jlink_supported_devices.html?m=Microchip
SEGGER J-Link Debug Probes : J-Link Microchip Adapter
J-Link Microchip Adapter
A adapter to use the J-Link probe with Microchip PIC32 devices is provided with a Segger J-Link probe purchased through Microchip. If you already own a supported Segger J-Link probe, you may purchase the adapter separately at:
Adapter configurations are shown in the figures below.
Figure: J-Link Microchip Adapter - 2-Wire JTAG
Figure: J-Link Microchip Adapter - 4-Wire JTAG
Available target interfaces
In general, there are three target interfaces available on PIC32 devices:
1. Debug via traditional 4-wire JTAG (IEEE1149.1)
2. Debug via Microchip proprietary 2-wire JTAG
3. Programming via Microchip proprietary 2-wire JTAG
(1) and (3) are supported by all PIC32 devices. (2) is supported by all later PIC32 devices, but not by some old ones. On such devices, debugging via 4-wire JTAG should be used. The following devices do not support full debugging via 2-wire JTAG:
• PIC32MX320 / 340 / 360 series devices
• PIC32MX420 / 440 / 460 series devices
• PIC32MX534 / 564 / 575 series devices
• PIC32MX664 / 675 / 695 series devices
• PIC32MX775 / 764 / 795 series devices
The J-Link PIC32 Adapter provides connectors for all commonly used headers for PIC32:
• 14-pin 0.1” connector for 4-wire JTAG
• RJ11 connector for 2-wire JTAG
• 6-pin PICkit connector (soldering option)
What is 2-wire JTAG?
2-wire JTAG is a proprietary debug interface defined by Microchip. Based on 4-wire JTAG device internally, using a 2-wire converter that multiplexes the TMS, TDI, TDO JTAG lines to a single data line to the outside and demultiplexes it to the inside. Requires a special conversion unit in the device. On older devices, this conversion unit was only activated in case the device was in the special 2-wire programming mode, but did not allow full debugging using the 2-wire protocol.

相关文章推荐
- [PIC32--IDE]使用MPLAB IDE调试
- MPLAB X IDE调试代码
- MPLAB X IDE调试代码
- [PIC32--IDE]使用MPLAB IDE调试
- pdb-不需要IDE也能调试
- oracle Solaris Studio 12.3 IDE 环境下调试
- MPLAB X IDE 如何保存中文注释
- Delphi应用程序的调试(十)调试器选项(在IDE中不要使用异常)
- WebStorm使用JetBrains IDE Support调试
- cocos xxx.app模拟器引入位置->cocos code ide代码调试总是跑到执行xxx.app中的解决办法
- PHP 设置调试工具XDebug PHPStorm IDE
- 7.25 IDE试用和调试
- Quick cocos2dx-Lua(V3.3R1)学习笔记(十二)----使用Cocos Code IDE 配合自带的PrebuiltRuntimeLua.apk进行真机调试
- Sublime Text 3 配置 PHP IDE环境 并使用Xdebug进行调试
- 【IDE-Visual Studio】如何在使用vs调试如何才能不显示反汇编?
- Python中的调试(assert, logging, pdb, pdb.set_trace(), IDE)
- 转:Openocd 安装并在Eclipse环境下通过J-Link调试
- 使用 WebStorm IDE 调试 Pomelo 应用程序
- 基于stm32的RT-Thread操作系统+J-link V9虚拟串口调试操作
- JAVA游戏编程之一----IDE安装调试(2)