netbackup 7.5.0.7 之oracle数据库的备份和恢复
2015-03-06 15:56
239 查看
Oracle数据库的数据结构
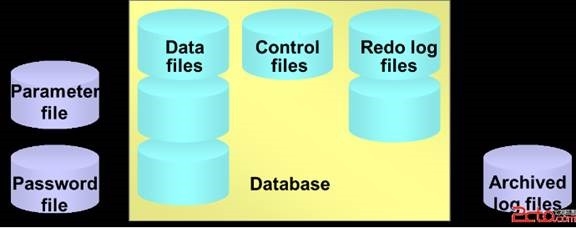
Oracle的文件系统主要分为四大部分:
1) 控制文件
2) 数据文件
3) 日志文件
4) 其他文件(如参数文件,密码文件等)
前三种文件系是Oracle文件系统的主要组成部分,一般在以下路径可以找到:
$ORACLE_HOME$\oradata\orcl
.CTL文件为控制文件
.DBF 文件为数据文件
.LOG 文件为日志文件
除了前三种文件还有一种参数文件,参数文件不是数据库系统中的有效组成部分,在启动数据库时,参数文件不直接参与工作,只是控制文件是由参数文件寻找的。参数文件位置:
$ORACLE_HOME$\admin\orcl\pfile
1.1.1 挂载裸LUN 1、 挂载裸LUN,mount到/nbubakcup。
1.1.2 确认安装环境 1、确认磁盘空间
在AIX/Linux环境中,/usr/openv目录下需要3GB以上的剩余空间。
2、解析相关服务器主机名与备份通信的ip地址
我们需要在/etc/hosts文件中添加本机及Master Server的主机名及IP地址。
3、确认Media Server已经正确识别磁带驱动器及磁带库
运行lsdev –Cc tape命令查看Media Server已经正确识别磁带库与磁带驱动器。
包括老带库及新带库。
1.1.3 安装NetBackup Media Server for AIX (Linux) 将NetBackup安装介质中标签为DVD3的DVD放入的P570A的光驱,
n 安装Media Server程序
运行install程序安装Media Server,过程如下:(红色为修改注意项)
# cd /
# /mnt/cdrom/install
Symantec Installation Script
Copyright 1993 - 2007 Symantec Corporation, All Rights Reserved.
Installing NetBackup Server Software
NOTE: To install only NetBackup Client software locally on this machine
or to load additional UNIX client software on this server, insert
the NetBackup UNIX Clients cdrom.
Do you wish to continue? [y,n] (y)
The NetBackup and Media Manager software is built for use on RS6000 hardware.
Do you want to install NetBackup and Media Manager files? [y,n] (y)
NetBackup and Media Manager are normally installed in /usr/openv.
Is it OK to install in /usr/openv? [y,n] (y)
Reading NetBackup files from /mnt/cdrom/rs6000/anb
x usr/openv/NB-Java.tar.Z, 95360520 bytes, 186252 media blocks.
x usr/openv/db/bin
。。。。。。
Done executing NB.inst.
If you ran NB.inst instead of <cdrom_path>/install, you must
run /usr/openv/netbackup/bin/install_bp to initiate NetBackup.
Running /usr/openv/netbackup/bin/install_bp -p /mnt/cdrom
Copying AIX5 Client Binaries
x openv
x openv/lib
。。。。。。
Installing NB-Java.
+ /bin/cp ./nbj.conf /usr/openv/java
updating /etc/inittab ...
The following temporary file can be deleted after you verify the proper
modification of /etc/inittab:
/tmp/SYMCnbclt-inittab.823642.i
An automatic startup script, /etc/rc.client.netbackup has been installed.
This will cause NetBackup client daemons to be automatically
restarted each time the server boots.
Starting nbftclnt...
LiveUpdate is not installed, skipping registration step...
A NetBackup Server or Enterprise Server license key is needed
for installation to continue.
Enter license key: XXXX-XXXX-XXXX-XXXX-XXXX-XXXX-XXXX-XXXX-XXXX (LICENSE序列号)
Evaluation NetBackup Enterprise Server with Jul 25, 2008 expiration date will
Is this OK? [y,n] (y)
XXXX-XXXX-XXXX-XXXX-XXXX-XXXX-XXXX-XXXX-XXXX:
Evaluation NetBackup Enterprise Server Base product with the followin
PureDisk Remote Office
PureDisk Option
SAN Client
PureDisk MS Exchange Agent
PureDisk MS SQL Server Agent
Flexible Disk Option
OpenStorage Disk Option
NAS SnapVault Option
Virtual Tape Option
Bare Metal Restore
Encryption
Open File Backup
Remote Client Support
Robotic Library Sharing Support
Remote Media Server Support
Microsoft RSM Robotic Libraries
ADIC DAS/SDLC Robotic Libraries
IBM ATL Robotic Libraries
Fujitsu LMF Robotic Libraries
StorageTek ACS Robotic Libraries
Snapshot Client
MS SharePoint Agent
Inline Tape Copy
Vault
GDM Managed Server
Library Based Tape Drives
Additional Drives/Robotics
DataStore
Encryption (Legacy DES 56-bit)
Encryption (Legacy DES 40-bit)
SAP extension
SQL-Backtrack extension
Sybase extension
Informix extension
Oracle extension
Lotus Notes extension
DB2 extension
MS SQL Server extension
MS Exchange extension
Advanced Reporting Option
Shared Storage Option
Global Data Manager
NDMP
EMC
Additional clients
has been registered.
All additional keys should be added at this time.
Do you want to add additional license keys now? [y,n] (y) n
Use /usr/openv/netbackup/bin/admincmd/get_license_key
to add, delete or list license keys at a later time.
Installing NetBackup Enterprise Server version: 6.5
If this machine will be using a different network interface than the
default (sop-p), the name of the preferred interface should be used
as the configured server name. If this machine will be part of a
cluster, the virtual name should be used as the configured server name.
Would you like to use "SOP-P" as the configured
name of the NetBackup server? [y,n] (N) 输入ssadb (本机)
Is sop the master server? [y,n] (y) n
What is the fully qualified name of the master server? Nbuserver1 (主服务器prd-nbu7)
Checking /etc/services for the needed NetBackup and Media Manager services.
Copying original /etc/services file to /etc/services.NBU_062508.15:52:50
Editing /etc/services to update NetBackup and Media Manager services.
/etc/services will be updated to add the following entries for
NetBackup/Media Manager.
bpjobd 13723/tcp bpjobd
NB_dbsrv 13785/tcp NB_dbsrv
vmd 13701/tcp vmd
acsd 13702/tcp acsd
tl8cd 13705/tcp tl8cd
tldcd 13711/tcp tldcd
odld 13706/tcp odld
tl4d 13713/tcp tl4d
tshd 13715/tcp tshd
tlmd 13716/tcp tlmd
tlhcd 13717/tcp tlhcd
rsmd 13719/tcp rsmd
/etc/services has been updated to contain NetBackup and Media
Manager services.
WARNING: ypwhich: the domainname hasn't been set on this machine.
WARNING: ypcat: the domainname hasn't been set on this machine.
Found the necessary NetBackup services in /etc/services.
Checking for a bpcd entry in /etc/inetd.conf: Adding bpcd entry.
Original /etc/inetd.conf saved as /etc/inetd.conf.NBU_062508.15:47:11.
Checking for a vnetd entry in /etc/inetd.conf: Adding vnetd entry.
Checking for a vopied entry in /etc/inetd.conf: Adding vopied entry.
Checking for a bpjava-msvc entry in /etc/inetd.conf: Adding bpjava-msvc entr
Sending SIGHUP to inetd process.
To make NetBackup start up automatically when the system is restarted,
the netbackup script found in /usr/openv/netbackup/bin/goodies has been copie
to /etc/rc.netbackup.aix. You must modify /etc/inittab to include it.
Enter the Enterprise Media Manager server (default: mastserver):
DBMS Server 9.0.2 is being installed
x bin
x bin/dbbackup, 251994 bytes, 493 tape blocks
Starting the NetBackup Event Manager.
Starting the NetBackup compatibility daemon.
Starting the Media Manager device daemon processes.
Starting the NetBackup Remote Monitoring Management System.
Starting the NetBackup Service Layer.
Starting the NetBackup Service Monitor.
File /usr/openv/tmp/install_trace.1507568 contains a trace of this install.
That file can be deleted after you are sure the install was successful.
1.1.4 Master服务器添加介质服务器 找到主机服务器,点击它。

选择“服务器”-“介质服务器”,天际介质服务器主机名(例如:ssadb)。
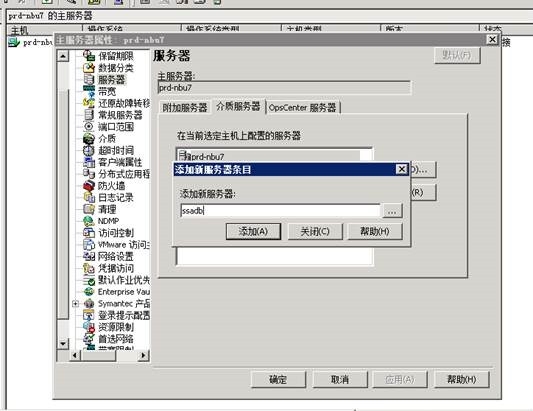
在“主机属性”-“介质服务器”查看是否刚才添加介质服务器。

1.1.5 Master服务器添加介质服务器存储单元 在“存储”-“存储单元”。

新建存储单元;输入名称,介质服务器选择ssadb,目录的绝对路径名输入ssadb上裸lun路径(例如:/nbubackup66)。如下图。

第一章 安装Client端程序
1.1、前期准备将客户端软件直接上传至AIX/Linux主机的/tmp目录,使用gzip -d和tar -xvf命令解压缩后进行安装;
1.2、安装步骤
Linux、Solaris和Aix上的安装步骤类似,进入对应系统的目录。
| root# ./install Symantec Installation Script Copyright 1993 - 2012 Symantec Corporation, All Rights Reserved. Installing NetBackup Client Software Please review the SYMANTEC SOFTWARE LICENSE AGREEMENT located on the installation media before proceeding. The agreement includes details on the NetBackup Product Improvement Program. Do you wish to continue? [y,n] (y) y Do you want to install the NetBackup client software for this client? [y,n] (y) y This package will install Solaris/Solaris10 client. This package will install NetBackup client 7.5. Enter the name of the NetBackup server : prd-nbu7 Would you like to use "sacnsun02102" as the configured name of the NetBackup client? [y,n] (y) y |
| 验证查看是否生成了/usr/openv/netbackup目录 # ls -l /usr/openv/netbackup |
第二章 配置Oracle备份
在NBU7.5客户端里已经包含了oracle客户端,接下来就是配置了。2.1、建立连接
| [root@localhost ~]# su - oracle [oracle@localhost ~]$ cd /usr/openv/netbackup/bin [oracle@localhost bin]$ ./oracle_link 2012年 08月 25日 星期六 09:43:28 CST All Oracle instances should be shutdown before running this script. Please log into the Unix system as the Oracle owner for running this script Do you want to continue? (y/n) y LIBOBK path: /usr/openv/netbackup/bin ORACLE_HOME: /orcl/oracle Oracle version: 10.2.0.1.0 Platform type: i686 Linking LIBOBK: ln -s /usr/openv/netbackup/bin/libobk.so /orcl/oracle/lib/libobk.so Done Please check the trace file located in /tmp/make_trace.4459 to make sure the linking process was successful. |
| [root@localhost ~]# mkdir -p /usr/openv/netbackup/script [root@localhost ~]# cd /usr/openv/netbackup/ext/db_ext/oracle/samples/rman [root@localhost rman]# ls cold_database_backup.sh database_restore.sh hot_tablespace_backup.sh cold_duplex_database_backup_full.sh hot_database_backup.sh pit_database_restore.sh [root@localhost rman]# cp hot_database_backup.sh /usr/openv/netbackup/script/ [root@localhost rman]# cd /usr/openv/netbackup/script/ [root@localhost script]# ls hot_database_backup.sh [root@localhost script]# mv hot_database_backup.sh rman.sh [root@localhost script]# chmod o+x rman.sh 一定要授权执行权限,否则NBU调用不了 [root@localhost script]# vi rman.sh |
| Oracle热备份脚本举例如下: #!/bin/sh # $Header: hot_database_backup.sh,v 1.2 2002/08/06 23:51:42 $ # #bcpyrght #*************************************************************************** #* $VRTScprght: Copyright 1993 - 2008 Symantec Corporation, All Rights Reserved $ * #*************************************************************************** #ecpyrght # # --------------------------------------------------------------------------- # hot_database_backup.sh # --------------------------------------------------------------------------- # This script uses Recovery Manager to take a hot (inconsistent) database # backup. A hot backup is inconsistent because portions of the database are # being modified and written to the disk while the backup is progressing. # You must run your database in ARCHIVELOG mode to make hot backups. It is # assumed that this script will be executed by user root. In order for RMAN # to work properly we switch user (su -) to the oracle dba account before # execution. If this script runs under a user account that has Oracle dba # privilege, it will be executed using this user's account. # --------------------------------------------------------------------------- # --------------------------------------------------------------------------- # Determine the user which is executing this script. # --------------------------------------------------------------------------- CUSER=`id |cut -d"(" -f2 | cut -d ")" -f1` # --------------------------------------------------------------------------- # Put output in <this file name>.out. Change as desired. # Note: output directory requires write permission. # --------------------------------------------------------------------------- RMAN_LOG_FILE=${0}.out # --------------------------------------------------------------------------- # You may want to delete the output file so that backup information does # not accumulate. If not, delete the following lines. # --------------------------------------------------------------------------- if [ -f "$RMAN_LOG_FILE" ] then rm -f "$RMAN_LOG_FILE" fi # ----------------------------------------------------------------- # Initialize the log file. # ----------------------------------------------------------------- echo >> $RMAN_LOG_FILE chmod 666 $RMAN_LOG_FILE # --------------------------------------------------------------------------- # Log the start of this script. # --------------------------------------------------------------------------- echo Script $0 >> $RMAN_LOG_FILE echo ==== started on `date` ==== >> $RMAN_LOG_FILE echo >> $RMAN_LOG_FILE # --------------------------------------------------------------------------- # Replace /db/oracle/product/ora81, below, with the Oracle home path. # --------------------------------------------------------------------------- ORACLE_HOME=/u01/app/oracle/product/11.2.0/ export ORACLE_HOME Oracle HOME目录,可通过env命令查出 # --------------------------------------------------------------------------- # Replace ora81, below, with the Oracle SID of the target database. # --------------------------------------------------------------------------- ORACLE_SID=orcl export ORACLE_SID Oracle实例名 # --------------------------------------------------------------------------- # Replace ora81, below, with the Oracle DBA user id (account). # --------------------------------------------------------------------------- ORACLE_USER=oracle Oracle系统账户 # --------------------------------------------------------------------------- # Set the target connect string. # Replace "sys/manager", below, with the target connect string. # --------------------------------------------------------------------------- TARGET_CONNECT_STR=sys/Qweasd123 Sys用户及其密码 # --------------------------------------------------------------------------- # Set the Oracle Recovery Manager name. # --------------------------------------------------------------------------- RMAN=$ORACLE_HOME/bin/rman # --------------------------------------------------------------------------- # Print out the value of the variables set by this script. # --------------------------------------------------------------------------- #中间代码不用更改,此处略 CMD_STR=" ORACLE_HOME=$ORACLE_HOME export ORACLE_HOME ORACLE_SID=$ORACLE_SID export ORACLE_SID $RMAN target $TARGET_CONNECT_STR nocatalog msglog $RMAN_LOG_FILE append << EOF RUN { ALLOCATE CHANNEL ch00 TYPE 'SBT_TAPE'; ALLOCATE CHANNEL ch01 TYPE 'SBT_TAPE'; echo send 'NB_ORA_POLICY=your_policy, NB_ORA_SERV=your_serverí'; 发送备份信息给相对应的备份策略,当每一台Oracle只有一个NBU备份策略时,次句可以不写 BACKUP $BACKUP_TYPE SKIP INACCESSIBLE TAG hot_db_bk_level0 FILESPERSET 5 # recommended format FORMAT 'bk_%s_%p_%t' DATABASE; sql 'alter system archive log current'; RELEASE CHANNEL ch00; RELEASE CHANNEL ch01; # backup all archive logs ALLOCATE CHANNEL ch00 TYPE 'SBT_TAPE'; ALLOCATE CHANNEL ch01 TYPE 'SBT_TAPE'; echo send 'NB_ORA_POLICY=your_policy, NB_ORA_SERV=your_serverí'; 发送备份信息给相对应的备份策略,当每一台Oracle只有一个NBU备份策略时,次句可以不写 BACKUP filesperset 20 FORMAT 'al_%s_%p_%t' ARCHIVELOG ALL; RELEASE CHANNEL ch00; RELEASE CHANNEL ch01; ALLOCATE CHANNEL ch00 TYPE 'SBT_TAPE'; DELETE NOPROMPT ARCHIVELOG ALL COMPLETED BEFORE 'SYSDATE-7'; RELEASE CHANNEL ch00; 原脚本备份后直接删除归档日志,可以如上编写,删除7天前的归档日志 # # Note: During the process of backing up the database, RMAN also backs up the # control file. This version of the control file does not contain the # information about the current backup because "nocatalog" has been specified. # To include the information about the current backup, the control file should # be backed up as the last step of the RMAN section. This step would not be # necessary if we were using a recovery catalog. # ALLOCATE CHANNEL ch00 TYPE 'SBT_TAPE'; BACKUP # recommended format FORMAT 'cntrl_%s_%p_%t' CURRENT CONTROLFILE; RELEASE CHANNEL ch00; } EOF " # Initiate the command string if [ "$CUSER" = "root" ] then su - $ORACLE_USER -c "$CMD_STR" >> $RMAN_LOG_FILE RSTAT=$? else /usr/bin/sh -c "$CMD_STR" >> $RMAN_LOG_FILE RSTAT=$? fi # --------------------------------------------------------------------------- # Log the completion of this script. # --------------------------------------------------------------------------- if [ "$RSTAT" = "0" ] then LOGMSG="ended successfully" else LOGMSG="ended in error" fi echo >> $RMAN_LOG_FILE echo Script $0 >> $RMAN_LOG_FILE echo ==== $LOGMSG on `date` ==== >> $RMAN_LOG_FILE echo >> $RMAN_LOG_FILE exit $RSTAT |
第三章 创建备份策略
3.1 选择策略类型和存储位置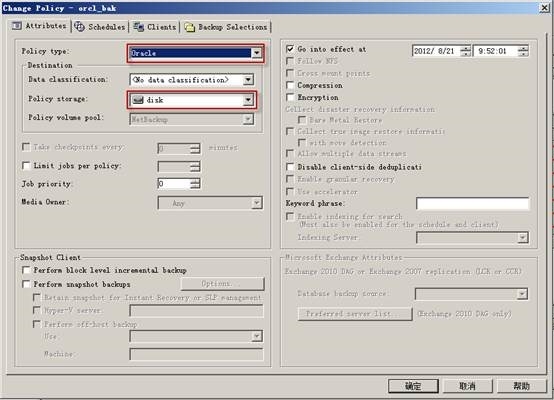
3.2 创建备份策略
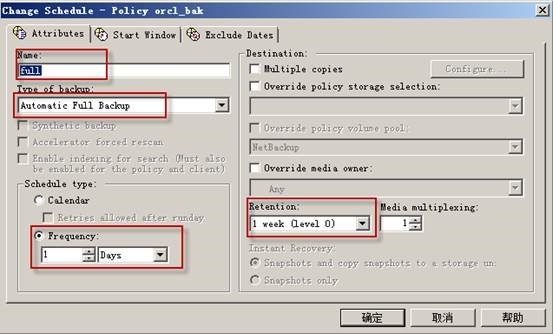
Frequency: 备份周期 Retention: 保留周期
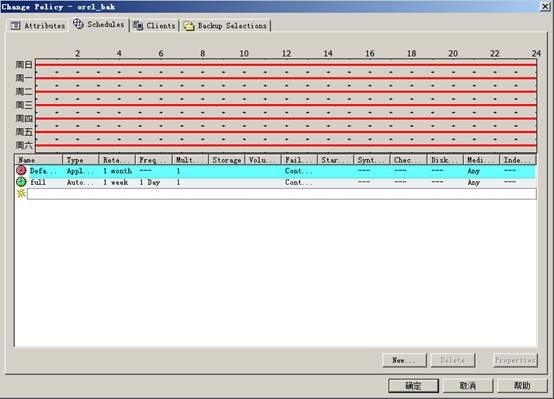
策略时间表,默认的Default-Application-Backup不要随意更改,一般只更改保留周期。
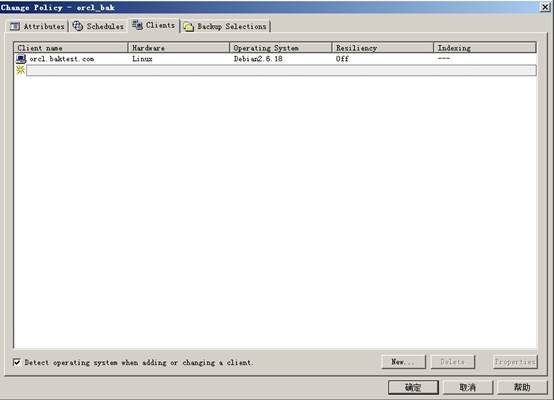
3.3 选择备份客户端
3.4 选择备份脚本

3.5 执行备份策略
第四章 本机数据文件恢复
关闭数据库:Sqlplus / as sysdba
shutdown immediate 立即关闭
4.1 删除数据文件
[root@orcl ~]# cd /u01/app/oracle/oradata/orcl
[root@orcl orcl]# rm -rf *.dbf
[root@orcl orcl]#
4.2 恢复数据文件
[oracle@orcl oradata]$ rman target /
RMAN> shutdown abort;
RMAN> startup mount;
connected to target database (not started)
Oracle instance started
database mounted
Total System Global Area 839282688 bytes
Fixed Size 2217992 bytes
Variable Size 528484344 bytes
Database Buffers 301989888 bytes
Redo Buffers 6590464 bytes
RMAN> run{
2> allocate channel ch00 type 'sbt_tape';(如果是数据量大,可以加多一个通道,通道数量最多不能超过备份时的通道数)
3> send 'NB_ORA_CLIENT=oracle-test';
4> send 'NB_ORA_SERV=master';
5> restore database;
6> recover database;
7> release channel ch00;
8> }
4.3 验证恢复效果
RMAN> alter database open; (如果是异机的话需要加resetlogs)
database opened
[root@orcl ~]# cd /u01/app/oracle/oradata/orcl
[root@orcl orcl]# ll
-rw-r-----. 1 oracle oinstall 9748480 8月 24 17:20 control01.ctl
-rw-r-----. 1 oracle oinstall 104865792 8月 24 17:19 example01.dbf
-rw-r-----. 1 oracle oinstall 52429312 8月 24 17:19 redo01.log
-rw-r-----. 1 oracle oinstall 52429312 8月 24 17:19 redo02.log
-rw-r-----. 1 oracle oinstall 52429312 8月 24 17:20 redo03.log
-rw-r-----. 1 oracle oinstall 566239232 8月 24 17:19 sysaux01.dbf
-rw-r-----. 1 oracle oinstall 723525632 8月 24 17:19 system01.dbf
-rw-r-----. 1 oracle oinstall 20979712 8月 24 17:19 temp01.dbf
-rw-r-----. 1 oracle oinstall 5251072 8月 24 17:19 users01.dbf
可以看到删除的数据文件都已经恢复
第五章 本机控制、系统数据文件恢复
5.1 系统数据文件恢复在删除了所有数据文件的情况下,需要先单独恢复系统的数据文件。
run {
allocate channel ch00 type 'sbt_tape';
send 'NB_ORA_CLIENT=szdbtest';
send 'NB_ORA_SERV=prd-nbu7';
restore datafile 1;
recover datafile 1;
release channel ch00;
sql 'alter database open';
}
run {
allocate channel ch00 type 'sbt_tape';
send 'NB_ORA_CLIENT=szdbtest';
send 'NB_ORA_SERV=prd-nbu7';
restore datafile 2;
recover datafile 2;
release channel ch00;
sql 'alter database open';
}
5.2全库恢复
再执行全库恢复即可。
run {
allocate channel ch00 type 'sbt_tape';
send 'NB_ORA_CLIENT=szdbtest';
send 'NB_ORA_SERV=prd-nbu7';
restore database;
recover database;
release channel ch00;
sql 'alter database open';
}
第六章 恢复控制文件
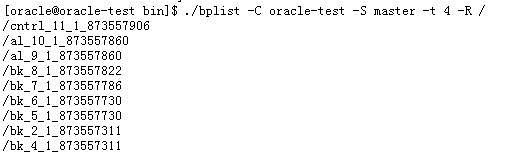
在测试环境中,发现控制文件出现了问题;恢复如下:(client:oracle-test; server:master)# ./bplist -C oracle-test -S master -t 4 -R / 查看nbu的备份文件
#rman target /
Rman>startup nomount
Rman>run {
allocate channel ch00 type 'sbt_tape';
send 'NB_ORA_CLIENT=oracle-test';
send 'NB_ORA_SERV=master';
restore controlfile from '/cntrl_11_1_873557906';
release channel ch00;
}
Rman>alter database open resetlogs; 要打开数据时,重置重做日志,即将重做日志的sequence置零
到此,控制文件就已经恢复完成了。
alter database open resetlogs是要打开数据时,重置重做日志,即将重做日志的sequence置零,为什么要重置重做日志呢?
不完全恢复后,原来的online redo log里面包含的是未做恢复前的数据,而这些数据对于恢复后的数据库不再有效,所以数据库会要求在Open之前先对online redo log的sequence置零。
Resetlogs命令表示一个数据库逻辑生存期的结束和另一个数据库逻辑生存期的开始,每次使用Resetlogs命令的时候,SCN不会被重置,不过oracle会重置日志序列号,而且会重置联机重做日志内容。
加上resetlogs,只是修改了日志序列号,并没有删除数据。所有数据是仍然存在的。
注:
recover和restore的区别:
restore just copy the physical file, recover will consistent the database.
restore 是还原,文件级的恢复。就是物理文件还原。
recover 是恢复,数据级的恢复。逻辑上恢复,比如应用归档日志、重做日志,全部同步,保持一致。
用我自己的土话讲就是,用restore先把备份文件拷贝到数据库目录下进行替换,再用recover经过一些处理,数据库就恢复正常了。
1、restore 命令:用于还原已经备份的数据文件。
(1)、restore database 还原所有的数据文件。
(2)、restore tablespace 还原特定表空间的数据文件。
(3)、restore datafile 还原特定的数据文件。
(4)、restore controlfile 还原控制文件。
(5)、restore archivelog 还原归档日志文件。
2、recover 命令:当数据库需要应用归档日志文件恢复数据文件时,使用recover命令。使用该命令数据库系统会自动应用归档的日志文件。
(1)、recover database 恢复所有的数据文件。
(2)、recover tablespace 恢复特定表空间的数据文件。
(3)、recover datafile 恢复特定的数据文件。
restore 只是用备份来还原,recover是用archivelog或者online log
举例说明:
假设我时间点A,做了个备份,时间点B数据库挂了
restore database ;// 这个操作利用时间点A做的备份来还原,返回到时间点A
recover database ;//这个操作利用archivelog and online log做recover,从时间点A,推进到时间点B
第七章 卸载NetBackup客户端软件
| Use the following procedure to remove all NetBackup client software components from a UNIX client. To remove NetBackup software from a UNIX client 1、 Log in to the client system as the root user. 2、Stop the NetBackup daemons by entering the following command: /usr/openv/netbackup/bin/bp.kill_all 3、Identify any installed add-on products by using the following command: AIX lslpp -L HP-UX swlist Linux rpm -qa Solaris pkginfo Remove each identified add-on product. ……………… 11、For all clients, navigate to the /usr/openv directory and proceed as follows: Warning: The rm -f /usr/openv command also removes any add-on products that are installed on this computer. ■ If /usr/openv is the actual directory, run the following command: rm -rf /usr/openv ■ If /usr/openv is a symbolic link to that directory, run the following commands: cd /usr/openv pwd ls Warning: Before you continue, make sure that you are at the correct location and verify that the subdirectories are what you expect them to be. To help prevent removing the wrong directories, the previous commands verify your current location and list the files in that directory. After you verify the directory location and its contents, remove the directory with the next commands. rm -rf * cd / rm -f /usr/openv 12、For Linux systems only: If you modified the startup and the shutdown scripts, run the following command: /sbin/chkconfig --del netbackup 13 Remove the following startup scripts: AIX /etc/rc.netbackup.aix Linux Red Hat /etc/rc.d/init.d/netbackup /etc/rc.d/rc0.d/K01netbackup /etc/rc.d/rc1.d/K01netbackup /etc/rc.d/rc2.d/S77netbackup /etc/rc.d/rc3.d/S77netbackup /etc/rc.d/rc5.d/S77netbackup /etc/rc.d/rc6.d/K01netbackup Other clients /etc/init.d/netbackup /etc/rc0.d/K01netbackup /etc/rc1.d/K01netbackup /etc/rc2.d/S77netbackup |

相关文章推荐
- Veritas Netbackup Oracle数据库本机备份恢复
- Oracle数据库备份与恢复(1):exp和imp
- Oracle数据库备份与恢复的三种方法
- Oracle数据库备份与恢复特性浅谈
- Oracle数据库的备份与恢复
- Oracle数据库备份与恢复的三种方法
- oracle数据库备份与恢复【转自www.bitsCN.com】
- oracle数据库的备份与恢复
- Oracle数据库备份与恢复的常用方法
- Oracle数据库的备份与恢复
- Oracle数据库备份与恢复 - RMAN备份
- Oracle数据库备份与恢复 - 增量备份
- Oracle数据库备份与恢复
- Windows计划任务+批处理文件实现oracle数据库的定时备份与恢复
- 使用NetBackup进行oracle备份和恢复
- Oracle数据库备份与恢复
- 测试oracle数据库的脱机备份和恢复
- Oracle数据库备份与恢复
- Oracle数据库表信息,序列,视图等导出,导入。(数据库备份和恢复)