uploadifive struts2实现图片上传
2015-03-06 09:51
435 查看
uploadify是来自国外的一款优秀的jQuery上传插件,主要功能是批量上传文件,带进度显示。
下面以HTML5 Version版本为例介绍uploadifive的使用,结合Struts2
各软件版本如下:
jQuery :1.8.0
Struts2 : 2.3.16.3
UploadiFive : 1.2.2
由于HTML5 Version是收费的,但可移步到download进行下载
<script type="text/javascript" src="uploadify/jquery.uploadifive.min.js"></script>
<link rel="stylesheet" type="text/css" href="uploadify/uploadifive.css">
<input id="file_upload" type="file" name="file" />
<div id="tip-queue"></div>
</body>
<script type="text/javascript">
$(function(){
$('#file_upload').uploadifive({
//'auto' : false, //取消自动上传
'uploadScript' : 'fileUploadAction.action', //处理上传文件Action路径
'fileObjName' : 'file', //文件对象
'buttonText' : '选择文件', //按钮显示文字
'queueID' : 'tip-queue', //提示信息放置目标
'fileType' : 'image/*', //允许上传文件类型
'onUploadComplete' : function(file, data) { //文件上传成功后执行
console.info('The file ' + file.name + ' uploaded successfully.');
}
});
})
</script>
"-//Apache Software Foundation//DTD Struts Configuration 2.0//EN"
"http://struts.apache.org/dtds/struts-2.0.dtd">
<struts>
<package name="ajax_code" extends="json-default">
<!-- 文件上传 -->
<action name="fileUploadAction" class="com.home.FileAction" method="fileUpload">
<result type="json" name="success">
<param name="contentType">text/html</param>
</result>
</action>
</package>
</struts>
import java.io.FileInputStream;
import java.io.FileOutputStream;
import java.io.InputStream;
import org.apache.struts2.ServletActionContext;
public class FileAction {
private File file; // 文件
private String fileFileName; // 文件名
private String filePath; // 文件路径
private InputStream inputStream;
/**
* 文件上传
*
* @return
*/
public String fileUpload() {
String path = ServletActionContext.getServletContext().getRealPath("/upload");
File ff = new File(path); // 判断文件夹是否存在,如果不存在则创建文件夹
if (!ff.exists()) {
ff.mkdir();
}
try {
if (this.file != null) {
File f = this.getFile();
String fileName = java.util.UUID.randomUUID().toString(); // 采用时间+UUID的方式随即命名
String name = fileName
+ fileFileName.substring(fileFileName.lastIndexOf(".")); // 保存在硬盘中的文件名
FileInputStream inputStream = new FileInputStream(f);
FileOutputStream outputStream = new FileOutputStream(path
+ "\\" + name);
byte[] buf = new byte[1024];
int length = 0;
while ((length = inputStream.read(buf)) != -1) {
outputStream.write(buf, 0, length);
}
inputStream.close();
outputStream.flush();
// 文件保存的完整路径
// 比如:D:\tomcat6\webapps\eserver\\upload\a0be14a1-f99e-4239-b54c-b37c3083134a.png
filePath = path + "\\" + name;
}
} catch (Exception e) {
e.printStackTrace();
}
return "success";
}
public File getFile() {
return file;
}
public void setFile(File file) {
this.file = file;
}
public String getFileFileName() {
return fileFileName;
}
public void setFileFileName(String fileFileName) {
this.fileFileName = fileFileName;
}
public String getFilePath() {
return filePath;
}
public void setFilePath(String filePath) {
this.filePath = filePath;
}
public InputStream getInputStream() {
return inputStream;
}
public void setInputStream(InputStream inputStream) {
this.inputStream = inputStream;
}
}
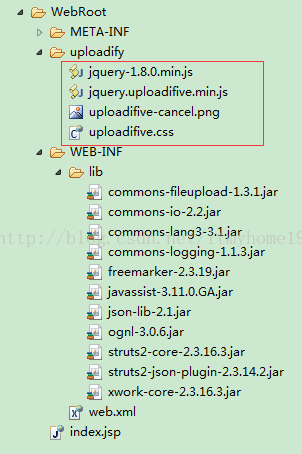
项目基本结构如下图:
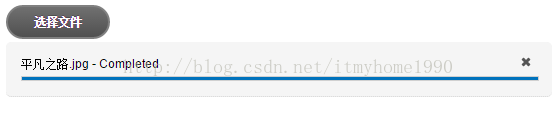
效果如图:
项目源码下载:download
作者:itmyhome
转载请注明出处:http://blog.csdn.net/itmyhome1990/article/details/44061225
下面以HTML5 Version版本为例介绍uploadifive的使用,结合Struts2
各软件版本如下:
jQuery :1.8.0
Struts2 : 2.3.16.3
UploadiFive : 1.2.2
由于HTML5 Version是收费的,但可移步到download进行下载
一、添加对js和css文件的引用
<script type="text/javascript" src="uploadify/jquery-1.8.0.min.js"></script><script type="text/javascript" src="uploadify/jquery.uploadifive.min.js"></script>
<link rel="stylesheet" type="text/css" href="uploadify/uploadifive.css">
二、JSP页面代码
<body><input id="file_upload" type="file" name="file" />
<div id="tip-queue"></div>
</body>
<script type="text/javascript">
$(function(){
$('#file_upload').uploadifive({
//'auto' : false, //取消自动上传
'uploadScript' : 'fileUploadAction.action', //处理上传文件Action路径
'fileObjName' : 'file', //文件对象
'buttonText' : '选择文件', //按钮显示文字
'queueID' : 'tip-queue', //提示信息放置目标
'fileType' : 'image/*', //允许上传文件类型
'onUploadComplete' : function(file, data) { //文件上传成功后执行
console.info('The file ' + file.name + ' uploaded successfully.');
}
});
})
</script>
三、struts.xml
<!DOCTYPE struts PUBLIC"-//Apache Software Foundation//DTD Struts Configuration 2.0//EN"
"http://struts.apache.org/dtds/struts-2.0.dtd">
<struts>
<package name="ajax_code" extends="json-default">
<!-- 文件上传 -->
<action name="fileUploadAction" class="com.home.FileAction" method="fileUpload">
<result type="json" name="success">
<param name="contentType">text/html</param>
</result>
</action>
</package>
</struts>
四、处理上传文件Action
import java.io.File;import java.io.FileInputStream;
import java.io.FileOutputStream;
import java.io.InputStream;
import org.apache.struts2.ServletActionContext;
public class FileAction {
private File file; // 文件
private String fileFileName; // 文件名
private String filePath; // 文件路径
private InputStream inputStream;
/**
* 文件上传
*
* @return
*/
public String fileUpload() {
String path = ServletActionContext.getServletContext().getRealPath("/upload");
File ff = new File(path); // 判断文件夹是否存在,如果不存在则创建文件夹
if (!ff.exists()) {
ff.mkdir();
}
try {
if (this.file != null) {
File f = this.getFile();
String fileName = java.util.UUID.randomUUID().toString(); // 采用时间+UUID的方式随即命名
String name = fileName
+ fileFileName.substring(fileFileName.lastIndexOf(".")); // 保存在硬盘中的文件名
FileInputStream inputStream = new FileInputStream(f);
FileOutputStream outputStream = new FileOutputStream(path
+ "\\" + name);
byte[] buf = new byte[1024];
int length = 0;
while ((length = inputStream.read(buf)) != -1) {
outputStream.write(buf, 0, length);
}
inputStream.close();
outputStream.flush();
// 文件保存的完整路径
// 比如:D:\tomcat6\webapps\eserver\\upload\a0be14a1-f99e-4239-b54c-b37c3083134a.png
filePath = path + "\\" + name;
}
} catch (Exception e) {
e.printStackTrace();
}
return "success";
}
public File getFile() {
return file;
}
public void setFile(File file) {
this.file = file;
}
public String getFileFileName() {
return fileFileName;
}
public void setFileFileName(String fileFileName) {
this.fileFileName = fileFileName;
}
public String getFilePath() {
return filePath;
}
public void setFilePath(String filePath) {
this.filePath = filePath;
}
public InputStream getInputStream() {
return inputStream;
}
public void setInputStream(InputStream inputStream) {
this.inputStream = inputStream;
}
}
项目基本结构如下图:
效果如图:
项目源码下载:download
作者:itmyhome
转载请注明出处:http://blog.csdn.net/itmyhome1990/article/details/44061225

相关文章推荐
- uploadifive struts2实现图片上传
- uploadifive struts2实现图片上传
- Struts2 +jquery+ajaxfileupload 实现无刷新上传图片
- 利用html5的FileReader对象实现图片预览,利用FormData对象结合struts2实现无刷新文件上传(多参数)
- ajaxFileUpload+struts2实现多文件上传
- 在struts2中实现文件上传(以图片上传为例)
- ajaxFileUpload+struts2实现多文件上传(动态添加文件上传框)
- easyui笔记:文件上传插件uploadifive 实现 验证文件名
- Struts2使用FlashFileUpload.swf实现批量文件上传
- struts2 +jquey uploadify3.2 实现多文件上传,可预览、删除、排序
- 利用KindEditor的uploadbutton实现异步上传图片 .
- jquery.uploadify插件实现图片上传和预览效果
- C#+aspx+ajaxfileupload 实现图片上传
- 基于h5的图片无刷新上传(uploadifive)
- Struts2 + jquey.uploadify 实现无刷新带进度条上传
- ajaxfileupload&amp;cropper实现图片上传与在线编辑
- Struts2实现图片上传功能 (单个图片文件)
- AjaxFileUpload+Struts2实现多文件上传功能
- Struts2 +jquery+ajaxfileupload 实现无刷新上传文件
- uploadifive 改进版 用于HTML5手机网站上传图片