Understanding Ionic’s Side Menu
2015-03-03 14:36
453 查看
In the last couple of years, the sliding-out side menu (sometimes known to as a Navigation Drawer) has become a very popular pattern for apps. It is a win for app developers as it is an easy way to include many different features where a tabbed interface does
not suffice. Users have become used to the pattern through use of mobile apps (and increasingly responsive or mobile websites) and so it is usually a safe pattern to use in your apps.
Ionic luckily has a side menu directive which is easy to implement, user friendly, and very performant. In this tutorial we’ll take a look a the ionic-start-sidemenu
project on Github and break it down piece by piece to get a good understanding of how it works.
The
directive that wraps everything related to the sidemenu.
Inside of here, we’ll define our
and our
You’ll notice here we specified for the menu that it should be on the left side. This value can also be right. Additionally, if we wanted a menu on both sides, we could have a
each side.
One additional thing to note is that we can change the behavior of the sidemenu to always display as a second column on tablets (like the settings left menu on an iPad.) To do this, we use the expose-aside-when attribute on our
The possible values on this attribute are a media query specifying
the keyword
The above example if 768px or greater will show the sidemenu next to the content whereas if the width is less than 768px, it will act as a normal slide-out side menu.
Let’s beginning digging into the sidemenu start project. The project is made up of the main index.html page,
a menu.html template which serves as our template and contains our sidemenu code, as well as templates for each view. Additionally, we have an app.js for
our app’s configuration and controllers.js for our controller code.
The idea here is our index.html defines our app and creates kind of a shell. The menu.html defines the structure of our app and inside of this structure is where the views live. Let’s take a look at our index.html page:
You’ll notice how little there actually is here. As stated above, the idea here is that we have a shell for our app by marking the body with the
(Fun fact: Angular uses Angular for it’s internal directives.
an Angular directive. Mind blown.)
Let’s take a look at the menu.html file. Remember, this file is our main template and will define both the menu and where the content will fit in.
So, you’ll see we have our
and
looks like:
As shown in this diagram, the structure of the markup and the final outcome are very similar.
In our
an
The
contains the
view. It also contains a
button then when clicked will go back a state.
The
be inserted and live. Note that we have given it a
This name will be used to reference to this
building our states in the app’s config.
In the
visual element) and a list of
link.
Notice that these links are decorated with two attributes:
to not display the normal transition between views.
to close the side menu. Without this attribute, clicking on the link will cause a the navigation to the new view, but will leave the sidemenu open.
Now that we have our app’s structure and main template, let’s take a look at what the child views (the actual content views of the app) look like.
This is playlists.html, the default view in our app. Two interesting things to note here are that we can specify additional buttons that should be in the
we’re in this view and that we are specifying the title within this view. Everything in these template files should be wrapped in the
and the actual content for the view in a
For this app, we have one main controller that applies to every view (because it is the controller for our parent state, menu.html) and then a controller for any child states that need a controller. These are pretty straight forward as far as Ionic/Angular
controllers go, so we won’t go much into that.
Here’s where the magic happens. Using the Angular-UI router, we want to define our menu.html (and our main controller, AppCtrl) as an abstract state. From the Angular-UI docs an abstract state “…can have child states but can not get activated itself. An ‘abstract’
state is simply a state that can’t be transitioned to. It is activated implicitly when one of its descendants are activated.”. This is exactly what we want. We want our user to navigate to the actual views, but to inherit the main layout from the parent abstract
state.
Our base URL, as configured here, is /app. Notice our child state uses dot notation where to the left of the dot is the name of the parent state and to the right of the dot is the name of the child state. In our url, we don’t need to tell the router to go to
“/app/playlists”, as it already knows to do this.
Remember that
on the
Here in the router, on the child state, we are defining that it should put it’s content (using the template file playlists.html and the controller
in that
While there is a lot going on in this kind of an app structure and a lot of concepts to wrap your head around, it becomes much easier to understand when you break it down piece by piece into bit sized pieces. Need further clarification or have a request for
another Ionic post? Feel free to comment below or follow and mention me on twitter (@andrewmcgivery).
转自:http://mcgivery.com/understanding-ionics-side-menu/
not suffice. Users have become used to the pattern through use of mobile apps (and increasingly responsive or mobile websites) and so it is usually a safe pattern to use in your apps.
Ionic luckily has a side menu directive which is easy to implement, user friendly, and very performant. In this tutorial we’ll take a look a the ionic-start-sidemenu
project on Github and break it down piece by piece to get a good understanding of how it works.
Sidemenu Directives
The ion-side-menusdirective is made up of a few parts. First, the main
directive that wraps everything related to the sidemenu.
<ion-side-menus>

</ion-side-menus>
Inside of here, we’ll define our
ion-side-menu(The actual side menu)
and our
ion-side-menu-content(The main content).
<ion-side-menus>
<!-- Main content -->
<ion-side-menu-content>

</ion-side-menu-content>

<!-- Left Side Menu -->
<ion-side-menu side="left">

</ion-side-menu>
</ion-side-menus>
You’ll notice here we specified for the menu that it should be on the left side. This value can also be right. Additionally, if we wanted a menu on both sides, we could have a
ion-side-menufor
each side.
<ion-side-menus>
<!-- Main content -->
<ion-side-menu-content>

</ion-side-menu-content>

<!-- Left Side Menu -->
<ion-side-menu side="left">

</ion-side-menu>

<!-- Right Side Menu -->
<ion-side-menu side="right">

</ion-side-menu>
</ion-side-menus>
One additional thing to note is that we can change the behavior of the sidemenu to always display as a second column on tablets (like the settings left menu on an iPad.) To do this, we use the expose-aside-when attribute on our
ion-side-menu.
<ion-side-menus>
<!-- Main content -->
<ion-side-menu-content>
</ion-side-menu-content>

<!-- Left Side Menu -->
<ion-side-menu expose-aside-when="large">
</ion-side-menu>
</ion-side-menus>
The possible values on this attribute are a media query specifying
min-widthor
the keyword
largewhich is a shortcut for
(min-width:768px).
The above example if 768px or greater will show the sidemenu next to the content whereas if the width is less than 768px, it will act as a normal slide-out side menu.
Sidemenu Index
Let’s beginning digging into the sidemenu start project. The project is made up of the main index.html page,a menu.html template which serves as our template and contains our sidemenu code, as well as templates for each view. Additionally, we have an app.js for
our app’s configuration and controllers.js for our controller code.
The idea here is our index.html defines our app and creates kind of a shell. The menu.html defines the structure of our app and inside of this structure is where the views live. Let’s take a look at our index.html page:
<!DOCTYPE html>
<html>
<head>
<meta charset="utf-8">
<meta name="viewport" content="initial-scale=1, maximum-scale=1, user-scalable=no, width=device-width">
<title></title>

<link href="lib/ionic/css/ionic.css" rel="stylesheet">
<link href="css/style.css" rel="stylesheet">

<!-- IF using Sass (run gulp sass first), then uncomment below and remove the CSS includes above
<link href="css/ionic.app.css" rel="stylesheet">
-->

<!-- ionic/angularjs js -->
<script src="lib/ionic/js/ionic.bundle.js"></script>

<!-- cordova script (this will be a 404 during development) -->
<script src="cordova.js"></script>

<!-- your app's js -->
<script src="js/app.js"></script>
<script src="js/controllers.js"></script>
</head>

<body ng-app="starter">
<ion-nav-view></ion-nav-view>
</body>
</html>
You’ll notice how little there actually is here. As stated above, the idea here is that we have a shell for our app by marking the body with the
ng-appattribute.
(Fun fact: Angular uses Angular for it’s internal directives.
ng-appis
an Angular directive. Mind blown.)
menu.html
Let’s take a look at the menu.html file. Remember, this file is our main template and will define both the menu and where the content will fit in.<ion-side-menus> <ion-side-menu-content> <ion-nav-bar class="bar-stable nav-title-slide-ios7"> <ion-nav-back-button class="button-clear"><i class="icon ion-ios7-arrow-back"></i> Back</ion-nav-back-button> </ion-nav-bar> <ion-nav-view name="menuContent" animation="slide-left-right"></ion-nav-view> </ion-side-menu-content> <ion-side-menu side="left"> <header class="bar bar-header bar-stable"> <h1 class="title">Left</h1> </header> <ion-content class="has-header"> <ion-list> <ion-item nav-clear menu-close ng-click="login()"> Login </ion-item> <ion-item nav-clear menu-close href="#/app/search"> Search </ion-item> <ion-item nav-clear menu-close href="#/app/browse"> Browse </ion-item> <ion-item nav-clear menu-close href="#/app/playlists"> Playlists </ion-item> </ion-list> </ion-content> </ion-side-menu> </ion-side-menus>
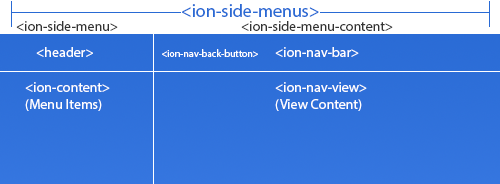
So, you’ll see we have our
ionic-side-menus,
ion-side-menu-content,
and
ion-side-menu pattern. Visually, this is what our app structure
looks like:
As shown in this diagram, the structure of the markup and the final outcome are very similar.
ion-side-menu-content
In our ion-side-menu-content, we have a
ion-nav-bar(with
an
ion-nav-back-button) and a
ion-nav-view.
<ion-side-menu-content>
<ion-nav-bar class="bar-stable nav-title-slide-ios7">
<ion-nav-back-button class="button-clear"><i class="icon ion-ios7-arrow-back"></i> Back</ion-nav-back-button>
</ion-nav-bar>
<ion-nav-view name="menuContent" animation="slide-left-right"></ion-nav-view>
</ion-side-menu-content>
The
ion-nav-barcreates a header bar at the top of our app that automatically
contains the
title(soon to be view-title in Beta 14) of the current
view. It also contains a
ion-nav-back-buttonwhich will generate a
button then when clicked will go back a state.
The
ion-nav-viewis where our child states (the views of our app) will
be inserted and live. Note that we have given it a
nameattribute of
menuContent.
This name will be used to reference to this
ion-nav-viewwhen we are
building our states in the app’s config.
ion-side-menu
In the ion-side-menuhalf of our menu.html, we have a
header(a
visual element) and a list of
ion-itemwhere each item is a side menu
link.
<ion-item nav-clear menu-close href="#/app/search">
Search
</ion-item>
Notice that these links are decorated with two attributes:
nav-clearand
menu-close.
nav-clearis an Ionic Directive which causes the element, when clicked,
to not display the normal transition between views.
menu-closeis an Ionic Directive which causes the element, when clicked,
to close the side menu. Without this attribute, clicking on the link will cause a the navigation to the new view, but will leave the sidemenu open.
Child View
Now that we have our app’s structure and main template, let’s take a look at what the child views (the actual content views of the app) look like.<ion-view title="Playlists">
<ion-nav-buttons side="left">
<button menu-toggle="left" class="button button-icon icon ion-navicon"></button>
</ion-nav-buttons>
<ion-content class="has-header">
<ion-list>
<ion-item ng-repeat="playlist in playlists" href="#/app/playlists/{{playlist.id}}">
{{playlist.title}}
</ion-item>
</ion-list>
</ion-content>
</ion-view>This is playlists.html, the default view in our app. Two interesting things to note here are that we can specify additional buttons that should be in the
ion-nav-barwhile
we’re in this view and that we are specifying the title within this view. Everything in these template files should be wrapped in the
ion-viewtag,
and the actual content for the view in a
ion-contenttag.
Controllers
For this app, we have one main controller that applies to every view (because it is the controller for our parent state, menu.html) and then a controller for any child states that need a controller. These are pretty straight forward as far as Ionic/Angularcontrollers go, so we won’t go much into that.
Configuration
Here’s where the magic happens. Using the Angular-UI router, we want to define our menu.html (and our main controller, AppCtrl) as an abstract state. From the Angular-UI docs an abstract state “…can have child states but can not get activated itself. An ‘abstract’state is simply a state that can’t be transitioned to. It is activated implicitly when one of its descendants are activated.”. This is exactly what we want. We want our user to navigate to the actual views, but to inherit the main layout from the parent abstract
state.
.config(function($stateProvider, $urlRouterProvider) {
$stateProvider
.state('app', {
url: "/app",
abstract: true,
templateUrl: "templates/menu.html",
controller: 'AppCtrl'
})
.state('app.playlists', {
url: "/playlists",
views: {
'menuContent' :{
templateUrl: "templates/playlists.html",
controller: 'PlaylistsCtrl'
}
}
});
Our base URL, as configured here, is /app. Notice our child state uses dot notation where to the left of the dot is the name of the parent state and to the right of the dot is the name of the child state. In our url, we don’t need to tell the router to go to
“/app/playlists”, as it already knows to do this.
Remember that
menuContent
nameattribute
on the
ion-nav-viewin the parent.html page?
<ion-nav-view name="menuContent" animation="slide-left-right"></ion-nav-view>
Here in the router, on the child state, we are defining that it should put it’s content (using the template file playlists.html and the controller
PlaylistsCtrl)
in that
ion-nav-view.
Conclusion
While there is a lot going on in this kind of an app structure and a lot of concepts to wrap your head around, it becomes much easier to understand when you break it down piece by piece into bit sized pieces. Need further clarification or have a request foranother Ionic post? Feel free to comment below or follow and mention me on twitter (@andrewmcgivery).
转自:http://mcgivery.com/understanding-ionics-side-menu/

相关文章推荐
- ionic ion-side-menu-content $ionicSideMenuDelega
- ionic-侧边菜单$ionicSideMenuDelegate
- ionic $ionicSideMenuDelegate 侧滑事件
- Understanding Front Side Bus
- Ionic基础——侧边栏ion-side-menus 以及ion-tap结合侧边栏详解
- Slide-out Sidebar Menu
- ionic的ion-tabs和ion-side-menus
- ionic侧边栏 ion-side-menus 以及 ion-tap结合侧边 栏详解
- iphone Dev 开发实例10:How To Add a Slide-out Sidebar Menu in Your Apps
- ionic sildemenu在大屏幕下一直显示,在小屏幕上隐藏的办法
- [开源项目]Yalantis/Side-Menu.Android 学习
- 【React Native 安卓开发】----侧边栏的实现DrawerLayoutAndroid以及第三方框架react-native-side-menu的使用【第六篇】
- How Setting Show Transaction Code on SAP Tree Menu Side.
- Ionic基础——侧边栏ion-side-menus 以及ion-tap结合侧边栏详解
- React-Native学习之第三方开源组件--侧滑栏----react-native-side-menu
- How Setting Show Transaction Code on SAP Tree Menu Side.
- Vertical Sidebar Menu
- ReactNative之SideMenu
- Side-Menu.Android的应用
- Side-Menu源码分析讲解