VS2010使用EntityFramework操作Sqlite数据库
2015-02-28 17:34
501 查看
http://www.codeproject.com/Articles/236918/Using-SQLite-embedded-database-with-entity-framewo
http://www.cnblogs.com/walkingboy/archive/2009/10/27/linqtosqlite.html
Introduction
Adding the provider
SQLite management tool
Edit SQLite database using Visual Studio 2010 or SQLite Administrator
Using SQLite with Entity Framework in Visual Studio 2010
Task management example with SQLite
Summary
Every now and then, we need a simple database solution which is light, small and pretty easy to use. What more can be useful other than SQLite, a simple yet very powerful tool to support database for any kind of application needs. When we started this research
work, our major concern was to choose the right kind of database depending on few criteria.
We don’t want to use a service based database rather a file system based database.
Clients have to be light, fast and support blob data.
We don’t want to install any client or framework in client machine.
SQLite is turning to be a very handy embedded database as far as the web and small scale database is concerned, and some people prefer SQLite over SQL compact Edition database because of its size, performance and support for large data. After doing research
on few area of the database, I have decided to put together the learnings that I had while exploring the uses and ease while working with Visual Studio 2010. In this short article, we are going to see how we can use ADO.NET entity framework and then how to
use Linq to SQL with SQLite database.
The next step is to add a data connection in server explorer in Visual Studio 2010. When you click on add connection, by default, you don’t have provider added in Visual Studio, so we have to add it using a third-party tool. You can download the provider for
SQLite from http://sqlite.phxsoftware.com/ site. “SQLite-1.0.66.0-setup” is the version we used for this particular
case. When you install this provider, you would be given an option to integrate this in VS2008 and VS2010. After installing the provider when you get back to the add data connection in server explorer, you would see a new provider is available for SQLite.
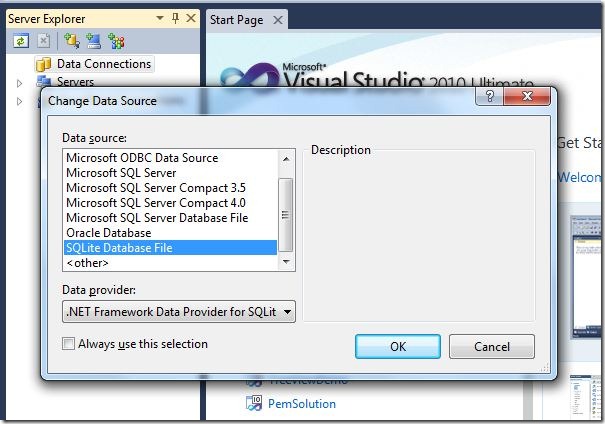
Go ahead and click on after choosing SQLite Database File. Next we will be presented with a screen, where you would either choose an existing database or create a new database file.
That’s it! Your connection string and database connection is now set up and you are good to go with the design of the database. Few interesting notes on this particular case. SQLite database has no database diagram support yet, but we hope that this will be
provided soon. After adding connection, we can created tables and add necessary relations to the table.
In this section, we have seen how easily SQLite can be used in Visual Studio 2010 using a provider to create connection in server explorer. Next we would discuss how to use SQLite to create a data layer using Entity Framework, but before that let's take a quick
look at a simple tool for SQLite DB management.
SQLite has lots of management tools, some of which are open source, some are trial ware and others are commercial. I found “SQLite Administrator” pretty easy to use and handy tool as far as SQLite database
file is concerned.
A complete list of SQLite management tools can be found at “http://sqlite.com/cvstrac/wiki?p=ManagementTools”.
Download whatever best suits you.
Here, I am going to talk about only SQLite Administrator. It can be downloaded from the following site:
http://sqliteadmin.orbmu2k.de/
This tool needs no installations whatsoever. The whole package is in a zip file and needs zero installation, just unzip and open the EXE, that’s it, and all of the functionality is pretty easy and it has a very intuitive UI. I would recommend it to everyone
who works with SQLite.
In the previous section, I have shared little useful information about SQLite Embedded database and how to use its provider to create a connection using
We have also seen a simple tool named “SQLite Administrator” which is very handy to use with SQLite database. In this short article, we will see how we can create and manipulate data using Visual Studio
2010 or SQLite Administrator.
Select the SQLite connection that you created and expand the Tables node, then right click and select “Add New Table”, that’s it. You are good to go to add a table just like the below figure. I am sure you guys have done this hundreds of time in SQL server,
this time it's just SQLite. You might see a warning when you first enter into edit of table editor.
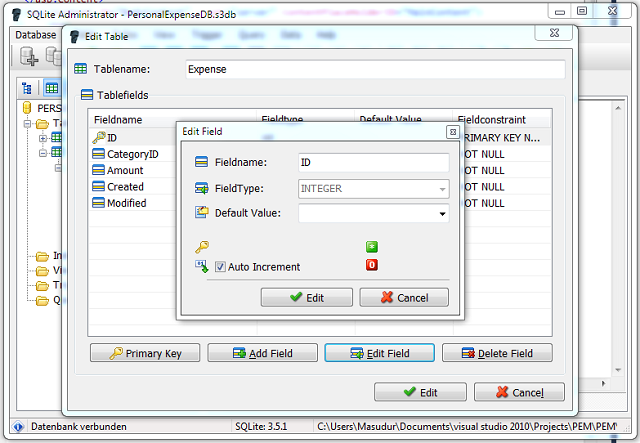
Double click on the SQLite database file, than right click on tables and click "Create Table”, rest of the UI is fanatic to Create the table. Set
field as primary key or assign auto increment to primary key, all can be done via simple clicks. So no custom hand written SQL any more.
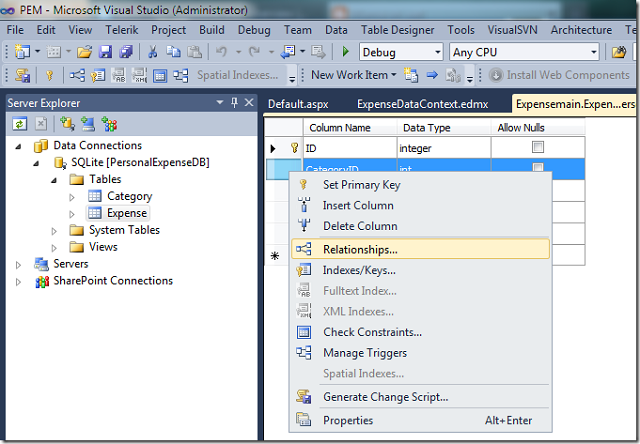
Creating the table relations are easy in Visual Studio, just click on relation icon, the icon beside primary key, in fact to be precise right side icon of primary key button. Or perhaps you can select a table and then click on relations, this will pop-up an
widget to create relation.
Creating auto increment primary key is not that much difficult also, now a days in every table we use auto increment key so we must discuss about it. At first glance, we didn’t find any button or option to assign it directly. You can use SQLite Administrator
to add it in few clicks, but to add in Visual Studio 2010 you got to bring the indexes window, just click on 'Indexes' after that you will find
an option to add auto increment column.
In the previous section, we have seen how using a simple “Data provider” provided byhttp://sqlite.phxsoftware.com/ can
make our life easier in the context of SQLite in .NET. In this section, we are going to see how we can use SQLite to generate Entity Framework Data model.
The primary thing is to first create any type of project in Visual Studio 2010, but I would prefer a web application or Windows Forms or perhaps a WPF application. Now click on 'Project'
and select 'add new' item to add a new item type. From Add new item wizard, select “ADO.NET Entity Data Model” and click on add, this will bring
up the Entity data model wizard.
Step 1: Select Generate from Database.
Step 2: In next window, select New connection.
Step 3: Connection properties window will popup and then we have to select the right kind of provider for SQLite.
Step 4: After that, the Connection properties will have browser or New db.
Step 5: Now select existing db if you have using browser or New to create new db.
Step 6: Continue with the wizard to select database table items to include in model.
Step 7: Click finish to close the wizard and a data model will be generated for you.
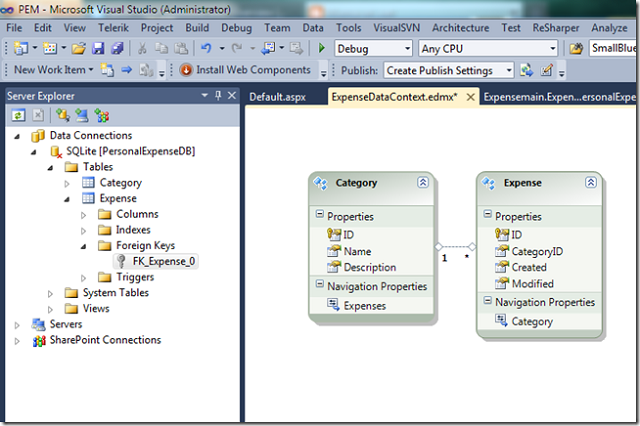
If you had any relationship in the database, those will automatically be synchronized in data model, that’s it. We are good to jump in the code to retrieve data and do all types of necessary stuff that we must do in a database. Best of luck and happy coding.
In the previous section, we have discussed about how to use ADO.NET Entity Framework with SQLite database. And we have witnessed that it's almost as similar to SQL server in context of ease and usability when you have the right provider.
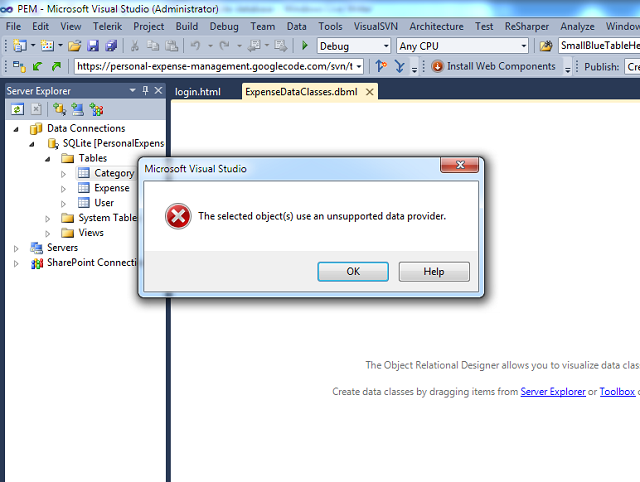
Today we are going to see how we can use Linq-to-SQL with SQLite database. We always looks for ways that would make our life easy and most important no more re-inventing the wheel. By default, you cannot drag and drop tables from server explorer or from data
connections. It's because we don’t have any built in provider that supports Linq and if you try to do so, you would certainly encounter with the following error:
Now, I know what am I going to show you won't please you but it certainly serves our purpose to use Linq with SQLite. There is no magic or rocket engineering behind this, we have a DBLinq open source distribution that comes with various sorts of database support.
For this particular case, let's stick to SQLite. The binaries can be found here, http://code.google.com/p/dblinq2007/,
please download latest binaries from this site.
Now it's time to generate the OurDatabase.dbml file. The steps are not that much complex, Locate the DBLinq package that you downloaded from Google code, then unzip in a suitable folder location where
you can access it easily.
Note that you need to copy the System.Data.SQLite DLL in the DBLinq directory.
Step 1: Create the dbml file:
Copy Code
Step 2: Create code file for the dbml file:
Copy Code
Copy those files to the Visual Studio. That’s it! You are good to go.
Make sure that everything compiles okay by hitting build. Below I have put a simple code snippet to demonstrate how to use this dbml to retrieve data.
Copy Code
In this section, I have put together a simple task editing code having only two field titles and description. This is just to demonstrate the idea of how we can use the above ideas in real coding for this particular example I have used ADO.NET entity framework.
Below the code snippets are given for most important methods:
Collapse

| Copy
Code
Note that while creating the connection string using the wizard, you might end up with database path that is not relative to your application. So please modify the connection string so that it takes relative location from
In this short article, we have seen how to administer SQLite database with various tools. and how we can use some useful tools to get it working with Linq-to-SQL. We have also seen how we can use provider to get some native support with Visual Studio 2010 to
design and manage SQLite database. Lastly, we have seen how to use SQLite with entity framework to perform some operations on database.
http://www.cnblogs.com/walkingboy/archive/2009/10/27/linqtosqlite.html
Table of Contents
IntroductionAdding the provider
SQLite management tool
Edit SQLite database using Visual Studio 2010 or SQLite Administrator
Using SQLite with Entity Framework in Visual Studio 2010
Task management example with SQLite
Summary
Introduction
Every now and then, we need a simple database solution which is light, small and pretty easy to use. What more can be useful other than SQLite, a simple yet very powerful tool to support database for any kind of application needs. When we started this researchwork, our major concern was to choose the right kind of database depending on few criteria.
We don’t want to use a service based database rather a file system based database.
Clients have to be light, fast and support blob data.
We don’t want to install any client or framework in client machine.
SQLite is turning to be a very handy embedded database as far as the web and small scale database is concerned, and some people prefer SQLite over SQL compact Edition database because of its size, performance and support for large data. After doing research
on few area of the database, I have decided to put together the learnings that I had while exploring the uses and ease while working with Visual Studio 2010. In this short article, we are going to see how we can use ADO.NET entity framework and then how to
use Linq to SQL with SQLite database.
Adding the Provider
The next step is to add a data connection in server explorer in Visual Studio 2010. When you click on add connection, by default, you don’t have provider added in Visual Studio, so we have to add it using a third-party tool. You can download the provider forSQLite from http://sqlite.phxsoftware.com/ site. “SQLite-1.0.66.0-setup” is the version we used for this particular
case. When you install this provider, you would be given an option to integrate this in VS2008 and VS2010. After installing the provider when you get back to the add data connection in server explorer, you would see a new provider is available for SQLite.
Adding the Connection in Server Explorer
Go ahead and click on after choosing SQLite Database File. Next we will be presented with a screen, where you would either choose an existing database or create a new database file.That’s it! Your connection string and database connection is now set up and you are good to go with the design of the database. Few interesting notes on this particular case. SQLite database has no database diagram support yet, but we hope that this will be
provided soon. After adding connection, we can created tables and add necessary relations to the table.
In this section, we have seen how easily SQLite can be used in Visual Studio 2010 using a provider to create connection in server explorer. Next we would discuss how to use SQLite to create a data layer using Entity Framework, but before that let's take a quick
look at a simple tool for SQLite DB management.
SQLite Management Tool
SQLite has lots of management tools, some of which are open source, some are trial ware and others are commercial. I found “SQLite Administrator” pretty easy to use and handy tool as far as SQLite databasefile is concerned.
A complete list of SQLite management tools can be found at “http://sqlite.com/cvstrac/wiki?p=ManagementTools”.
Download whatever best suits you.
Here, I am going to talk about only SQLite Administrator. It can be downloaded from the following site:
http://sqliteadmin.orbmu2k.de/
Note
This tool needs no installations whatsoever. The whole package is in a zip file and needs zero installation, just unzip and open the EXE, that’s it, and all of the functionality is pretty easy and it has a very intuitive UI. I would recommend it to everyonewho works with SQLite.
Edit SQLite Database using Visual Studio 2010 or SQLite Administrator
In the previous section, I have shared little useful information about SQLite Embedded database and how to use its provider to create a connection using System.Data.SQLite.
We have also seen a simple tool named “SQLite Administrator” which is very handy to use with SQLite database. In this short article, we will see how we can create and manipulate data using Visual Studio
2010 or SQLite Administrator.
Creating Table in Visual Studio 2010
Select the SQLite connection that you created and expand the Tables node, then right click and select “Add New Table”, that’s it. You are good to go to add a table just like the below figure. I am sure you guys have done this hundreds of time in SQL server,this time it's just SQLite. You might see a warning when you first enter into edit of table editor.
Using SQLite Administrator
Double click on the SQLite database file, than right click on tables and click "Create Table”, rest of the UI is fanatic to Create the table. Setfield as primary key or assign auto increment to primary key, all can be done via simple clicks. So no custom hand written SQL any more.
Creating Relations in Visual Studio 2010
Creating the table relations are easy in Visual Studio, just click on relation icon, the icon beside primary key, in fact to be precise right side icon of primary key button. Or perhaps you can select a table and then click on relations, this will pop-up anwidget to create relation.
Creating auto increment primary key is not that much difficult also, now a days in every table we use auto increment key so we must discuss about it. At first glance, we didn’t find any button or option to assign it directly. You can use SQLite Administrator
to add it in few clicks, but to add in Visual Studio 2010 you got to bring the indexes window, just click on 'Indexes' after that you will find
an option to add auto increment column.
Using SQLite with Entity Framework in Visual Studio 2010
In the previous section, we have seen how using a simple “Data provider” provided byhttp://sqlite.phxsoftware.com/ canmake our life easier in the context of SQLite in .NET. In this section, we are going to see how we can use SQLite to generate Entity Framework Data model.
Choosing the Provider
The primary thing is to first create any type of project in Visual Studio 2010, but I would prefer a web application or Windows Forms or perhaps a WPF application. Now click on 'Project'and select 'add new' item to add a new item type. From Add new item wizard, select “ADO.NET Entity Data Model” and click on add, this will bring
up the Entity data model wizard.
Step 1: Select Generate from Database.
Step 2: In next window, select New connection.
Step 3: Connection properties window will popup and then we have to select the right kind of provider for SQLite.
Step 4: After that, the Connection properties will have browser or New db.
Step 5: Now select existing db if you have using browser or New to create new db.
Step 6: Continue with the wizard to select database table items to include in model.
Step 7: Click finish to close the wizard and a data model will be generated for you.
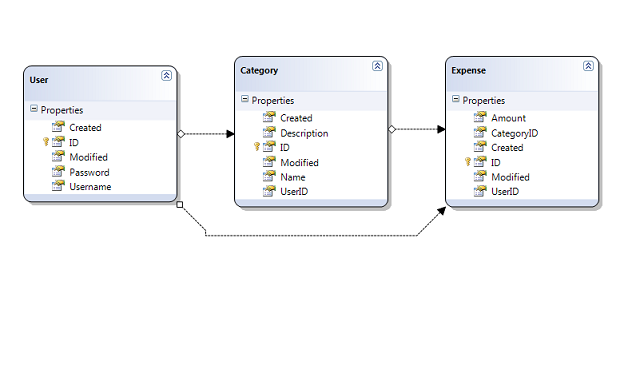
If you had any relationship in the database, those will automatically be synchronized in data model, that’s it. We are good to jump in the code to retrieve data and do all types of necessary stuff that we must do in a database. Best of luck and happy coding.
Using LINQ-to-SQL with SQLite Database
In the previous section, we have discussed about how to use ADO.NET Entity Framework with SQLite database. And we have witnessed that it's almost as similar to SQL server in context of ease and usability when you have the right provider.Today we are going to see how we can use Linq-to-SQL with SQLite database. We always looks for ways that would make our life easy and most important no more re-inventing the wheel. By default, you cannot drag and drop tables from server explorer or from data
connections. It's because we don’t have any built in provider that supports Linq and if you try to do so, you would certainly encounter with the following error:
Now, I know what am I going to show you won't please you but it certainly serves our purpose to use Linq with SQLite. There is no magic or rocket engineering behind this, we have a DBLinq open source distribution that comes with various sorts of database support.
For this particular case, let's stick to SQLite. The binaries can be found here, http://code.google.com/p/dblinq2007/,
please download latest binaries from this site.
Now it's time to generate the OurDatabase.dbml file. The steps are not that much complex, Locate the DBLinq package that you downloaded from Google code, then unzip in a suitable folder location where
you can access it easily.
Note that you need to copy the System.Data.SQLite DLL in the DBLinq directory.
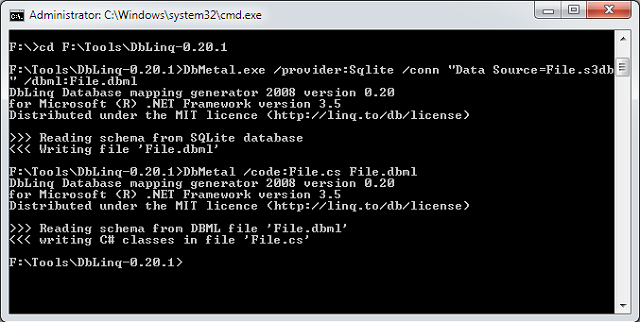
Step 1: Create the dbml file:
Copy Code
DbMetal /provider:Sqlite /conn "Data Source=File.db3" /dbml:File.dbml
Step 2: Create code file for the dbml file:
Copy Code
DbMetal /code:File.cs File.dbml
Copy those files to the Visual Studio. That’s it! You are good to go.
Make sure that everything compiles okay by hitting build. Below I have put a simple code snippet to demonstrate how to use this dbml to retrieve data.
Copy Code
public static void GetData()
{
string ConStr = "Data Source=" +
HttpContext.Current.Server.MapPath("App_Data\\PersonalExpenseDB.s3db") +
";Version=3;";

var connection = new SQLiteConnection(
ConStr
);

connection.Open();

var db = new Main(connection, new SqliteVendor());

var users = db.User;

var item = users.Take(10).ToList();
}
Task Management Example with SQLite
In this section, I have put together a simple task editing code having only two field titles and description. This is just to demonstrate the idea of how we can use the above ideas in real coding for this particular example I have used ADO.NET entity framework.Below the code snippets are given for most important methods:
Collapse
| Copy
Code
//load task
private void LoadTasks()
{
var db = new PersonalExpenseDBEntities();
var tasks = db.Tasks.ToList();
RepeaterTasks.DataSource = tasks;
RepeaterTasks.DataBind();
}

//add new task
private void AddNewTask()
{
var db = new PersonalExpenseDBEntities();
Task task;
if (EditTaskId > 0)
{
task = db.Tasks.Where(p => p.ID == EditTaskId).SingleOrDefault();
if (task != null)
{
task.Description = TextBoxDescription.Text.Trim();
task.Title = TextBoxTitle.Text.Trim();
}
EditTaskId = 0;
}
else
{
task = new Task {Description = TextBoxDescription.Text.Trim(),
Title = TextBoxTitle.Text.Trim()};
db.AddToTasks(task);
}
db.SaveChanges(true);
}

//delete task
private static void DeleteTask(CommandEventArgs e)
{
var db = new PersonalExpenseDBEntities();
var argument = e.CommandArgument;
int taskId = Convert.ToInt32(argument);
var editingTask = db.Tasks.Where(p => p.ID == taskId).SingleOrDefault();
db.DeleteObject(editingTask);
db.SaveChanges();
}

//populate task
private void PopulateEditingTask(CommandEventArgs e)
{
var argument = e.CommandArgument;
int taskId = Convert.ToInt32(argument);
var db = new PersonalExpenseDBEntities();
var editingTask = db.Tasks.Where(p => p.ID == taskId).SingleOrDefault();
if (editingTask != null)
{
TextBoxTitle.Text = editingTask.Title;
TextBoxDescription.Text = editingTask.Description;
}
EditTaskId = taskId;
}
Note that while creating the connection string using the wizard, you might end up with database path that is not relative to your application. So please modify the connection string so that it takes relative location from
app_data.
Summary
In this short article, we have seen how to administer SQLite database with various tools. and how we can use some useful tools to get it working with Linq-to-SQL. We have also seen how we can use provider to get some native support with Visual Studio 2010 todesign and manage SQLite database. Lastly, we have seen how to use SQLite with entity framework to perform some operations on database.

相关文章推荐
- 使用entityframework操作sqlite数据库
- 使用事务操作SQLite数据库
- 使用SQLiteDatabase操作SQLite数据库
- Android 使用SQLiteDatabase操作SQLite数据库(一)
- 使用SQLiteDatabase操作SQLite数据库
- 使用SQLiteDatabase操作SQLite数据库
- 如何使用C#操作SQLite数据库
- 使用事务操作SQLite数据库
- 使用SQLiteDatabase操作SQLite数据库
- Android 使用SQLiteDatabase操作SQLite数据库
- 使用SQLiteDatabase操作SQLite数据库(二)
- 使用VC与GCC操作SQLite数据库的最简单Demo
- 【ios开发】使用FMDB封装类的sqlite数据库操作
- Android Sqlite数据库查询操作使用 '%?%' 的问题
- Android使用SQLiteDatabase操作SQLite数据库
- 使用SQLiteDatabase操作SQLite数据库
- 解决使用VS2010时,引用外部dll时提示,无法嵌入互操作类型“……”,请改用适用的接口的解决方法
- 使用SQLiteDatabase 操作SQLite数据库
- 使用SQLite数据库存储数据(1)-操作SQLite数据库
- 使用SQLiteDatabase操作SQLite数据库(三)