Android L Phone进程初始化_02
2015-02-26 19:28
337 查看
本文代码目录以高通平台Android 5.0为基础,可能与AOSP有不同之处。
* 如转帖请注明它来自这里 http://blog.csdn.net/shrimpcolo?viewmode=contents*
1) Phone进程在创建过程中的入口以及各个关系类的用途,没有深入展开
2) RIL的实例化过程
那么本篇是在上文的基础上,针对各个关系类展开描述。目的还是只有一个,剥洋葱!!
梳理清楚几个关键的消息注册,包括MT(来电)消息注册,状态改变消息注册。这是基础,懂得了这些,会有助于分析定位问题。
—————————————–感觉又是一个坑啊———————————————
–>
–>
说明
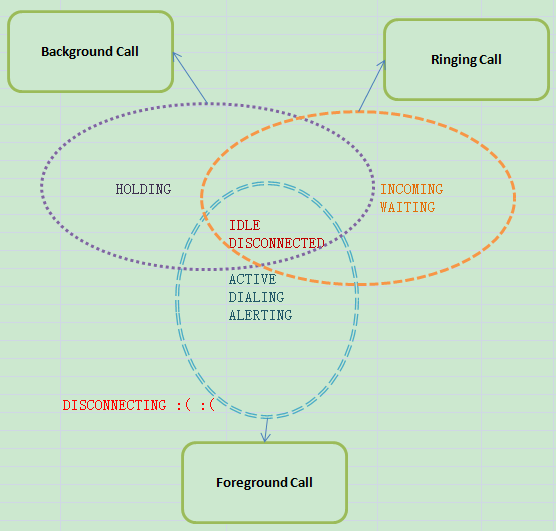
初始化CallManager,仅仅是初始化了 3个Calls List和1个Phone List。这里有个问题,Ringing Calls, Background Calls, Foreground Calls是什么?或者说是按照什么标准分类的?
要说明这个问题,也顺带的把后续要说明的Call的状态分类。统一在这里说明下。(注意,不要忘记上面我们的问题)
Phone: 理解为我家的座机。
座机不用的时候是空闲状态 IDLE(空闲);
来电话了,此时座机是响铃状态 RINGING(响铃);
通话过程中,此时座机状态是通话状态 OFFHOOK(摘机:通话中或是拨号中)
Call: 理解为使用我家的座机来打电话。
ACTIVE: 电话处于活动状态。
HOLDING: 电话处于保持状态,类似暂停一样,不过通话时间还是要算的哦。
DIALING: 电话处于拨号状态,使用座机拨了号码。
ALERTING: 电话处于振铃状态,这是针对拨号者而言的,对方此时的状态是INCOMING或是WAITING。
INCOMING:电话处于来电状态,手机当前处于IDLE状态时的来电是incoming
WAITING: 电话处于等待状态,当你电话处于通话过程中,再来电的时的情况。
IDEL: 电话处于空闲状态
DISCONNECTING: 电话正在挂断状态,这个是一瞬间的状态。
DISCONNECTED: 电话已经挂断,之后会转到IDLE。
Connection:理解为一个通话连接
一通电话至少有一个连接,但是一通电话可以有多个连接,电话会议就是典型例子。
电话会议允许有5个连接存在,这个是GSM协议规定的。也就是说,使用智能手机,开通多方通话功能后,手机上最多有7个连接。包括 一个电话会议(5 个Connections),一通电话(1个Connection),一通来电(Connection)。
从上面的例子就可以引申出上面的问题,7个连接。当电话会议处于活动状态的,那么电话会议属于Foreground Call, 另外的一通电话是Background Call, 来电的就是Ringing Call。
至于这三个是如何划分的,也是按照CallState的状态划分。
–>
–>
–>
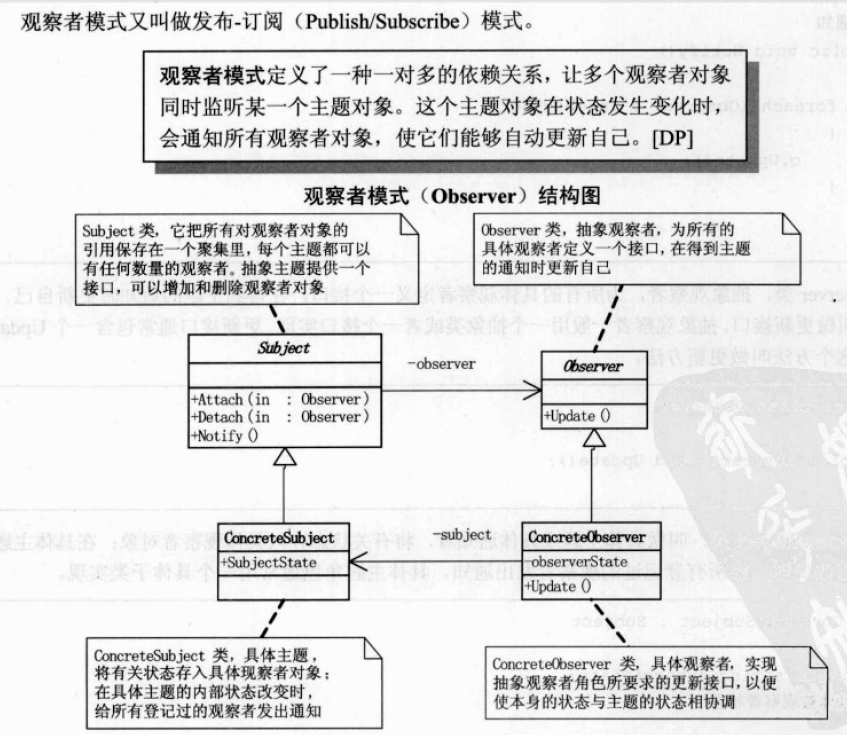
讲解这个之前,需要简单复习下观察者模式是什么样子的,强烈建议参考 程杰老师的《大话设计模式》中的 观察者模式这一章节。你,值得拥有!!!
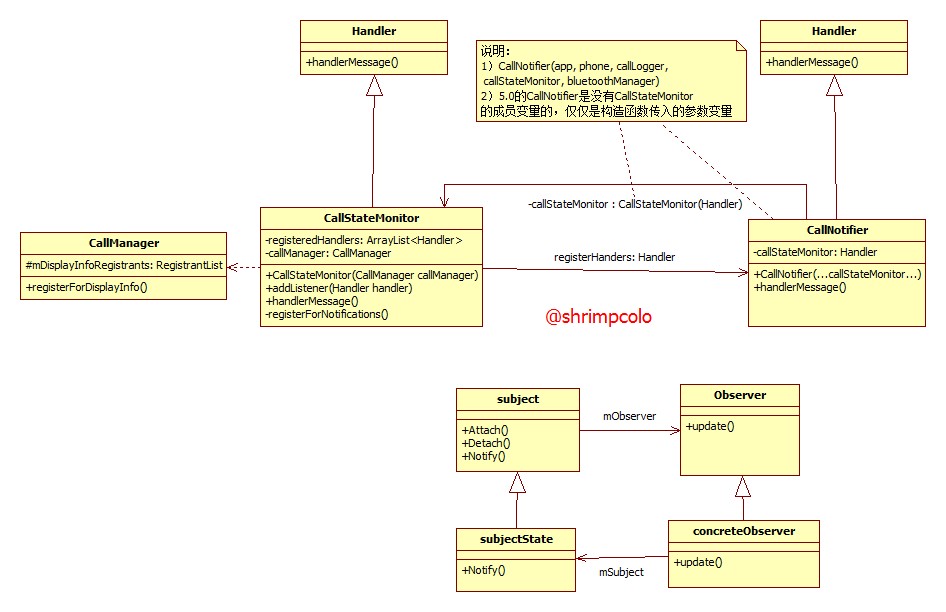
注意到,这里注释了好多跟来电相关的注册,仅仅保留了几个其他的消息,说明来电通知这块不会使用CallStateMonitor来承担了,由其他的人士去完成了。
结合4 ,6 来具体说明下观察者模式的在CallStateMonitor 和 CallNotifer中的使用。
图形:Observer4CallStateMonitor.jpg
说明:
不需要关注CallManager类的内容。CallStateMonitor 和 CallNotifer都是继承自Handler,都自己重写了Handler中的handleMessage方法。
这里subject 和 Observe都是一个类 Handler,CallStateMonitor当成subjectState, CallNotifer当成concreteObserver。handleMessage就是其中的Notify方法。
CallStateMonitor中有addListener(Handler handler),用于将外界对CallStateMonitor感兴趣的Handler (如CallNotifer), 放入自己的Handler list中。当然外界的CallNotifer也需要有CallStateMonitor这个subjectState的实例(参数变量或是成员变量),然后才能使用他的addListener方法。
一旦CallStateMonitor有处理到HandleMessage到,就会以如下的方式调用:
–>
–>
针对上文中的主要关系类,展开学习。主要是学习,在Phone进程中有什么作用,扮演什么角色。
梳理清楚几个关键的消息注册,包括MT(来电)消息注册,状态改变消息注册。这是基础,懂得了这些,会有助于分析定位问题。
但是分析代码,发现问题 1. 算是将清楚了,但是问题 2. 却没有说明白。而是偏向了Phone 状态, Call 状态的分类, 这个很重要。
建议去查看 @seven同学写的Phone浅析,非常的详细,也非常的用心。
Android 4.4 Kitkat Phone工作流程浅析(八)__Phone状态分析
关于MT来电的消息注册在CallManager中提及了,因为有了消息的注册:
只要沿着
->
保存到特定列表中。然后反向分析是谁调用了
也就梳理清楚了消息注册流程。
* 如转帖请注明它来自这里 http://blog.csdn.net/shrimpcolo?viewmode=contents*
概述
上一篇文章主要是说明了2个问题:Phone进程初始化1) Phone进程在创建过程中的入口以及各个关系类的用途,没有深入展开
2) RIL的实例化过程
那么本篇是在上文的基础上,针对各个关系类展开描述。目的还是只有一个,剥洋葱!!
目标
针对上文中的主要关系类,展开学习。主要是学习,在Phone进程中有什么作用,扮演什么角色。梳理清楚几个关键的消息注册,包括MT(来电)消息注册,状态改变消息注册。这是基础,懂得了这些,会有助于分析定位问题。
—————————————–感觉又是一个坑啊———————————————
再探PhoneGlobal
public void onCreate() {
if (VDBG) Log.v(LOG_TAG, "onCreate()...");

ContentResolver resolver = getContentResolver();

// Cache the "voice capable" flag.
// This flag currently comes from a resource (which is
// overrideable on a per-product basis):
sVoiceCapable =
getResources().getBoolean(com.android.internal.R.bool.config_voice_capable);
// ...but this might eventually become a PackageManager "system
// feature" instead, in which case we'd do something like:
// sVoiceCapable =
//   getPackageManager().hasSystemFeature(PackageManager.FEATURE_TELEPHONY_VOICE_CALLS);

if (phone == null) {
// Initialize the telephony framework
//这就是上篇的主要内容,初始化Phone数组,RIL数组,PhoneProxy... ...
PhoneFactory.makeDefaultPhones(this);
//忽略此处,(其实很重要,是跟双卡侦测有关系的)
int numPhones = TelephonyManager.getDefault().getPhoneCount();
if(numPhones > 1) PrimarySubSelectionController.init(this);

// Get the default phone
//得到默认的Phone接口,其实就是在PhoneFactory中的sProxyPhones[0]
/* //使用默认的phoneproxy和RIL接口
//sProxyPhone = sProxyPhones[0];
*/
phone = PhoneFactory.getDefaultPhone();

// Start TelephonyDebugService After the default phone is created.
Intent intent = new Intent(this, TelephonyDebugService.class);
startService(intent);

//这个是高通自有的,phone 和 mPhones的关系是, phone = mPhones[0]
mPhones = new PhoneProxy[numPhones];
mPhones = PhoneFactory.getPhones();

*1) CallManager是phone进程的一部分,负责消息注册 处理,上报,承上启下的作用.*
mCM = CallManager.getInstance();
for (Phone ph : mPhones) {
mCM.registerPhone(ph);//注册的部分,细节需要说明
}

// Create the NotificationMgr singleton, which is used to display
// status bar icons and control other status bar behavior.
*2) 这里会稍微说明下,以后会写一篇关于通话过程中的notification显示的文章*
notificationMgr = NotificationMgr.init(this);

mHandler.sendEmptyMessage(EVENT_START_SIP_SERVICE);
//获得phone type类型,这个是在new phone的时候就知道了的
int phoneType = phone.getPhoneType();

if (phoneType == PhoneConstants.PHONE_TYPE_CDMA) {
// Create an instance of CdmaPhoneCallState and initialize it to IDLE
cdmaPhoneCallState = new CdmaPhoneCallState();
cdmaPhoneCallState.CdmaPhoneCallStateInit();
}
//以下是些其他重要的东西,电话会跟电源相关,会有自己的wakelock, 当然也跟Keygurad有联系
// before registering for phone state changes
mPowerManager = (PowerManager) getSystemService(Context.POWER_SERVICE);
mWakeLock = mPowerManager.newWakeLock(PowerManager.FULL_WAKE_LOCK, LOG_TAG);
// lock used to keep the processor awake, when we don't care for the display.
mPartialWakeLock = mPowerManager.newWakeLock(PowerManager.PARTIAL_WAKE_LOCK
| PowerManager.ON_AFTER_RELEASE, LOG_TAG);

mKeyguardManager = (KeyguardManager) getSystemService(Context.KEYGUARD_SERVICE);

// get a handle to the service so that we can use it later when we
// want to set the poke lock.
mPowerManagerService = IPowerManager.Stub.asInterface(
ServiceManager.getService("power"));

// Get UpdateLock to suppress system-update related events (e.g. dialog show-up)
// during phone calls.
mUpdateLock = new UpdateLock("phone");

if (DBG) Log.d(LOG_TAG, "onCreate: mUpdateLock: " + mUpdateLock);

CallLogger callLogger = new CallLogger(this, new CallLogAsync());

callGatewayManager = CallGatewayManager.getInstance();

// Create the CallController singleton, which is the interface
// to the telephony layer for user-initiated telephony functionality
// (like making outgoing calls.)
*3) 从上面的描述说,这个会跟outgoing calls相关,但是从现在我看到的MO流程是不一样的,并没有走callcontroller中的placecall,或许我忽略了什么??*
callController = CallController.init(this, callLogger, callGatewayManager);

// Create the CallerInfoCache singleton, which remembers custom ring tone and
// send-to-voicemail settings.
//
// The asynchronous caching will start just after this call.
callerInfoCache = CallerInfoCache.init(this);

// Monitors call activity from the telephony layer
*4) 看名字就知道了使用了监听者模式,这个是一个非常重要的设计模式,在Phone模块使用频繁,需要讲解下*
callStateMonitor = new CallStateMonitor(mCM);

// Bluetooth manager
bluetoothManager = new BluetoothManager();
*5) 是phone服务的实现类,在内部可以直接使用,第三方apps不能直接获取,需要使用TelephonyManager来间接使用该服务。*
phoneMgr = PhoneInterfaceManager.init(this, phone);

// Create the CallNotifer singleton, which handles
// asynchronous events from the telephony layer (like
// launching the incoming-call UI when an incoming call comes
// in.)
*6) 这个是通知的主类,所谓“通知”是指 当有phone状态变化或是有来自telephony layer层的事件的时候,会触发该类,然后通过此类通知UI层*
notifier = CallNotifier.init(this, phone, callLogger, callStateMonitor,
bluetoothManager);

// register for ICC status
IccCard sim = phone.getIccCard();
if (sim != null) {
if (VDBG) Log.v(LOG_TAG, "register for ICC status");
sim.registerForPersoLocked(mHandler, EVENT_PERSO_LOCKED, null);
}

// register for MMI/USSD
mCM.registerForMmiComplete(mHandler, MMI_COMPLETE, null);

// register connection tracking to PhoneUtils
PhoneUtils.initializeConnectionHandler(mCM);

// Register for misc other intent broadcasts.
IntentFilter intentFilter =
new IntentFilter(Intent.ACTION_AIRPLANE_MODE_CHANGED);
intentFilter.addAction(TelephonyIntents.ACTION_ANY_DATA_CONNECTION_STATE_CHANGED);
intentFilter.addAction(Intent.ACTION_DOCK_EVENT);
intentFilter.addAction(TelephonyIntents.ACTION_SIM_STATE_CHANGED);
intentFilter.addAction(TelephonyIntents.ACTION_RADIO_TECHNOLOGY_CHANGED);
intentFilter.addAction(TelephonyIntents.ACTION_SERVICE_STATE_CHANGED);
intentFilter.addAction(TelephonyIntents.ACTION_EMERGENCY_CALLBACK_MODE_CHANGED);
registerReceiver(mReceiver, intentFilter);

//set the default values for the preferences in the phone.
PreferenceManager.setDefaultValues(this, R.xml.network_setting, false);

PreferenceManager.setDefaultValues(this, R.xml.call_feature_setting, false);

// Make sure the audio mode (along with some
// audio-mode-related state of our own) is initialized
// correctly, given the current state of the phone.
PhoneUtils.setAudioMode(mCM);
}

cdmaOtaProvisionData = new OtaUtils.CdmaOtaProvisionData();
cdmaOtaConfigData = new OtaUtils.CdmaOtaConfigData();
cdmaOtaScreenState = new OtaUtils.CdmaOtaScreenState();
cdmaOtaInCallScreenUiState = new OtaUtils.CdmaOtaInCallScreenUiState();

// XXX pre-load the SimProvider so that it's ready
resolver.getType(Uri.parse("content://icc/adn"));

// start with the default value to set the mute state.
mShouldRestoreMuteOnInCallResume = false;

// TODO: Register for Cdma Information Records
// phone.registerCdmaInformationRecord(mHandler, EVENT_UNSOL_CDMA_INFO_RECORD, null);

// Read HAC settings and configure audio hardware
*声音设置,这里不关注*
if (getResources().getBoolean(R.bool.hac_enabled)) {
int hac = android.provider.Settings.System.getInt(phone.getContext().getContentResolver(),
android.provider.Settings.System.HEARING_AID,
0);
AudioManager audioManager = (AudioManager) getSystemService(Context.AUDIO_SERVICE);
audioManager.setParameter(CallFeaturesSetting.HAC_KEY, hac != 0 ?
CallFeaturesSetting.HAC_VAL_ON :
CallFeaturesSetting.HAC_VAL_OFF);
}
}
1. CallManager
mCM = CallManager.getInstance();
for (Phone ph : mPhones) {
mCM.registerPhone(ph);//注册的部分,细节需要说明
}
mCM = CallManager.getInstance();
跟踪代码发现如下内容:/**
* get singleton instance of CallManager
* @return CallManager
*/
public static CallManager getInstance() {
return INSTANCE;
}–>
private static final CallManager INSTANCE = new CallManager();
–>
private CallManager() {
mPhones = new ArrayList<Phone>();
mRingingCalls = new ArrayList<Call>();
mBackgroundCalls = new ArrayList<Call>();
mForegroundCalls = new ArrayList<Call>();
mDefaultPhone = null;
}
说明
初始化CallManager,仅仅是初始化了 3个Calls List和1个Phone List。这里有个问题,Ringing Calls, Background Calls, Foreground Calls是什么?或者说是按照什么标准分类的?
要说明这个问题,也顺带的把后续要说明的Call的状态分类。统一在这里说明下。(注意,不要忘记上面我们的问题)
Phone: 理解为我家的座机。
座机不用的时候是空闲状态 IDLE(空闲);
来电话了,此时座机是响铃状态 RINGING(响铃);
通话过程中,此时座机状态是通话状态 OFFHOOK(摘机:通话中或是拨号中)
Call: 理解为使用我家的座机来打电话。
ACTIVE: 电话处于活动状态。
HOLDING: 电话处于保持状态,类似暂停一样,不过通话时间还是要算的哦。
DIALING: 电话处于拨号状态,使用座机拨了号码。
ALERTING: 电话处于振铃状态,这是针对拨号者而言的,对方此时的状态是INCOMING或是WAITING。
INCOMING:电话处于来电状态,手机当前处于IDLE状态时的来电是incoming
WAITING: 电话处于等待状态,当你电话处于通话过程中,再来电的时的情况。
IDEL: 电话处于空闲状态
DISCONNECTING: 电话正在挂断状态,这个是一瞬间的状态。
DISCONNECTED: 电话已经挂断,之后会转到IDLE。
Connection:理解为一个通话连接
一通电话至少有一个连接,但是一通电话可以有多个连接,电话会议就是典型例子。
电话会议允许有5个连接存在,这个是GSM协议规定的。也就是说,使用智能手机,开通多方通话功能后,手机上最多有7个连接。包括 一个电话会议(5 个Connections),一通电话(1个Connection),一通来电(Connection)。
从上面的例子就可以引申出上面的问题,7个连接。当电话会议处于活动状态的,那么电话会议属于Foreground Call, 另外的一通电话是Background Call, 来电的就是Ringing Call。
至于这三个是如何划分的,也是按照CallState的状态划分。
mCM.registerPhone(ph);
/**
* Register phone to CallManager
* @param phone to be registered
* @return true if register successfully
*/
public boolean registerPhone(Phone phone) {
Phone basePhone = getPhoneBase(phone);

if (basePhone != null && !mPhones.contains(basePhone)) {

if (DBG) {
Rlog.d(LOG_TAG, "registerPhone(" +
phone.getPhoneName() + " " + phone + ")");
}

if (mPhones.isEmpty()) {
mDefaultPhone = basePhone;
}
//mPhones, mRingingCalls, mBackgroundCalls, mForegroundCalls都是list
mPhones.add(basePhone);
mRingingCalls.add(basePhone.getRingingCall());
mBackgroundCalls.add(basePhone.getBackgroundCall());
mForegroundCalls.add(basePhone.getForegroundCall());
//注册重要的Phone状态
registerForPhoneStates(basePhone);
return true;
}
return false;
}
–>
private void registerForPhoneStates(Phone phone) {
... ...
CallManagerHandler handler = mHandlerMap.get(phone);
if (handler != null) {
Rlog.d(LOG_TAG, "This phone has already been registered.");
return;
}

// New registration, create a new handler instance and register the phone.
handler = new CallManagerHandler();
mHandlerMap.put(phone, handler);

// for common events supported by all phones
phone.registerForPreciseCallStateChanged(handler, EVENT_PRECISE_CALL_STATE_CHANGED, null);
... ...
phone.registerForNewRingingConnection(handler, EVENT_NEW_RINGING_CONNECTION, null);
phone.registerForUnknownConnection(handler, EVENT_UNKNOWN_CONNECTION, null);
phone.registerForIncomingRing(handler, EVENT_INCOMING_RING, null);
... ...
phone.registerForSuppServiceFailed(handler, EVENT_SUPP_SERVICE_FAILED, null);
phone.registerForServiceStateChanged(handler, EVENT_SERVICE_STATE_CHANGED, null);

// for events supported only by GSM, CDMA and IMS phone
if (phone.getPhoneType() == PhoneConstants.PHONE_TYPE_GSM ||
phone.getPhoneType() == PhoneConstants.PHONE_TYPE_CDMA ||
phone.getPhoneType() == PhoneConstants.PHONE_TYPE_IMS) {
phone.setOnPostDialCharacter(handler, EVENT_POST_DIAL_CHARACTER, null);
}

// for events supported only by CDMA phone
... ...

// for events supported only by IMS phone
if (phone.getPhoneType() == PhoneConstants.PHONE_TYPE_IMS) {
phone.registerForOnHoldTone(handler, EVENT_ONHOLD_TONE, null);
}
}
2. Notification Manager
// Create the NotificationMgr singleton, which is used to display
// status bar icons and control other status bar behavior.
2) 这里会稍微说明下,只会初始化一次,以后会直接使用
notificationMgr = NotificationMgr.init(this);
/**
* Initialize the singleton NotificationMgr instance.
*
* This is only done once, at startup, from PhoneApp.onCreate().
* From then on, the NotificationMgr instance is available via the
* PhoneApp's public "notificationMgr" field, which is why there's no
* getInstance() method here.
*/
/* package */ static NotificationMgr init(PhoneGlobals app) {
synchronized (NotificationMgr.class) {
if (sInstance == null) {
sInstance = new NotificationMgr(app);
} else {
Log.wtf(LOG_TAG, "init() called multiple times!  sInstance = " + sInstance);
}
return sInstance;
}
}
–>
/**
* Private constructor (this is a singleton).
* @see #init(PhoneGlobals)
*/
private NotificationMgr(PhoneGlobals app) {
mApp = app;
mContext = app;
//需要使用系统的NotificationManager服务
mNotificationManager =
(NotificationManager) app.getSystemService(Context.NOTIFICATION_SERVICE);
//获得StatusBarManager服务
mStatusBarManager =
(StatusBarManager) app.getSystemService(Context.STATUS_BAR_SERVICE);
mUserManager = (UserManager) app.getSystemService(Context.USER_SERVICE);
statusBarHelper = new StatusBarHelper();
}
3. CallController
// Create the CallController singleton, which is the interface
// to the telephony layer for user-initiated telephony functionality
// (like making outgoing calls.)
// 3) 从上面的描述说,这个会跟outgoing calls相关,但是5.0的MO流程跟4.4是不一样的,并没有走callcontroller中的placecall,或许我忽略了什么??
callController = CallController.init(this, callLogger, callGatewayManager);
/**
* Initialize the singleton CallController instance.
*
* This is only done once, at startup, from PhoneApp.onCreate().
* From then on, the CallController instance is available via the
* PhoneApp's public "callController" field, which is why there's no
* getInstance() method here.
*/
/* package */ static CallController init(PhoneGlobals app, CallLogger callLogger,
CallGatewayManager callGatewayManager) {
synchronized (CallController.class) {
if (sInstance == null) {
sInstance = new CallController(app, callLogger, callGatewayManager);
} else {
Log.wtf(TAG, "init() called multiple times!  sInstance = " + sInstance);
}
return sInstance;
}
}
–>
/**
* Private constructor (this is a singleton).
* @see init()
*/
private CallController(PhoneGlobals app, CallLogger callLogger,
CallGatewayManager callGatewayManager) {
if (DBG) log("CallController constructor: app = " + app);
mApp = app;
mCM = app.mCM;
mCallLogger = callLogger;
mCallGatewayManager = callGatewayManager;
}
4. CallStateMonitor
// Monitors call activity from the telephony layer
// 4) 看名字就知道了使用了监听者模式,这个是一个非常重要的设计模式,在Phone模块使用频繁,需要讲解下
callStateMonitor = new CallStateMonitor(mCM);
讲解这个之前,需要简单复习下观察者模式是什么样子的,强烈建议参考 程杰老师的《大话设计模式》中的 观察者模式这一章节。你,值得拥有!!!
/**
* Register for call state notifications with the CallManager.
*/
private void registerForNotifications() {
... ...
//callManager.registerForNewRingingConnection(this, PHONE_NEW_RINGING_CONNECTION, null);
//callManager.registerForPreciseCallStateChanged(this, PHONE_STATE_CHANGED, null);
//callManager.registerForDisconnect(this, PHONE_DISCONNECT, null);
//callManager.registerForUnknownConnection(this, PHONE_UNKNOWN_CONNECTION_APPEARED, null);
callManager.registerForCdmaOtaStatusChange(this, EVENT_OTA_PROVISION_CHANGE, null);
//callManager.registerForCallWaiting(this, PHONE_CDMA_CALL_WAITING, null);
callManager.registerForDisplayInfo(this, PHONE_STATE_DISPLAYINFO, null);
callManager.registerForSignalInfo(this, PHONE_STATE_SIGNALINFO, null);
callManager.registerForInCallVoicePrivacyOn(this, PHONE_ENHANCED_VP_ON, null);
callManager.registerForInCallVoicePrivacyOff(this, PHONE_ENHANCED_VP_OFF, null);
//callManager.registerForRingbackTone(this, PHONE_RINGBACK_TONE, null);
//callManager.registerForResendIncallMute(this, PHONE_RESEND_MUTE, null);
//callManager.registerForPostDialCharacter(this, PHONE_ON_DIAL_CHARS, null);
}
注意到,这里注释了好多跟来电相关的注册,仅仅保留了几个其他的消息,说明来电通知这块不会使用CallStateMonitor来承担了,由其他的人士去完成了。
6. CallNotifer
注意 这里的编号是6, 是按照PhoneGlobals.onCreate()中的顺序而来, 4,6一起是为了说明观察者模式// Create the CallNotifer singleton, which handles // asynchronous events from the telephony layer (like // launching the incoming-call UI when an incoming call comes // in.) // 6) 这个是通知的主类,所谓“通知”是指 当有phone状态变化或是有来自telephony layer层的事件的时候,会触发该类,然后通过此类通知UI层 notifier = CallNotifier.init(this, phone, callLogger, callStateMonitor, bluetoothManager);
结合4 ,6 来具体说明下观察者模式的在CallStateMonitor 和 CallNotifer中的使用。
图形:Observer4CallStateMonitor.jpg
说明:
不需要关注CallManager类的内容。CallStateMonitor 和 CallNotifer都是继承自Handler,都自己重写了Handler中的handleMessage方法。
这里subject 和 Observe都是一个类 Handler,CallStateMonitor当成subjectState, CallNotifer当成concreteObserver。handleMessage就是其中的Notify方法。
CallStateMonitor中有addListener(Handler handler),用于将外界对CallStateMonitor感兴趣的Handler (如CallNotifer), 放入自己的Handler list中。当然外界的CallNotifer也需要有CallStateMonitor这个subjectState的实例(参数变量或是成员变量),然后才能使用他的addListener方法。
一旦CallStateMonitor有处理到HandleMessage到,就会以如下的方式调用:
@Override
public void handleMessage(Message msg) {
if (DBG) {
Log.d(LOG_TAG, "handleMessage(" + msg.what + ")");
}

for (Handler handler : registeredHandlers) {
handler.handleMessage(msg);
}
}
5. PhoneInterfaceManger
// 5) 是phone服务的实现类,在内部可以直接使用,第三方apps不能直接获取,需要使用TelephonyManager来间接使用该服务。
phoneMgr = PhoneInterfaceManager.init(this, phone);
/**
* Initialize the singleton PhoneInterfaceManager instance.
* This is only done once, at startup, from PhoneApp.onCreate().
*/
/* package */ static PhoneInterfaceManager init(PhoneGlobals app, Phone phone) {
synchronized (PhoneInterfaceManager.class) {
if (sInstance == null) {
//new PhoneInterfaceManager 实例
sInstance = new PhoneInterfaceManager(app, phone);
} else {
Log.wtf(LOG_TAG, "init() called multiple times!  sInstance = " + sInstance);
}
return sInstance;
}
}
–>
//都是为了“phone”服务的运行做准备
/** Private constructor; @see init() */
private PhoneInterfaceManager(PhoneGlobals app, Phone phone) {
mApp = app;
mPhone = phone;
mCM = PhoneGlobals.getInstance().mCM;
mAppOps = (AppOpsManager)app.getSystemService(Context.APP_OPS_SERVICE);
//这是一个Handle,处理phone主线中的消息,主要是供系统内部的其他apps或是纯粹的第三方app来使用。
mMainThreadHandler = new MainThreadHandler();
carrierPrivilegeConfigs =
PreferenceManager.getDefaultSharedPreferences(mPhone.getContext());
//这一步就是把phone服务加入ServiceManager中,是的外界可以使用【phone】服务
publish();
}
–>
private void publish() {
if (DBG) log("publish: " + this);
ServiceManager.addService("phone", this);
}
小结
这篇本想回答两个问题:针对上文中的主要关系类,展开学习。主要是学习,在Phone进程中有什么作用,扮演什么角色。
梳理清楚几个关键的消息注册,包括MT(来电)消息注册,状态改变消息注册。这是基础,懂得了这些,会有助于分析定位问题。
但是分析代码,发现问题 1. 算是将清楚了,但是问题 2. 却没有说明白。而是偏向了Phone 状态, Call 状态的分类, 这个很重要。
建议去查看 @seven同学写的Phone浅析,非常的详细,也非常的用心。
Android 4.4 Kitkat Phone工作流程浅析(八)__Phone状态分析
关于MT来电的消息注册在CallManager中提及了,因为有了消息的注册:
phone.registerForNewRingingConnection(handler, EVENT_NEW_RINGING_CONNECTION, null);
phone.registerForIncomingRing(handler, EVENT_INCOMING_RING, null);
只要沿着
phone.registerForNewRingingConnection
->
phoneBase.registerForNewRingingConnection
保存到特定列表中。然后反向分析是谁调用了
mNewRingingConnectionRegistrants.notifyRegistrants(ar)
也就梳理清楚了消息注册流程。

相关文章推荐
- Android L Phone进程初始化_01
- Android L Phone的目录结构与进程模型
- 如何让你的APK跑在 com.android.phone 进程
- Tornado框架02-创建服务器与多进程
- UNIX环境高级编程——初始化一个守护进程
- 多进程的进程表初始化
- busybox的init初始化进程
- linux进程启动时段寄存器的初始化 及意义
- 02.Oracle官方并发教程之进程和线程
- android init 进程分析 (3 初始化脚本)
- 我学xingo golang服务器之-xingo的单进程,集群服务器的配置和初始化过程
- Android Phone进程启动过程详解
- os基础--多线程进程面试题02
- 黑马程序员_基础复习02_初始化
- UNIX环境高级编程——初始化一个守护进程
- ogg初始化进程配置
- unix系统之进程初始化
- 操作系统学习笔记(28)--初始化进程调度
- Android 5.0 Phone初始化分析
- UNIX环境高级编程学习之第十三章守护进程 - 初始化一个守护进程