Building Ogre in Windows 7/8 using Visual Studio 2012
2015-01-30 17:38
363 查看
http://techny.tumblr.com/post/39928642180/building-ogre-in-windows-7-8-using-visual-studio

Since there are no prebuilt Ogre SDK’s targeting Visual Studio 2012 I decided to build it myself from source.
This is a guide on how to build Ogre in Windows using CMake and Visual Studio.
This guide assumes you are running Windows 7/8 and have Visual Studio 2012 installed.
You will need this to configure Ogre and it’s dependencies. Download and install it fromhttp://www.cmake.org/cmake/resources/software.html
You will need this as Ogre uses this as their source code versioning system. Install it using the big blue button over at http://mercurial.selenic.com
If you want to build Ogre with support for DirectX you will need to install the DirectX SDK for Windows 7 or just the Windows SDK if you are running Windows 8.
You can download the DirectX Software Development Kit from http://www.microsoft.com/en-us/download/details.aspx?id=6812
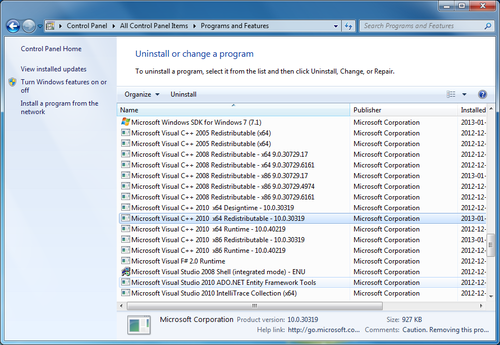
If the DirectX SDK or WindowsSDK installer fails with something like error S1023 you should follow thisguide
on how to uninstall and re-install the "Visual C++ 2010 Redistributable Package "
You can skip this and only build the Ogre OpenGL rendering system.
Here we will clone and build the Ogre dependencies project fromhttps://bitbucket.org/cabalistic/ogredeps using Mercrial and CMake.
Create the directory
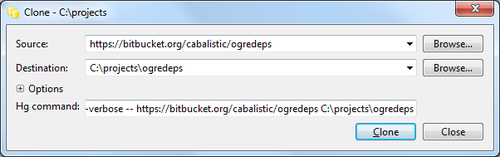
Set “https://bitbucket.org/cabalistic/ogredeps” as the source and “c:\projects\ogredeps” as the destination, click clone and let it finish.
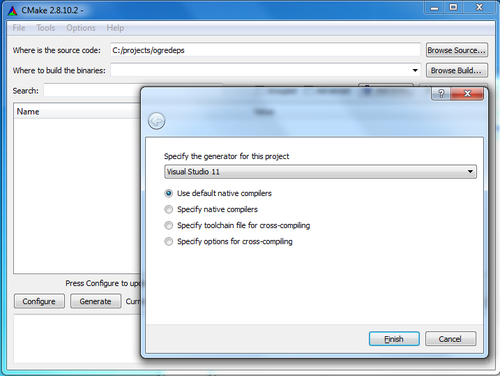
Start CMake and set “Where is the source code” to
In the dialog choose “Visual Studio 11” in the dropdown and click “Finish”
Set “CMAKE_INSTALL_PREFIX” to
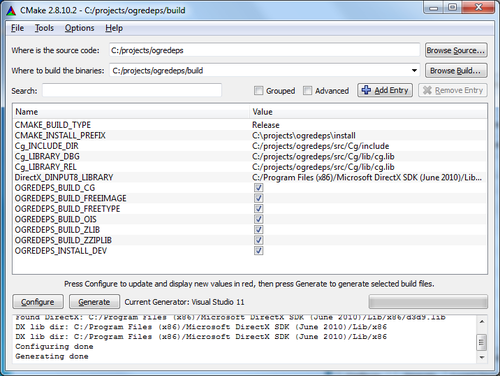
Set “Where to build the binaries” to “c:/projects/ogredeps/build” and click on “Generate”, it will create solution files for you in
open the solution file
using both release and debug, this will build and install the dependencies to
We now have all of the tools and dependencies needed to build Ogre.
Open the
This will create a clone of the latest unstable branch, right click on the folder
version to “v1-8” and click the update button.
v1-8 is the latest stable version of Ogre as I am writing this, checkhttp://www.ogre3d.org/developers/mercurial if this has changed when you are reading this.
Start CMake and set “Where is the source code” to
In the dialog choose “Visual Studio 11” in the drop-down and click “Finish”
CMake will fail, this is ok, we will fix it.
set “Where to build the binaries” to
set “OGRE_DEPENDENCIES_DIR” to
set “CMAKE_INSTALL_PREFIX” to
make sure to check both “OGRE_BUILD_SAMPLES” and “OGRE_INSTALL_SAMPLES” if you wanna test Ogre after the build/install.
now click on “Configure” and then on “Generate” and it will generate the solution files for us in
Open the solution file
release and debug, this will build and install the Ogre SDK and Samples into
All done! you have now successfully built and installed Ogre into
Execute

Building Ogre in Windows 7/8 using Visual Studio 2012
Since there are no prebuilt Ogre SDK’s targeting Visual Studio 2012 I decided to build it myself from source.
This is a guide on how to build Ogre in Windows using CMake and Visual Studio.
Prerequisites
This guide assumes you are running Windows 7/8 and have Visual Studio 2012 installed.
Needed software
CMake
You will need this to configure Ogre and it’s dependencies. Download and install it fromhttp://www.cmake.org/cmake/resources/software.html
Mercurial
You will need this as Ogre uses this as their source code versioning system. Install it using the big blue button over at http://mercurial.selenic.com
DirectX SDK / Windows SDK
If you want to build Ogre with support for DirectX you will need to install the DirectX SDK for Windows 7 or just the Windows SDK if you are running Windows 8.You can download the DirectX Software Development Kit from http://www.microsoft.com/en-us/download/details.aspx?id=6812
If the DirectX SDK or WindowsSDK installer fails with something like error S1023 you should follow thisguide
on how to uninstall and re-install the "Visual C++ 2010 Redistributable Package "
You can skip this and only build the Ogre OpenGL rendering system.
Download and build the Ogre dependencies
Here we will clone and build the Ogre dependencies project fromhttps://bitbucket.org/cabalistic/ogredeps using Mercrial and CMake.
clone the Ogre dependencies repository
Create the directory
c:/projects/and open it in the windows explorer, right click and choose “TortoiseHg > Clone…”
Set “https://bitbucket.org/cabalistic/ogredeps” as the source and “c:\projects\ogredeps” as the destination, click clone and let it finish.
Configure the dependencies project using CMake
Start CMake and set “Where is the source code” to
c:/projects/ogredeps. Click on the “Configure” button at the lower left.
In the dialog choose “Visual Studio 11” in the dropdown and click “Finish”
Set “CMAKE_INSTALL_PREFIX” to
c:/projects/ogredeps/install
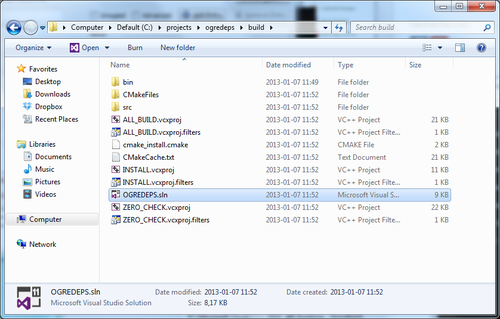
Set “Where to build the binaries” to “c:/projects/ogredeps/build” and click on “Generate”, it will create solution files for you in
c:/projects/ogredeps/build
Build the Ogre Dependencies using Visual Studio
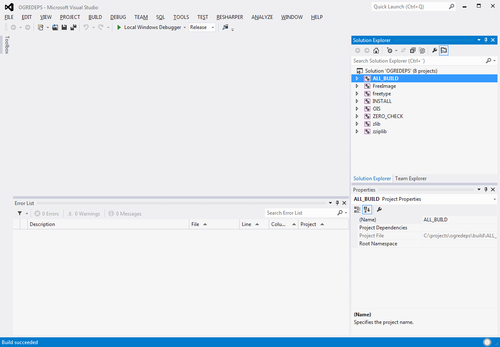
open the solution file
c:/projects/ogredeps/build/OGREDEPS.slnand build the “ALL_BUILD” project using both debug and release mode, then build the “INSTALL” project
using both release and debug, this will build and install the dependencies to
c:/projects/ogredeps/install
Download and build Ogre
We now have all of the tools and dependencies needed to build Ogre.
clone the Ogre repository
Open the
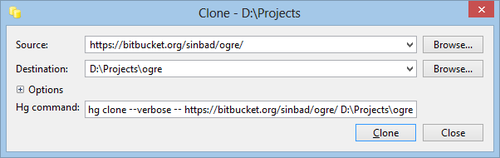
c:/projectsfolder in the windows explorer, using TortoiseHg clone “https://bitbucket.org/sinbad/ogre/ -u v1-8” into
c:/projects/ogre/
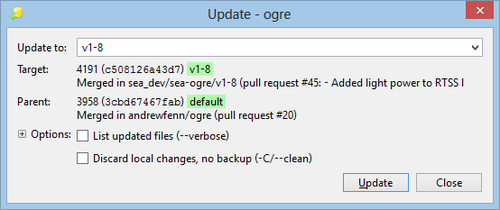
This will create a clone of the latest unstable branch, right click on the folder
c:/projects/ogre/, choose TortoiseHg > Update and change the branch
version to “v1-8” and click the update button.
v1-8 is the latest stable version of Ogre as I am writing this, checkhttp://www.ogre3d.org/developers/mercurial if this has changed when you are reading this.
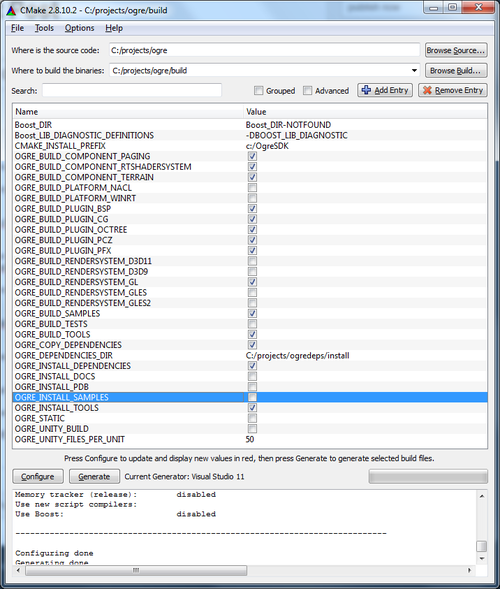
Configure Ogre using CMake
Start CMake and set “Where is the source code” to
c:/projects/ogre. Click on the “Configure” button at the lower left.
In the dialog choose “Visual Studio 11” in the drop-down and click “Finish”
CMake will fail, this is ok, we will fix it.
set “Where to build the binaries” to
c:/projects/ogre/build
set “OGRE_DEPENDENCIES_DIR” to
c:/projects/ogredeps/install
set “CMAKE_INSTALL_PREFIX” to
c:/OgreSDK
make sure to check both “OGRE_BUILD_SAMPLES” and “OGRE_INSTALL_SAMPLES” if you wanna test Ogre after the build/install.
now click on “Configure” and then on “Generate” and it will generate the solution files for us in
c:/projects/ogre/build
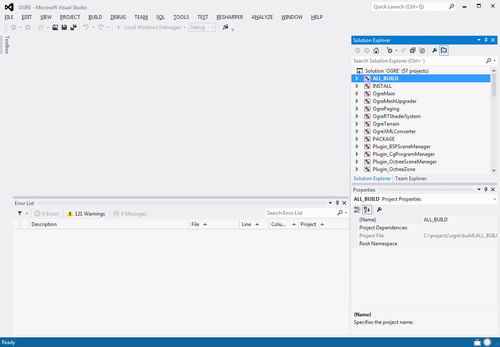
Build Ogre using Visual Studio
Open the solution file
c:/projects/ogre/build/OGRE.slnand build the “ALL_BUILD” project using both debug and release mode, then build the “INSTALL” project using both
release and debug, this will build and install the Ogre SDK and Samples into
c:/OgreSDK
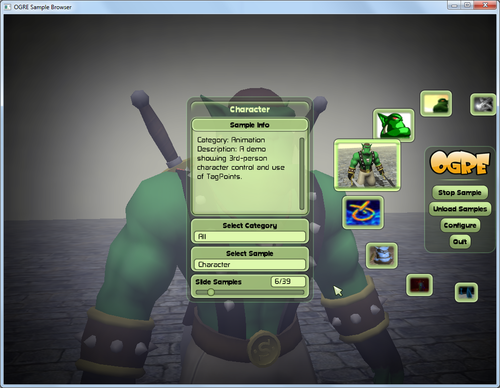
All done! you have now successfully built and installed Ogre into
c:/OgreSDK
Execute
C:\OgreSDK\bin\release\SampleBrowser.exeto view the prebuilt demos.

相关文章推荐
- 电子书下载:Professional Windows Phone 7 Application Development: Building Applications and Games Using Visual Studio, Silverl
- Building PortAudio for Windows using Microsoft Visual Studio
- Windows XP Targeting with C++ in Visual Studio 2012
- Using color themes with Visual Studio 2012 Express Editions
- link file in windows and visual studio
- Building NT kernel mode drivers in MS Visual Studio 8.0 (VS 2005)
- Using #region Directive With JavaScript Files in Visual Studio 【转载】
- Create custom Task List and Forms in SharePoint 2010 with Visual Studio 2012
- Using UTF-8 as the internal representation for strings in C and C++ with Visual Studio
- Develop Arduino Using Visual Studio 2012 on Windows 8
- Using Visual Studio to Debug JavaScript in IE
- Blend for Visual Studio 2012:为Windows 8应用所用的UX工具
- Solution of Problems in Building sscli via Visual Studio 2008
- Deploy custom Css,Js files in SharePoint 2010 using visual studio 2010
- Remove double empty lines in Visual Studio 2012
- Visual studio Express 2012 for windows phone 试用 (一) 安装 推荐
- [转]Setting up an ASP.NET website development environment using Visual Studio .NET, Subversion, and Windows XP
- Solution of Problems in Building sscli via Visual Studio 2008
- Using LINQ in Visual Studio 2005
- SDL check in Visual Studio 2012