How to use GitHub with Android Studio
2015-01-28 19:04
661 查看
How to use GitHub with Android Studio | London App Developer
UPDATE: This is an old tutorial written for Android Studio Beta. Since then there have been some updates and (although the below will still work) you may find it quicker to follow my updated tutorial How to use GitHub with Android Studio 1.x.
This article will explain how to use GitHub with Android Studio.
Firstly, let’s login to github.com and create a new repository. From the top right corner of the screen, click the + sign and select New repository.

GitHub “New repository” option
Now complete the form to create a new repository called testproject. Leave the Initialize this repository with a README unticked.

GitHub create new repository form
Next, open Android Studio and create a new project. Call your new application TestProject. Click Next to continue.
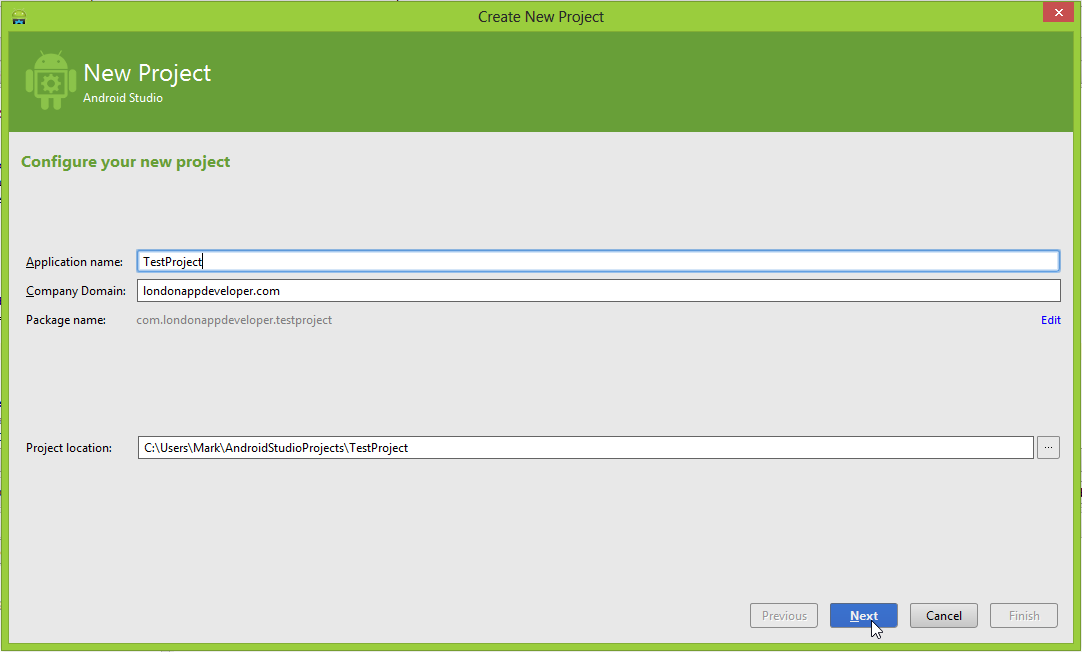
Android Studio new project window
Leave the next page as default and click Next.

Android Studio “Select the form factors your app will run on” screen
On the Add an activity to Mobile screen select Blank Activity and click Next.

Android Studio “Add an activity to Mobile” screen
In the next screen, leave the default activity name of MyActivity and click Finish.

Android Studio “New file options” screen
Your new project will open in Android Studio. On the top menu, select VCS > Import into Version Control > Create Git Repository.

Android Studio “Create Git Repository” option.
On the next screen, leave it all as default and click OK.

Android Studio “Select directory for git init” screen
Now use Internet Explorer and navigate to the root of your projects folder. Right click and select Git Bash (If you do not see this option, then first install Git for Windows).
When the Git bash screen appears, type:
An example of a Git repository URL is: https://github.com/markwint/testproject.git

Entering command into Git Bash
Then press enter. The GitHub remote will be added to your Git repository.
Next, jump back into Android Studio, right click your projects root directory and select Git > Add. This will add all your project files to your Git repository.

Android Studio “Git > Add” option
It will seem like nothing has happened, but trust me, the project files are added.
Now right click the project name again and this time select Git > Commit Directory.
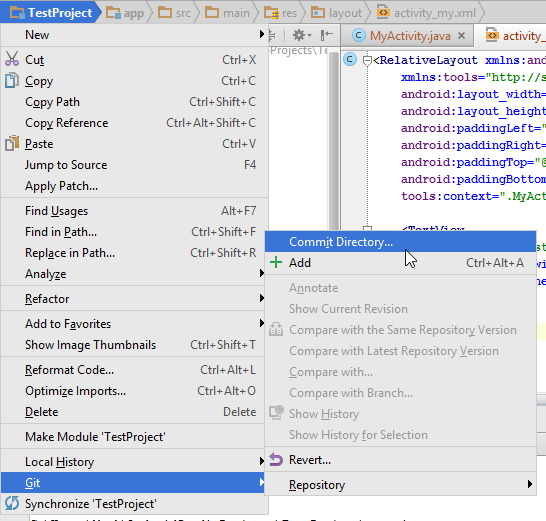
Android Studio “Commit Directory” option
In the next screen, type a Commit Message and select Commit.

Android Studio “Commit Changes” option
If a Code Analysis warning appears, click Commit. (Unless it’s a real project, in which case review and fix the issue before committing!)

Android Studio “Code Analysis” warning
Now, right click the project name, select Git > Repository > Push.

Android Studio “Git Push” option
Check the box Push current branch to alternative branch and leave the branch name as master. Then select push.

Android Studio “Git Push” prompt
Now enter your GitHub Login (email address) and Password. Then click OK.

Android Studio GitHub Remote Login
If it’s all good, you will see this message.

Android Studio Successful Git Push
Now your code is pushed to your GitHub repository. Don’t believe me? Logon and check for yourself.

GitHub repository pushed from Android Studio
Hope that was helpful.

Messerli Vinzenz says:
September 30, 2014 at 8:22 am
Thank you for sharing this, it really helped me!
Reply

mark says:
September 30, 2014 at 6:40 pm
Great, I’m glad you found it useful. How are you finding working with Android Studio so far?
Reply

Prashant Pandey says:
October 14, 2014 at 5:55 pm
thank you sir
Reply

Noman says:
October 28, 2014 at 10:06 am
Thank you.. it works
Reply
mark says:
November 5, 2014 at 2:48 pm
Glad you found it useful!
Reply

amd says:
November 25, 2014 at 11:34 am
I may have entered a wrong password, it says “Push Rejected”. The enter password popup is not showing again. How can I re-enter my password?
Reply
mark says:
December 8, 2014 at 5:08 pm
Hi amd. Did you try to close Android Studio and re-open? This comment is a bit old so did you figure the solution already? If not, let me know.
Reply

Wrolf says:
December 7, 2014 at 5:47 pm
Thank you. Just what I needed.
Reply
mark says:
December 8, 2014 at 5:07 pm
That’s brilliant, glad you found it helpful

Reply

Piotrek says:
December 30, 2014 at 8:36 am
Excellent article – thank you very much!
Reply

Zeeshan says:
January 3, 2015 at 12:20 pm
Thank you so much.. it works!
Reply

Jess says:
January 5, 2015 at 1:04 am
I’m trying to do this with my own project and it keeps giving me “Push rejected: master: rejected”. Any idea why?
Reply

LuditeTechnologies says:
January 15, 2015 at 2:15 pm
Nicely done. I had serious issues with rejections when I was trying from my home but I tried this tutorial again from my office with a different project and it worked flawlessly.
I have one question: My final layout ( the project tree structure, I mean ) looks slightly different from your screenshot at the end. Does that matter at all?
Reply
mark says:
January 15, 2015 at 2:26 pm
Glad it helped you. Not sure regarding the layout, can you send a screenshot to my email: mark (at) winterbottom.me…
UPDATE: This is an old tutorial written for Android Studio Beta. Since then there have been some updates and (although the below will still work) you may find it quicker to follow my updated tutorial How to use GitHub with Android Studio 1.x.
This article will explain how to use GitHub with Android Studio.
Firstly, let’s login to github.com and create a new repository. From the top right corner of the screen, click the + sign and select New repository.
GitHub “New repository” option
Now complete the form to create a new repository called testproject. Leave the Initialize this repository with a README unticked.
GitHub create new repository form
Next, open Android Studio and create a new project. Call your new application TestProject. Click Next to continue.
Android Studio new project window
Leave the next page as default and click Next.
Android Studio “Select the form factors your app will run on” screen
On the Add an activity to Mobile screen select Blank Activity and click Next.
Android Studio “Add an activity to Mobile” screen
In the next screen, leave the default activity name of MyActivity and click Finish.
Android Studio “New file options” screen
Your new project will open in Android Studio. On the top menu, select VCS > Import into Version Control > Create Git Repository.
Android Studio “Create Git Repository” option.
On the next screen, leave it all as default and click OK.
Android Studio “Select directory for git init” screen
Now use Internet Explorer and navigate to the root of your projects folder. Right click and select Git Bash (If you do not see this option, then first install Git for Windows).
When the Git bash screen appears, type:
git remote add origin https://github.com/[username]/[project_name].git
An example of a Git repository URL is: https://github.com/markwint/testproject.git
Entering command into Git Bash
Then press enter. The GitHub remote will be added to your Git repository.
Next, jump back into Android Studio, right click your projects root directory and select Git > Add. This will add all your project files to your Git repository.
Android Studio “Git > Add” option
It will seem like nothing has happened, but trust me, the project files are added.
Now right click the project name again and this time select Git > Commit Directory.
Android Studio “Commit Directory” option
In the next screen, type a Commit Message and select Commit.
Android Studio “Commit Changes” option
If a Code Analysis warning appears, click Commit. (Unless it’s a real project, in which case review and fix the issue before committing!)
Android Studio “Code Analysis” warning
Now, right click the project name, select Git > Repository > Push.
Android Studio “Git Push” option
Check the box Push current branch to alternative branch and leave the branch name as master. Then select push.
Android Studio “Git Push” prompt
Now enter your GitHub Login (email address) and Password. Then click OK.
Android Studio GitHub Remote Login
If it’s all good, you will see this message.
Android Studio Successful Git Push
Now your code is pushed to your GitHub repository. Don’t believe me? Logon and check for yourself.
GitHub repository pushed from Android Studio
Hope that was helpful.
14 Comments
Messerli Vinzenz says:
September 30, 2014 at 8:22 am
Thank you for sharing this, it really helped me!
Reply
mark says:
September 30, 2014 at 6:40 pm
Great, I’m glad you found it useful. How are you finding working with Android Studio so far?
Reply
Prashant Pandey says:
October 14, 2014 at 5:55 pm
thank you sir
Reply
Noman says:
October 28, 2014 at 10:06 am
Thank you.. it works
Reply
mark says:
November 5, 2014 at 2:48 pm
Glad you found it useful!
Reply
amd says:
November 25, 2014 at 11:34 am
I may have entered a wrong password, it says “Push Rejected”. The enter password popup is not showing again. How can I re-enter my password?
Reply
mark says:
December 8, 2014 at 5:08 pm
Hi amd. Did you try to close Android Studio and re-open? This comment is a bit old so did you figure the solution already? If not, let me know.
Reply
Wrolf says:
December 7, 2014 at 5:47 pm
Thank you. Just what I needed.
Reply
mark says:
December 8, 2014 at 5:07 pm
That’s brilliant, glad you found it helpful
Reply
Piotrek says:
December 30, 2014 at 8:36 am
Excellent article – thank you very much!
Reply
Zeeshan says:
January 3, 2015 at 12:20 pm
Thank you so much.. it works!
Reply
Jess says:
January 5, 2015 at 1:04 am
I’m trying to do this with my own project and it keeps giving me “Push rejected: master: rejected”. Any idea why?
Reply
LuditeTechnologies says:
January 15, 2015 at 2:15 pm
Nicely done. I had serious issues with rejections when I was trying from my home but I tried this tutorial again from my office with a different project and it worked flawlessly.
I have one question: My final layout ( the project tree structure, I mean ) looks slightly different from your screenshot at the end. Does that matter at all?
Reply
mark says:
January 15, 2015 at 2:26 pm
Glad it helped you. Not sure regarding the layout, can you send a screenshot to my email: mark (at) winterbottom.me…

相关文章推荐
- How to use GitHub with Android Studio
- How to use GitHub with Android Studio
- [Android] How to use github with android studio
- Android Studio You need to use a Theme.AppCompat theme (or descendant) with this activity解决方法
- How to start root shell with Android Studio?
- How to Use OpenCV in Android Studio
- How to Enable USB-Debugging with Nexus 5 for Android Studio
- How to set up github to work with Visual Studio 2013
- Step by Step - How to create a c++ library with NDK on Android Studio 1.5 (not experimental way)
- how to use BaiduMap in android studio under ubuntu
- how to use greendao in android studio
- android studio编程时出现的错误:you need to use a theme.appCompat theme(or descendant) with this a
- How to use GitHub with terminal commands[命令行下使用GitHub]
- How to configure and use Git with visual studio 2012 and TFS
- This article explains how to use icons with QListView
- How to use Subversion with Eclipse
- (转贴)How to use JDBC and transactions in Tomcat with JOTM
- How to install Android SDK and play with Android 2.0 in the emulator
- How to set up Eclipse with Android SDK on Ubuntu linux 9.04/9.10 (updated)
- How to configure OpenFiler v2.3 iSCSI Storage for use with VMware ESX.