SpringMVC学习笔记-Hello world
2015-01-12 15:12
357 查看
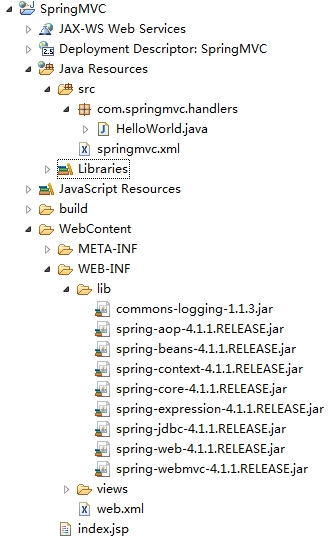
项目结构如图
web.xml配置拦截
index.jsp中只有一个超链接
在配置web.xml的时候也可以采用如下方式
把之前的springMVC.xml改为springDispatcherServlet-servlet.xml放在web-inf目录下
源码http://yunpan.cn/lk/cyWpCtiRtvvDJ 访问密码 e5ab
@RequestMapping修饰类
本文出自 “优赛工作室” 博客,请务必保留此出处http://shamrock.blog.51cto.com/2079212/1602490
web.xml配置拦截
<?xml version="1.0" encoding="UTF-8"?>
<web-app xmlns:xsi="http://www.w3.org/2001/XMLSchema-instance"
xmlns="http://java.sun.com/xml/ns/javaee" xmlns:web="http://java.sun.com/xml/ns/javaee/web-app_2_5.xsd"
xsi:schemaLocation="http://java.sun.com/xml/ns/javaee http://java.sun.com/xml/ns/javaee/web-app_2_5.xsd" id="WebApp_ID" version="2.5">

<!-- 配置springDispatcherServlet -->
<servlet>
<servlet-name>springDispatcherServlet</servlet-name>
<servlet-class>org.springframework.web.servlet.DispatcherServlet</servlet-class>
<init-param>
<param-name>contextConfigLocation</param-name>
<param-value>classpath:springmvc.xml</param-value>
</init-param>
<load-on-startup>1</load-on-startup>
</servlet>
<servlet-mapping>
<servlet-name>springDispatcherServlet</servlet-name>
<url-pattern>/</url-pattern>
</servlet-mapping>
</web-app>
springMVC.xml配置文件
<?xml version="1.0" encoding="UTF-8"?>
<beans xmlns="http://www.springframework.org/schema/beans"
xmlns:xsi="http://www.w3.org/2001/XMLSchema-instance"
xmlns:aop="http://www.springframework.org/schema/aop"
xmlns:context="http://www.springframework.org/schema/context"
xmlns:tx="http://www.springframework.org/schema/tx"
xmlns:mvc="http://www.springframework.org/schema/mvc"
xsi:schemaLocation=" http://www.springframework.org/schema/beans http://www.springframework.org/schema/beans/spring-beans.xsd http://www.springframework.org/schema/aop http://www.springframework.org/schema/aop/spring-aop-4.1.xsd http://www.springframework.org/schema/context http://www.springframework.org/schema/context/spring-context-4.1.xsd http://www.springframework.org/schema/tx http://www.springframework.org/schema/tx/spring-tx-4.0.xsd http://www.springframework.org/schema/mvc http://www.springframework.org/schema/mvc/spring-mvc-4.1.xsd">

<context:component-scan base-package="com.springmvc"></context:component-scan>
<!-- 配置视图解析器 -->
<bean class="org.springframework.web.servlet.view.InternalResourceViewResolver">
<property name="prefix" value="/WEB-INF/views/"></property>
<property name="suffix" value=".jsp"></property>
</bean>
</beans>
HelloWorld.java
package com.springmvc.handlers;

import org.springframework.stereotype.Controller;
import org.springframework.web.bind.annotation.RequestMapping;

@Controller
public class HelloWorld {

/**
* 使用@RequestMapping注解来映射请求URL
* 返回值会用过视图解析器解析为实际的物理视图
* InternalResourceViewResolver视图解析器会做如下解析
* prefix+returnVal+后缀得到实际的物理视图,然后做转发操作
* WEN-INF/views/success.jsp
* @return
*/
@RequestMapping("/helloworld")
public String hello() {
System.out.println("Hello world!!!");
return "success";
}
}
index.jsp中只有一个超链接
<a href="helloworld">helloworld</a>success.jsp表示成功页面
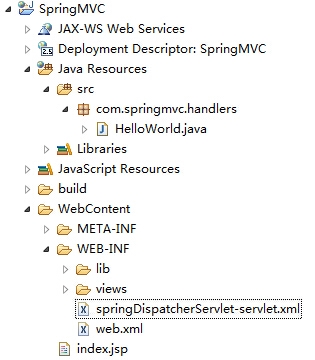
在配置web.xml的时候也可以采用如下方式
<?xml version="1.0" encoding="UTF-8"?>
<web-app xmlns:xsi="http://www.w3.org/2001/XMLSchema-instance"
xmlns="http://java.sun.com/xml/ns/javaee" xmlns:web="http://java.sun.com/xml/ns/javaee/web-app_2_5.xsd"
xsi:schemaLocation="http://java.sun.com/xml/ns/javaee http://java.sun.com/xml/ns/javaee/web-app_2_5.xsd" id="WebApp_ID" version="2.5">

<!-- 配置springDispatcherServlet -->
<servlet>
<servlet-name>springDispatcherServlet</servlet-name>
<servlet-class>org.springframework.web.servlet.DispatcherServlet</servlet-class>
<!--
也可以使用spring默认的配置方式来写配置文件
默认的配置文件为:/WEB-INF/<servlet-name>-servlet.xml
-->
<!--
<init-param>
<param-name>contextConfigLocation</param-name>
<param-value>classpath:springmvc.xml</param-value>
</init-param>
-->
<load-on-startup>1</load-on-startup>
</servlet>
<servlet-mapping>
<servlet-name>springDispatcherServlet</servlet-name>
<url-pattern>/</url-pattern>
</servlet-mapping>
</web-app>
此时项目的目录结构如图
把之前的springMVC.xml改为springDispatcherServlet-servlet.xml放在web-inf目录下
源码http://yunpan.cn/lk/cyWpCtiRtvvDJ 访问密码 e5ab
@RequestMapping修饰类
@RequestMapping("/springmvc")//此路径是相对于web应用根目录的路径
@Controller
public class SpringMVCTest {

private static final String SUCCESS = "success";

/**
* @RequestMapping 除了修饰方法还可以修饰类
* 类定义处:提供初步的请求映射信息,相对于WEB应用的根目录
* 方法处:提供进一步的细分映射信息
* @return
*/
//此时请求应写为http://localhost:8080/SpringMVC/springmvc/testRequestMapping
@RequestMapping("/testRequestMapping")//此路径是相对于类上面注解的路径
public String testRequestMapping() {
System.out.println("testRequestMapping");
return SUCCESS;
}
}
本文出自 “优赛工作室” 博客,请务必保留此出处http://shamrock.blog.51cto.com/2079212/1602490

相关文章推荐
- springMVC学习笔记一(hello world)
- SpringMVC 学习笔记(一) Hello World
- springMVC学习笔记一(hello world)
- SpringMVC 学习笔记(一) Hello World
- SpringMVC 学习笔记(一) Hello World
- SpringMVC学习笔记-Hello world
- ArcGIS API for Silverlight 入门学习笔记(一):hello world
- ArcGIS API for Silverlight 入门学习笔记(一)hello world 补充问题
- grails学习笔记之二:Hello World
- ROR 学习笔记系列二 基于ROR的简单Hello World程序入门
- Nebula3学习笔记(2): Hello World
- API Demos 2.3 学习笔记 (2)--创建第一个Android项目(Hello World!)
- wcf学习笔记1 hello world程序
- Linux驱动学习笔记(1) hello world !
- JAX-RPC学习笔记(1)-Hello World!
- [Soot学习笔记][3]通过Soot API生成Hello World程序
- wcf学习笔记1 hello world程序
- Jquery学习笔记:Hello World
- Qt学习笔记-从Hello World说起
- IPhone学习笔记一-----Hello World!