linux下jboss eap 6.3 集群(cluster)配置
2014-12-23 09:48
579 查看
jboss eap 6.3 集群(cluster)配置接上一篇继续,Domain模式解决了统一管理多台jboss的问题,今天我们来学习如何利用mod_cluster来实现负载均衡、容错。mod_cluster是jboss的一个开源集群模块(基于apache 2.2.x),官网地址为http://mod-cluster.jboss.org/ ,下面是使用步骤: 一、从官网下载binary文件http://mod-cluster.jboss.org/downloads/1-2-6-Final-bin 这上面有各种OS的版本,本文以windows为试验环境,应该下载mod_cluster-1.2.6.Final-linux2-x64-ssl.tar.gz 这个版本 二、解压安装将下载下来的文件解压到jboss masterserver机器上的某个目录(假定master server的IP为172.21.129.181),比如/usr/local/ ,生成licenses和opt的目录,mod_cluster其实就是一个包含集群模块的apache server,如果你的机器上之前有安装过apache server,强烈建议先卸载,(也可不卸载但是确保启动的是mod_cluster-1.2.6.Final-linux2-x64-ssl.tar.gz 也就是/usr/local/opt/jboss/sbin/apachectl内的apache)否则启动mod_cluster对应的apache时,有可能启动的是之前的版本。2.1 先执行opt/jboss/httpd/sbin/installhome.sh 生成默认配置2.2 修改/usr/local/opt/jboss/httpd/httpd/conf/httpd.confa)#Listen 12.34.56.78:80Listen 8040行,把原来的端口8000,改成80,这样方便直接用 http://172.21.129.181/xxx 来访问应用b)164行改成ServerName 172.21.129.181:80c)最后的mod_cluster部分,参考下面修改

# MOD_CLUSTER_ADDS# Adjust to youhostname and subnet.<IfModule manager_module> Listen 172.21.129.181:6666 ManagerBalancerName mycluster <VirtualHost 172.21.129.181:6666> <Location /> Order deny,allow Deny from all Allow from all </Location> KeepAliveTimeout 60 MaxKeepAliveRequests 0#ServerAdvertiseon http://IP@:6666ServerAdvertise on AdvertiseFrequency 5 #AdvertiseSecurityKey secret#AdvertiseGroup224.0.1.105:23364ManagerBalancerNamemodclusterEnableMCPMReceiveonAllowDisplay On <Location /mod_cluster_manager> SetHandler mod_cluster-manager Order deny,allow Deny from all Allow from all </Location> </VirtualHost></IfModule>
主要是把127.0.0.1,改成master server对应的真实IP,另外把Deny from all注释掉,把紧贴着的一行改成Allow from all,去掉这些访问上的限制ServerAdvertise说明ServerAdvertise On 时系统自动接受有效地jboss server声明。 在domain.xml中modcluster段有mutilcast-address配置。是一个广播地址。sever通过这个广播地址 告诉mod_cluster 组件自己存在。ServerAdvertise Off 或者不在一个广播域,那么就需要设置proxies地址,告诉jboss server 去哪里向http报告自己的状态 也在domain.xml中设置。不过可以在界面设置。 profiles(右上)--〉选择ha (左上)profile--〉subsystem --> web --> mod_cluster-->proxies设置
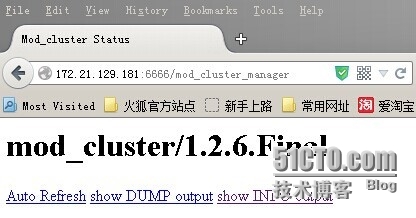
2.3 启动apache/usr/local/opt/jboss/sbin/apachectl start不会有任何提示并且浏览http://172.21.129.181看到

代表apache启动成功。顺利的话,浏览http://172.21.129.181:6666/mod_cluster_manager 应该能看到类似以下界面:
这是很关键的一个界面,用来管理/监控所有节点,如果没成功,请仔细检查前面的步骤是否有误。 三、以domain模式启动所有jboss master/slave server参考上一篇的做法,启动jboss masterserver / slave server,完成后,刷新http://172.21.129.181:6666/mod_cluster_manager,会看到多出了好多节点
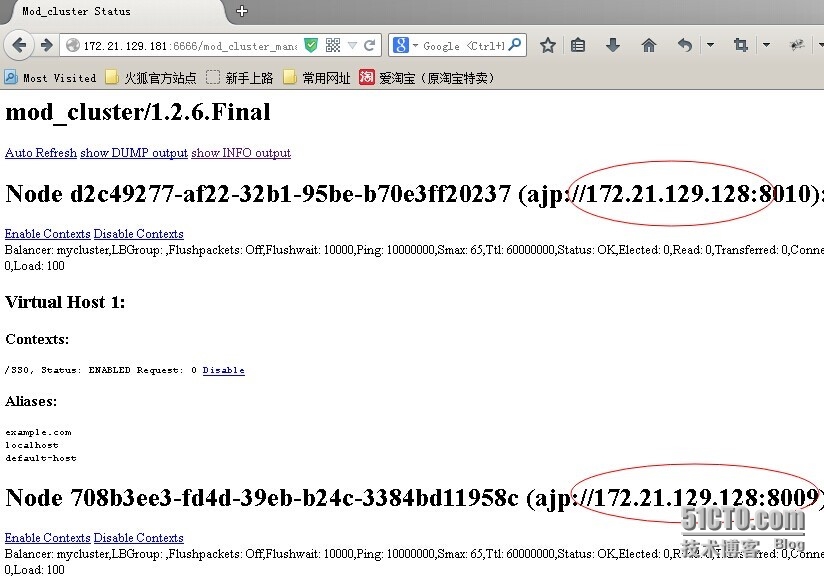
如果没有新的节点显示在该界面,检查jboss master server中创建的group,对应的profile是否为full-ha或ha点击相关的链接,还能看到更详细的信息
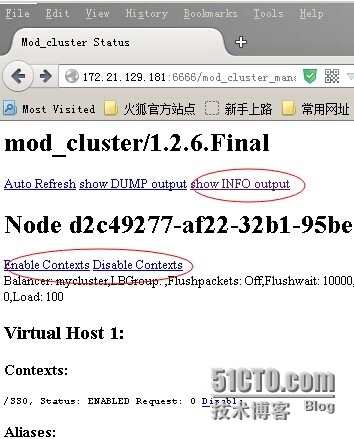
下面是点击 show INFOoutput后的内容:Node: [1],Name:d2c49277-af22-32b1-95be-b70e3ff20237,Balancer: mycluster,LBGroup: ,Host:172.21.129.128,Port: 8010,Type: ajp,Flushpackets: Off,Flushwait: 10,Ping:10,Smax: 65,Ttl: 60,Elected: 0,Read: 0,Transfered: 0,Connected: 0,Load: 100Node: [2],Name:708b3ee3-fd4d-39eb-b24c-3384bd11958c,Balancer: mycluster,LBGroup: ,Host:172.21.129.128,Port: 8009,Type: ajp,Flushpackets: Off,Flushwait: 10,Ping:10,Smax: 65,Ttl: 60,Elected: 0,Read: 0,Transfered: 0,Connected: 0,Load: 100Node: [3],Name: c4051fb6-9cc9-30aa-967b-6ba1294026b8,Balancer:mycluster,LBGroup: ,Host: 172.21.129.181,Port: 8011,Type: ajp,Flushpackets:Off,Flushwait: 10,Ping: 10,Smax: 65,Ttl: 60,Elected: 0,Read: 0,Transfered:0,Connected: 0,Load: 100Node: [4],Name:17181717-8b5c-3289-b6ea-fedcee2a27cb,Balancer: mycluster,LBGroup: ,Host:172.21.129.181,Port: 8012,Type: ajp,Flushpackets: Off,Flushwait: 10,Ping:10,Smax: 65,Ttl: 60,Elected: 3,Read: 3355,Transfered: 0,Connected: 0,Load: 100Node: [5],Name:2465cf8d-9cb0-3248-b335-09c02f13b6fe,Balancer: mycluster,LBGroup: ,Host:172.21.129.181,Port: 8009,Type: ajp,Flushpackets: Off,Flushwait: 10,Ping:10,Smax: 65,Ttl: 60,Elected: 0,Read: 0,Transfered: 0,Connected: 0,Load: -1Node: [6],Name:68a1e90f-6645-38e0-8157-219ab2004148,Balancer: mycluster,LBGroup: ,Host:172.21.129.181,Port: 8010,Type: ajp,Flushpackets: Off,Flushwait: 10,Ping:10,Smax: 65,Ttl: 60,Elected: 0,Read: 0,Transfered: 0,Connected: 0,Load: -1Node: [7],Name:b403bcec-5eb5-37a2-a956-51d273b87548,Balancer: mycluster,LBGroup: ,Host:172.21.129.57,Port: 8011,Type: ajp,Flushpackets: Off,Flushwait: 10,Ping:10,Smax: 65,Ttl: 60,Elected: 0,Read: 0,Transfered: 0,Connected: 0,Load: 100Node: [8],Name:6e5ac603-5f19-3c90-8f97-d0bf01124c94,Balancer: mycluster,LBGroup: ,Host:172.21.129.57,Port: 8012,Type: ajp,Flushpackets: Off,Flushwait: 10,Ping:10,Smax: 65,Ttl: 60,Elected: 0,Read: 0,Transfered: 0,Connected: 0,Load: 100Vhost: [2:1:1], Alias:example.comVhost: [2:1:2], Alias:localhostVhost: [2:1:3], Alias:default-hostVhost: [4:1:4], Alias:default-hostVhost: [4:1:5], Alias:localhostVhost: [4:1:6], Alias:example.comVhost: [1:1:7], Alias:example.comVhost: [1:1:8], Alias:localhostVhost: [1:1:9], Alias:default-hostVhost: [3:1:10],Alias: default-hostVhost: [3:1:11], Alias:localhostVhost: [3:1:12],Alias: example.comVhost: [6:1:13],Alias: localhostVhost: [6:1:14],Alias: default-hostVhost: [7:1:15],Alias: example.comVhost: [8:1:16],Alias: example.comVhost: [8:1:17],Alias: localhostVhost: [8:1:18],Alias: default-hostVhost: [7:1:19],Alias: localhostVhost: [7:1:20],Alias: default-hostContext: [2:1:1],Context: /SSO, Status: ENABLEDContext: [4:1:2],Context: /SSO, Status: ENABLEDContext: [1:1:3],Context: /SSO, Status: ENABLEDContext: [3:1:4],Context: /SSO, Status: DISABLEDContext: [7:1:5],Context: /SSO, Status: ENABLEDContext: [8:1:6],Context: /SSO, Status: ENABLED 注意一下:虽然我们有8台jboss server,但是mod_cluster貌似最多只能支持6个node的负载均衡,有2个node的转发因子是-1,即未生效(但大多数情况下,已经够用了)。mod_cluster还有其它一些限制,详情可参考http://docs.jboss.org/mod_cluster/1.2.0/html_single/#d0e85 四、负载均衡、容错验证在上一篇里,已经在my-group-1、my-group-2上部署了一个名为SSO的应用,现在可以直接用http://172.21.129.181/SSO/ 来访问了,apache会智能转发到6个节点中的某一个,如果访问正常,说明负载均衡已经生效。继续把其它server停掉几台,再继续访问http://172.21.129.181/SSO/ ,如果仍然正常,说明某几个node损坏,并不影响正常使用,即容错成功。所有server全shutdown后,http://172.21.129.181/SSO/ 将无法访问。
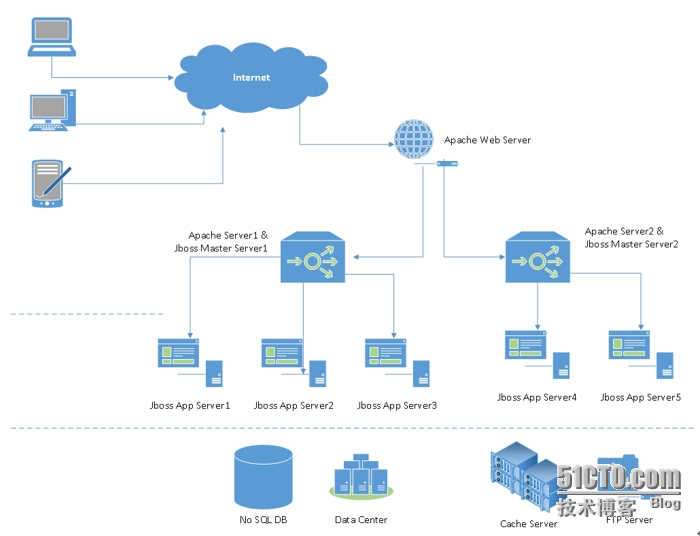
最后附一张:架构图
原作者:紫云飘雪 http://9388567.blog.51cto.com/9378567/1593548参考文章: href="http://yjmyzz.cnblogs.com/" target=_blank>菩提树下的杨过 http://yjmyzz.cnblogs.com对其进行更改,菩提树下的杨过是基于windows的环境搭建
# MOD_CLUSTER_ADDS# Adjust to youhostname and subnet.<IfModule manager_module> Listen 172.21.129.181:6666 ManagerBalancerName mycluster <VirtualHost 172.21.129.181:6666> <Location /> Order deny,allow Deny from all Allow from all </Location> KeepAliveTimeout 60 MaxKeepAliveRequests 0#ServerAdvertiseon http://IP@:6666ServerAdvertise on AdvertiseFrequency 5 #AdvertiseSecurityKey secret#AdvertiseGroup224.0.1.105:23364ManagerBalancerNamemodclusterEnableMCPMReceiveonAllowDisplay On <Location /mod_cluster_manager> SetHandler mod_cluster-manager Order deny,allow Deny from all Allow from all </Location> </VirtualHost></IfModule>
主要是把127.0.0.1,改成master server对应的真实IP,另外把Deny from all注释掉,把紧贴着的一行改成Allow from all,去掉这些访问上的限制ServerAdvertise说明ServerAdvertise On 时系统自动接受有效地jboss server声明。 在domain.xml中modcluster段有mutilcast-address配置。是一个广播地址。sever通过这个广播地址 告诉mod_cluster 组件自己存在。ServerAdvertise Off 或者不在一个广播域,那么就需要设置proxies地址,告诉jboss server 去哪里向http报告自己的状态 也在domain.xml中设置。不过可以在界面设置。 profiles(右上)--〉选择ha (左上)profile--〉subsystem --> web --> mod_cluster-->proxies设置
2.3 启动apache/usr/local/opt/jboss/sbin/apachectl start不会有任何提示并且浏览http://172.21.129.181看到
代表apache启动成功。顺利的话,浏览http://172.21.129.181:6666/mod_cluster_manager 应该能看到类似以下界面:
这是很关键的一个界面,用来管理/监控所有节点,如果没成功,请仔细检查前面的步骤是否有误。 三、以domain模式启动所有jboss master/slave server参考上一篇的做法,启动jboss masterserver / slave server,完成后,刷新http://172.21.129.181:6666/mod_cluster_manager,会看到多出了好多节点
如果没有新的节点显示在该界面,检查jboss master server中创建的group,对应的profile是否为full-ha或ha点击相关的链接,还能看到更详细的信息
下面是点击 show INFOoutput后的内容:Node: [1],Name:d2c49277-af22-32b1-95be-b70e3ff20237,Balancer: mycluster,LBGroup: ,Host:172.21.129.128,Port: 8010,Type: ajp,Flushpackets: Off,Flushwait: 10,Ping:10,Smax: 65,Ttl: 60,Elected: 0,Read: 0,Transfered: 0,Connected: 0,Load: 100Node: [2],Name:708b3ee3-fd4d-39eb-b24c-3384bd11958c,Balancer: mycluster,LBGroup: ,Host:172.21.129.128,Port: 8009,Type: ajp,Flushpackets: Off,Flushwait: 10,Ping:10,Smax: 65,Ttl: 60,Elected: 0,Read: 0,Transfered: 0,Connected: 0,Load: 100Node: [3],Name: c4051fb6-9cc9-30aa-967b-6ba1294026b8,Balancer:mycluster,LBGroup: ,Host: 172.21.129.181,Port: 8011,Type: ajp,Flushpackets:Off,Flushwait: 10,Ping: 10,Smax: 65,Ttl: 60,Elected: 0,Read: 0,Transfered:0,Connected: 0,Load: 100Node: [4],Name:17181717-8b5c-3289-b6ea-fedcee2a27cb,Balancer: mycluster,LBGroup: ,Host:172.21.129.181,Port: 8012,Type: ajp,Flushpackets: Off,Flushwait: 10,Ping:10,Smax: 65,Ttl: 60,Elected: 3,Read: 3355,Transfered: 0,Connected: 0,Load: 100Node: [5],Name:2465cf8d-9cb0-3248-b335-09c02f13b6fe,Balancer: mycluster,LBGroup: ,Host:172.21.129.181,Port: 8009,Type: ajp,Flushpackets: Off,Flushwait: 10,Ping:10,Smax: 65,Ttl: 60,Elected: 0,Read: 0,Transfered: 0,Connected: 0,Load: -1Node: [6],Name:68a1e90f-6645-38e0-8157-219ab2004148,Balancer: mycluster,LBGroup: ,Host:172.21.129.181,Port: 8010,Type: ajp,Flushpackets: Off,Flushwait: 10,Ping:10,Smax: 65,Ttl: 60,Elected: 0,Read: 0,Transfered: 0,Connected: 0,Load: -1Node: [7],Name:b403bcec-5eb5-37a2-a956-51d273b87548,Balancer: mycluster,LBGroup: ,Host:172.21.129.57,Port: 8011,Type: ajp,Flushpackets: Off,Flushwait: 10,Ping:10,Smax: 65,Ttl: 60,Elected: 0,Read: 0,Transfered: 0,Connected: 0,Load: 100Node: [8],Name:6e5ac603-5f19-3c90-8f97-d0bf01124c94,Balancer: mycluster,LBGroup: ,Host:172.21.129.57,Port: 8012,Type: ajp,Flushpackets: Off,Flushwait: 10,Ping:10,Smax: 65,Ttl: 60,Elected: 0,Read: 0,Transfered: 0,Connected: 0,Load: 100Vhost: [2:1:1], Alias:example.comVhost: [2:1:2], Alias:localhostVhost: [2:1:3], Alias:default-hostVhost: [4:1:4], Alias:default-hostVhost: [4:1:5], Alias:localhostVhost: [4:1:6], Alias:example.comVhost: [1:1:7], Alias:example.comVhost: [1:1:8], Alias:localhostVhost: [1:1:9], Alias:default-hostVhost: [3:1:10],Alias: default-hostVhost: [3:1:11], Alias:localhostVhost: [3:1:12],Alias: example.comVhost: [6:1:13],Alias: localhostVhost: [6:1:14],Alias: default-hostVhost: [7:1:15],Alias: example.comVhost: [8:1:16],Alias: example.comVhost: [8:1:17],Alias: localhostVhost: [8:1:18],Alias: default-hostVhost: [7:1:19],Alias: localhostVhost: [7:1:20],Alias: default-hostContext: [2:1:1],Context: /SSO, Status: ENABLEDContext: [4:1:2],Context: /SSO, Status: ENABLEDContext: [1:1:3],Context: /SSO, Status: ENABLEDContext: [3:1:4],Context: /SSO, Status: DISABLEDContext: [7:1:5],Context: /SSO, Status: ENABLEDContext: [8:1:6],Context: /SSO, Status: ENABLED 注意一下:虽然我们有8台jboss server,但是mod_cluster貌似最多只能支持6个node的负载均衡,有2个node的转发因子是-1,即未生效(但大多数情况下,已经够用了)。mod_cluster还有其它一些限制,详情可参考http://docs.jboss.org/mod_cluster/1.2.0/html_single/#d0e85 四、负载均衡、容错验证在上一篇里,已经在my-group-1、my-group-2上部署了一个名为SSO的应用,现在可以直接用http://172.21.129.181/SSO/ 来访问了,apache会智能转发到6个节点中的某一个,如果访问正常,说明负载均衡已经生效。继续把其它server停掉几台,再继续访问http://172.21.129.181/SSO/ ,如果仍然正常,说明某几个node损坏,并不影响正常使用,即容错成功。所有server全shutdown后,http://172.21.129.181/SSO/ 将无法访问。
最后附一张:架构图
原作者:紫云飘雪 http://9388567.blog.51cto.com/9378567/1593548参考文章:

相关文章推荐
- jboss eap 6.3 集群(cluster)配置
- jboss eap 6.3 集群(cluster)配置
- linux下jboss eap 6.3 域(Domain)模式配置
- 使用mod_cluster进行apache httpd server和jboss eap 6.1集群配置
- inux下jboss eap 6.3 集群(cluster)-Session 复制(Replication)
- 使用mod_cluster进行apache httpd server和jboss eap 6.1集群配置
- 基于jboss mod_cluster的均衡负载集群系统配置详解
- Jboss的production配置下去除集群(cluster)服务
- JBoss AS7.1.1+mod_cluster (Apache)集群配置
- jboss-eap-6.3集成OracleDS和MySqlDS配置
- linux下apache负载均衡与jboss集群配置
- jboss eap 6.3 域(Domain)模式配置
- jboss eap 6.3 域(Domain)模式配置
- jboss eap 6.3 集群(cluster)配置
- jboss linux cas 相关配置
- JBOSS4.0.2 HTTP集群配置详解
- Redhat(Linux)上的JBoss管理配置
- Jboss4集群配置之五:Jboss集群session复制
- Jboss4集群配置之二:Jboss集群配置实例与负载均衡器配置
- Linux下配置JBoss自动启动