HTML5制作Flappy Bird详细教程
2014-12-12 14:05
281 查看
微盘下载地址
在这篇文章中,让我们来一起用Flappy Bird。

HTML5游戏的教程。在这片教程中,我们使用65行Flappy
Bird。JavaScript
设置
先下载我为教程制作的:
Phaser框架index.html, 用来展示游戏的文件main.js, 我们写代码的地方asset/, 用来保存小鸟和管子的图片的文件夹(pipe.png)index.html,用文本编辑器打开main.js中可以看到我们之前提到的
接下来我们一次完成update()方法,并增加一些新的方法。
首先我们来更新update()方法。
保存index.html后你就可以得到一个用空格键来控制的小鸟了。preload()中添加管子的载入create()中添加画一组管子的方法。因为我们在游戏中要用到许多管子,所以我们先做一个包含
现在我们需要一个新的方法来把管子添加到游戏中,默认情况下,所有的管子都没有被激活也没有显示。我们选一个管子激活他并显示他,保证他在不在显示的情况下移除他的激活状态,这样我们就有用不尽的管子了。6段,并保证中间有一个能让小鸟通过的缺口。下面的方法实现了此功能。1.5秒调用一次create()方法中添加一个计时器。restart_game()方法的最前面添加下面这行代码来实现游戏重新开始时停止计时器。
实现得分和碰撞
最后一步我们来实现得分和碰撞,这很简单。
在
下面的代码放入
下面的代码放入restart_game()。Flappy bird的
设置
首先下载新的模板。其中包括了我们在上一个教程中完成的代码和一个新的音效文件。main.js,开始敲吧。
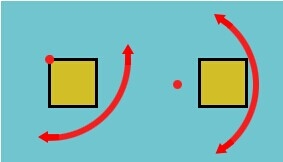
2.上升时翻转角度。update()方法。jump()方法中添加
也可以揉成一行代码:
为了达到这个目的,我们要做的是改变小鸟的中心(create()方法中添加如下代码来改变中心(
现在测试一下游戏你就会发现已经好得多了。update()方法:用restart_rame()。hit_pipe()方法。jump()方法的最前面添加如下代码:
添加音效
用
(作者提供的音效文件貌似无法播放,大家可以找点儿别的代替。preload()中添加create()中添加jump()中添加
最终效果的源码可以点击这里下载

1391866807_index.jpg (7.69
KB)
2014-5-15 11:43
在这篇文章中,让我们来一起用Flappy Bird。
HTML5游戏的教程。在这片教程中,我们使用65行Flappy
Bird。JavaScript
设置
先下载我为教程制作的:
Phaser框架index.html, 用来展示游戏的文件main.js, 我们写代码的地方asset/, 用来保存小鸟和管子的图片的文件夹(pipe.png)index.html,用文本编辑器打开main.js中可以看到我们之前提到的
| 1 2 3 4 5 6 7 8 9 10 11 12 13 14 15 16 17 18 19 20 21 22 | //Initialize Phaser, and creates a 400x490px game var game = new Phaser.Game(400, 490, Phaser.AUTO,'game_div'); //Creates a new'main'state that will contain the game var main_state = { preload:function() { //Function called first to load all the assets }, create:function() { //Fuction called after'preload'to setup the game }, update:function() { //Function called 60timesper second }, }; //Add and start the'main'state to start the game game.state.add('main', main_state); game.state.start('main'); |
首先我们来更新update()方法。
| 1 2 3 4 5 6 7 8 9 10 11 | //Make the bird jump jump:function() { //Add a vertical velocity to the bird this.bird.body.velocity.y = -350; }, //Restart the game restart_game:function() { //Start the'main'state,whichrestarts the game this.game.state.start('main'); }, |
| 1 2 | this.pipes = game.add.group(); this.pipes.createMultiple(20,'pipe'); |
实现得分和碰撞
最后一步我们来实现得分和碰撞,这很简单。
在
| 1 2 3 | this.score = 0; var style = { font:"30px Arial", fill:"#ffffff"}; this.label_score = this.game.add.text(20, 20,"0", style); |
| 1 2 | this.score += 1; this.label_score.content = this.score; |
设置
首先下载新的模板。其中包括了我们在上一个教程中完成的代码和一个新的音效文件。main.js,开始敲吧。
2.上升时翻转角度。update()方法。jump()方法中添加
| 1 2 3 4 5 6 7 8 | //create an animation on the bird var animation = this.game.add.tween(this.bird); //Set the animation to change the angle of the sprite to -20°in100 milliseconds animation.to({angle: -20}, 100); //And start the animation animation.start(); |
为了达到这个目的,我们要做的是改变小鸟的中心(create()方法中添加如下代码来改变中心(
| 1 | this.bird.anchor.setTo(-0.2, 0.5); |
添加音效
用
(作者提供的音效文件貌似无法播放,大家可以找点儿别的代替。preload()中添加create()中添加jump()中添加
最终效果的源码可以点击这里下载
1391866807_index.jpg (7.69
KB)
2014-5-15 11:43

相关文章推荐
- XP母盘制作详细教程1
- WPE详细教程四 滤镜制作(4)
- 基于ArcMap的地图符号制作(详细教程)
- Google Sitemap详细制作教程
- 从DOS 命令到制作IMG映像的详细解说实战教程
- [转]WPE详细教程四 滤镜制作(3)
- WPE详细教程四 滤镜制作(1)
- 从 DOS 命令到制作IMG映像的详细解说实战教程课
- [转]WPE详细教程四 滤镜制作(1)
- GHOST一键恢复光盘制作详细教程
- 用CSS样式如何制作圆角的详细教程
- 用CSS样式如何制作圆角的详细教程
- WPE详细教程四 滤镜制作(2)
- GHOST一键恢复光盘制作详细教程
- GHOST光盘制作详细教程
- 非常详细的启动光盘制作教程-菜鸟版
- 手把手教你制作GoogleSitemap(详细制作教程和协议讲解)
- WPE详细教程四 独立外挂制作(1)
- [转]WPE详细教程四 滤镜制作(2)