自己写一个MVC框架
2014-12-08 15:57
302 查看
MVC是三个单词的缩写,分别为: 模型(Model),视图(View)和控制(Controller)。
MVC模式如今大量应用与web开发中,其优势明显,收到了众多开发者的欢迎和支持,struts框架的核心架构也用到了MVC,既然MVC如此犀利,我们就应该深入理解其中的流程,而作为一个IT精英,我们肯定会想到看相关的源码,看完理解之后,我个人认为最高的境界就是自己写一个类似的框架出来,下面我就把自己理解编写的MVC框架分享给大家!
当然我现在采用的是struts1.X版本的思想!
struts1.X中有两个 核心的配置:
action和form-bean
对应每个客户端页面,发送请求时都会把该页面的参数封装到一个form-bean中,这也就是form-bean的基本作用。
action元素是用来配置业务Action类,在struts中充当控制器,原则上每个请求的路径都会被拦截到对应的action,并调用action中的某个方法。
于是我仿制的struts.config 配置文件的格式就出来了,如下:
[html] view
plaincopy
<mvc-config>
<!-- form-beans标签只有一个 -->
<form-beans>
<!-- form-bean标签有多个 -->
<form-bean name="newsForm" type="net.localer.news.form.NewsForm"/>
<form-bean name="userForm" type="net.localer.news.form.UserForm"/>
</form-beans>
<!-- action-mappings标签只有一个 -->
<action-mappings>
<!--
action元素:配置业务Action类
path : 请求的路径
type : 业务Action类的类路径
-->
<!-- action标签有多个 -->
<action path="/index" type="net.localer.news.action.NewsAction" name="newsForm"/>
<action path="/user" type="net.localer.news.action.UserAction" name="userForm"/>
</action-mappings>
</mvc-config>
看到这里很多人应该会知道其中的type属性将来会通过反射形成一个具体的object对象。当然配置文件出来了肯定就要与之相对应的bean类,否则是无法识别的,当然既然与配置文件对应,那bean类也相当的简单!如下:
[html] view
plaincopy
public class ActionConfig {
private String path;
private String type;
private String name;
public String getPath() {
return path;
}
public void setPath(String path) {
this.path = path;
}
public String getType() {
return type;
}
public void setType(String type) {
this.type = type;
}
public String getName() {
return name;
}
public void setName(String name) {
this.name = name;
}
}
[html] view
plaincopy
public class FormBeanConfig {
private String name;
private String type;
public String getName() {
return name;
}
public void setName(String name) {
this.name = name;
}
public String getType() {
return type;
}
public void setType(String type) {
this.type = type;
}
}
配置文件里还可以看出 action 和 form 要通过name 关联起来。为什么要关联呢?之前说页面的请求封装到form里面 并且 请求会传到action 所以form也会要传给action 所以当请求发出的时候:首先根据请求路径找到对应的action 然后根据action里面name 找到对应的form,将form反射出来后 再传进 对应的action里面!
同时我们还需要一个类,这个类比较特殊
[html] view
plaincopy
/**
*缓存所有已经读取到的ActionConfig对象
*和FormBeanConfig对象
*
*/
public class ActionMappingConfig {
//actionInfo的key键是path
private Map<String,ActionConfig> actionInfo = null;
//formbeanInfo中的key是name
private Map<String,FormBeanConfig> formbeanInfo = null;
public ActionMappingConfig(){
actionInfo = new Hashtable<String, ActionConfig>();
formbeanInfo = new Hashtable<String, FormBeanConfig>();
}
public void setActionConfig(ActionConfig config) {
actionInfo.put(config.getPath(), config);
}
public ActionConfig getActionConfig(String path) {
return actionInfo.get(path);
}
public void setFormBeanConfig(FormBeanConfig config) {
formbeanInfo.put(config.getName(), config);
}
public FormBeanConfig getFormBeanConfig(String name) {
return formbeanInfo.get(name);
}
}
运行的时候我们需要找一个类把所有的actionbean 和 formbean 缓存起来 ActionMappingConfig 类就是干这个的。
那么缓存是要缓存 可是怎么缓存起来呢 这就要用到另外一个类:XMLParser
代码如下:
[html] view
plaincopy
public class XMLParser {
/**
*
* @param path XML文档的路径
* @return 是一已经封装好XML信息的ActionMappingConfig对象
*/
public static ActionMappingConfig getActionMappingConfig(String path) {
//1、构造SAX解析器
SAXReader reader = new SAXReader();
//2、创建一个空的ActionMappingConfig对象
ActionMappingConfig config = new ActionMappingConfig();
try {
//3、获得整个对象
Document doc = reader.read(path);
//4、获得根元素
Element root = doc.getRootElement();
//5、解析并封装FormBeanConfig的方法
formBeanParser(root,config);
//6、解析并封装ActionConfig的方法
actionParser(root,config);
} catch (DocumentException e) {
e.printStackTrace();
}
return config;
}
/**
*
* @param root文档的根元素
* @param config 空的ActionMappingConfig对象
*/
private static void formBeanParser(Element root, ActionMappingConfig config) {
Element beans = root.element("form-beans");
List<Element> list = beans.elements();
for (Element e : list) {
String name = e.attribute("name").getValue();
String type = e.attribute("type").getValue();
//构建FormBeanConfig对象
FormBeanConfig formBean = new FormBeanConfig();
formBean.setName(name);
formBean.setType(type);
config.setFormBeanConfig(formBean);
}
}
private static void actionParser(Element root, ActionMappingConfig config) {
Element beans = root.element("action-mappings");
List<Element> list = beans.elements();
for (Element e : list) {
String name = null;
if (null != e.attribute("name")) {
name = e.attribute("name").getValue();
}
String type = e.attribute("type").getValue();
String path = e.attribute("path").getValue();
ActionConfig action = new ActionConfig();
action.setName(name);
action.setPath(path);
action.setType(type);
config.setActionConfig(action);
}
}
}
一看好像一个非常复杂的类 但是 一学就会 就是一个普通的解析xml的java代码,网上一搜一堆,不懂可以百度,在这不多浪费时间!
到这里我们已经完成了第一大步,把所有的基础config数据备好,
下面要进行的就是核心精髓的部分:action类,actionForm类,actionForward类等地编写!
基础数据准备好之后,就轮到action 和 actionform 出场了 (struts 的核心组件)。
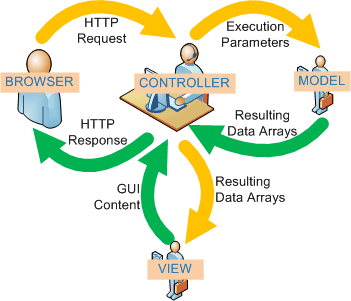
mvc框架中control 在这里就是action,充当控制器的action在请求发送发来时可以做出相应的处理然后转发到(或者重定向)对应的页面,这样通过控制器这个中介者,当模型层的数据发生了改变之后,视图层将自动改变其内容,这里也蕴含了设计模式中的观察者模式和中介者模式。
我写的简单action如下:
[html] view
plaincopy
<span style="font-family:System;font-size:13px;">import javax.servlet.http.HttpServletRequest;
import javax.servlet.http.HttpServletResponse;
public abstract class Action {
public abstract ActionForward execute(ActionForm form, HttpServletRequest request, HttpServletResponse response) throws Exception ;
}</span>
但是你会发现这个action里面只有一个方法,所有的处理只能在这一个方法里面写,跟普通的servlet相比强不到哪里去,于是我模仿struts1.X写了个dispatcheraction 这个action继承了抽象类action(体现了面向对象思想的小优点),运用反射思想实现了一个更加灵活的控制器;如下:
[html] view
plaincopy
<span style="font-family:System;font-size:13px;">import java.lang.reflect.Method;
import javax.servlet.http.HttpServletRequest;
import javax.servlet.http.HttpServletResponse;
public class DispatcherAction extends Action {
@Override
public ActionForward execute(ActionForm form, HttpServletRequest request,
HttpServletResponse response) throws Exception {
//1、获取界面上传递的method参数
String methodName = request.getParameter("method");
if (null == methodName || "".equals(methodName)) {
return this.unspecified(form, request, response);
}
//2、根据method参数,调用自身的对应方法
Class c = this.getClass();
Method method = c.getMethod(methodName, new Class[]{ActionForm.class,HttpServletRequest.class,HttpServletResponse.class});
return (ActionForward)method.invoke(this, new Object[]{form,request,response});
}
public ActionForward unspecified(ActionForm form, HttpServletRequest request,
HttpServletResponse response) throws Exception {
return null;
}
}</span>
我们可以通过界面传来的method参数动态选择调用对应的方法,反射真带感;当没有method参数的就默认调用unspecified方法。
c.getMethod(methodName, new Class[]{ActionForm.class,HttpServletRequest.class,HttpServletResponse.class}); 这行代码就要求我们当自己写一个要被调用的方法时候参数列表比喻和这里的参数一样,只有这样反射的时候才能获取到对应的方法。
你或许在上面又看到了一个不知道的类:actionforward。
每当控制层拿到模型层的数据的时候,根据需要要选择转发或者重定向,但是需要返回相同的类型哦;所以我们就把这两种情况封装到一个类里面。
如下:
[html] view
plaincopy
public class ActionForward {
//请求或者重定向的URI
private String uri;
//是否转发。为TRUE就转发,为FALSE就是重定向
private boolean isForward;
public ActionForward(String uri) {
this.uri = uri;
isForward = true;
}
public ActionForward(String uri, boolean isForward) {
this.uri = uri;
this.isForward = isForward;
}
public String getUri() {
return uri;
}
public void setUri(String uri) {
this.uri = uri;
}
public boolean isForward() {
return isForward;
}
public void setForward(boolean isForward) {
this.isForward = isForward;
}
}
当然这时候还缺少一个界面数据封装组件,大家应该也知道就是actionform(呵呵,struts1.X的 代表作,曾被无数高手鄙视,它的存在催生了struts2.0的诞生)如下:
[html] view
plaincopy
/**
* 少了一个reset方法和一个validator方法
*
*/
public abstract class ActionForm {
}
本人偷了个懒,没有将reset方法和 validator方法写到里面去,所以写的十分的简单,当然本身这个类也十分的简单,里面全是一个界面参数。
但是现在大家仍然没感觉到我这个MVC框架到底怎么个回事,是的之前全是在做准备工作,下面的就是核心的命令控制器 RequestProcessor的 实现,它会将整个MVC框架的流程展现得淋漓尽致!
ActionServlet 继承了传统的servlet,负责从创建应用命令控制器RequestProcessor,和创建XML解析器XmlParser,它如同打仗时的先锋队,“所有的请求”首先被它获取拦截,通过它和已知的配置文件就可以把请求发给对应的action,因此它在MVC模型中扮演中央控制器的角色。(其实和struts框架中的actionservlet的功能几乎一样)代码如下:
[html] view
plaincopy
public class ActionServlet extends HttpServlet {
public void destroy() {
}
public void doGet(HttpServletRequest request, HttpServletResponse response)
throws ServletException, IOException {
this.doPost(request, response);
}
public void doPost(HttpServletRequest request, HttpServletResponse response)
throws ServletException, IOException {
this.process(request, response);
}
/**
* 负责创建应用控制器RequestProcessor,并且缓存它
* @param request
* @param response
*/
private void process(HttpServletRequest request, HttpServletResponse response) {
RequestProcessor processor = null;
if (null == this.getServletContext().getAttribute("REQUERS_PROCESSOR")) {
//创建
processor = new RequestProcessor(this.getServletContext());
this.getServletContext().setAttribute("REQUERS_PROCESSOR", processor);
} else {
processor = (RequestProcessor) this.getServletContext().getAttribute("REQUERS_PROCESSOR");
}
try {
processor.processor(request, response);
} catch (Exception e) {
e.printStackTrace();
}
}
/**
* 在初始化的时候,解析xml返回ActionMappingConfig对象,缓存对象
*/
public void init() throws ServletException {
String tmp = this.getServletContext().getRealPath("/");
String path = tmp + this.getInitParameter("config");
ActionMappingConfig config = XMLParser.getActionMappingConfig(path);
this.getServletContext().setAttribute("config", config);
}
}
初始化的时候,我们需要解析xml并返回之前谈到过的ActionMappingConfig,并将其缓存到公共区域中,以便之后的读取。当然要想使这个servlet起作用还是需要在web。xml里面进行配置的,由于需要一开始就加载配置文件,所以说还要加上<load-on-startup>0</load-on-startup>;
[html] view
plaincopy
<servlet>
<servlet-name>ActionServlet</servlet-name>
<servlet-class>net.localer.mvc.servlet.ActionServlet</servlet-class>
<init-param>
<param-name>config</param-name>
<param-value>/WEB-INF/mvc.xml</param-value>
</init-param>
<load-on-startup>0</load-on-startup>
</servlet>
上面涉及到RequestProcessor这个类,这个类在MVC小框架中充当命令应用控制器。 它负责创建和缓存Action对象,同时也根据请求path调用action对象,并创建ActionForm对象,将ActionForm传递到Action对象中。详细的RequestProcessor类的处理过程我总结如下:
1、获取请求路径。
2、根据请求路径查找缓存(可以用一个Hashtabel来当缓存)中是否有对应的action实例,如果没有将对应的action实例化出来。
3、若是刚实例的action则把Action对象缓存起来。
4. 根据actionconfig查找对应action的actionForm。
5. 反射设置参数到actionForm。
6. 传递ActionForm到Action,并调用execute方法。
7. 接受action的返回值。
8. 根据返回值决定重定向还是转发。代码如下:
[html] view
plaincopy
public class RequestProcessor {
private ServletContext application = null;
private Map<String,Action> actionInstance = null;
public RequestProcessor(ServletContext application) {
this.application = application;
actionInstance = new Hashtable<String, Action>();
}
/**
* @param request
* @param response
* @throws Exception
*/
public void processor(HttpServletRequest request, HttpServletResponse response) throws Exception {
//1、获取请求路径
String uri = request.getRequestURI();
//2、去掉后缀的.do,比如请求的地址是http://127.0.0.1/mvc/index.do
uri = uri.substring(0, uri.length() - 3);
String path = application.getRealPath("/");
String[] array = path.split("\\\\");
uri = uri.substring(array[array.length - 1].length() + 1);
//3、获取缓存ActionMappingConfig
ActionMappingConfig mapping = (ActionMappingConfig)application.getAttribute("config");
//4、把路径当成key获取对应的ActionConfig对象
ActionConfig actionConfig = mapping.getActionConfig(uri);
//5、判断acttionConfig对象是否存在,为空就是配置文件中没有这个路径的配置
if (null == actionConfig) {
throw new Exception("没有找到对应的action实例");
}
//从缓存获取action对象
Action action = actionInstance.get(uri);
//6、根据路径信息到缓存中查找Action对象
if (null == action) {
//7、反射出该ActionConfig对象对应的Action对象
action = this.getActionInstance(actionConfig);
//8、把新创建的action对象缓存
actionInstance.put(uri, action);
}
//9、获取到action配置的name属性的值
String name = actionConfig.getName();
ActionForm form = null;
if (name != null) {
//10、根据ActionConfig的name属性找到对应的FormBeanConfig对象
FormBeanConfig config = mapping.getFormBeanConfig(name);
//11、获取对应ActionForm的实例
form = this.getActionFormInstance(config);
//12、封装界面上传递的参数到ActionForm里面
this.setParamter(form, request);
}
//13、调用action的execute方法,传递form对象
ActionForward forward = action.execute(form, request, response);
//14、做转发或者重定向
this.forward(forward, request, response);
}
/**
* 这个方法是决定重定向或者转发对应视图的
* @param forward
* @param request
* @param response
* @throws ServletException
* @throws IOException
*/
private void forward(ActionForward forward,HttpServletRequest request, HttpServletResponse response)
throws ServletException, IOException {
if (null == forward) {
return;
}
if (forward.isForward()) {
//转发
request.getRequestDispatcher(forward.getUri()).forward(request, response);
} else {
//重定向
response.sendRedirect(forward.getUri());
}
}
/**
* 反射自动封装参数
* @param form
* @param request
*/
private void setParamter(ActionForm form, HttpServletRequest request) {
//1、获取界面上传递过来的所有的参数的名字
Enumeration<String> enu = request.getParameterNames();
String parameterName = null;
Class c = form.getClass();
Field[] fields = null;
StringBuffer setMethodName = null;
Method setMethod = null;
Map<String,String> map = new HashMap<String,String>();
//2、迭代所有名字,判断和form当中是否有名字一致的
while (enu.hasMoreElements()) {
setMethodName = new StringBuffer();
parameterName = enu.nextElement();
if (map.get(parameterName) != null) {
continue;
}
//获取form所有的字段
fields = c.getDeclaredFields();
for (int i = 0; i < fields.length; i++) {
//如果有一个参数名字和字段名字一模一样
if (fields[i].getName().equals(parameterName)) {
//拼凑出set方法
setMethodName.append("set").append(parameterName.substring(0, 1).toUpperCase()).append(parameterName.substring(1));
//获取对应的set方法
try {
setMethod = c.getMethod(setMethodName.toString(), new Class[]{fields[i].getType()});
//判断form里面的字段是数组的还是String类型的
if (fields[i].getType().getName().equals("[Ljava.lang.String;")) {
map.put(parameterName, "");
setMethod.invoke(form, new Object[]{request.getParameterValues(parameterName)});
} else {
setMethod.invoke(form, new Object[]{request.getParameter(parameterName)});
}
} catch (SecurityException e) {
e.printStackTrace();
} catch (NoSuchMethodException e) {
e.printStackTrace();
} catch (IllegalArgumentException e) {
e.printStackTrace();
} catch (IllegalAccessException e) {
e.printStackTrace();
} catch (InvocationTargetException e) {
e.printStackTrace();
}
}
}
}
}
/**
* 反射从FormBeanConfig中获取ActionForm对象
* @param config
* @return
*/
private ActionForm getActionFormInstance(FormBeanConfig config) {
ActionForm form = null;
try {
form = (ActionForm)Class.forName(config.getType()).newInstance();
} catch (ClassNotFoundException e) {
e.printStackTrace();
} catch (InstantiationException e) {
e.printStackTrace();
} catch (IllegalAccessException e) {
e.printStackTrace();
}
return form;
}
/**
* 反射出ActionConfig中Action对象
* @param config
* @return
*/
private Action getActionInstance(ActionConfig config) {
Action action = null;
try {
action = (Action)Class.forName(config.getType()).newInstance();
} catch (ClassNotFoundException e) {
e.printStackTrace();
} catch (InstantiationException e) {
e.printStackTrace();
} catch (IllegalAccessException e) {
e.printStackTrace();
}
return action;
}
}
上述代码的注释也把整个流程描述得十分清楚。有很多代码细节大家若不懂,百度一下就能知道,是一些很简单的小细节功能。
加上之前的类,一个简单的MVC框架就基本成型了。下面是简单的应用代码:
[html] view
plaincopy
public class NewsAction extends Action {
@Override
public ActionForward execute(ActionForm form, HttpServletRequest request,
HttpServletResponse response) throws Exception {
NewsForm newsForm = (NewsForm)form;
return new ActionForward("index.jsp",false);
}
}
这个Action就继承了抽象类Action并对其中的execute方法进行重写。
[html] view
plaincopy
public class NewsForm extends ActionForm{
private String id;
private String title;
private String content;
private String[] abc;
public String[] getAbc() {
return abc;
}
public void setAbc(String[] abc) {
this.abc = abc;
}
public String getId() {
return id;
}
public void setId(String id) {
this.id = id;
}
public String getTitle() {
return title;
}
public void setTitle(String title) {
this.title = title;
}
public String getContent() {
return content;
}
public void setContent(String content) {
this.content = content;
}
}
这个form继承了actionform用来封装页面传来的参数。之前的mvc.xml配置如下:
[html] view
plaincopy
<!-- form-beans标签只有一个 -->
<form-beans>
<!-- form-bean标签有多个 -->
<form-bean name="newsForm" type="net.localer.news.form.NewsForm"/>
<form-bean name="userForm" type="net.localer.news.form.UserForm"/>
</form-beans>
<!-- action-mappings标签只有一个 -->
<action-mappings>
<!--
action元素:配置业务Action类
path : 请求的路径
type : 业务Action类的类路径
-->
<!-- action标签有多个 -->
<action path="/index" type="net.localer.news.action.NewsAction" name="newsForm"/>
<action path="/user" type="net.localer.news.action.UserAction" name="userForm"/>
</action-mappings>
项目运行起来之后,在页面输入http://127.0.0.1/项目名/index.do 请求就会被拦截并调用NewsAction中的execute方法。
(具体项目的具体设置不一样,struts框架原则上认为访问任何一个页面之前都需要通过一个控制器,之后再转发到对应的页面,因此我们用户在地址栏上输入的时候一般不会出现*.jsp这样的地址,而一般都是*.do或者*.action等等这样的地址)。
最后呢我们可以把之前的代码打成一个jar包(不包括NewsAction)。下次写一个新的web项目的时候我们就可以把这个jar包导入,自己建一个xml文件来写配置(和上面的配置文件一样),省去了写大量servlet配置的时间,这样的感觉就如同用一个框架,虽然这个框架很小,嘿嘿,总之算是实现了一个MVC框架的最最基本的功能。当然呢我这个框架还有很多很多的不足,其中我认为最大最大的不足呢是:
1.dispatcherAction里面的那个method参数不能自己配置,而是写死了,这样页面传递参数的时候会受到了限制。
2.没有像标准struts框架那样把转发重定向的路径 也配置到文件(如<result name="hello">/index.jsp</result>),这样有时候路劲变化的时候还是需要改变源代码,违背了开闭原则。
这个框架和标准的框架没得比,但是也把MVC的基本思想体现出来
MVC模式如今大量应用与web开发中,其优势明显,收到了众多开发者的欢迎和支持,struts框架的核心架构也用到了MVC,既然MVC如此犀利,我们就应该深入理解其中的流程,而作为一个IT精英,我们肯定会想到看相关的源码,看完理解之后,我个人认为最高的境界就是自己写一个类似的框架出来,下面我就把自己理解编写的MVC框架分享给大家!
当然我现在采用的是struts1.X版本的思想!
struts1.X中有两个 核心的配置:
action和form-bean
对应每个客户端页面,发送请求时都会把该页面的参数封装到一个form-bean中,这也就是form-bean的基本作用。
action元素是用来配置业务Action类,在struts中充当控制器,原则上每个请求的路径都会被拦截到对应的action,并调用action中的某个方法。
于是我仿制的struts.config 配置文件的格式就出来了,如下:
[html] view
plaincopy
<mvc-config>
<!-- form-beans标签只有一个 -->
<form-beans>
<!-- form-bean标签有多个 -->
<form-bean name="newsForm" type="net.localer.news.form.NewsForm"/>
<form-bean name="userForm" type="net.localer.news.form.UserForm"/>
</form-beans>
<!-- action-mappings标签只有一个 -->
<action-mappings>
<!--
action元素:配置业务Action类
path : 请求的路径
type : 业务Action类的类路径
-->
<!-- action标签有多个 -->
<action path="/index" type="net.localer.news.action.NewsAction" name="newsForm"/>
<action path="/user" type="net.localer.news.action.UserAction" name="userForm"/>
</action-mappings>
</mvc-config>
看到这里很多人应该会知道其中的type属性将来会通过反射形成一个具体的object对象。当然配置文件出来了肯定就要与之相对应的bean类,否则是无法识别的,当然既然与配置文件对应,那bean类也相当的简单!如下:
[html] view
plaincopy
public class ActionConfig {
private String path;
private String type;
private String name;
public String getPath() {
return path;
}
public void setPath(String path) {
this.path = path;
}
public String getType() {
return type;
}
public void setType(String type) {
this.type = type;
}
public String getName() {
return name;
}
public void setName(String name) {
this.name = name;
}
}
[html] view
plaincopy
public class FormBeanConfig {
private String name;
private String type;
public String getName() {
return name;
}
public void setName(String name) {
this.name = name;
}
public String getType() {
return type;
}
public void setType(String type) {
this.type = type;
}
}
配置文件里还可以看出 action 和 form 要通过name 关联起来。为什么要关联呢?之前说页面的请求封装到form里面 并且 请求会传到action 所以form也会要传给action 所以当请求发出的时候:首先根据请求路径找到对应的action 然后根据action里面name 找到对应的form,将form反射出来后 再传进 对应的action里面!
同时我们还需要一个类,这个类比较特殊
[html] view
plaincopy
/**
*缓存所有已经读取到的ActionConfig对象
*和FormBeanConfig对象
*
*/
public class ActionMappingConfig {
//actionInfo的key键是path
private Map<String,ActionConfig> actionInfo = null;
//formbeanInfo中的key是name
private Map<String,FormBeanConfig> formbeanInfo = null;
public ActionMappingConfig(){
actionInfo = new Hashtable<String, ActionConfig>();
formbeanInfo = new Hashtable<String, FormBeanConfig>();
}
public void setActionConfig(ActionConfig config) {
actionInfo.put(config.getPath(), config);
}
public ActionConfig getActionConfig(String path) {
return actionInfo.get(path);
}
public void setFormBeanConfig(FormBeanConfig config) {
formbeanInfo.put(config.getName(), config);
}
public FormBeanConfig getFormBeanConfig(String name) {
return formbeanInfo.get(name);
}
}
运行的时候我们需要找一个类把所有的actionbean 和 formbean 缓存起来 ActionMappingConfig 类就是干这个的。
那么缓存是要缓存 可是怎么缓存起来呢 这就要用到另外一个类:XMLParser
代码如下:
[html] view
plaincopy
public class XMLParser {
/**
*
* @param path XML文档的路径
* @return 是一已经封装好XML信息的ActionMappingConfig对象
*/
public static ActionMappingConfig getActionMappingConfig(String path) {
//1、构造SAX解析器
SAXReader reader = new SAXReader();
//2、创建一个空的ActionMappingConfig对象
ActionMappingConfig config = new ActionMappingConfig();
try {
//3、获得整个对象
Document doc = reader.read(path);
//4、获得根元素
Element root = doc.getRootElement();
//5、解析并封装FormBeanConfig的方法
formBeanParser(root,config);
//6、解析并封装ActionConfig的方法
actionParser(root,config);
} catch (DocumentException e) {
e.printStackTrace();
}
return config;
}
/**
*
* @param root文档的根元素
* @param config 空的ActionMappingConfig对象
*/
private static void formBeanParser(Element root, ActionMappingConfig config) {
Element beans = root.element("form-beans");
List<Element> list = beans.elements();
for (Element e : list) {
String name = e.attribute("name").getValue();
String type = e.attribute("type").getValue();
//构建FormBeanConfig对象
FormBeanConfig formBean = new FormBeanConfig();
formBean.setName(name);
formBean.setType(type);
config.setFormBeanConfig(formBean);
}
}
private static void actionParser(Element root, ActionMappingConfig config) {
Element beans = root.element("action-mappings");
List<Element> list = beans.elements();
for (Element e : list) {
String name = null;
if (null != e.attribute("name")) {
name = e.attribute("name").getValue();
}
String type = e.attribute("type").getValue();
String path = e.attribute("path").getValue();
ActionConfig action = new ActionConfig();
action.setName(name);
action.setPath(path);
action.setType(type);
config.setActionConfig(action);
}
}
}
一看好像一个非常复杂的类 但是 一学就会 就是一个普通的解析xml的java代码,网上一搜一堆,不懂可以百度,在这不多浪费时间!
到这里我们已经完成了第一大步,把所有的基础config数据备好,
下面要进行的就是核心精髓的部分:action类,actionForm类,actionForward类等地编写!
基础数据准备好之后,就轮到action 和 actionform 出场了 (struts 的核心组件)。
mvc框架中control 在这里就是action,充当控制器的action在请求发送发来时可以做出相应的处理然后转发到(或者重定向)对应的页面,这样通过控制器这个中介者,当模型层的数据发生了改变之后,视图层将自动改变其内容,这里也蕴含了设计模式中的观察者模式和中介者模式。
我写的简单action如下:
[html] view
plaincopy
<span style="font-family:System;font-size:13px;">import javax.servlet.http.HttpServletRequest;
import javax.servlet.http.HttpServletResponse;
public abstract class Action {
public abstract ActionForward execute(ActionForm form, HttpServletRequest request, HttpServletResponse response) throws Exception ;
}</span>
但是你会发现这个action里面只有一个方法,所有的处理只能在这一个方法里面写,跟普通的servlet相比强不到哪里去,于是我模仿struts1.X写了个dispatcheraction 这个action继承了抽象类action(体现了面向对象思想的小优点),运用反射思想实现了一个更加灵活的控制器;如下:
[html] view
plaincopy
<span style="font-family:System;font-size:13px;">import java.lang.reflect.Method;
import javax.servlet.http.HttpServletRequest;
import javax.servlet.http.HttpServletResponse;
public class DispatcherAction extends Action {
@Override
public ActionForward execute(ActionForm form, HttpServletRequest request,
HttpServletResponse response) throws Exception {
//1、获取界面上传递的method参数
String methodName = request.getParameter("method");
if (null == methodName || "".equals(methodName)) {
return this.unspecified(form, request, response);
}
//2、根据method参数,调用自身的对应方法
Class c = this.getClass();
Method method = c.getMethod(methodName, new Class[]{ActionForm.class,HttpServletRequest.class,HttpServletResponse.class});
return (ActionForward)method.invoke(this, new Object[]{form,request,response});
}
public ActionForward unspecified(ActionForm form, HttpServletRequest request,
HttpServletResponse response) throws Exception {
return null;
}
}</span>
我们可以通过界面传来的method参数动态选择调用对应的方法,反射真带感;当没有method参数的就默认调用unspecified方法。
c.getMethod(methodName, new Class[]{ActionForm.class,HttpServletRequest.class,HttpServletResponse.class}); 这行代码就要求我们当自己写一个要被调用的方法时候参数列表比喻和这里的参数一样,只有这样反射的时候才能获取到对应的方法。
你或许在上面又看到了一个不知道的类:actionforward。
每当控制层拿到模型层的数据的时候,根据需要要选择转发或者重定向,但是需要返回相同的类型哦;所以我们就把这两种情况封装到一个类里面。
如下:
[html] view
plaincopy
public class ActionForward {
//请求或者重定向的URI
private String uri;
//是否转发。为TRUE就转发,为FALSE就是重定向
private boolean isForward;
public ActionForward(String uri) {
this.uri = uri;
isForward = true;
}
public ActionForward(String uri, boolean isForward) {
this.uri = uri;
this.isForward = isForward;
}
public String getUri() {
return uri;
}
public void setUri(String uri) {
this.uri = uri;
}
public boolean isForward() {
return isForward;
}
public void setForward(boolean isForward) {
this.isForward = isForward;
}
}
当然这时候还缺少一个界面数据封装组件,大家应该也知道就是actionform(呵呵,struts1.X的 代表作,曾被无数高手鄙视,它的存在催生了struts2.0的诞生)如下:
[html] view
plaincopy
/**
* 少了一个reset方法和一个validator方法
*
*/
public abstract class ActionForm {
}
本人偷了个懒,没有将reset方法和 validator方法写到里面去,所以写的十分的简单,当然本身这个类也十分的简单,里面全是一个界面参数。
但是现在大家仍然没感觉到我这个MVC框架到底怎么个回事,是的之前全是在做准备工作,下面的就是核心的命令控制器 RequestProcessor的 实现,它会将整个MVC框架的流程展现得淋漓尽致!
控制器与View
MVC里面不仅需要action这样普通的控制器,还需要另外一种控制器:前端控制器 ActionServletActionServlet 继承了传统的servlet,负责从创建应用命令控制器RequestProcessor,和创建XML解析器XmlParser,它如同打仗时的先锋队,“所有的请求”首先被它获取拦截,通过它和已知的配置文件就可以把请求发给对应的action,因此它在MVC模型中扮演中央控制器的角色。(其实和struts框架中的actionservlet的功能几乎一样)代码如下:
[html] view
plaincopy
public class ActionServlet extends HttpServlet {
public void destroy() {
}
public void doGet(HttpServletRequest request, HttpServletResponse response)
throws ServletException, IOException {
this.doPost(request, response);
}
public void doPost(HttpServletRequest request, HttpServletResponse response)
throws ServletException, IOException {
this.process(request, response);
}
/**
* 负责创建应用控制器RequestProcessor,并且缓存它
* @param request
* @param response
*/
private void process(HttpServletRequest request, HttpServletResponse response) {
RequestProcessor processor = null;
if (null == this.getServletContext().getAttribute("REQUERS_PROCESSOR")) {
//创建
processor = new RequestProcessor(this.getServletContext());
this.getServletContext().setAttribute("REQUERS_PROCESSOR", processor);
} else {
processor = (RequestProcessor) this.getServletContext().getAttribute("REQUERS_PROCESSOR");
}
try {
processor.processor(request, response);
} catch (Exception e) {
e.printStackTrace();
}
}
/**
* 在初始化的时候,解析xml返回ActionMappingConfig对象,缓存对象
*/
public void init() throws ServletException {
String tmp = this.getServletContext().getRealPath("/");
String path = tmp + this.getInitParameter("config");
ActionMappingConfig config = XMLParser.getActionMappingConfig(path);
this.getServletContext().setAttribute("config", config);
}
}
初始化的时候,我们需要解析xml并返回之前谈到过的ActionMappingConfig,并将其缓存到公共区域中,以便之后的读取。当然要想使这个servlet起作用还是需要在web。xml里面进行配置的,由于需要一开始就加载配置文件,所以说还要加上<load-on-startup>0</load-on-startup>;
[html] view
plaincopy
<servlet>
<servlet-name>ActionServlet</servlet-name>
<servlet-class>net.localer.mvc.servlet.ActionServlet</servlet-class>
<init-param>
<param-name>config</param-name>
<param-value>/WEB-INF/mvc.xml</param-value>
</init-param>
<load-on-startup>0</load-on-startup>
</servlet>
上面涉及到RequestProcessor这个类,这个类在MVC小框架中充当命令应用控制器。 它负责创建和缓存Action对象,同时也根据请求path调用action对象,并创建ActionForm对象,将ActionForm传递到Action对象中。详细的RequestProcessor类的处理过程我总结如下:
1、获取请求路径。
2、根据请求路径查找缓存(可以用一个Hashtabel来当缓存)中是否有对应的action实例,如果没有将对应的action实例化出来。
3、若是刚实例的action则把Action对象缓存起来。
4. 根据actionconfig查找对应action的actionForm。
5. 反射设置参数到actionForm。
6. 传递ActionForm到Action,并调用execute方法。
7. 接受action的返回值。
8. 根据返回值决定重定向还是转发。代码如下:
[html] view
plaincopy
public class RequestProcessor {
private ServletContext application = null;
private Map<String,Action> actionInstance = null;
public RequestProcessor(ServletContext application) {
this.application = application;
actionInstance = new Hashtable<String, Action>();
}
/**
* @param request
* @param response
* @throws Exception
*/
public void processor(HttpServletRequest request, HttpServletResponse response) throws Exception {
//1、获取请求路径
String uri = request.getRequestURI();
//2、去掉后缀的.do,比如请求的地址是http://127.0.0.1/mvc/index.do
uri = uri.substring(0, uri.length() - 3);
String path = application.getRealPath("/");
String[] array = path.split("\\\\");
uri = uri.substring(array[array.length - 1].length() + 1);
//3、获取缓存ActionMappingConfig
ActionMappingConfig mapping = (ActionMappingConfig)application.getAttribute("config");
//4、把路径当成key获取对应的ActionConfig对象
ActionConfig actionConfig = mapping.getActionConfig(uri);
//5、判断acttionConfig对象是否存在,为空就是配置文件中没有这个路径的配置
if (null == actionConfig) {
throw new Exception("没有找到对应的action实例");
}
//从缓存获取action对象
Action action = actionInstance.get(uri);
//6、根据路径信息到缓存中查找Action对象
if (null == action) {
//7、反射出该ActionConfig对象对应的Action对象
action = this.getActionInstance(actionConfig);
//8、把新创建的action对象缓存
actionInstance.put(uri, action);
}
//9、获取到action配置的name属性的值
String name = actionConfig.getName();
ActionForm form = null;
if (name != null) {
//10、根据ActionConfig的name属性找到对应的FormBeanConfig对象
FormBeanConfig config = mapping.getFormBeanConfig(name);
//11、获取对应ActionForm的实例
form = this.getActionFormInstance(config);
//12、封装界面上传递的参数到ActionForm里面
this.setParamter(form, request);
}
//13、调用action的execute方法,传递form对象
ActionForward forward = action.execute(form, request, response);
//14、做转发或者重定向
this.forward(forward, request, response);
}
/**
* 这个方法是决定重定向或者转发对应视图的
* @param forward
* @param request
* @param response
* @throws ServletException
* @throws IOException
*/
private void forward(ActionForward forward,HttpServletRequest request, HttpServletResponse response)
throws ServletException, IOException {
if (null == forward) {
return;
}
if (forward.isForward()) {
//转发
request.getRequestDispatcher(forward.getUri()).forward(request, response);
} else {
//重定向
response.sendRedirect(forward.getUri());
}
}
/**
* 反射自动封装参数
* @param form
* @param request
*/
private void setParamter(ActionForm form, HttpServletRequest request) {
//1、获取界面上传递过来的所有的参数的名字
Enumeration<String> enu = request.getParameterNames();
String parameterName = null;
Class c = form.getClass();
Field[] fields = null;
StringBuffer setMethodName = null;
Method setMethod = null;
Map<String,String> map = new HashMap<String,String>();
//2、迭代所有名字,判断和form当中是否有名字一致的
while (enu.hasMoreElements()) {
setMethodName = new StringBuffer();
parameterName = enu.nextElement();
if (map.get(parameterName) != null) {
continue;
}
//获取form所有的字段
fields = c.getDeclaredFields();
for (int i = 0; i < fields.length; i++) {
//如果有一个参数名字和字段名字一模一样
if (fields[i].getName().equals(parameterName)) {
//拼凑出set方法
setMethodName.append("set").append(parameterName.substring(0, 1).toUpperCase()).append(parameterName.substring(1));
//获取对应的set方法
try {
setMethod = c.getMethod(setMethodName.toString(), new Class[]{fields[i].getType()});
//判断form里面的字段是数组的还是String类型的
if (fields[i].getType().getName().equals("[Ljava.lang.String;")) {
map.put(parameterName, "");
setMethod.invoke(form, new Object[]{request.getParameterValues(parameterName)});
} else {
setMethod.invoke(form, new Object[]{request.getParameter(parameterName)});
}
} catch (SecurityException e) {
e.printStackTrace();
} catch (NoSuchMethodException e) {
e.printStackTrace();
} catch (IllegalArgumentException e) {
e.printStackTrace();
} catch (IllegalAccessException e) {
e.printStackTrace();
} catch (InvocationTargetException e) {
e.printStackTrace();
}
}
}
}
}
/**
* 反射从FormBeanConfig中获取ActionForm对象
* @param config
* @return
*/
private ActionForm getActionFormInstance(FormBeanConfig config) {
ActionForm form = null;
try {
form = (ActionForm)Class.forName(config.getType()).newInstance();
} catch (ClassNotFoundException e) {
e.printStackTrace();
} catch (InstantiationException e) {
e.printStackTrace();
} catch (IllegalAccessException e) {
e.printStackTrace();
}
return form;
}
/**
* 反射出ActionConfig中Action对象
* @param config
* @return
*/
private Action getActionInstance(ActionConfig config) {
Action action = null;
try {
action = (Action)Class.forName(config.getType()).newInstance();
} catch (ClassNotFoundException e) {
e.printStackTrace();
} catch (InstantiationException e) {
e.printStackTrace();
} catch (IllegalAccessException e) {
e.printStackTrace();
}
return action;
}
}
上述代码的注释也把整个流程描述得十分清楚。有很多代码细节大家若不懂,百度一下就能知道,是一些很简单的小细节功能。
加上之前的类,一个简单的MVC框架就基本成型了。下面是简单的应用代码:
[html] view
plaincopy
public class NewsAction extends Action {
@Override
public ActionForward execute(ActionForm form, HttpServletRequest request,
HttpServletResponse response) throws Exception {
NewsForm newsForm = (NewsForm)form;
return new ActionForward("index.jsp",false);
}
}
这个Action就继承了抽象类Action并对其中的execute方法进行重写。
[html] view
plaincopy
public class NewsForm extends ActionForm{
private String id;
private String title;
private String content;
private String[] abc;
public String[] getAbc() {
return abc;
}
public void setAbc(String[] abc) {
this.abc = abc;
}
public String getId() {
return id;
}
public void setId(String id) {
this.id = id;
}
public String getTitle() {
return title;
}
public void setTitle(String title) {
this.title = title;
}
public String getContent() {
return content;
}
public void setContent(String content) {
this.content = content;
}
}
这个form继承了actionform用来封装页面传来的参数。之前的mvc.xml配置如下:
[html] view
plaincopy
<!-- form-beans标签只有一个 -->
<form-beans>
<!-- form-bean标签有多个 -->
<form-bean name="newsForm" type="net.localer.news.form.NewsForm"/>
<form-bean name="userForm" type="net.localer.news.form.UserForm"/>
</form-beans>
<!-- action-mappings标签只有一个 -->
<action-mappings>
<!--
action元素:配置业务Action类
path : 请求的路径
type : 业务Action类的类路径
-->
<!-- action标签有多个 -->
<action path="/index" type="net.localer.news.action.NewsAction" name="newsForm"/>
<action path="/user" type="net.localer.news.action.UserAction" name="userForm"/>
</action-mappings>
项目运行起来之后,在页面输入http://127.0.0.1/项目名/index.do 请求就会被拦截并调用NewsAction中的execute方法。
(具体项目的具体设置不一样,struts框架原则上认为访问任何一个页面之前都需要通过一个控制器,之后再转发到对应的页面,因此我们用户在地址栏上输入的时候一般不会出现*.jsp这样的地址,而一般都是*.do或者*.action等等这样的地址)。
最后呢我们可以把之前的代码打成一个jar包(不包括NewsAction)。下次写一个新的web项目的时候我们就可以把这个jar包导入,自己建一个xml文件来写配置(和上面的配置文件一样),省去了写大量servlet配置的时间,这样的感觉就如同用一个框架,虽然这个框架很小,嘿嘿,总之算是实现了一个MVC框架的最最基本的功能。当然呢我这个框架还有很多很多的不足,其中我认为最大最大的不足呢是:
1.dispatcherAction里面的那个method参数不能自己配置,而是写死了,这样页面传递参数的时候会受到了限制。
2.没有像标准struts框架那样把转发重定向的路径 也配置到文件(如<result name="hello">/index.jsp</result>),这样有时候路劲变化的时候还是需要改变源代码,违背了开闭原则。
这个框架和标准的框架没得比,但是也把MVC的基本思想体现出来

相关文章推荐
- 自己写一个MVC框架(二)
- 怎样自己写一个MVC框架
- 如何封装一个自己的mvc框架(五)
- 自己有时间可以写一个MVC框架
- 自己动手写一个简单的MVC框架(第二版)
- 如何封装一个自己的mvc框架(四)
- 怎样自己写一个MVC框架
- 自己动手写一个简单的MVC框架(第二版)
- 自己动手写一个简单的MVC框架(第一版)
- 如何封装一个自己的mvc框架(七)
- 如何封装一个自己的mvc框架(一)
- 自己写一个MVC框架(三)
- 自己动手写一个简单的MVC框架(第二版)
- 做一个自己的MVC框架[php]
- 如何封装一个自己的mvc框架(二)
- 如何封装一个自己的mvc框架(三)
- 自己动手模仿 springmvc 写一个 mvc框架
- 自己动手写一个简单的MVC框架(第一版)
- 封装一个自己的mvc框架
- 自己写一个MVC框架(一)